Terrys87 88 Truck Build
 11-15-2012, 01:39 AM
#341
Super Moderator
Staff
Thread Starter
iTrader: (1)
Join Date: Aug 2008
Location: Anderson Missouri
Posts: 11,788
Likes: 0
Received 22 Likes
on
20 Posts
Hello shaheen1969... Wishing you the best of luck on your rebuild. What are you stuck on? On my 88 4Runner build on the first page, I list where and how I have fixed things. I have 2 other builds and I move that information over a little at a time. Let me know where you get stuck at and I have probably have already been into the area that you are in.
I have had these 84-88 trucks down to nothing and back up so could probably give some tips on how to get it apart and back together. I hear you on your truck fighting you. My 86 Runner is not as cooperative as I would like. But that is the fun of it. Dont look at the big picture but enjoy each small accomplishment/fix or repair you get done.
If you are like me and you get one done, you have 10 more you want to do, so just try to keep a steady pace on one project at a time. Will be looking forward to your build thread.
 11-15-2012, 01:59 AM
#342
Super Moderator
Staff
Thread Starter
iTrader: (1)
Join Date: Aug 2008
Location: Anderson Missouri
Posts: 11,788
Likes: 0
Received 22 Likes
on
20 Posts
Just an update on Steves truck. He has always driven cookie cutter cars and never something just a little different. He says he cant belive it when people come and give him the thumbs up while going down the hiway or when getting fuel and asking questions and the compliments.
Said he is starting to understand why I have always been tinkering with cars all of these years. Anything he had there were 10 more of them on the road. I could always go buy a nice one but it wouldnt be any different then the rest. He has been helping alot more lately on it and seeing how things come apart and back together, I think he likes the idea that he has helped fix some of the smaller issues. Currently we are trying to get the heater core cleaned out. I could swap it out for a new one but if I can get working like it should I would rather wait until spring or summer to change it as most of the dash has to come out. It is a pretty good size job to swap cores.
It is deer season here and he is able to take it to someplaces his Chevy 4x4 wont go and think he is impressed at the way it gets around out where he hunts at. I had to help him find and load a deer and he wasnt brave enough to take it where I wanted to go with it. He didnt think it would come out of some of the places we needed to go. ( I do not like walking up and down hills, so yes I was being lazy).
He has put several hundered miles on it and really likes driving it. It is a fun truck to drive and has been into some really bad hills and loose gravel and it just goes like it should.
 11-15-2012, 11:36 AM
#344
Registered User
11-20-2012, 01:09 AM
#345
Super Moderator
Staff
Thread Starter
iTrader: (1)
Join Date: Aug 2008
Location: Anderson Missouri
Posts: 11,788
Likes: 0
Received 22 Likes
on
20 Posts
Lol..Cyberhorn...He is really liking this truck. He cant believe the amount of looks and compliments he gets on it.
Thanks Jason.. I think he will eventually get there. He never had anthing to be proud of and think he is starting to catch the bug.lol
Thanks Jason.. I think he will eventually get there. He never had anthing to be proud of and think he is starting to catch the bug.lol
11-20-2012, 01:37 AM
#346
Super Moderator
Staff
Thread Starter
iTrader: (1)
Join Date: Aug 2008
Location: Anderson Missouri
Posts: 11,788
Likes: 0
Received 22 Likes
on
20 Posts
The temperture has been dropping around here and Steve was saying that his heater wasnt working. He doesnt know much about mechanicing so I looked at it and said it must be a clogged heater core so we tried flushing it several times and got very little junk out of it. So then I tried to soak it with CLR. Trying everything to avoid from swapping heater cores. Nothing worked, so today he went and bought a core from Oriellys for $62 if I recall right.
Flushing wasnt going to fix this one and is the first time that I have ran into something like this. His truck doesnt have AC, and instead of having the condenser, it has a square tube in its place. The heater core was full of dust,dirt and debri. My guess is with an AC unit under the dash it would of blocked the debri from getting to the heater core, but with a square tube, the debri goes from the blower straight to the core. Flushing cant fix the outside of the core.
I have listed on one of my threads about how debri gets thru the cowl and on the passenger side it can get down to the blower and that is how you can get fan noise from debri getting in from the out side. I am going to do the following write up so as I can just copy and paste it to my 88 Runner build as I am trying to make it where someone that has questions, that maybe the 88 Runner build can help solve their problems. I refer to it alot myself.
Remove Speedometer Bezel
Remove Speedometer Assembly
Remove Lower Panel
Remove Glove Box
Remove Dashpad
Remove the hoses clamps under the hood. I find it easier to leave the hoses attached to the core and push the hose thru the firewall with firewall seals attached.
Unhook the 4 cables attached to the heater controls.
Here you can see I removed the White plastic cover and the side arms that support the dash and where your stereo will mount to.

When pulling the heater core assembly thru, pull it til the metal hose portion clears the firewall and slide to the right to clear the bracket and core where my fingers are pointing to.

Here is the Core Assembly. You will have 4 clamps on top that are held by phillips screws. Remove and slide the core up and out.

Seperate the pipes from the core. My replacement core didnt come with new seals or the c clips. Be gentle with these as you will need to reuse them. When you stick the old pipes into the new core (you use your old pipes) do NOT try to squeeze them with pliers to try and close the gap. The edge will bend and then you have to straighten it out. I found it easier to have someone to push the two pieces together while I put on the clip.

The oring you will need to reuse. I should of went to the store and got a new one, but we didnt have any leaks when done.

Here is the problem with this core. Steve wanted a new one in it. The old one was actually in great shape, so I will clean the outside and keep it for a spare. I am a cheapscape and can have a core out in 45 minutes, just because I have done this several times.
The first time I changed heater controls, it took me 3 hours. This is not an easy job for your first time but will add this post to my 88 build to try and make it easier for someone who might have to do this. I have some videos of other steps.
New one on left and clogged one on the right. First time I ever ran into a core like this.
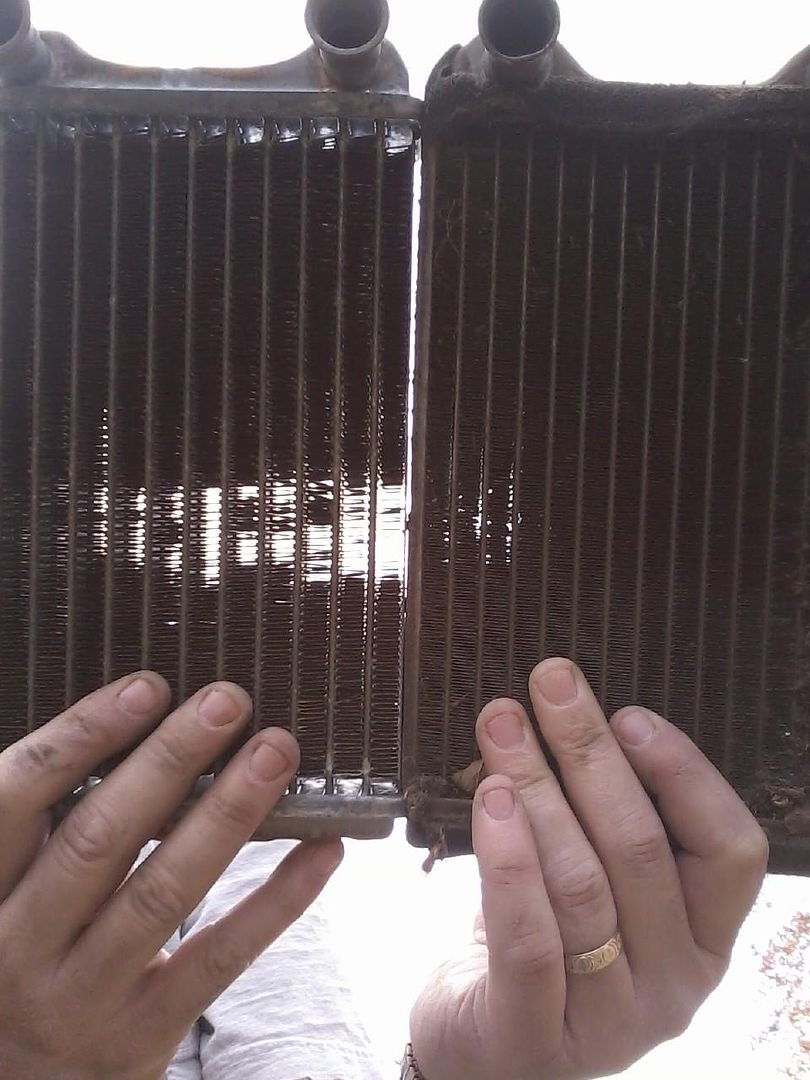
Flushing wasnt going to fix this one and is the first time that I have ran into something like this. His truck doesnt have AC, and instead of having the condenser, it has a square tube in its place. The heater core was full of dust,dirt and debri. My guess is with an AC unit under the dash it would of blocked the debri from getting to the heater core, but with a square tube, the debri goes from the blower straight to the core. Flushing cant fix the outside of the core.
I have listed on one of my threads about how debri gets thru the cowl and on the passenger side it can get down to the blower and that is how you can get fan noise from debri getting in from the out side. I am going to do the following write up so as I can just copy and paste it to my 88 Runner build as I am trying to make it where someone that has questions, that maybe the 88 Runner build can help solve their problems. I refer to it alot myself.
Remove Speedometer Bezel
Remove Speedometer Assembly
Remove Lower Panel
Remove Glove Box
Remove Dashpad
Remove the hoses clamps under the hood. I find it easier to leave the hoses attached to the core and push the hose thru the firewall with firewall seals attached.
Unhook the 4 cables attached to the heater controls.
Here you can see I removed the White plastic cover and the side arms that support the dash and where your stereo will mount to.
When pulling the heater core assembly thru, pull it til the metal hose portion clears the firewall and slide to the right to clear the bracket and core where my fingers are pointing to.
Here is the Core Assembly. You will have 4 clamps on top that are held by phillips screws. Remove and slide the core up and out.
Seperate the pipes from the core. My replacement core didnt come with new seals or the c clips. Be gentle with these as you will need to reuse them. When you stick the old pipes into the new core (you use your old pipes) do NOT try to squeeze them with pliers to try and close the gap. The edge will bend and then you have to straighten it out. I found it easier to have someone to push the two pieces together while I put on the clip.
The oring you will need to reuse. I should of went to the store and got a new one, but we didnt have any leaks when done.
Here is the problem with this core. Steve wanted a new one in it. The old one was actually in great shape, so I will clean the outside and keep it for a spare. I am a cheapscape and can have a core out in 45 minutes, just because I have done this several times.
The first time I changed heater controls, it took me 3 hours. This is not an easy job for your first time but will add this post to my 88 build to try and make it easier for someone who might have to do this. I have some videos of other steps.
New one on left and clogged one on the right. First time I ever ran into a core like this.
Last edited by Terrys87; 12-22-2015 at 04:02 PM.
11-22-2012, 06:38 PM
#348
Super Moderator
Staff
Thread Starter
iTrader: (1)
Join Date: Aug 2008
Location: Anderson Missouri
Posts: 11,788
Likes: 0
Received 22 Likes
on
20 Posts
Hello Cyberhorn...It is a poor design, but apparently it works. So far things are still holding up. I hadnt seen anything mentioned about them in the past so thought I would mention it.
11-22-2012, 06:42 PM
#349
Super Moderator
Staff
Thread Starter
iTrader: (1)
Join Date: Aug 2008
Location: Anderson Missouri
Posts: 11,788
Likes: 0
Received 22 Likes
on
20 Posts
I have been working on several parts and if all goes well like I have planned, alot of the small things should come together, but we know what happens to plans.
Other pics didnt turn out. The panels were orginally gray but faded to white. These cleaned up well. The stereo face plate is getting replaced as it was cut up. Here they used regular spray paint on it and it turned out poorly. It has to be paint made specifically for interiors.
Left side is painted and the right side is unpainted.
11-24-2012, 11:42 AM
#352
Super Moderator
Staff
Thread Starter
iTrader: (1)
Join Date: Aug 2008
Location: Anderson Missouri
Posts: 11,788
Likes: 0
Received 22 Likes
on
20 Posts
Hello Cyberhorn...I finally got it on. Had them done for a few days. Got alot more done ot it as well. I will post pics here in a second.
Hello Brandon.. The best part about this build is I dont have to fund it. Would of liked to have kept it but my brother is going to make it nice within the year. He likes the tuck quite well.
Hello Brandon.. The best part about this build is I dont have to fund it. Would of liked to have kept it but my brother is going to make it nice within the year. He likes the tuck quite well.
11-24-2012, 11:51 AM
#353
Super Moderator
Staff
Thread Starter
iTrader: (1)
Join Date: Aug 2008
Location: Anderson Missouri
Posts: 11,788
Likes: 0
Received 22 Likes
on
20 Posts
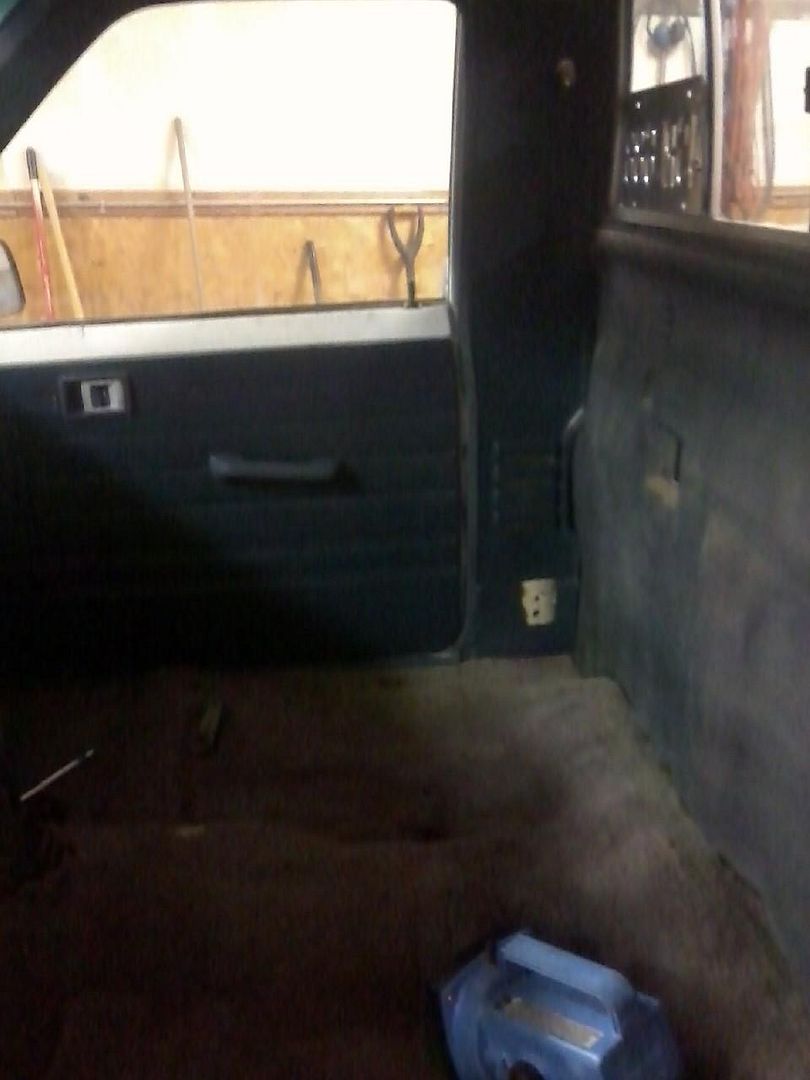
Pcture is blurry. Got the spare tire carrier on. It was rusted up bad. I just let it soak in PB Blaster for a week and kept working with it. Was surprised I was even able to get this one to work. So far I have been able to get every one of them to work with a little time and persistance.
I also got the back piece and side pieces on B pillars, stereo section, door panels, and the steering column covers. Between the 4 Runner and the trucks interior, I am getting some storage space back, and it was getting difficult keeping them seperated.
Will replace the carpet at a later time. Still trying to get alot of the dependabiltiy issues worked out. It is starting to look like a truck on the inside though.
11-25-2012, 07:37 AM
#355
Super Moderator
Staff
Thread Starter
iTrader: (1)
Join Date: Aug 2008
Location: Anderson Missouri
Posts: 11,788
Likes: 0
Received 22 Likes
on
20 Posts
Thanks Cyberhorn...I got most of it put back together. Just some small odds and ends left to do. Got alot of other little things done as well that really arent noticeable. Truck is coming along sowly but surely.
11-25-2012, 07:46 AM
#356
Super Moderator
Staff
Thread Starter
iTrader: (1)
Join Date: Aug 2008
Location: Anderson Missouri
Posts: 11,788
Likes: 0
Received 22 Likes
on
20 Posts
I am alot more comfortable in the 22re world. Learning the 22r is someways a completely different motor. Having to dig up infomation on setting the timing on a 22r as the label is unreadable. From what I have gathered, it is 12 degrees plugged and 0 degrees with them unplugged and blocked for vac advance.
Looking into other possibilities of not running correct. I may not have the Ignition Timing values correct. Missing the label. If some one knows, please chime in.
Timing
12 vac line hooked up
0 vac lines unhooked and blocked.
The truck is running as well as I know that it can or should. I am suspecting that there is alot of carbon build up from the EGR. I havent looked into it just yet but wouldnt be surprised.
EGR delete thread>>> https://www.yotatech.com/forums/f114...ly-22r-205845/
11-25-2012, 11:09 AM
#357
Registered User
the EGR on my 79 terry was packed i had to clean it for calif emissions real PITA
the carb shafts tend to leak id go to the webber soon as you can as the asian carb is a pain if you cant set the off idle an idle settings Due to the leaking carb shafts it'll stall or races at idle
the carb shafts tend to leak id go to the webber soon as you can as the asian carb is a pain if you cant set the off idle an idle settings Due to the leaking carb shafts it'll stall or races at idle
11-26-2012, 03:48 PM
#358
Super Moderator
Staff
Thread Starter
iTrader: (1)
Join Date: Aug 2008
Location: Anderson Missouri
Posts: 11,788
Likes: 0
Received 22 Likes
on
20 Posts
Hello Cyberhorn..On a 22re, I can get all of the carbon out of one and know where to look. On a 22r it connects to the back of the head like an Re but has a pipe that runs up to about the center of number 2 and 3 cylinder. I am sure that is full of carbon. Any suggestions where else I would need to clean. Also would plugging the hose on the bottom of the modulater disable it as well?
I found a thread that shows how to remove all of that emissins crap off of one. I would like to clear all of the excess off of it as it would be one less thing to go wrong. Would you suggest doing that?
I have told Steve where he could probably get a Webber and it really does eliminate alot of hoses and junk off of a 22r. I hear they run better as well.
Have you got any suggestions and the specs for timing, other things I can do to make it run better?
Another thing I know from reading is both vaccum advance lines are to have a vaccum on them. Only one does, the one closest to the motor. The front one doesnt have ay at all while at idle or revving it up. Any suggestions on that. Hoping not to have to replace the distributor. I can put the timing light on it and rev it and you can see it advance like it should.
Last edited by Terrys87; 11-26-2012 at 04:03 PM.
11-26-2012, 04:00 PM
#359
Super Moderator
Staff
Thread Starter
iTrader: (1)
Join Date: Aug 2008
Location: Anderson Missouri
Posts: 11,788
Likes: 0
Received 22 Likes
on
20 Posts
I set the Igition timing, ran some Seafoam thru the carb as well as carb cleaner, cleared a few hose of some junk in them and just alot of little things that I know would help it run better. Still new to the 22r so am nowhere as comfortable as I am on the 22re.
I had a hard time holding 55 in 4th gear. Now I can hold 65 in 5th gear and even accelerate up a hill. I feel it is still lacking the power that it should have though. It has a dead spot it seems like when driving. I can set and rev it while under the hood and it will rev as fast I want to go, but does seem to slightly stall or hesitate at times while driving. As soon as I can, I want to run a compression check on it.
Steve will be driving it for a while and am having him to run some Seafoam thru the tank. Since getting the truck running, I doubt that it has 300 miles on it and told him there could be some more issues that could come up on it. I did have to replace a radiator hose and the fan belts on it. Im starting to get a little more confidence it in and think once it starts getting some miles on it, will get things working better as well.
Been spending alot of time reading up on the 22r. In some ways, it is a completely different motor from the 22re.
11-26-2012, 04:35 PM
#360
Registered User
Hello Cyberhorn..On a 22re, I can get all of the carbon out of one and know where to look. On a 22r it connects to the back of the head like an Re but has a pipe that runs up to about the center of number 2 and 3 cylinder. I am sure that is full of carbon. Any suggestions where else I would need to clean. Also would plugging the hose on the bottom of the modulater disable it as well?
then i sprayed carb cleaner through it an wire bottle brushes the EGR itself was also clogged an that was a PITA i soaked it with carb cleaner using a hand held vacuum pump to move the valve lubing it finally after a coupe hours it cracked loose wire brushes an picks cleaned it out really well i would say unplugging the vacuum line would cut it out of the system
Another thing I know from reading is both vaccum advance lines are to have a vaccum on them. Only one does, the one closest to the motor. The front one doesnt have ay at all while at idle or revving it up. Any suggestions on that. Hoping not to have to replace the distributor. I can put the timing light on it and rev it and you can see it advance like it should.


