Terrys87 86 4Runner with a 2nd Chance
 09-17-2013, 10:32 AM
#1461
Super Moderator
Staff
Thread Starter
iTrader: (1)
Join Date: Aug 2008
Location: Anderson Missouri
Posts: 11,788
Likes: 0
Received 22 Likes
on
20 Posts
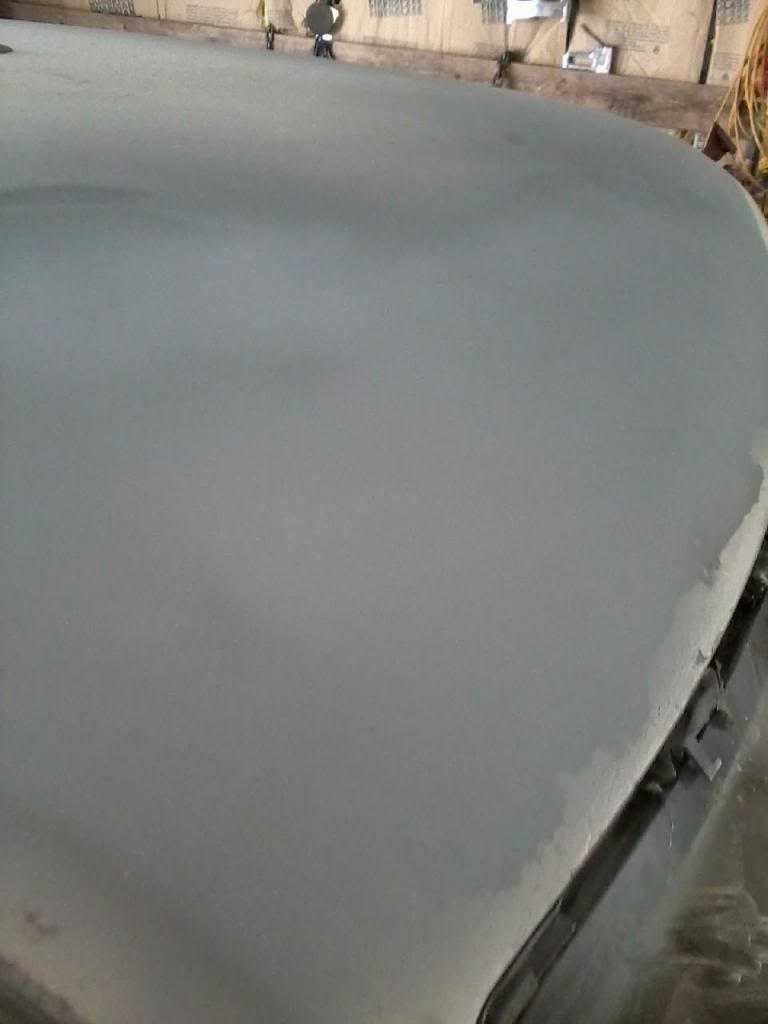
I have finally gotten the roof of the 86 extra cab smooth. It was rougher then it looked 3 small dents just wouldnt get smooth like I would like. I remember when I first started doing bodywork that I would get a dent like one of these and work on it for hours and then the owner of the bodyshop would come over and tap in a few areas with his pecking hammer and have it done in 10 minutes. I gave that a try on one of the dents and it fixed itself, two other dents it didnt work on. I got all 3 of them so it was an accomplishment, wahoo. Just need to do a little work on the doors and then final sand for paint. I am hoping to paint next week.
Roofs are the most difficult as they like to flex.
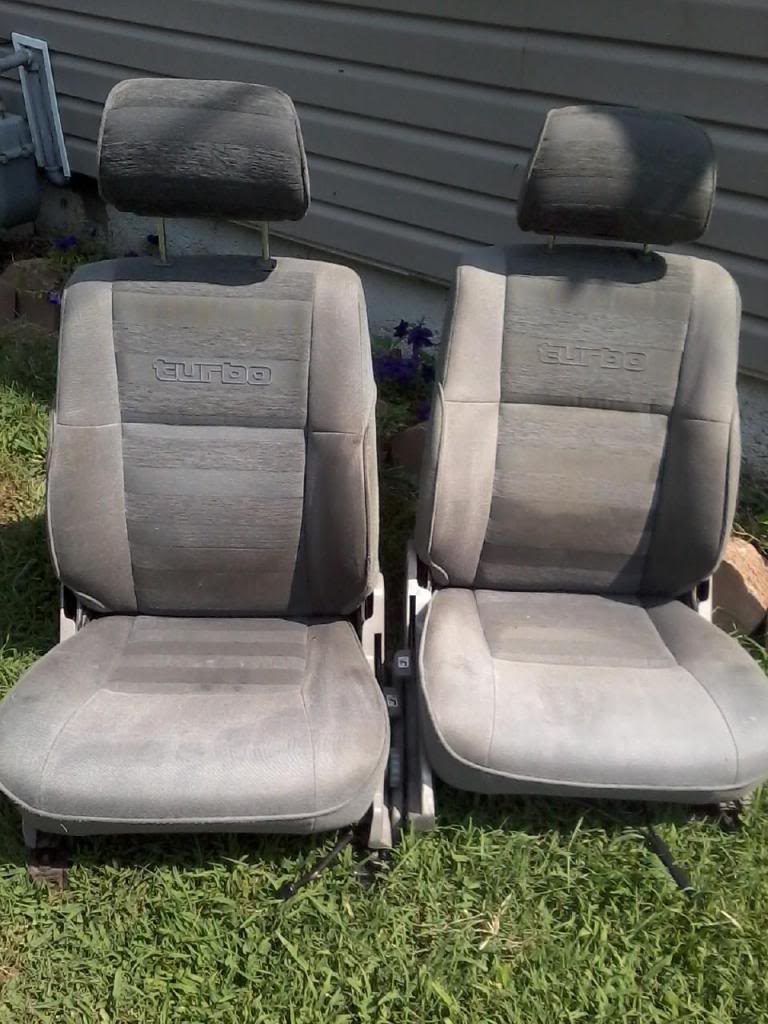
Seats that will be going in this truck.
Roofs are the most difficult as they like to flex.

Seats that will be going in this truck.

 09-17-2013, 10:39 AM
#1462
Super Moderator
Staff
Thread Starter
iTrader: (1)
Join Date: Aug 2008
Location: Anderson Missouri
Posts: 11,788
Likes: 0
Received 22 Likes
on
20 Posts
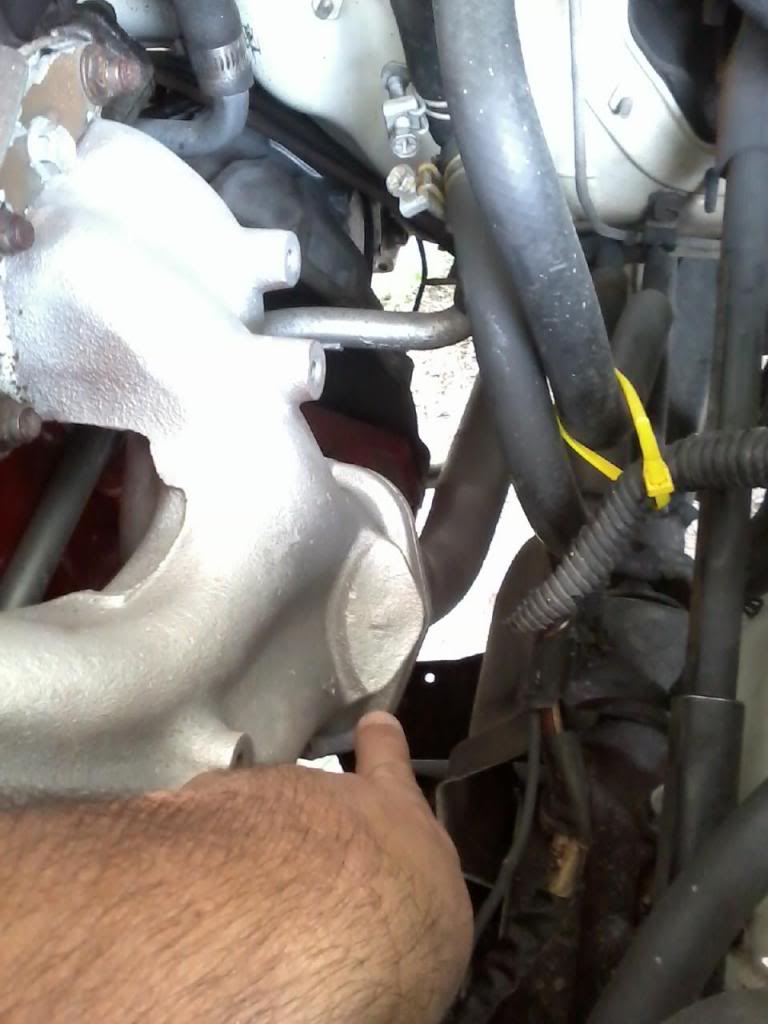
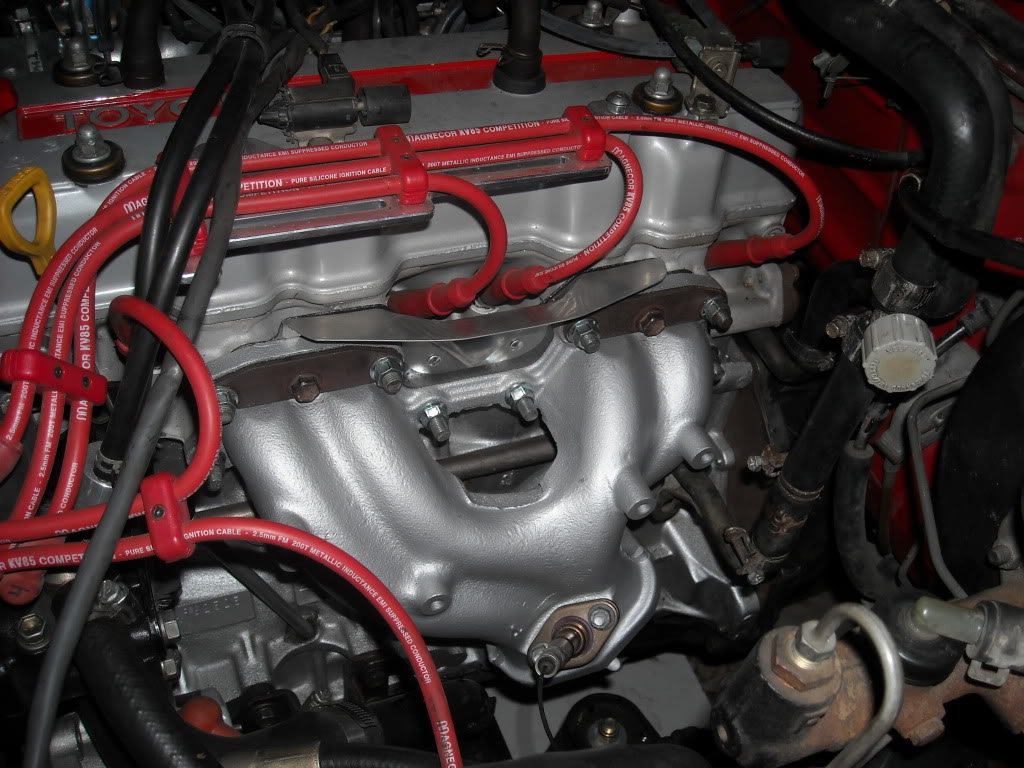
This is for Tom to see the difference in manifolds. This is on my 85 truck and has the single O2 sensor in the exhaust manifold. 85 and 86 have them here.
I am holding the O2 Sensor. Notice the block off plates where yours might have the Air Injection pipes.
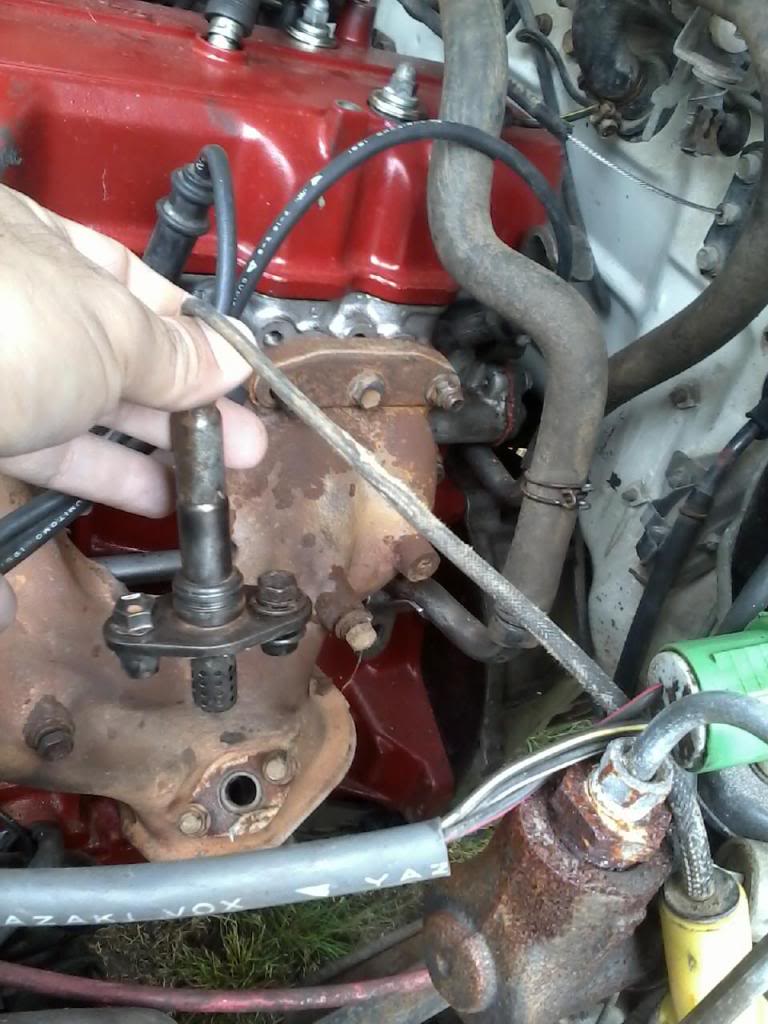
I am almost positive that 87 have the O2 Sensor under the seat sticking in the exhaust pipe by the tcase. I know 88 and above have them this way. I will look thru Marks thread or another 87 thread and see.
This is the 88 Runners. O2 Sensor is blocked off and might could be machined but I dont know for sure.

Last edited by Terrys87; 09-17-2013 at 10:42 AM.
 09-23-2013, 10:35 AM
#1464
Super Moderator
Staff
Thread Starter
iTrader: (1)
Join Date: Aug 2008
Location: Anderson Missouri
Posts: 11,788
Likes: 0
Received 22 Likes
on
20 Posts
Thanks Mark. I was thinking 87 was the O2 in the exhaust. Helping a friend find the correct manifold. 88 is the change over.
Last edited by Terrys87; 09-23-2013 at 10:39 AM.
09-23-2013, 10:38 AM
#1465
Super Moderator
Staff
Thread Starter
iTrader: (1)
Join Date: Aug 2008
Location: Anderson Missouri
Posts: 11,788
Likes: 0
Received 22 Likes
on
20 Posts
Been trying to get the 86 Extra cab ready for paint and messing with my excab. Any electriclal gurus got some suggestions on the Firing Side of these trucks, I am all ears. My 85 has a couple of problems and maybe I have found it, but I am not holding my breath. >>> https://www.yotatech.com/forums/f198...3/index13.html Start on Page 13 and go backwards to get an idea of where I have been trouble shooting. I will try and get caught up with what others are doing soon.
09-23-2013, 10:43 AM
#1466
Super Moderator
Staff
Thread Starter
iTrader: (1)
Join Date: Aug 2008
Location: Anderson Missouri
Posts: 11,788
Likes: 0
Received 22 Likes
on
20 Posts
I was lookinig up some information while at Toyota. There are only 7 new 22re motors left for sale from Toyota and they are not going to be shipping any more here from what the parts guy told me. PN# 11400-35043 at the cost of $2552.05. They have gone up four hundred dollars since I checked them a few years ago.
I got quite a bit to post on the 86 extra cab and my brothers step side and will try on to get that soon as well. Been a busy little beaver and cuts into web time.
I got quite a bit to post on the 86 extra cab and my brothers step side and will try on to get that soon as well. Been a busy little beaver and cuts into web time.
Last edited by Terrys87; 09-23-2013 at 10:45 AM.
09-25-2013, 12:49 AM
#1467
Super Moderator
Staff
Thread Starter
iTrader: (1)
Join Date: Aug 2008
Location: Anderson Missouri
Posts: 11,788
Likes: 0
Received 22 Likes
on
20 Posts
Thought I would post some info as to how I do things for parts and frame. I have some nice air tools that I have recieved for gifts and such, but I still have some of them in the boxs that they come in. I personally like electric tools because I dont have to listen to the air compressor run and the air hose is not as flexible as an electric cord. I dont care for what pawn shops do to people but I will save a few bucks and get my electric tools from them as you can get some real nice tools for less and will last along time.
For frames I use a drill and a wire brush or 180 grit sandpaper. Dont get your sandpaper from the parts stores. They are expensive. If you search around, you will find an autobody shop supply store that is alot cheaper then the auto parts stores. The local bodyshop can locate one for you.
I buy a 5 gallon can and pour it into one gallon cans. The supply store I got this from didnt have any 5 gallon cans of thinner so I asked when he would have the 5 gallon cans, he just sold me 5 one gallon cans for the price of a gallon can.
A gallon of thinner is around $15 a can, a 5 gallon can is $25-$40 a can. I use alot for priming and cleaning up paint tools and for degreasing. I just use a 50/50 mix of water and thinner on a rag to degrease parts. I have used Simple Green for degreasing parts as well. It will work just as good. I usually run out of Simple Green so use what I have on hand.
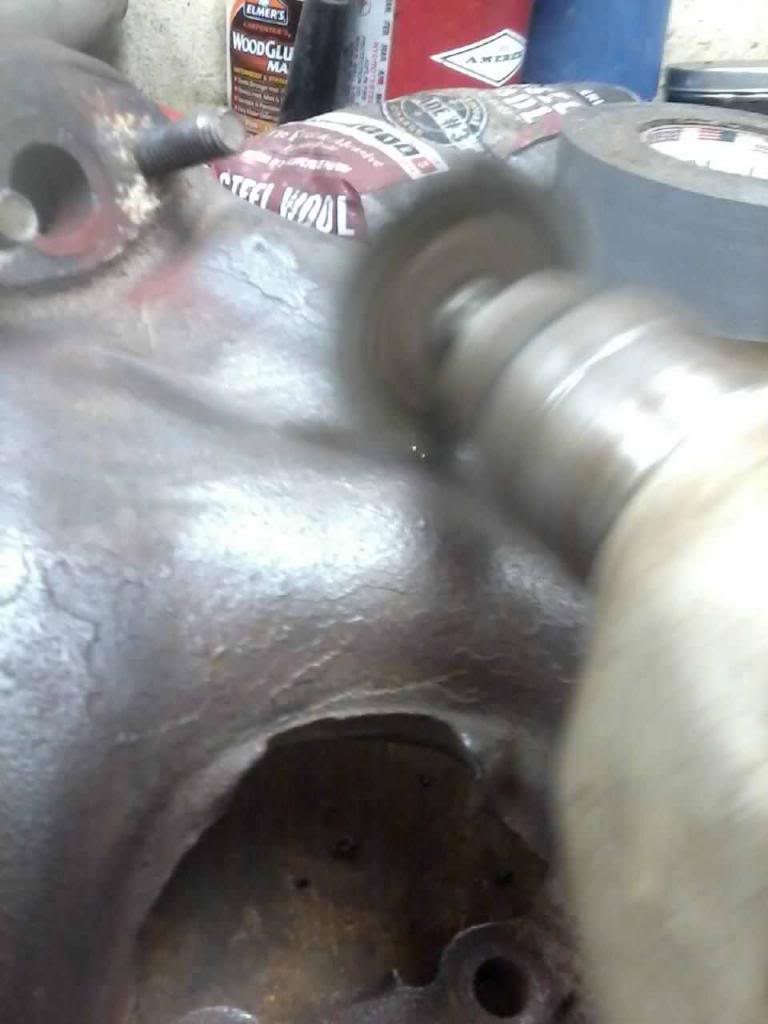
Here is one of the wire brushs I have used to clean alot of parts. You will see that the bristles go clockwise. This works great on alot of parts. When the bristles are like this, it wont really hurt you or most parts you are cleaning.
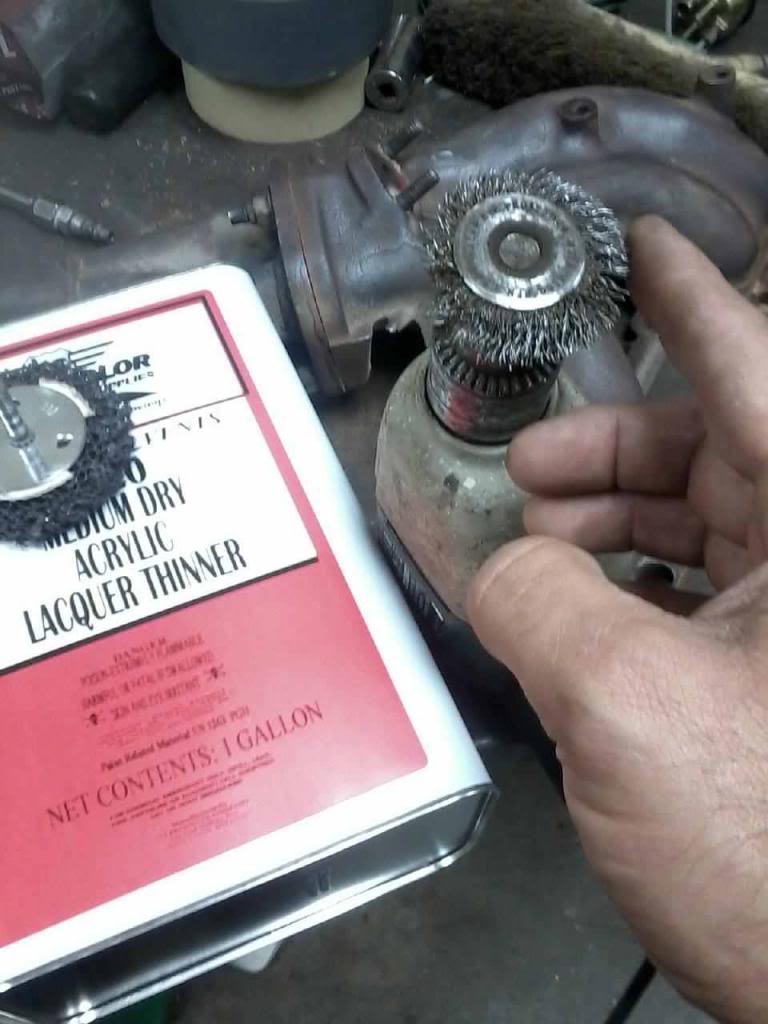
When I really want to get aggressive on some rust parts, reverse the direction of the drill and the bristles are facing the oppisite way of the rotation of the drill. Here is where you need both hands on the drill and be careful. It can and will jump and if it hits you with the bristles facing oppisite of the rotation, it will leave a nasty scratch or gouge. Sparks are not really showing in this picture, but it will spark in some instances.
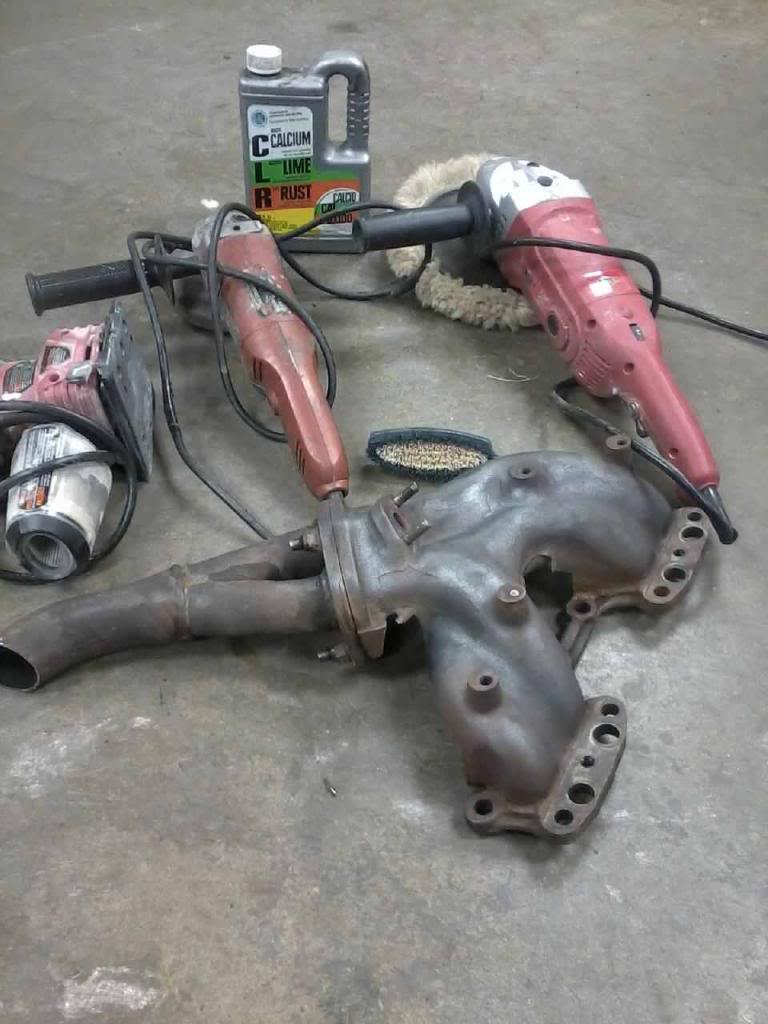
Here is the manifold that was nasty. I may have about 30 minutes into it and it is cleaner then what I did to Mistys manifold and it is still looking great and has several thousand miles on it. I am going to seperate the manifold from the pipe as I have another pipe that is better so I will be putting this into the electrolisis tank that I got the idea from Cyberhorn. I can post a picture of it later.
The electrolisis tank works even better and if you are not in no hurry is easy to do. I have cleaned alot of parts with just a wire brush though. My biggest reason for using the electrolisis tank is to free up the nuts to the exhaust stud on this manifold. Once I loosen a stud from the manifold, I have never gotten them to stay tight.
I did put a little CLR on the manifold and give it a quick scrubbing with the hand brush to get it a little cleaner as well.
The buffer and grinder are probably the most expensive tools I have. I dont recommend a buffer for a beginner. It will damage paint if not careful. The grinder is also able to have cutoff wheels on it and is handy. I do have a pneumatic die grinder that I adapted with cutoff blades. The reason I do use it is where the electric is just to big to get into some areas. The die grinder is best for tight spots like bed bolts.
The electric sander is just one of many that I have either gotten at pawn shops,garage sales, or something similar. About the only air tools I use is a die grinder,air gun for cleaning and a impact wrench.
My air tank only goes to 125, but more would be better when it comes to impact wrenches but 125 will take most things loose on a Toyota.
For frames I use a drill and a wire brush or 180 grit sandpaper. Dont get your sandpaper from the parts stores. They are expensive. If you search around, you will find an autobody shop supply store that is alot cheaper then the auto parts stores. The local bodyshop can locate one for you.
I buy a 5 gallon can and pour it into one gallon cans. The supply store I got this from didnt have any 5 gallon cans of thinner so I asked when he would have the 5 gallon cans, he just sold me 5 one gallon cans for the price of a gallon can.
A gallon of thinner is around $15 a can, a 5 gallon can is $25-$40 a can. I use alot for priming and cleaning up paint tools and for degreasing. I just use a 50/50 mix of water and thinner on a rag to degrease parts. I have used Simple Green for degreasing parts as well. It will work just as good. I usually run out of Simple Green so use what I have on hand.
Here is one of the wire brushs I have used to clean alot of parts. You will see that the bristles go clockwise. This works great on alot of parts. When the bristles are like this, it wont really hurt you or most parts you are cleaning.

When I really want to get aggressive on some rust parts, reverse the direction of the drill and the bristles are facing the oppisite way of the rotation of the drill. Here is where you need both hands on the drill and be careful. It can and will jump and if it hits you with the bristles facing oppisite of the rotation, it will leave a nasty scratch or gouge. Sparks are not really showing in this picture, but it will spark in some instances.

Here is the manifold that was nasty. I may have about 30 minutes into it and it is cleaner then what I did to Mistys manifold and it is still looking great and has several thousand miles on it. I am going to seperate the manifold from the pipe as I have another pipe that is better so I will be putting this into the electrolisis tank that I got the idea from Cyberhorn. I can post a picture of it later.
The electrolisis tank works even better and if you are not in no hurry is easy to do. I have cleaned alot of parts with just a wire brush though. My biggest reason for using the electrolisis tank is to free up the nuts to the exhaust stud on this manifold. Once I loosen a stud from the manifold, I have never gotten them to stay tight.
I did put a little CLR on the manifold and give it a quick scrubbing with the hand brush to get it a little cleaner as well.
The buffer and grinder are probably the most expensive tools I have. I dont recommend a buffer for a beginner. It will damage paint if not careful. The grinder is also able to have cutoff wheels on it and is handy. I do have a pneumatic die grinder that I adapted with cutoff blades. The reason I do use it is where the electric is just to big to get into some areas. The die grinder is best for tight spots like bed bolts.
The electric sander is just one of many that I have either gotten at pawn shops,garage sales, or something similar. About the only air tools I use is a die grinder,air gun for cleaning and a impact wrench.
My air tank only goes to 125, but more would be better when it comes to impact wrenches but 125 will take most things loose on a Toyota.
 09-26-2013, 05:30 PM
#1468
Registered User
iTrader: (1)
Join Date: Oct 2011
Location: VA
Posts: 599
Likes: 0
Received 0 Likes
on
0 Posts
I know I'm a little late, but on my 87 im almost 100% sure the O2 is up under the cab.....hmmmm different transition years between carb'd and fuel injected or maybe mines a freak coincidence lol
10-02-2013, 08:01 PM
#1471
Super Moderator
Staff
Thread Starter
iTrader: (1)
Join Date: Aug 2008
Location: Anderson Missouri
Posts: 11,788
Likes: 0
Received 22 Likes
on
20 Posts
Hello Dakotawho...Now that you mention it, I have no idea if there is a O2 sensor on a carbed truck. I have seen several trucks and never really paid attention. I have an 86 22r out in the shop so I am going to be taking a look.
Thanks Mark..I didnt know August was the dividing month in the years of trucks. I know some genuis for a sales gimmick started selling newer models in the older year ( Selling 87s in 1986) but that was alot earlier then our trucks. Would be nice if they had changed in January instead of half way in the year. Thanks for the info on 87 manifolds.
Thanks Mark..I didnt know August was the dividing month in the years of trucks. I know some genuis for a sales gimmick started selling newer models in the older year ( Selling 87s in 1986) but that was alot earlier then our trucks. Would be nice if they had changed in January instead of half way in the year. Thanks for the info on 87 manifolds.
10-02-2013, 08:21 PM
#1472
Super Moderator
Staff
Thread Starter
iTrader: (1)
Join Date: Aug 2008
Location: Anderson Missouri
Posts: 11,788
Likes: 0
Received 22 Likes
on
20 Posts
I am still alive and kicking. Been doing a lot of training for work and that is overtime so havent had much time to mess with the trucks any lately. I am not having much luck getting my 85 running. It isnt getting power to the coil and I know that system is good. It is a wiring problem some where but RAD has been helping me with that thru the PMs so I feel alot more confident on getting it running soon. Thanks Ray.
I was supposed to have guard drill this weekend and this was the weekend that I was supposed to take a PT test. I was pretty confident that I wouldnt have any problems failing it. I think I could of failed it with flying colors. Thanks to the goverment shutdown, I now have another month to get into shape as they cancelled drill for this month. Whew!!! I tried to get into shape, but the older I get, the harder it is to pass.
I met a guy in my area that got a 1st Gen runner in my area and it is a nice little truck. A teenager had it and teenaged it a little so he wants to unteenage it and just happen to find me here on Yotatech. I will post pics of his truck here in the near future. There are now 2 Yota guys in south west Missouri. Just dont see many in this part of the country.
Also had a new neighbor to move in and he is a retired body guy. Seems like a great guy and is an old hot rodder and has alot more experience then me so am hoping to learn something from him.
I went and got paint today for the 86 Extracab. I plan on shooting sealer on the bed in the morning. It looks straight and feels straight but sealer will show a few flaws, always does and is a good thing as it gives one last chance to fix the flaws. Some old timers dont believe in it, but when you have primer over metal,paint, and body filler, you have three different shades. Sealer makes it all one color and helps fill in sandpaper scratches. I will fix those and hopefully get paint on it tomorrow. I hope to be painting the cab Friday morning or Friday nite if all goes as planned.
10-02-2013, 08:43 PM
#1473
Nice Rig
Got an 85 4runner myself with over 300,000 miles on it (odometer works intermittently). Nice job on the vehicles! Good to see people fixing up their old Toyotas. The comments I get on mine are "nice 4runner" and "still wish I had mine". Hang on to them and fix them up. Vehicles (including many Toyotas) aren't made they like used to be.
10-02-2013, 08:51 PM
#1474
Registered User
iTrader: (1)
Join Date: Oct 2011
Location: VA
Posts: 599
Likes: 0
Received 0 Likes
on
0 Posts
It's funny you say that about carb'd trucks terry because today we finally got to working on mine and well I'll be darned if I saw an O2 sensor anywhere...I just assumed carb'd had them, maybe you are right lol
10-03-2013, 08:40 AM
#1475
Super Moderator
Staff
Thread Starter
iTrader: (1)
Join Date: Aug 2008
Location: Anderson Missouri
Posts: 11,788
Likes: 0
Received 22 Likes
on
20 Posts
Hello JaredL...Welcome to Yotatech. I missed out on an 85 SR5 for $500 before I really got into Toyotas. One of the most loaded trucks I have ever seen. If I knew then what I know now, I would of been all over it. A friend of mine does a lot of work on Toyotas and he has a speedometer that he replaced in it as it stopped working and it stopped at 431,000 miles. He says the truck itself has over 750k miles on it. Other then the bed, it is still fixable and looks suprisingly well.
I get alot of compliments on mine and most dont really know the condition that it was in when I started. Not much orginal on it, but I enjoyed the challenge and making it to what I wanted. I still need to finish the trunk area and then I want to go thru the suspension and get it as new as possible. The suspension is ok as it is for now but I figure I still have a couple of more years to get it to where I want it. I sometimes dont even feel like it is the same truck.
These trucks are easy to get on the road for the most part and fairly reasonable. On my next break, I will suggest how I go about doing mine. It isnt the fastest in the world, but it is slow and steady progress that doesnt break the bank and keeps it moving forward. Sealer is nearly dry so I will get back out there in a few. Glad you stopped in.
Hello Dakotawho... The O2 feeds information to the computer to adjust fuel so I am betting that the carbs dont have O2s. I will look at the 86 truck when I get back out there. I know you did a cab swap and maybe that is how yours still had the O2 sensor.
Been keeping up with your thread. I know school is keeping you busy. Keep that as your priority. You have come along ways on your truck.
10-03-2013, 08:48 AM
#1476
Super Moderator
Staff
Thread Starter
iTrader: (1)
Join Date: Aug 2008
Location: Anderson Missouri
Posts: 11,788
Likes: 0
Received 22 Likes
on
20 Posts
I am waiting on the sealer to dry. I only have a few flaws to take care of. One was where I bumped my head on the rear fender trying to use up the excess sealer on the fender wells. Doh!!! It will wet sand out. The white dot on my forehead should wash off easily enough. Just hope I dont forget about the dot if I need to run to the parts store.
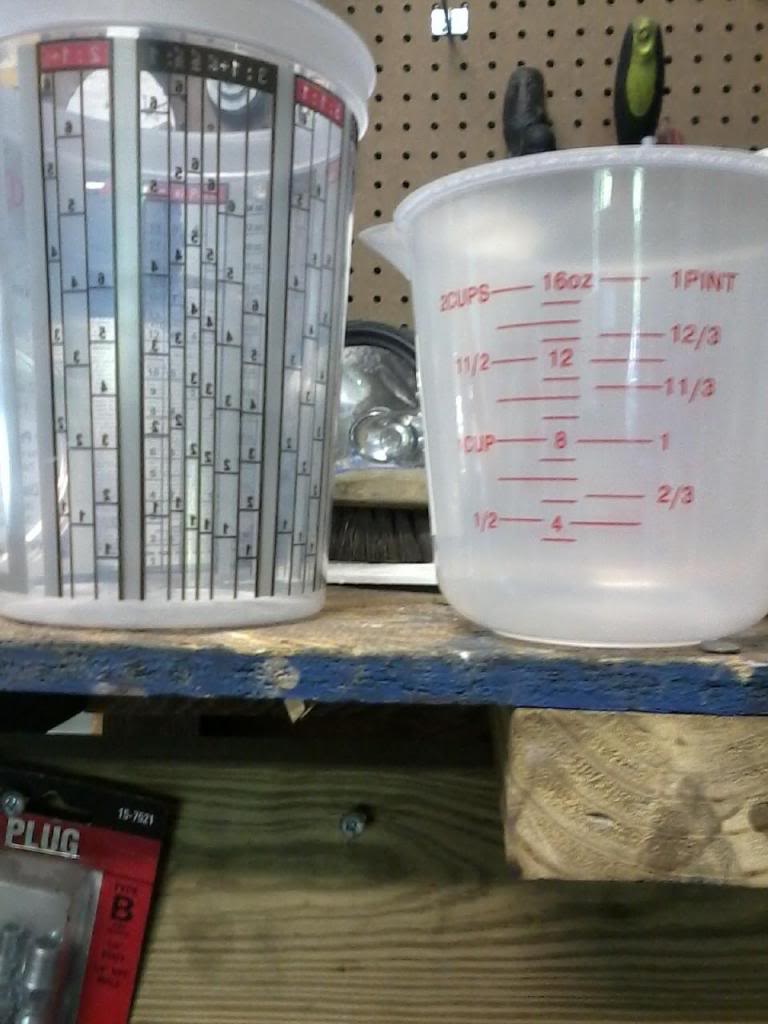
You get mixing buckets when painting. To complicated for me to figure out. Jason suggest measuring cups when we did his runner. Soooo much easier. My mixing is 4:1 on sealer. 4 onces of sealer to 1 ounce of activtor or 8 onces of sealer to 2 onces of activator. Cheapy mixing cups are the way to go.
Drivers side in sealer. Should be painting here in a couple of hours. When I start painting, I will have the floor wet. Last time a soaked thre sets of shoes when painting. This time I have rubber boots.
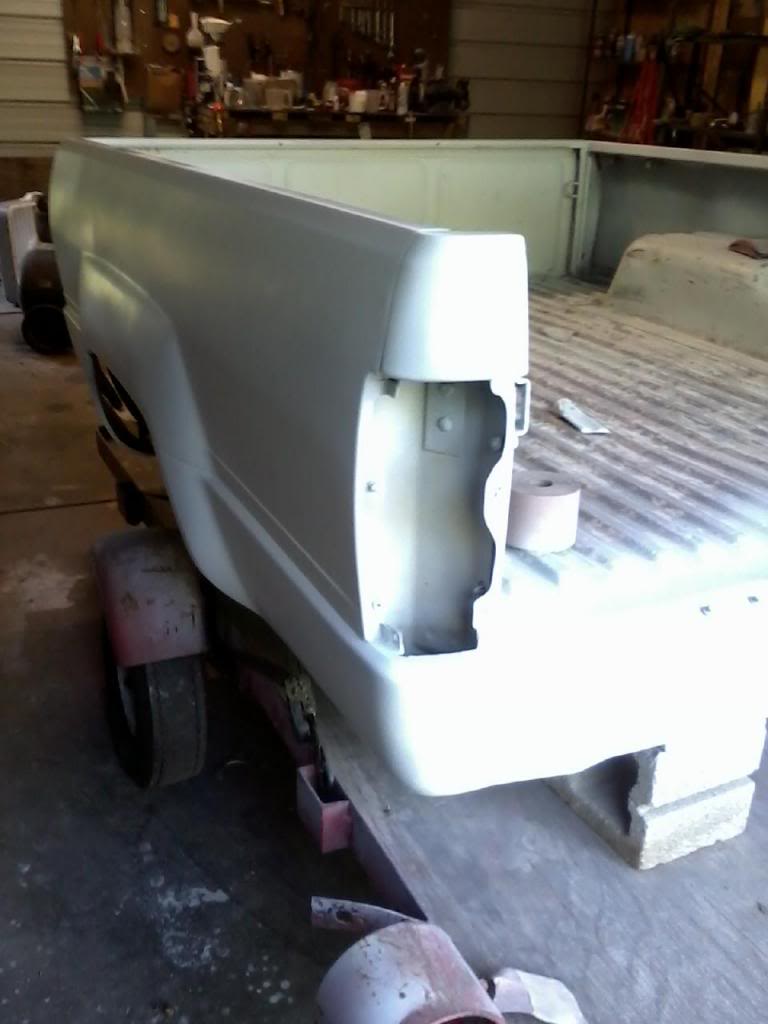
Tailgate and gas cap cover in sealer.
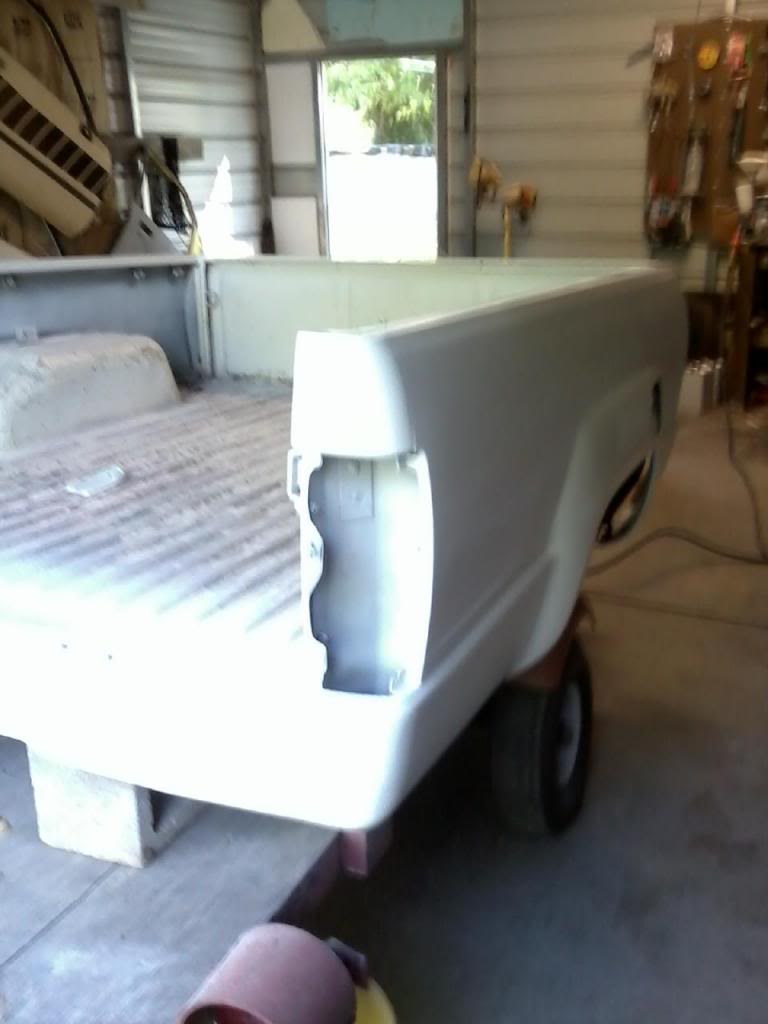
Passenger side in sealer. The inside of the bed is to rough to clean up. I tried, but a roll on bed liner should make a big difference. Will do the side panels a little later on. It gets crowded with everything all at once. Will start on cab in the morning.
You get mixing buckets when painting. To complicated for me to figure out. Jason suggest measuring cups when we did his runner. Soooo much easier. My mixing is 4:1 on sealer. 4 onces of sealer to 1 ounce of activtor or 8 onces of sealer to 2 onces of activator. Cheapy mixing cups are the way to go.

Drivers side in sealer. Should be painting here in a couple of hours. When I start painting, I will have the floor wet. Last time a soaked thre sets of shoes when painting. This time I have rubber boots.

Tailgate and gas cap cover in sealer.

Passenger side in sealer. The inside of the bed is to rough to clean up. I tried, but a roll on bed liner should make a big difference. Will do the side panels a little later on. It gets crowded with everything all at once. Will start on cab in the morning.

Last edited by Terrys87; 10-03-2013 at 08:50 AM.
10-03-2013, 11:31 AM
#1479
Super Moderator
Staff
Thread Starter
iTrader: (1)
Join Date: Aug 2008
Location: Anderson Missouri
Posts: 11,788
Likes: 0
Received 22 Likes
on
20 Posts
Thanks Mark and Cyberhorn.. Had to fix a few screw ups and I want to have some spare cups before I start painting. Off to the store I go here in a few.
10-03-2013, 11:37 AM
#1480
Super Moderator
Staff
Thread Starter
iTrader: (1)
Join Date: Aug 2008
Location: Anderson Missouri
Posts: 11,788
Likes: 0
Received 22 Likes
on
20 Posts
Going to wait an hour or so for it to cool a little and run to the store.
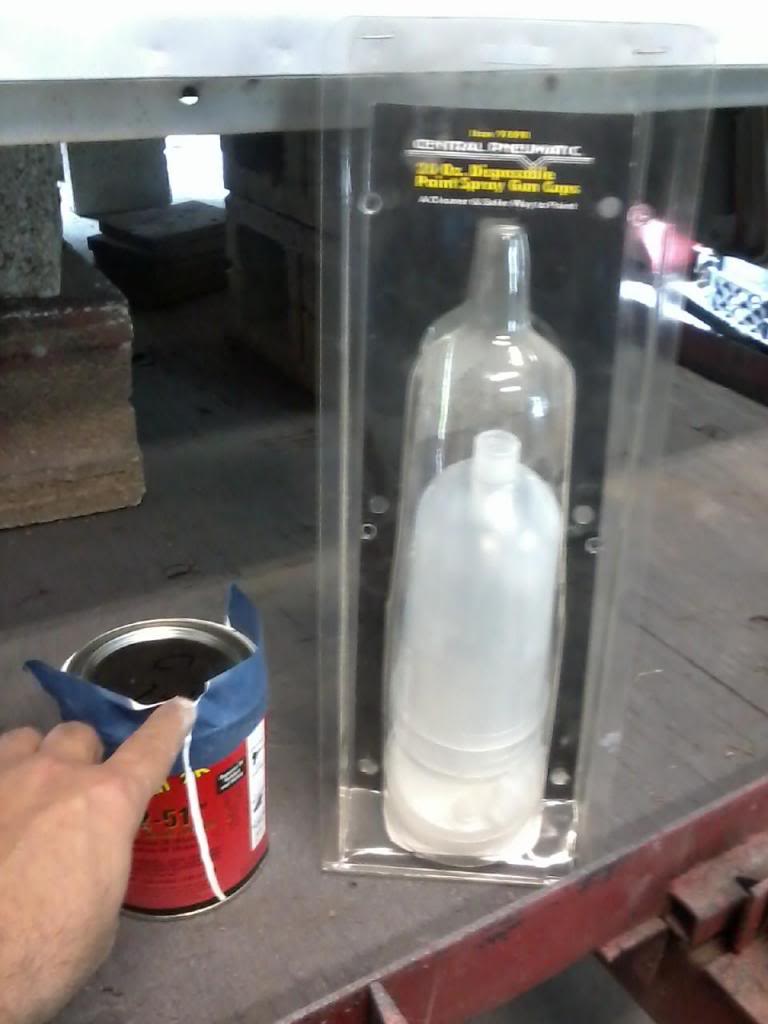
Here are the cups that I like to use. These are disposable and make clean up a snap. These are the next best thing to sliced bread. When pouring from a can, put a little tape around the edge and it pours so much nicer.
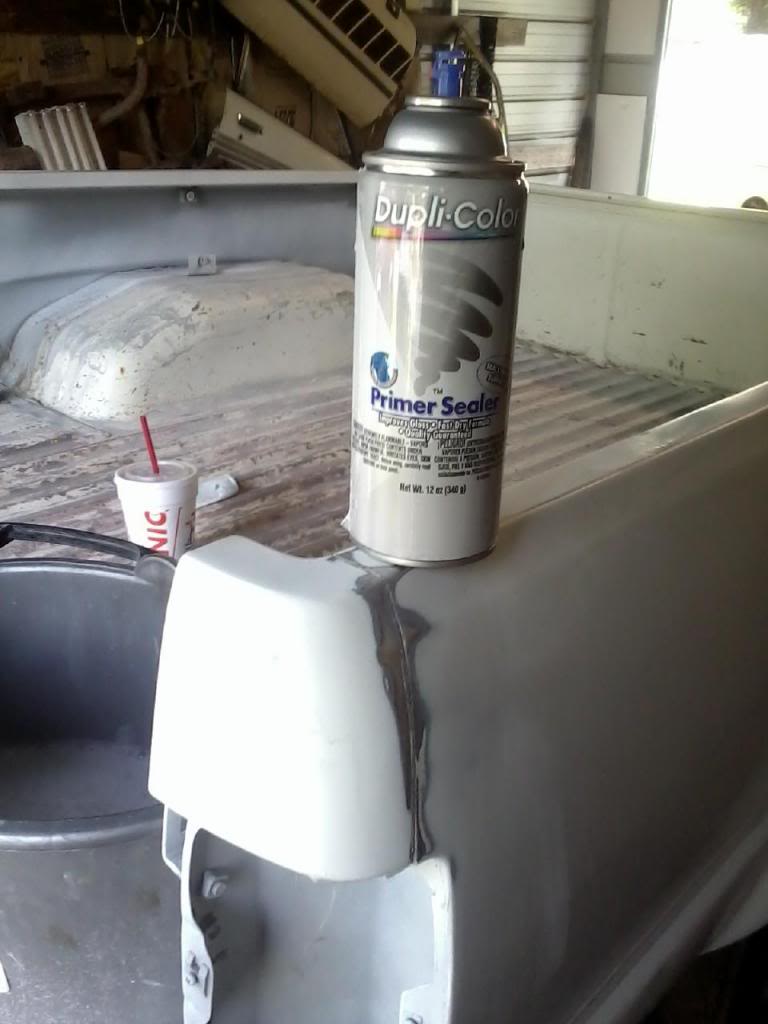
Here is a screw up I did. When doing to filling, I didnt put the body line back in. Got it taken care of now. For a quick touch up, rattle can primer sure beats an air gun.
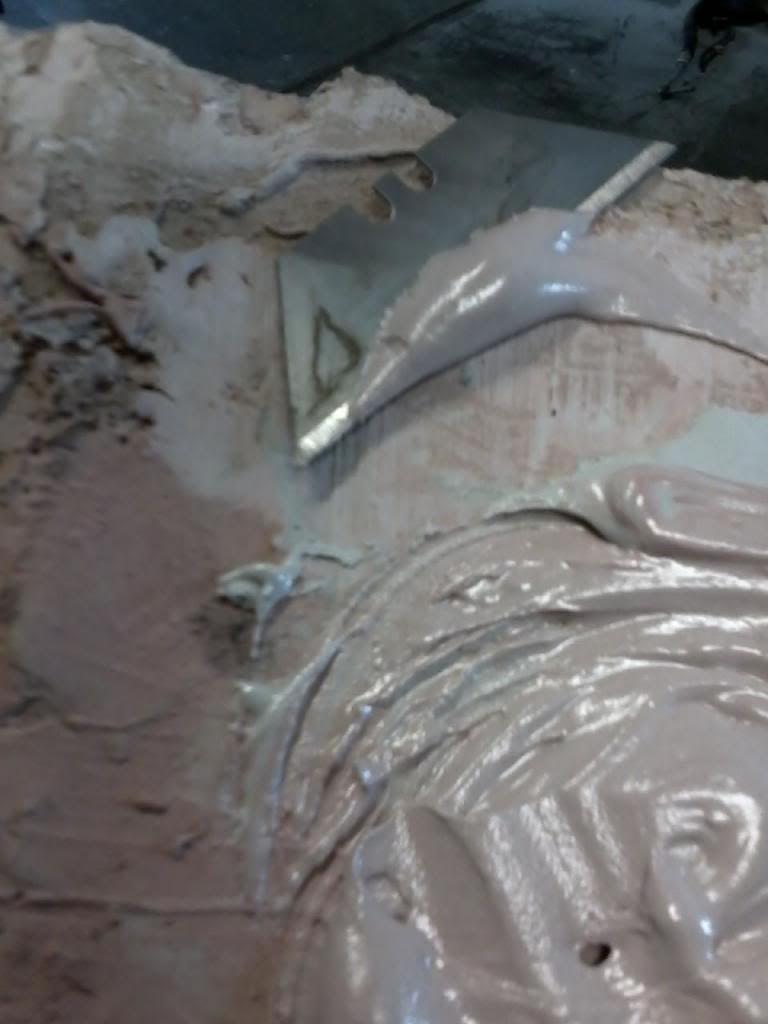
Used the razor blade to fill in a couple of pin holes. I use a razor blade as much as I use a spreader. Saves alot of sanding.


