RAD4Runner's 1986 4Runner dlx Build-up
 09-12-2013, 07:42 AM
#341
Super Moderator
Staff
iTrader: (1)
Join Date: Aug 2008
Location: Anderson Missouri
Posts: 11,788
Likes: 0
Received 21 Likes
on
19 Posts
Just catching up on your thread. I have heard some shocks can be a little on the stiff side. Looks like you had it right. I never tried the Ranchos so really dont knwo anything about them.
 09-19-2013, 01:58 PM
#342
Registered User
Thread Starter
Truck Overheating, Coolant Overflowing with Engine Cold
BTW, truck had been overheating recently. I posted on related thread here.
Would appreciate your thoughts.
TIA,
Ray
09-20-2013, 06:18 AM
#343
Super Moderator
Staff
iTrader: (1)
Join Date: Aug 2008
Location: Anderson Missouri
Posts: 11,788
Likes: 0
Received 21 Likes
on
19 Posts
How is your water pump? Trying to find the easier, cheaper fixes first.
It is sounding like instead of the exhaust/air going out the pipe, it is getting past the gasket and getting into the cooling system and eventually to the radiator. I would run a compression test. I have never had oil in the water, it is possible for oil to get into the water, but a headgasket can happen without oil in the water.
Another sign of a headgasket is coolant going out the tail pipe. Do you get a splash out of the exhaust pipe. It is normal for some steam when first starting up in humid areas, you are dry climate for the most part so too much water or steam would grab my attention in your area.
Next what I would do is to pull the valve cover and retorque my head bolts and run it again. If you find any loose head bolts, you are still going to have to replace the head gasket, but you will know what cylinder it is in. I have had loose head bolts to cause a blown gasket. Also it will slow down the air leak and help confirm the head gasket.
Because of the loose bolt I have dealt with. I have come across a few other trucks that when doing a tune up, when I adjust the valves, I automatically retorque the head bolts as a preventive measure. A new to me truck or someone elses, I have found one that was a little loose but not loose enough to blow the headgasket on several trucks. Was probably a matter of time.
Do your compression test. The rest is worse case scenarios, but I think will be cheaper and quicker to getting your truck on the road. If it turns out to be a head gasket, you should send your head to the shop. A new head can be had for about $250. If a little machine work is needed, I will have the head fixed, but if cost gets over around $170, I buy a new head.
From now on and what I have done in the past is just replace head and gasket. I just got done rebuilding a motor for my 85 and I used Enginebuilder. No complaints with Engine builder at all great service. Some will say if you are going to replace the headgasket you may as well do a rebuild. What they dont say is you need to add about $300 for parts and $300 or more for machine work.
I have bought 2 motors and my brother has bought one from http://unitedengine.com/ Check their specials at the top of the page also, they have it a little cheaper and they are in your area and that will save you on shipping. All three of these motors and another one I referred someone to have all been great motors. They dont always require a core, that can be hit or miss on that.
I thought I could rebuild one cheaper then buying one and I was wrong, I should of just bought one from them. This is worse case scenario, but I would just do the head gasket if it was me and that is what it is sounding like. Compression test doesnt take long.
Last edited by Terrys87; 09-20-2013 at 06:40 AM.
09-20-2013, 06:34 AM
#344
Super Moderator
Staff
iTrader: (1)
Join Date: Aug 2008
Location: Anderson Missouri
Posts: 11,788
Likes: 0
Received 21 Likes
on
19 Posts
I have replaced, tested, and confirmed my ignition parts for my 85 on my 86 and they are working great. I still am not getting spark to the plugs. I am going to get some new Densos plugs today just to eliminate that, but the plugs I used only have a 1000 miles on them and it started raining before I could test the plugs.
I cant see my plugs failing and also I am restoring another junk truck so that is what my problem most likely is anyways but i just cant seem to learn my lesson. It is an extra cab and solid axle so is a little rarer and that appeals to me. Besides I can make it to what I want. There is another IFS extracab for sale in my area that would be the better investment, but I am a sucker for punishment.
The motor will turn over so my cranking circuit is good. It is on the ignition side. You have any tips or suggestions that I should look at? It is not getting any spark. here is the build>>> https://www.yotatech.com/forums/f198...l#post52120263 I even stuck in another (86) computer to see if it would deliver spark to the plugs. I dont know if the other computer is good or not and I will test it on my 86 Runner.
I am not the best at reading schematics but can get a general idea. But from what I am seeing in the diagrams, there isnt much to the ignition system. There is no hurry on this. Thanks in advance.
10-18-2013, 10:00 PM
#345
Registered User
Thread Starter
Ruby Tuesday Gets New (rebuilt) Engine!
Ruby Tuesday came out of shop after rebuild, and altho I drive with a very light foot, because it's break-in period, I can feel the restored power  .
.
A couple of wires in the engine harness (rightside firewall to throttle body) broke during pull & install. Considering buying replacement or refurbishing engine harness... on this post
.A couple of wires in the engine harness (rightside firewall to throttle body) broke during pull & install. Considering buying replacement or refurbishing engine harness... on this post
Last edited by RAD4Runner; 10-18-2013 at 10:45 PM.
10-18-2013, 10:47 PM
#347
Registered User
Thread Starter
Sorry Mark, Only pics I could get would be that of a cleaner engine bottom
No more drips from engine. Clutch and tranny front main seal were replaced as well. Now my clutch pedal sits higher.
Last edited by RAD4Runner; 10-18-2013 at 10:49 PM.
10-19-2013, 11:40 PM
#348
Super Moderator
Staff
iTrader: (1)
Join Date: Aug 2008
Location: Anderson Missouri
Posts: 11,788
Likes: 0
Received 21 Likes
on
19 Posts
I wouldn't know about where to get a new harness and matching up the correct wires I am sure is hard to find. I would guess that there has to be a place on the internet that sells the wire colors that you may want. Just have not ever checked it out.
The harness that goes from the inner fender and down under the intake can get full of crud. I would remove the wire loom cover and give it a good cleaning. A lot of times it is full of moisture, sand and who knows what else under there.
Having a new motor at peak condition makes a big improvement on these and sure you are suprised at the difference in horse power from what you had before. Glad to see you got it back on the road.
10-20-2013, 11:04 PM
#349
Registered User
Thread Starter
Thanks, Terry!
I wouldn't know about where to get a new harness and matching up the correct wires I am sure is hard to find. I would guess that there has to be a place on the internet that sells the wire colors that you may want. Just have not ever checked it out.
The harness that goes from the inner fender and down under the intake can get full of crud. I would remove the wire loom cover and give it a good cleaning. A lot of times it is full of moisture, sand and who knows what else under there.
Having a new motor at peak condition makes a big improvement on these and sure you are suprised at the difference in horse power from what you had before. Glad to see you got it back on the road.
The harness that goes from the inner fender and down under the intake can get full of crud. I would remove the wire loom cover and give it a good cleaning. A lot of times it is full of moisture, sand and who knows what else under there.
Having a new motor at peak condition makes a big improvement on these and sure you are suprised at the difference in horse power from what you had before. Glad to see you got it back on the road.
Looking forward to the next time we go on Tejon Pass.
10-22-2013, 03:28 PM
#350
sub'd
Now I've finished reading thru all of your build up so I finally get to subscribe so that I can get your new great ideas as they come!
I found myself making quite a few bookmarks along the way. Keep 'em coming!
I hope to get my '86 4runner out of my garage soon. I got slowed down because I broke my hand and now I have to wait for times when my dad can assist (I just need to re-attach upper and lower intake manifold and injectors/fuel rail and should be good to go).
10-22-2013, 03:54 PM
#351
Registered User
Thread Starter
Updates on Suspension
Guys,
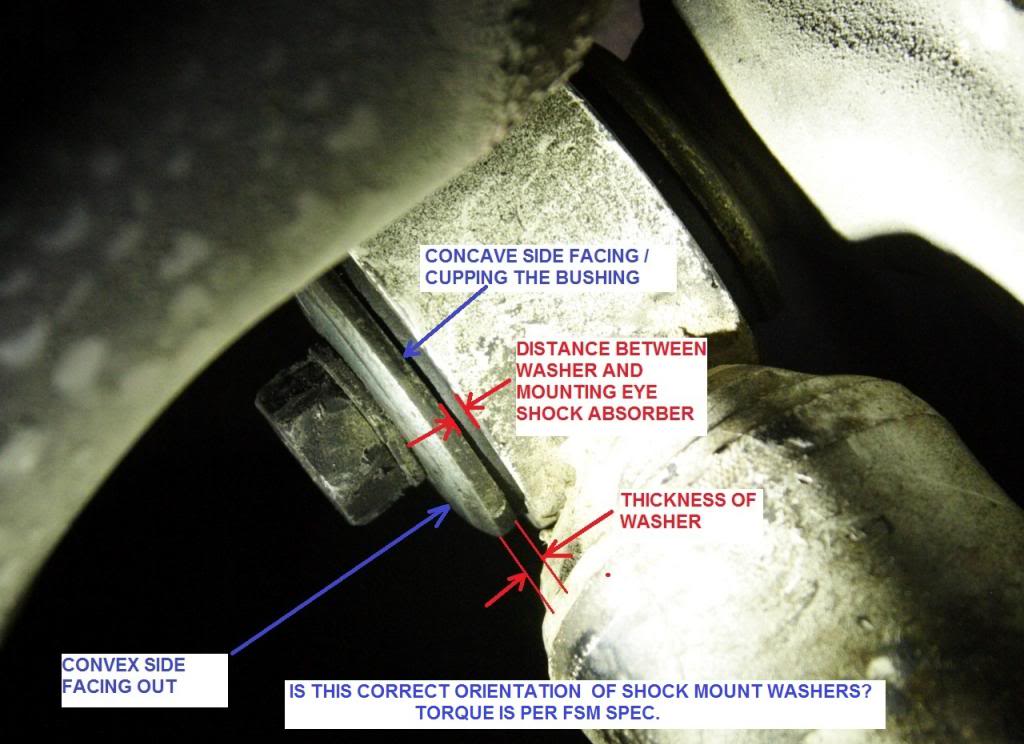
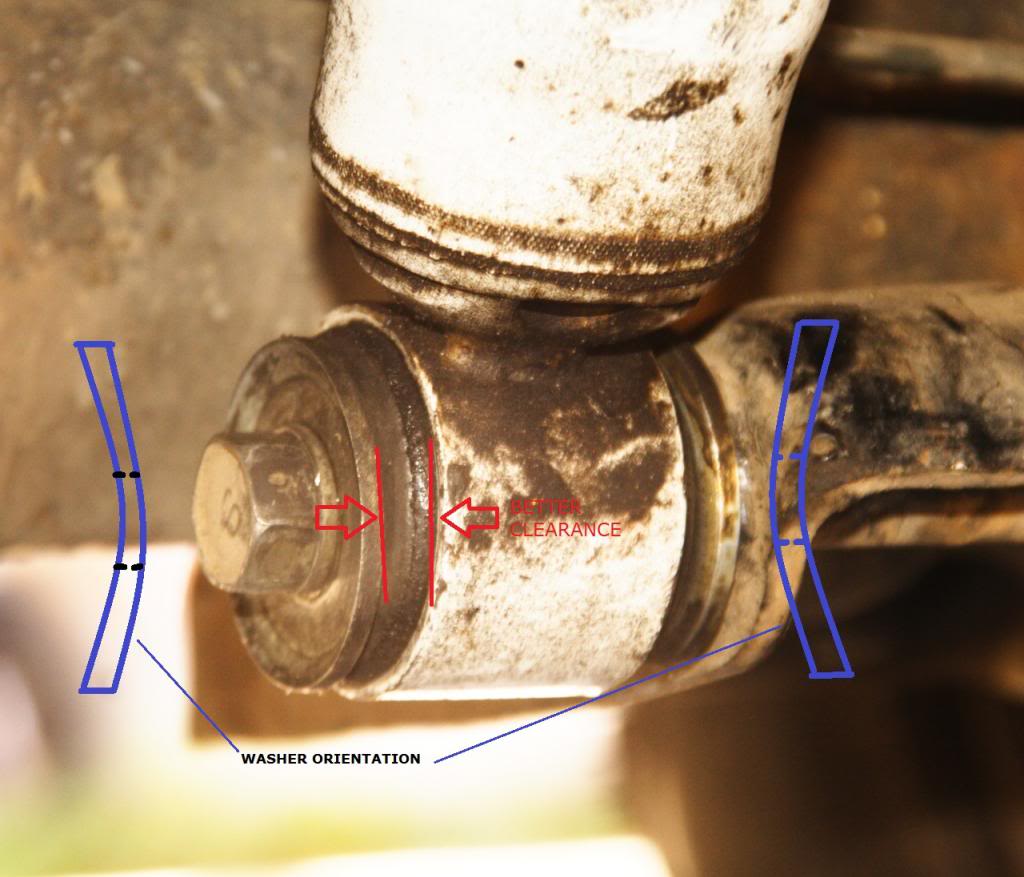
Updates on suspension...I turned my Rancho shocks around so now rubber boot is up, and also turned bushing washers so concave side faces out. Washers clear the shock mounting eyes better, and now speed bumps feel gentler and more quiet.
Before:
Now:
Hearing/feeling creaks from front suspension/steering when on dirt road. I know that idler arm has play so I'll replace that ASAP and monitor.
10-22-2013, 04:07 PM
#352
Registered User
Thread Starter
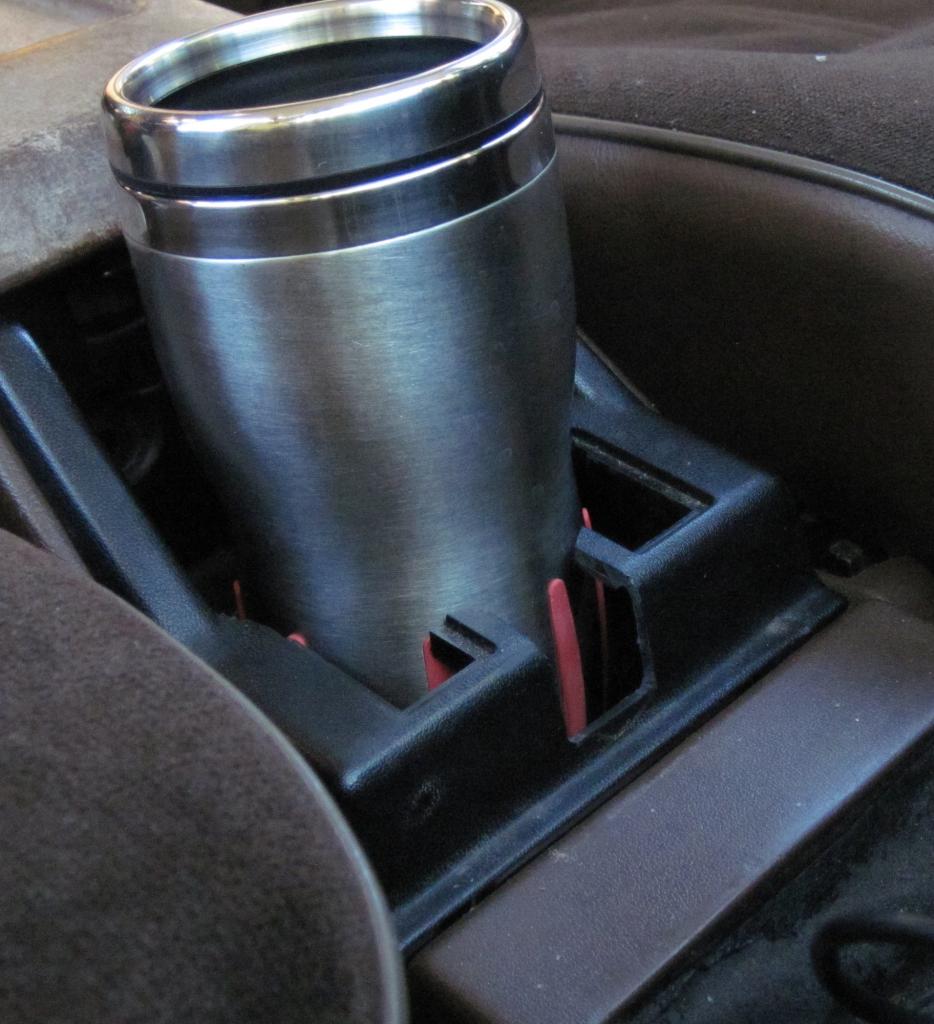
Cup Holder Mod
Previously, I relocated my console switches...
Now...
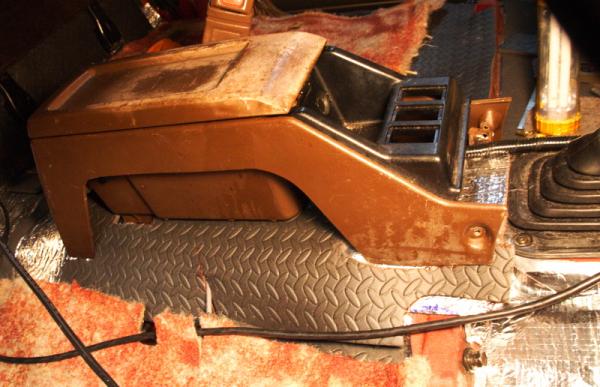
Cut the insert up to accommodate "standard" ceramic coffee mug with handle. Gold marking is reference for hole I will make for smaller diamater base of skinny but tall "travel" cup.
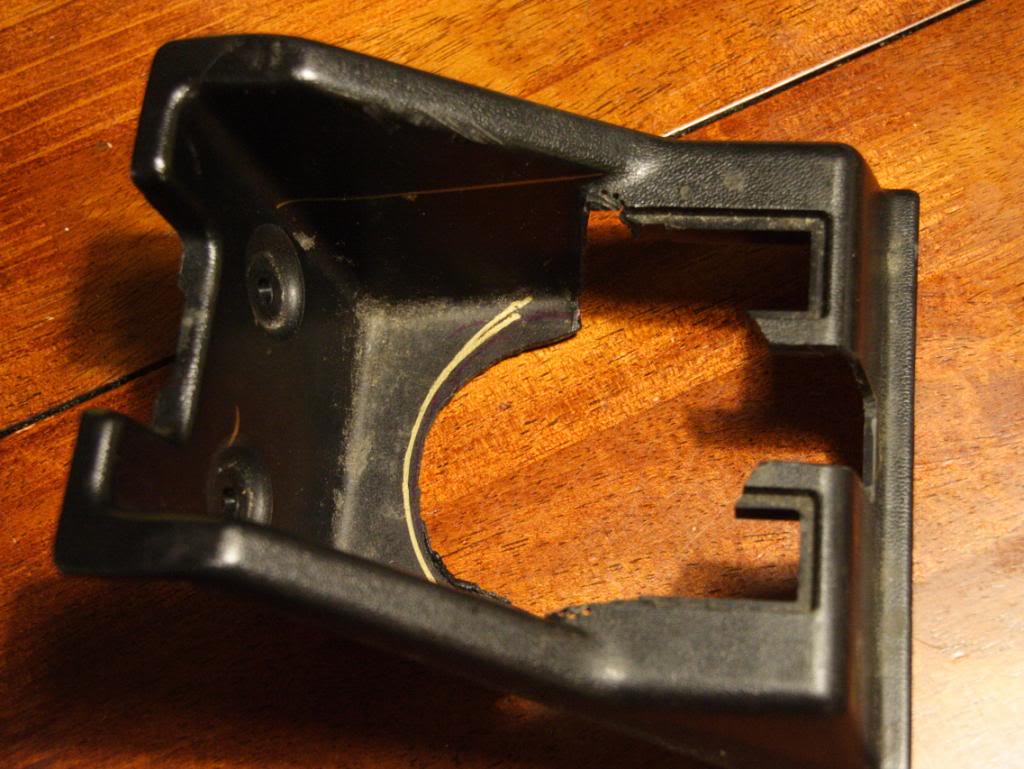
Slotted for mug handle.
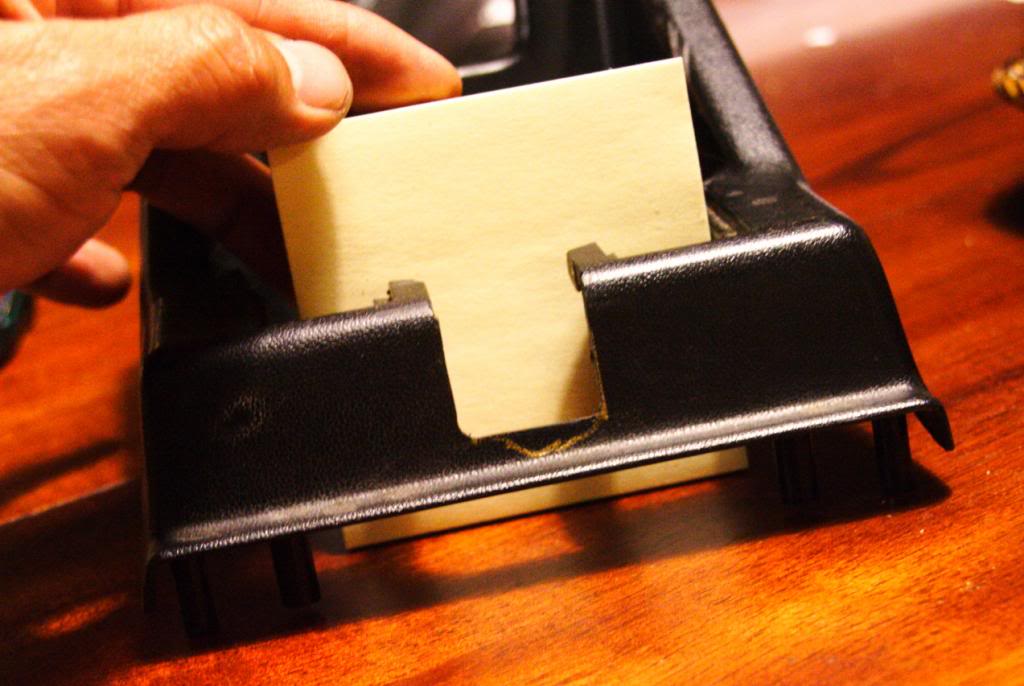
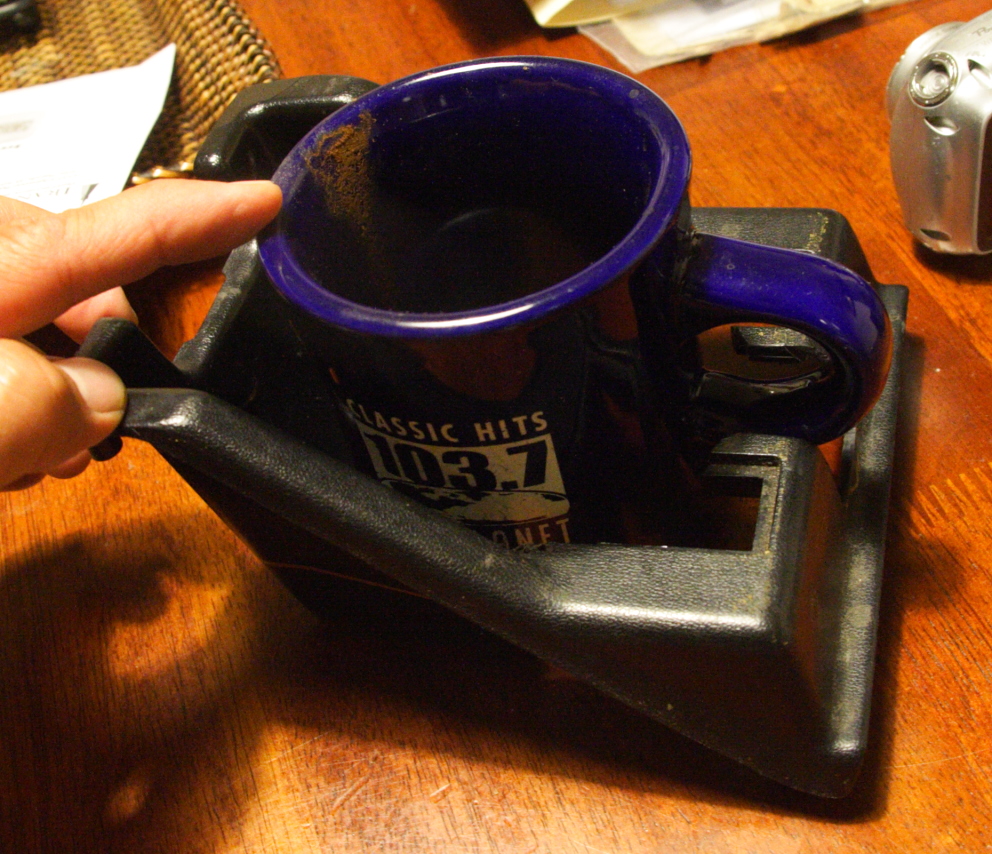
Bottom of cut level with transmission cover trim, so that's the lowest the mug could sit. Placing mug deeper will not work because mug handle will bottom out on transmission cover trim.
Right now it works in this configuration, altho not pretty. Mug would rest on the stock bottom.
I have now opened up opening on stock bottom.
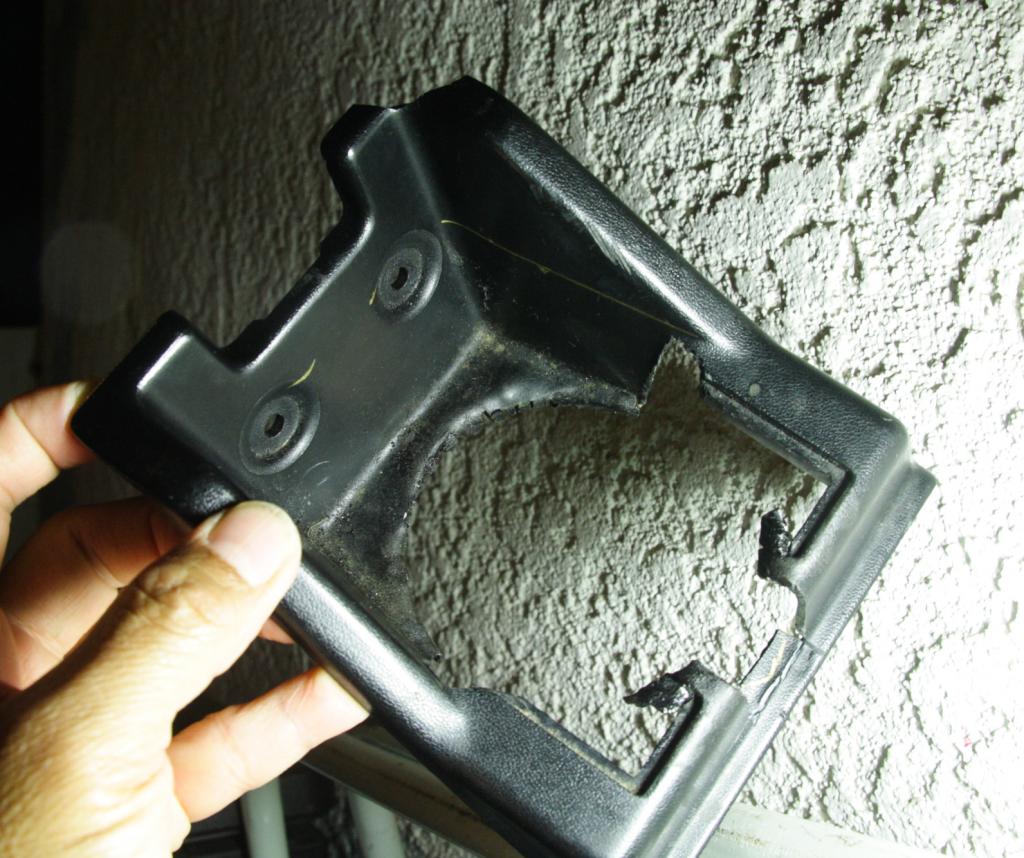
Taller, skinnier travel cup will rest in that step below stock bottom...
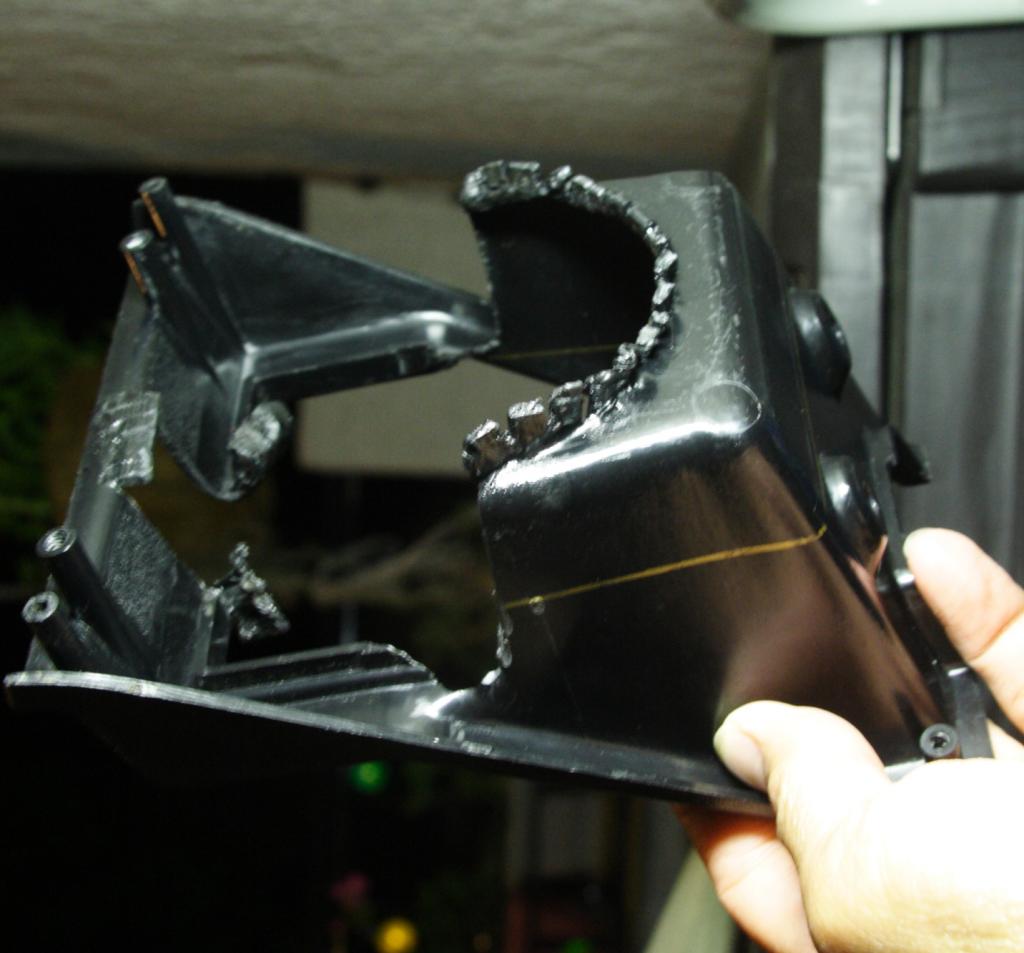
Would need to make a mold for the fiberglas and resin work...
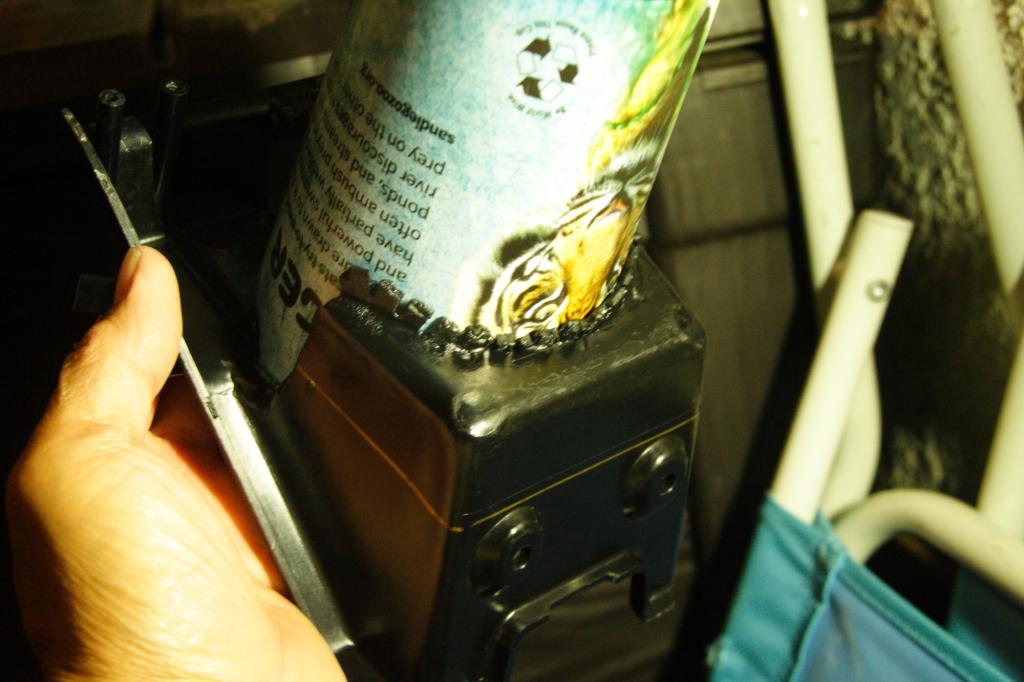
Maybe something like this...
Now...
Cut the insert up to accommodate "standard" ceramic coffee mug with handle. Gold marking is reference for hole I will make for smaller diamater base of skinny but tall "travel" cup.
Slotted for mug handle.
Bottom of cut level with transmission cover trim, so that's the lowest the mug could sit. Placing mug deeper will not work because mug handle will bottom out on transmission cover trim.
Right now it works in this configuration, altho not pretty. Mug would rest on the stock bottom.
I have now opened up opening on stock bottom.
Taller, skinnier travel cup will rest in that step below stock bottom...
Would need to make a mold for the fiberglas and resin work...
Maybe something like this...
Last edited by RAD4Runner; 10-27-2014 at 03:09 PM.
10-22-2013, 10:31 PM
#353
Super Moderator
Staff
iTrader: (1)
Join Date: Aug 2008
Location: Anderson Missouri
Posts: 11,788
Likes: 0
Received 21 Likes
on
19 Posts
That looks like a great place for a cup holder. As far as the switches, where have you decided to put them at? I have been meaning to get my switches moved to the slots under the heater controls. It would help keep the dust and spill out of the switches.
I believe you have the washers on the correct way. If it is quieter and better all the way around, I would just roll with it.
I believe you have the washers on the correct way. If it is quieter and better all the way around, I would just roll with it.
10-22-2013, 11:01 PM
#354
Registered User
Thread Starter
(the console is where we would spill our drinks) so I moved the window switches (up/down and lock) to slots below ashtray (above the radio). Then I decided that it's more logical to place the rear wiper closer to the front wipers, so I moved that to slot forward of the wiper stalk.Mod post here
Yeah, suspension feels smoother now. It's likely that when flexing or hitting a bump the washers could be hitting the "eye" of the shocks, making a stronger "THUD!"
Regards,
Ray
Last edited by RAD4Runner; 11-04-2013 at 09:38 AM.
10-29-2013, 04:11 PM
#355
Registered User
Thread Starter
Off-Topic: Epic Halloween Regatta
No wrenching last weekend, but had an epic Halloween regatta ni San Diego Bay. Dressed as punk zombies. Lots of wind. We lost the mast to gusts over 19-knots, but no injury, pulled everything back on board. Still better than the best day at the office
Trick or Treat!
Here's quick video (I have the authentic mohawk - LOL!):
Regards,
Ray
Trick or Treat!
Here's quick video (I have the authentic mohawk - LOL!):
Regards,
Ray
Last edited by RAD4Runner; 10-29-2013 at 04:16 PM.
10-29-2013, 04:25 PM
#356

btw started build threads for my 4runners and I plan on stealing many of your ideas hehe. (linkys in sig unless they don't work)
11-04-2013, 04:26 AM
#357
Hey Ray, I'm really enjoying reading through this thread. As an ME I've always found EE stuff to be a little mysterious, so thanks for breaking it down for us!
I'll try to get a picture of my cupholder mod for you sometime today.
BTW, are you considering doing the brass bushing idler arm upgrade? I did that years ago and have been very happy. I also added a brace and tapped the body of the idler to make it greaseable.
I'll try to get a picture of my cupholder mod for you sometime today.
BTW, are you considering doing the brass bushing idler arm upgrade? I did that years ago and have been very happy. I also added a brace and tapped the body of the idler to make it greaseable.
11-04-2013, 09:54 AM
#358
Registered User
Thread Starter
Thanks MaltDisney. Yeah.. cruising is one thing but racing is another. Even on an uneventful day, one gets bruised and scratched. When seen from afar, boats turn/sway gracefully, race smoothly flows.. However, from inside elbows fly, people scramble, ducking from the boom, chaotic, analogous to a mosh pit. hence, the boat's name
Thanks! Although, I have more functional things to do so I'll make the cup holder pretty later. For now it works both for my standard coffee mug and slender travel cups.
Yeah, I like the Brass fitting in Duralast FA5040 idler arm, but I already got Mark's idler arm so I installed that (Moog heavy-duty before they went Chinese made?)
I noticed after replacement, though that my steering I now kind of off-center. Now it's approx 5 degrees to right when driving straight. You guys think I need adjustment to pitman arm?
For now, I don't wheel - truck only takes me on rough roads to trailheads - so no need for bracing for now. but making the body greasable is really a good idea and easy to implement.
BTW, are you considering doing the brass bushing idler arm upgrade? I also added a brace and tapped the body of the idler to make it greaseable.
I noticed after replacement, though that my steering I now kind of off-center. Now it's approx 5 degrees to right when driving straight. You guys think I need adjustment to pitman arm?
For now, I don't wheel - truck only takes me on rough roads to trailheads - so no need for bracing for now. but making the body greasable is really a good idea and easy to implement.
11-11-2013, 10:54 PM
#359
Registered User
Thread Starter
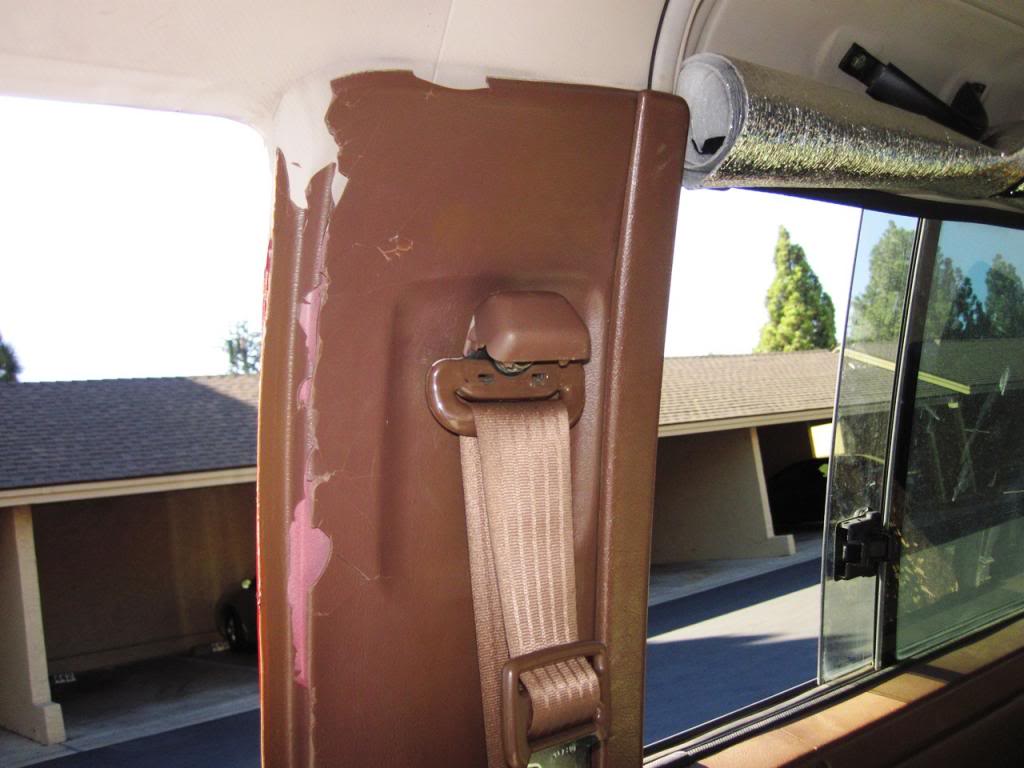
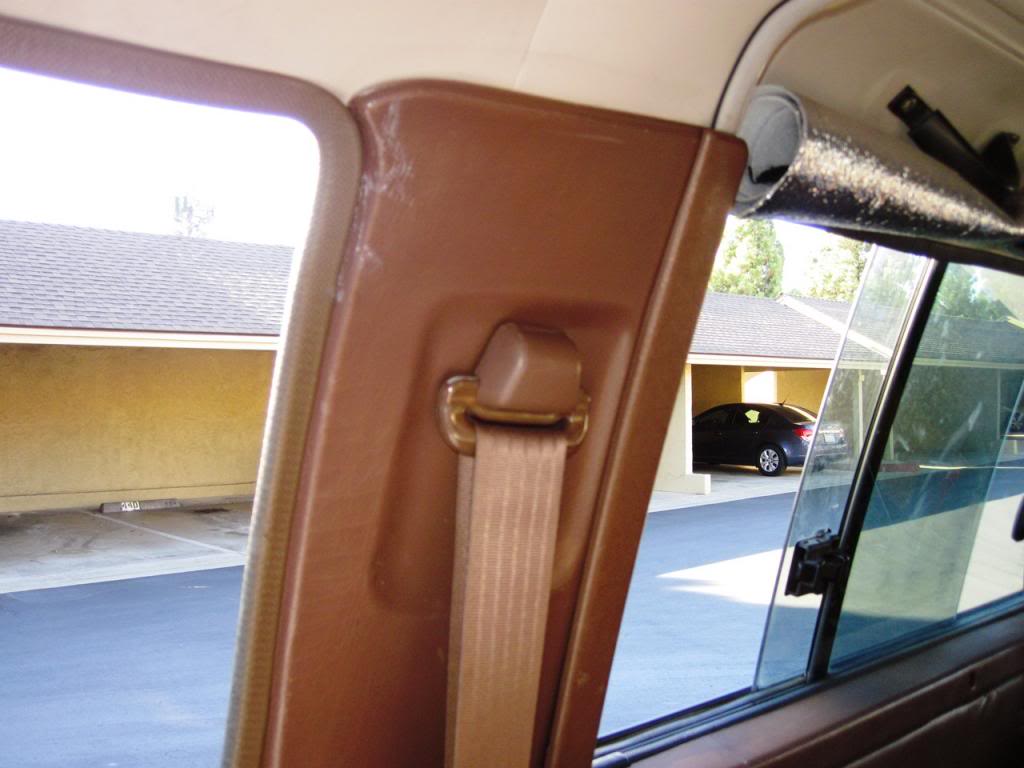
Passenger Side B-Pillar Panel Replaced
Thanks again Grego!
Before:
After:
Before:
After:


