
Project daily driver 1991 4Runner
 Mar 7, 2019 | 02:24 PM
#21

Thread Starter
Registered User
Joined: Apr 2013
Posts: 93
Likes: 23
From: Prosser, WA
This thing has been buried in the snow for weeks now, its suppose to warm up this weekend and since my trip was cancelled, maybe i can get away from the wife long enough to get something done on it.
Mar 18, 2019 | 08:53 AM
#22
Thread Starter
Registered User
Joined: Apr 2013
Posts: 93
Likes: 23
From: Prosser, WA
snow finally melted enough to work on it a bit yesterday afternoon (after other projects). pulled the upper intake off to get room to try a pipe wrench on the broken thermostat bolt that was sticking up. it started to move, I re position the pipe wrench and SNAP... now its broken off flush. This has been the worst bolt to try and remove, I tried heat and PB blaster before it broke, then after it broke, even more PB blaster and heating iron. Im going to go pick up some left handed drill bits today, worse case scenario i drill it out bigger and tap it.
Mar 18, 2019 | 03:34 PM
#23
Thread Starter
Registered User
Joined: Apr 2013
Posts: 93
Likes: 23
From: Prosser, WA
ordered up some parts today, 4.7:1 transfer case gears from rocktactics, and a trail gear winch plate from some random Amazon seller. I am going to build a bumper off the plate (eventually), and beef up the rusted frame where it mounts to.
May 31, 2019 | 02:53 PM
#24
Thread Starter
Registered User
Joined: Apr 2013
Posts: 93
Likes: 23
From: Prosser, WA
Well I have had 0 time to work on this thing, but I am gathering more parts to give myself more work lol. Picked up a top shift transfercase that I will put the 4.7 gears into and run a 2.28/4.70 dual case.
Jun 14, 2019 | 10:00 AM
#25
Thread Starter
Registered User
Joined: Apr 2013
Posts: 93
Likes: 23
From: Prosser, WA
I have been so unmotivated to work on any of my projects by the time I get off work, drive home, feed the family, feed the livestock, get my kid showered and in bed, I don't want to do anything. Yesterday one of my old friends came into work and were talking toyotas and it motivated me a little bit so after everything else was done last night I went out and started removing the leaky steering box until I found out I didn't have a pickle fork big enough to pull the pitman arm off.

 Jun 19, 2019 | 06:44 AM
#27
Thread Starter
Registered User
Joined: Apr 2013
Posts: 93
Likes: 23
From: Prosser, WA
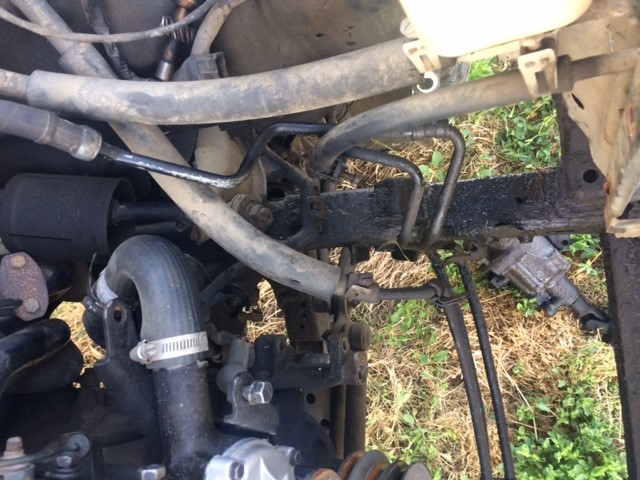
I have been working on it about 10 minutes each night, not much but its something lol. I was able to finish drilling and tapping the broken thermostat bolt, wasn't the cleanest job so I am changing it from a bolt to a stud which I epoxied into place last night to let it dry. Now i can start getting the intake put back together and delete as many vacuum lines as possible.
Jun 25, 2019 | 09:08 AM
#28
Thread Starter
Registered User
Joined: Apr 2013
Posts: 93
Likes: 23
From: Prosser, WA
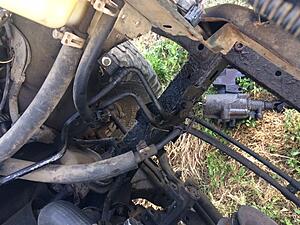
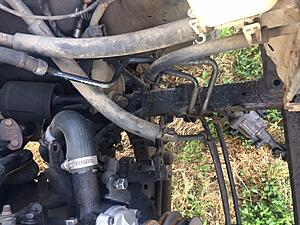
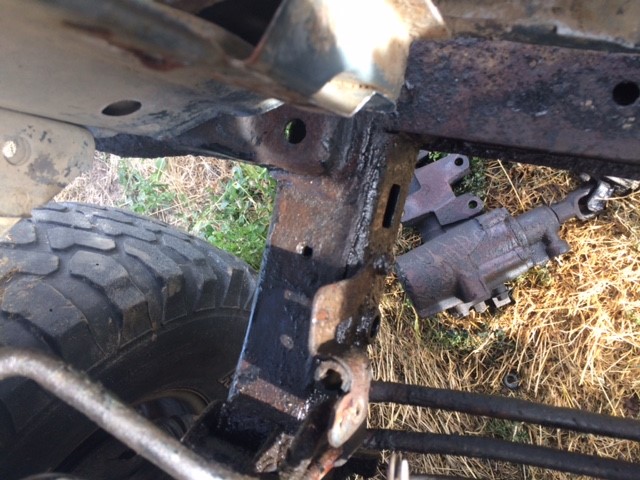
Little more tinkering around the last few days, only took me 6 months or so but I got the thermostat changed lol, both studs are epoxied/loctited in. I got the intake bolted back up, pulled the leaky steering box off, last night I tried the oven cleaner trick to clean the frame off, tonight I will go out and see just how clean it got it after drying.
Jun 26, 2019 | 12:03 PM
#29
Thread Starter
Registered User
Joined: Apr 2013
Posts: 93
Likes: 23
From: Prosser, WA
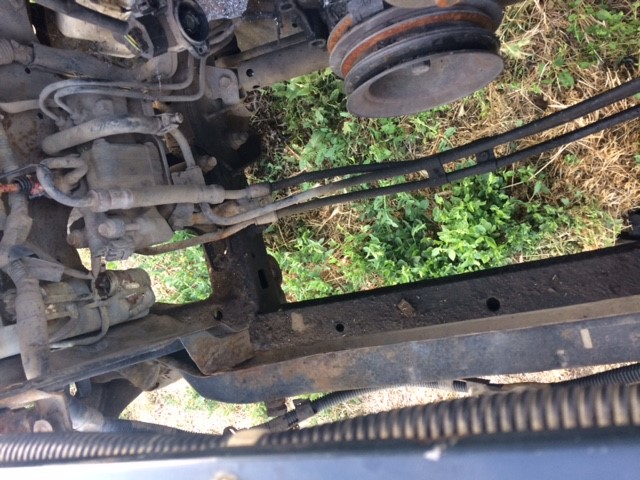
just chipping away at it, last night was mounting the steering box, hooking up the hydraulics and steering shaft, then removing ang capping un-needed vacuum lines. I tried the oven cleaner instead of like a brake cleaner or engine de-greaser, it worked but I dont know that it worked any better than anything else. it was not a miracle in a can lol.
greasy

less greasy
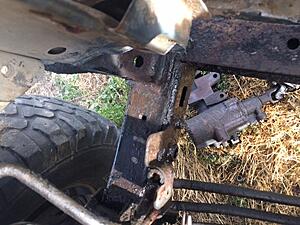

greasy

less greasy
 Jul 30, 2019 | 07:10 AM
#30
Thread Starter
Registered User
Joined: Apr 2013
Posts: 93
Likes: 23
From: Prosser, WA
We have been busy with junior rodeo season so its been a couple weeks since I have even touched the 4Runner. went out last night mounted my circuit breaker for the new alternator and tried my hand at building battery cables out of welding ground cable. I got both my positive cables made, from the alt to the breaker and breaker to battery. By the time I was done with those it was dark and bed time, hopefully tonight I can get out there and make a couple ground cables and get the alternator put in.
Aug 1, 2019 | 08:15 AM
#31
Thread Starter
Registered User
Joined: Apr 2013
Posts: 93
Likes: 23
From: Prosser, WA
Went out last night and routed my positive cables, mounted the alternator and the power steering pump, went to put the power steering belt tensioner on and the bearing is seized. Pulley would move but not free spin, tear it apart and the bearing was spinning on the bolt spacer. pressed the bearing out and am picking a new one up in town today. Looking online the tensioners are about $200, I can get the bearing in town for $15 or order it online for $6
Last edited by warrpath4x4; Aug 1, 2019 at 08:16 AM.
Aug 2, 2019 | 06:52 AM
#32
Thread Starter
Registered User
Joined: Apr 2013
Posts: 93
Likes: 23
From: Prosser, WA
Still chipping away at it, went home last night and pushed the new bearing into the pulley, easy as butter and got it mounted, got the water pump pulley bolted on and the belts put on but not tightened yet. Then the family went to dinner down town.
Aug 15, 2019 | 06:52 AM
#34
Thread Starter
Registered User
Joined: Apr 2013
Posts: 93
Likes: 23
From: Prosser, WA
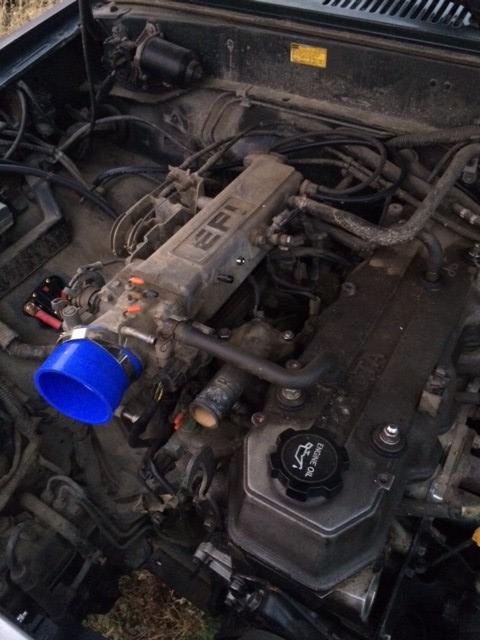
test fitted the new radiator, had to drill new mounting holes but fitment looks good
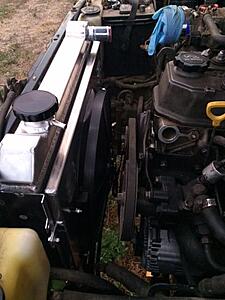
not too keen on how the upper hose fitting points to the passenger side though but I was still able to get the hose on it.
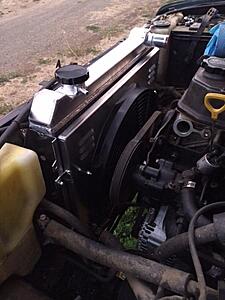
my de-vacuumed engine
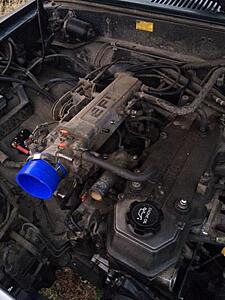
I was originally going to run the air cleaner in the stock location but after dealing with fitment issues of the intake pipe and now the location of the upper radiator hose I am just going to swap the battery and air filter sides, this should give me plenty of air flow to the filter

and no I am not going to leave it like that.

not too keen on how the upper hose fitting points to the passenger side though but I was still able to get the hose on it.

my de-vacuumed engine
I was originally going to run the air cleaner in the stock location but after dealing with fitment issues of the intake pipe and now the location of the upper radiator hose I am just going to swap the battery and air filter sides, this should give me plenty of air flow to the filter

and no I am not going to leave it like that.
Aug 15, 2019 | 09:55 AM
#36
Thread Starter
Registered User
Joined: Apr 2013
Posts: 93
Likes: 23
From: Prosser, WA
Aug 15, 2019 | 02:09 PM
#37
Registered User
Joined: Aug 2008
Posts: 531
Likes: 168
From: British Columbia
Yeah that stuff is all pretty straight forward, finding a proper elbow(s) of some sort seems like it might be the harder thing to do, but we shall see! The interweb has it somewhere I'm sure..
Aug 15, 2019 | 03:09 PM
#38
Thread Starter
Registered User
Joined: Apr 2013
Posts: 93
Likes: 23
From: Prosser, WA
I originally bought a cold air kit (amazon) for mine so it came with different elbows and fittings but I am also installing an 82 Supra AFM and will be building a heat shield so mine is a little more in depth of an install.
Aug 15, 2019 | 05:26 PM
#39
Registered User
Joined: Aug 2008
Posts: 531
Likes: 168
From: British Columbia
So the 82 Supra AFM has a larger in and outlet for flow? I've read a few threads mentioning it, but mothing really stating the exact benefits.
A heat shield to partition it off from the hot engine bay air? Sounds like a good plan!
 Aug 17, 2019 | 01:15 PM
#40
Thread Starter
Registered User
Joined: Apr 2013
Posts: 93
Likes: 23
From: Prosser, WA
I had a couple minutes while. Waiting on the wife so I went out and looked at the wiring for the AFM. Don�t even need to cut and extend the wires, I was able to pull the wires and connector out of the loom and run it to the other side of the engine bay. I will grab some more split loom the protect them and get it cleaned up.


