
OLblue87's '86 pickup build
 Apr 24, 2011 | 02:02 PM
#21
Make sure to post your experiences with the 38. You might also want to get a fuel pressure regulator for that.
How much for the block off plates? I made some myself from 1/4" alum. Easy as tracing the gasket and sawsall.
How much for the block off plates? I made some myself from 1/4" alum. Easy as tracing the gasket and sawsall.
 Apr 24, 2011 | 05:59 PM
#23
Thread Starter
Registered User
Joined: Dec 2010
Posts: 59
Likes: 0
From: NW GA
it was like $40 all told for the EGR block off plates, I ended up finding a small plate of 1/4 inch aluminum in the shop after I ordered the block plates... so I am probably gonna cut out a set of water block plates for the motor as well.
-as far as a pressure regulator for the weber, what kind of experience do you guys have with various regulators?
I got a little more done this evening after all the Easter goings on:

-as far as a pressure regulator for the weber, what kind of experience do you guys have with various regulators?
I got a little more done this evening after all the Easter goings on:
May 1, 2011 | 06:03 PM
#25
Thread Starter
Registered User
Joined: Dec 2010
Posts: 59
Likes: 0
From: NW GA
Got a little more done this weekend. My weber 38 came in the mail Thurs, and my EGR block off plates came Fri. Gonna try and get the motor buttoned up and back in the truck this coming week/weekend. Man I cant wait to hear the ol 22R purr again!!!
I am thinking about making some more block off plates for the water tubes coming down either side of the block... any reason these should not be blocked off? Also the water port in the center of the intake manifold on the head, any reason not to block this?
thanks for looking guys!!


I am thinking about making some more block off plates for the water tubes coming down either side of the block... any reason these should not be blocked off? Also the water port in the center of the intake manifold on the head, any reason not to block this?
thanks for looking guys!!
May 4, 2011 | 06:51 PM
#26
Thread Starter
Registered User
Joined: Dec 2010
Posts: 59
Likes: 0
From: NW GA
Made a little more progress towards getting the motor ready to stab back in the truck!! got all the pulleys and brackets back on, as well as the motor mounts. I also did a cold adjustment on the valves @ .007" intake, and .009" exhaust for the 261C cam. Its startin to look like a motor again! 
All I really lack now:
1. new fuel pump/filter
2. new thermostat
3. fuel pressure regulator
4. new intake/exhaust manifold studs and bolts (mine are rusted up pretty badly)
5. fluids, plugs, wires, rotor, dist cap,etc... basically all that tune up stuff
6. get this bad boy stuffed back under the hood!!!!!
May 5, 2011 | 08:28 AM
#29
Thread Starter
Registered User
Joined: Dec 2010
Posts: 59
Likes: 0
From: NW GA
Thanks guys!
86- for now I think I'm just going to run the stock manifold, but with 2.25" pipe, no cat, and an aftermarket muffler. Maybe flowmaster or similar... I just don't want it to sound like a pissed off bumblebee haha
86- for now I think I'm just going to run the stock manifold, but with 2.25" pipe, no cat, and an aftermarket muffler. Maybe flowmaster or similar... I just don't want it to sound like a pissed off bumblebee haha
May 7, 2011 | 06:08 PM
#30
Thread Starter
Registered User
Joined: Dec 2010
Posts: 59
Likes: 0
From: NW GA
Little more wrench turning this afternoon... new fuel pump, oil pressure sender, new temp sender, new thermostat and gasket, new rotor and distributor cap, and got the water tubes run down either side of the block... now just waiting on my new intake/exhaust manifold studs to get here.
sorry no pics from the work this afternoon.... time was getting short and I wanted to at least get a few little things accomplished.
my plan is to have the motor back in next weekend... so fingers crossed that I can get some time to finish up what little is left now
sorry no pics from the work this afternoon.... time was getting short and I wanted to at least get a few little things accomplished.
my plan is to have the motor back in next weekend...
so fingers crossed that I can get some time to finish up what little is left now
May 11, 2011 | 08:04 PM
#31
Thread Starter
Registered User
Joined: Dec 2010
Posts: 59
Likes: 0
From: NW GA
alright guys and gals! got my intake/exhaust manifold studs in the mail this afternoon so I jumped on getting everything back together so I can hopefully get this bad boy back in the truck this weekend!!!


 May 22, 2011 | 11:21 AM
#33
Thread Starter
Registered User
Joined: Dec 2010
Posts: 59
Likes: 0
From: NW GA
sorry the build has been slow for a little bit guys... Time/funds have been short so I have just been doing some small odds/ends that aren't too time consuming or expensive...
Here is one of those little projects- I decided to dress up the rocker panels and fenders with some spray on bed liner that I already had on hand from when I did my floorboards.
Got the Ol gal all taped off and ready for sanding


and here is the final product! I am very pleased with the texture, and coverage of the spray on liner!


Here is one of those little projects- I decided to dress up the rocker panels and fenders with some spray on bed liner that I already had on hand from when I did my floorboards.
Got the Ol gal all taped off and ready for sanding
and here is the final product! I am very pleased with the texture, and coverage of the spray on liner!
May 23, 2011 | 05:17 PM
#35
Thread Starter
Registered User
Joined: Dec 2010
Posts: 59
Likes: 0
From: NW GA
twistedyota- thanks! you should do it! I am really happy with the way mine turned out. They say its all in the prep... I used to work at Line-X, so I prepped everything the same way we used to at the shop. Minus the wire-tape to cut through the liner. The spray I used wasn't anywhere near as thick as line-x. But I really like the texture of it.
Jun 3, 2011 | 06:36 PM
#36
Thread Starter
Registered User
Joined: Dec 2010
Posts: 59
Likes: 0
From: NW GA
alright guys! today was officially D-Day! The motor is sittin back in the truck! Here are some photos before we got her stuffed back in, while I was waiting on the help to arrive!
I'll post up some pics of the motor in the engine bay tomorrow, and hopefully a short video of the first fire up!


I'll post up some pics of the motor in the engine bay tomorrow, and hopefully a short video of the first fire up!
Last edited by OLblue87; Jun 3, 2011 at 06:44 PM.
Jun 7, 2011 | 07:23 PM
#37
Thread Starter
Registered User
Joined: Dec 2010
Posts: 59
Likes: 0
From: NW GA
well I went and done it now....
got the ol gal runnin tonight!!!
-I'll get some pics of the motor and the weber setup as soon as I can guys, but she's runnin strong and loud right now! haha
got the ol gal runnin tonight!!!
-I'll get some pics of the motor and the weber setup as soon as I can guys, but she's runnin strong and loud right now! haha
Jun 8, 2011 | 10:34 AM
#39
Thread Starter
Registered User
Joined: Dec 2010
Posts: 59
Likes: 0
From: NW GA
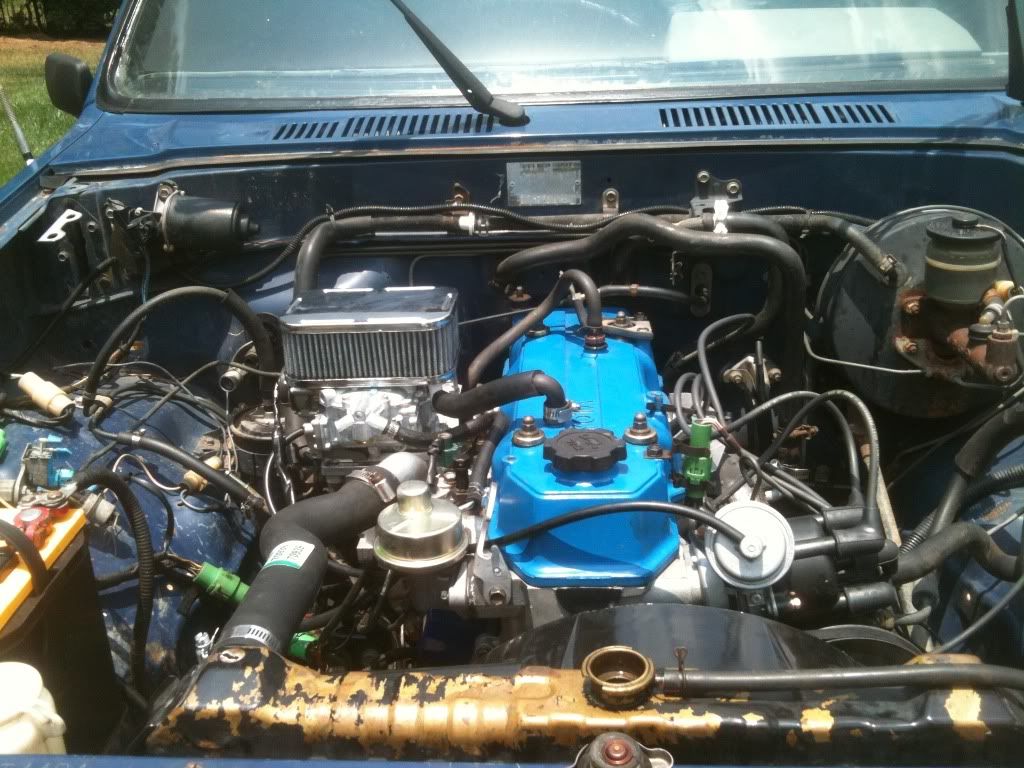
here are some finished pics! still got to get my idle speed set, and some fine tuning on the timing, but she is running smooth as butter right now at around ~1500 rpm's. mixture screws are at 1 turn out, and the speed screw is at the 1/2 turn in baseline on the 38 weber.
as of right now, I'm not running a pressure regulator. but if i need to then thats what it will be! haha
here she is!


as of right now, I'm not running a pressure regulator. but if i need to then thats what it will be! haha
here she is!


