
Mojave_Moze's 1987 4Runner Build-Up Thread!
 Jun 23, 2011 | 10:45 PM
#162
Thread Starter
Registered User
Joined: Mar 2010
Posts: 413
Likes: 0
From: Mojave Desert, California
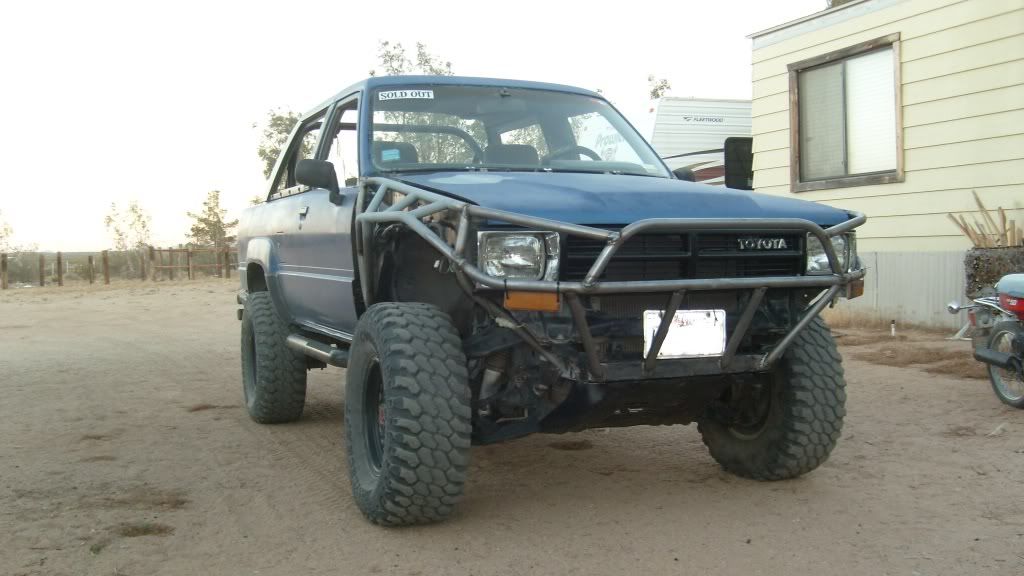
For once, we actually had enough time to get a LOT done today. So much in fact, that the front bumper is FINISHED!
Builds pics:

Light bar welded:


Fender corners didn't look right, so we came up with this design on the fly:


Finished result:
Aaaaand as you all say: A Brown truck showed up today, with the most epic package, I have ever relieved!

TOTAL CHAOS!!!!!!
Builds pics:
Light bar welded:
Fender corners didn't look right, so we came up with this design on the fly:
Finished result:
Aaaaand as you all say: A Brown truck showed up today, with the most epic package, I have ever relieved!
TOTAL CHAOS!!!!!!
Jun 23, 2011 | 10:55 PM
#164
Thread Starter
Registered User
Joined: Mar 2010
Posts: 413
Likes: 0
From: Mojave Desert, California
Welcome!
Me and my buddy came up with the ideas, it started with me wanting fenders that wouldn't get destroyed by desert terrain, then evolved into this. My buddy did the fab work, and even though hes a hard-core rock crawler who swears by domestic 4x4s, even HE said this thing looked awesome. Which is good, cause hes the one who did the welding, lol
Me and my buddy came up with the ideas, it started with me wanting fenders that wouldn't get destroyed by desert terrain, then evolved into this. My buddy did the fab work, and even though hes a hard-core rock crawler who swears by domestic 4x4s, even HE said this thing looked awesome. Which is good, cause hes the one who did the welding, lol
Jun 23, 2011 | 11:05 PM
#165
Registered User
Joined: Feb 2010
Posts: 1,934
Likes: 0
From: N. Lake Tahoe/Chico CA
damn! looks awesome! you should put sheetmetal on the inside of the fenders and lower part of the bumper, that way it covers the insides up. and that long travel is awesome! i cant wait to see the finished result!
Jun 24, 2011 | 08:29 PM
#168
Registered User
Joined: Jun 2010
Posts: 487
Likes: 1
From: West Virginia : the state not near Richmond!
I just noticed that you have your factory turn signals zip-tied up, and i was reading through a thread earlier today about a pipe bumper, and someone (i belive it was Irab88 correct me if i'm wrong) said "why don't you use motorcycle turn signals, since they were desinged to be mounted to the forks anyway"
it's what im planning to do on my mud toy/crawler project, when(/if according to my old man) i get that far along.
it's what im planning to do on my mud toy/crawler project, when(/if according to my old man) i get that far along.
 to you and your truck
Jun 26, 2011 | 03:17 AM
to you and your truck
Jun 26, 2011 | 03:17 AM
#170
Thread Starter
Registered User
Joined: Mar 2010
Posts: 413
Likes: 0
From: Mojave Desert, California
As for an Update: The blueberry is officially on jack stands and garaged until every last bit of the front suspension is done....To anyone considering the Total Chaos long travel kit, I have this to say: It is NOT simply "Bolt On", Penetrating oil is AWESOME, Be sure to have a really GOOD grinder AND cut-off wheel, Air Impact tools are a MUST, Remove all Castle nuts for tie-rods/ball joints BEFORE removing spindles from the truck, Theres a LOT of factory hardware that is re-used so removing olds parts "with extreme prejudice" and flinging the hardware and parts out of the garage...into a dirt driveway...is NOT recommended. MOST IMPORTANTLY OF ALL:....make sure you have a 220 volt outlet in your garage before asking your fabricator buddy to bring his welder over to do a "quick" welding job. ...
As you can guess, things didn't go as smoothly as expected, certain steps I thought would be hard actually turned out to be painless, but the "Small" steps, like "Remove stock bushing sleeves from factory control arm" turned into impossible nightmares. Having a parts truck though, SAVED the day though, since we had destroyed an upper control arm mounting bracket while trying to remove the large nuts from the ends of the bracket. Which required a liberal coating of penetrating oil, and a 5ft long breaker bar extension.
We literally spent 12 hours straight, working on the suspension today. All we got done was complete removal of all stock parts, except the power steering box, ALL welding but the droop stops, and managed to get just one lower control arm mounted, and this was with 3 guys working on it all day....well, mostly two guys, the third kept playing angry birds on his phone and didn't help much...
I'll post build pics and give a more detailed progress report later, right now I'm tired and want nothing more than to sleep. In closing though, I will say this: DO NOT go head first into a project like this, and expect it to be "Easy" I read many many forums that covered very little details about suspension upgrades like this. So to ensure everyone is well informed, I'll be sure to cover every step of the project.
BUT, in the end, we did get a lot done, and got a good start to the build. Despite the delays, blisters, smashed thumbs and welding burns, we all had a lot of fun working on the truck, which is the most important part of any project.
 Jun 26, 2011 | 10:12 AM
#173
SICK! X2 on that^^^ Mak's right, .... that could be "bolt/weld" on kit that would DEFINITELY sell whatever you had time to make.
Just curious....don't think I'm criticizing, cuz I'm not, I KNOW NOT of these things... just looking and thinking....>>> Is that good to go for a straight impact with a tree or something? WIM is, .... would it taco into the hood because I don't see anything for support in the center, .....meaning, "straight back from the height of the original bumpers height to the sub frame..... thought maybe that would help, ...am I crazy? I know the fenders would take a lot of the blow, ...but just curious, HONEST, that's all.
PS> I LOVE that your stinger is around hood height! You gonna put lights in it?
Jun 26, 2011 | 12:59 PM
#174
Thread Starter
Registered User
Joined: Mar 2010
Posts: 413
Likes: 0
From: Mojave Desert, California
Thanks guys, me and the fab buddy definitely have profit on the mind seeing as how the fenders are getting so popular. Still gotta figure out the best way to sheet-metal them without covering up the tubing though.
The bumper right now, it a glorified brush-guard. The problem with these toyotas, is theres not a lot to weld on but the frame. the whole front clip of this truck is thin metal and plastic. Me and my buddy are still trying to figure out how to reinforce the bumper for any kind of front impact without filling the engine bay with tubing. Right now, the bumper is mostly to protect from bushes, and harsh landings. I'm thinking we'll be adding a winch plate and support to help beef it up though.
And, as promised, heres some pics:
Couple shots while out on the LAST 4wheeling trip with stock suspension. Despite trying really hard, nothing broke...I DID get body damage though, lol


photo bucket is being silly, so I can't post any TC build-up pics until later. For now...its back to the parts store...
The bumper right now, it a glorified brush-guard. The problem with these toyotas, is theres not a lot to weld on but the frame. the whole front clip of this truck is thin metal and plastic. Me and my buddy are still trying to figure out how to reinforce the bumper for any kind of front impact without filling the engine bay with tubing. Right now, the bumper is mostly to protect from bushes, and harsh landings. I'm thinking we'll be adding a winch plate and support to help beef it up though.
And, as promised, heres some pics:
Couple shots while out on the LAST 4wheeling trip with stock suspension. Despite trying really hard, nothing broke...I DID get body damage though, lol
photo bucket is being silly, so I can't post any TC build-up pics until later. For now...its back to the parts store...
Jun 27, 2011 | 01:49 AM
#176
Thread Starter
Registered User
Joined: Mar 2010
Posts: 413
Likes: 0
From: Mojave Desert, California
No problem Mark! I know you weren't takin crap, I saw it as more "A concerned for friend's safety" opinion
So today was much less productive, as most sundays are. The welder/fab buddy is now out with the flu, so we couldn't get the spindles and steering link bar drilled yet. For those who don't know, in order to install the Total Chaos gen 2. caddy kit, the top bolt whole (where the ball joint goes into the knuckle) is required to be drilled out to 3/4" diameter, and the steering link bar where the idler arm bolts to, has to be drilled out to 5/8"dia
Another possible FAQ I should mention, is that despite what anyone thinks, or how different the angles of the steering linkage look, a dropped pitman arm is NOT needed for this kit.
Really though, the biggest issues we've had with this install have been badly worn out, or faulty stock parts. The biggest of which was the upper control arm brackets.
As an extra precaution though, I made sure to replace ALL joints or badly worn parts in the front suspension while doing this install. I bought ALL new tie-rods, lower ball joints, steering stabilizer, and even a new power steering box and pressure lines....the lines however, came from necessity...
Which brings us to todays progress: Removal of the old power steering box. I'm pretty sure the old box was still the stock one from 87' O.o Considering it was leaking BADLY, I mean enough to coat the whole drivers side frame in fluid, cause a thick coating of dirt/grime that required a chizel and a few cans of brake-cleaner to remove. That and the steering had felt funny for a long time now. It was in the parts budget to replace, so I went ahead and did so. Unfortunately, the power steering pressure lines had been tightened down to the point of Never-coming-off-again ft-lbs of torque. SO they required cutting. I'm gonna take this moment to mention how nice it is having a buddy who wrenches, Always helps out, AND works at an autoparts store. I almost gave in for the day until he said "I can order the lines and get them to ya in a few days" so OUT came the Sawsall! The lines were cut off the truck, and then again at the box short enough to air-impact the fittings off. Though I'm still not looking forward to installing the new lines, because me and hard lines....don't like each other. Mostly due to the fact that whoever designed hardlines, decided to make them out of a material weaker than the wrench used to tighten them down, ALL while knowing you have to get the fittings EXTRA SUPER tight for them not to leak. Its like they were designed to specifically round off the fittings.....
Anyway, rant over now, the frame and all welds still need to be cleaned up and painted to prevent rusting. And also made the discovery that the rubber seals on the "Lock" and "Free" selector switch on my hubs are bad, causing the need to use pliers to lock in the hubs from dirt getting in. Cleaned them up as best I could and now must begin the search online for hub replacement parts...also because one axle didn't even have a certain specialty spacer/washer that fits between the spindle and the CV axle c-clip. Not entirely sure of the significance of said washer, having been wheeling this long without one....the rubber seals though are a much needed part.
Anyone know where I might find the above mentioned washer? Just in case it really IS an important part?
And as a closer for this post: Teaser build pics!
Torsion bars removed

Spindle knuckles removed:

EVERYTHING removed


and, pile-o-parts

So today was much less productive, as most sundays are. The welder/fab buddy is now out with the flu, so we couldn't get the spindles and steering link bar drilled yet. For those who don't know, in order to install the Total Chaos gen 2. caddy kit, the top bolt whole (where the ball joint goes into the knuckle) is required to be drilled out to 3/4" diameter, and the steering link bar where the idler arm bolts to, has to be drilled out to 5/8"dia
Another possible FAQ I should mention, is that despite what anyone thinks, or how different the angles of the steering linkage look, a dropped pitman arm is NOT needed for this kit.
Really though, the biggest issues we've had with this install have been badly worn out, or faulty stock parts. The biggest of which was the upper control arm brackets.
As an extra precaution though, I made sure to replace ALL joints or badly worn parts in the front suspension while doing this install. I bought ALL new tie-rods, lower ball joints, steering stabilizer, and even a new power steering box and pressure lines....the lines however, came from necessity...
Which brings us to todays progress: Removal of the old power steering box. I'm pretty sure the old box was still the stock one from 87' O.o Considering it was leaking BADLY, I mean enough to coat the whole drivers side frame in fluid, cause a thick coating of dirt/grime that required a chizel and a few cans of brake-cleaner to remove. That and the steering had felt funny for a long time now. It was in the parts budget to replace, so I went ahead and did so. Unfortunately, the power steering pressure lines had been tightened down to the point of Never-coming-off-again ft-lbs of torque. SO they required cutting. I'm gonna take this moment to mention how nice it is having a buddy who wrenches, Always helps out, AND works at an autoparts store
. I almost gave in for the day until he said "I can order the lines and get them to ya in a few days" so OUT came the Sawsall! The lines were cut off the truck, and then again at the box short enough to air-impact the fittings off. Though I'm still not looking forward to installing the new lines, because me and hard lines....don't like each other. Mostly due to the fact that whoever designed hardlines, decided to make them out of a material weaker than the wrench used to tighten them down, ALL while knowing you have to get the fittings EXTRA SUPER tight for them not to leak. Its like they were designed to specifically round off the fittings.....Anyway, rant over now, the frame and all welds still need to be cleaned up and painted to prevent rusting. And also made the discovery that the rubber seals on the "Lock" and "Free" selector switch on my hubs are bad, causing the need to use pliers to lock in the hubs from dirt getting in. Cleaned them up as best I could and now must begin the search online for hub replacement parts...also because one axle didn't even have a certain specialty spacer/washer that fits between the spindle and the CV axle c-clip. Not entirely sure of the significance of said washer, having been wheeling this long without one....the rubber seals though are a much needed part.
Anyone know where I might find the above mentioned washer? Just in case it really IS an important part?
And as a closer for this post: Teaser build pics!
Torsion bars removed
Spindle knuckles removed:
EVERYTHING removed
and, pile-o-parts
Jun 28, 2011 | 12:10 AM
#177
Thread Starter
Registered User
Joined: Mar 2010
Posts: 413
Likes: 0
From: Mojave Desert, California
I keep finding (or losing) more parts that need replacing it seems. I've now had to order new C-clip snap rings and spacers for the end of the CV axle that sticks out of the spindle because we've somehow lost the old ones.....That, and I discovered that the stock replacement lower ball joints I've had for over a year now, are actually two different, but still very crappy brands. They'll work as far as getting everything together and at least get the truck aligned, but much superior brand lower Ball joints will be getting ordered as well. As for everything else: Inner Tie Rods/ Pitman arm/ power steering lines arrive wednsday, coil over shocks (minus coil springs) arrive sometime this week. Until then theres plenty more work to be done. I'll update the pics tomorrow guys! Its a painfully slow process but shes gettin closer and closer to being complete
Jun 29, 2011 | 10:17 PM
#180
Dang, you ARE moving right along...."whatchu talkin bout willis??????" lol..... No, but really, it'll FLYYYYYY, Moze, just you wait. Soon as it's rolling, especially with all that crap out, you'll be 'ROLLIN', quick! ...OH YEAH ,..."And FLYING, TOO" HAHAHA.


