When you click on links to various merchants on this site and make a purchase, this can result in this site earning a commission. Affiliate programs and affiliations include, but are not limited to, the eBay Partner Network.
Really? The bosch O2 was one of the only O2s I could find that had a smaller size. Good to know, the Denso sensor I bought was too big to fit into the exhaust manifold. You have advice? I mean today the truck ran well, a little higher RPM at idle. There were no codes showing.
Amazon, RockAuto, & DensoUSA all sell the O2 for our trucks.
Why did you replace the O2, did you get a code, what was the code?
Sounds like you may have something else contributing to your issue. When you replace sensors, it is common practice to clear the codes after install.
IIRC, the O2 is tied into the VAFM and TPS, make sure they are operating correctly. In the case of these two sensors, you may not receive a code for a malfunction.
RBX, I replaced it as a preventative maintenance measure. No codes at all. So I'm struggling to determine what generation of 22R/22RE exhaust manifold I have because of the O2 sensors. I read on another thread that the O2 sensor holes are different shapes for different generations of manifolds. I purchased the correct O2 sensor for my year vehicle, however, the Denso O2 doesn't fit into the manifold. and now that I'm thinking about it, the sticker on the valve cover is a 22R sticker, so I'm wondering if the previous owner mix and matched parts when rebuilding the engine.
The engine runs well with the old O2, so I'm going to return back to that O2. There is a small misfire every once in a while, however the truck runs well overall. Maybe I go to a header soon so I can go to the correct denso O2 specially considering your comment about the less than stellar integration of non-denso electronics to a denso based electronic management system.
If it ain't broke don't fix it. Replacing sensors are not preventative maintenance, IMO. Change the fluids, plugs wires....computer stuff should be left alone unless failing.
Your engine could be from a different year, or a California emissions engine. Manifold could be a different year. Cross reference O2 sensors with different years and you will probably find the answer.
22R was carbed so it didn't have an O2 sensor(I could be wrong, but not sure how that would work). There is also a mod to put a 22R head on a EFI engine, but I have no experience with this. So I believe the valve covers would interchange.
I had a cracked manifold for a while that would heat up cherry red, I then went to Downey headers, my same O2 sensor swapped right over to it.
If you somehow have a CA emissions engine, the electricals for that generation OBD1 is screwy, and may be the source of problem. On the 49 state trucks of the OBD1, you can pretty much unplug all the emissions stuff without it complaining.
I converted a 22r to a 22re and was surprised to see it had an O2 Sensor. It was a California model 22r. It did have a mini computer in the drivers kick panel. Not sure how it operated but it did have a sensor. Non California models dont have the sensor from my experience.
Your 86 should use this sensor http://www.sparkplugs.com/product.aspx?zpid=17828 If you are having problems of the sensor going into the manifold, I suspect the wrong manifold. 85-87 had a single wire O2 sensor.
Like mentioned earlier, never use Bosch anything on Toyota. They may be great for domestic but are terrible for Toyotas.
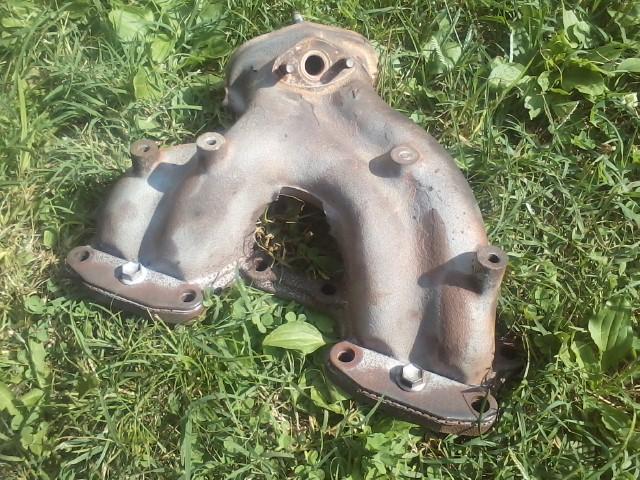
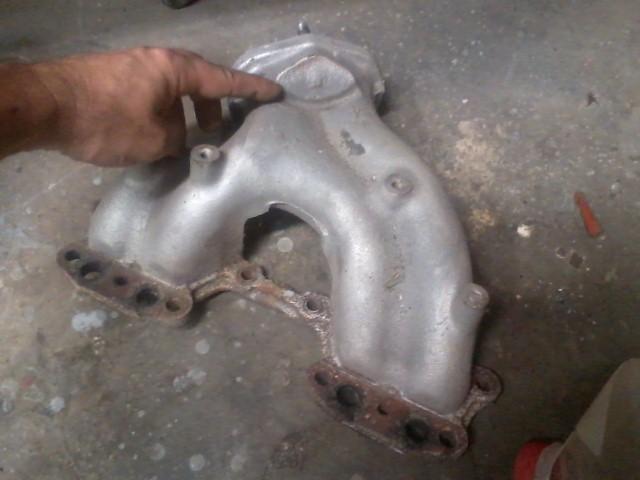
Seen you asking questions on another thread. Below is what a manifold for the 85-87 22re should look like. You dont by chance have a lot of carbon build up not letting the O2 sensor to slide in do you? As I understand, Dorman makes a great replacement for a exhaust manifold. Just make sure it has the holes for the O2 sensor. 88 and newer will have the Os sensor hole blocked off as their O2 Sensor is in the exhaust pipe by the transfer case.
So talked to the guy who owns 22REPerformance. What I believe I have is an aftermarket Exhaust Manifold that doesn't have the large enough hole for the OEM O2 Sensor made by DENSO. So I removed the bosch after noticing that it didn't run very well & after RBX made the comment about Bosch not meshing well with the Toyota Comps. No biggy, threw the old O2 in there and it runs like a champ like before.
How I will rectify down the road... pick up a aftermarket header with a bonge that allows for the DENSO OEM Sensor.
No issues currently!
Next topic. Threw in the nice new NAPA brand Upper & Lower BJs. Thought about putting in my 1.5" BJ Spacers, but decided not to. Relaxed the T-Bars waaaay down. So I am sitting at around 5" from the fender to the tire. I like it low!!!
This dude's 04 Taco is the inspiration to stay low, go wide & big... with tons of trimming.
Stuffed 35" with NO lift. I mean he updated his suspension, but with Zero lift from stock height.
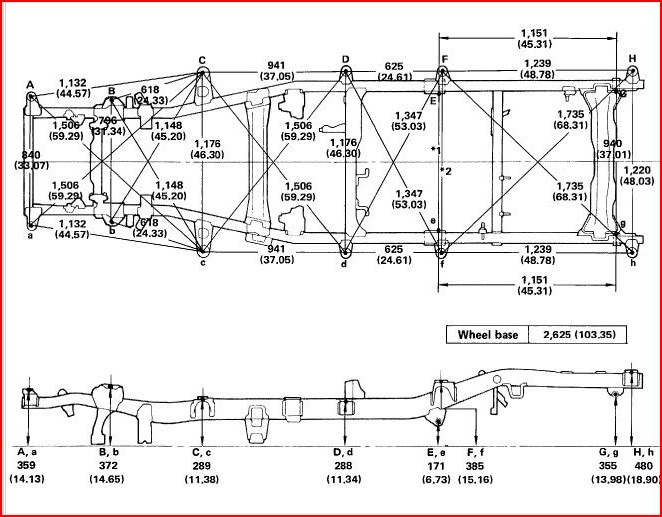
Anyways. I let the T-Bars down... replaced the upper and lower BJs, did NOT install the BJ Spacer. Trimmed the fenders some more, did more Pinch Weld smashing and got an alignment to max out the caster. I am finding that the Firestone can't get the Driverside front tire to get to 0* of camber... its sitting at like 0.3* so I'm wondering if the frame is tweeked or something. Not sure what to do about that, but it makes me nervous about spending money towards a BlazeLand LT instead of going SAS. Regardless, I wanna stay LOW!
Take a tape measure and 'X' bolts under the hood to determine if it's square. Do the same under the truck from factory frame bolts holes. Get a copy of the fsm with the frame dimensions.
Take a tape measure and 'X' bolts under the hood to determine if it's square. Do the same under the truck from factory frame bolts holes. Get a copy of the fsm with the frame dimensions.
just purchased a 22RE AFM from MTB_Taco, another local so I'll have the AFMs ready for bench work next weekend in prep for the SUPRA/cressida AFM swap. I also read up on malteserunner's 1987 T4R build and he picked up some silicone elbows from a website called siliconeintakes.com
(links straight to this badboy!)
The silicone bend is only $17, interior diameter is 3" reducing to 2 3/4" and the website has detailed outline of the measurements surrounding the entire item.
And I also put in the order for the circular filter mounting bracket last night along with some of those SR5 courtesy door light assemblies off ebay for $20 bucks which includes the lenses, the assembly and some bulbs.
I'm still waiting on Addicted Offroad to send out my rear bumper and sliders, so I'll focus on getting that irritating braking wobble out and some other small fixes inside the Runner.
I definitely need to clean up the engine bay some more. I'll post a picture of how gnarly the truck looks without the chrome over the wheel wells or how it looks with the relaxes T-Bars. I need to get rid of the 1" block lift in the rear too!
Thompson Toyota of Edgewood, MD told me my rotors were warped... they put those rotors on brand new 3 months ago... They wanted to charge me to fix work they failed to do correctly in the first place. Hopefully once they turn the rotors I will never have to return to that establishment. I pray that this will rectify my issue.
So I finally fixed the issue with the pulsating brake pedal. The rear drums were warped. I had to argue with Thompson of Toyota for about 15 minutes on the phone, then we finally came to a resolution. The Shop Manager took the truck out with the mechanic and determined that the rear drums were the issue, which they were relatively new. Regardless, I had them turned and bam, pulse gone. Also started working on the supra/cressida AFM swap. Turns out the 22RE AFM i got is not the correct one... so I'll be selling that and once I collect all of the goodies to do the battery swap too, then I'll pull the trigger. I prepped the supra/cressida AFM, put on my silcone 90* bend reducer. that thing is awesome. I've gotta grab some wire to match the AFM wire harness, then I'll move the battery to the other side, build an additional fuse block, do the big 3 upgrade, all in one weekend i guess. anyone have recommendations on high quality connectors, etc. Looking for websites where I can do a majority of my shopping for the battery/afm swap.
Here's the inside of the Supra/Cressida AFM. I removed the arm and de-soldered the connections to the pins. You can see there are 3x that you have to de-solder. You must be incredibly sensitive when moving the connection from these as the metal is flimsy and it will rip up from the board.
You can see how snug the 90* bend silicone reducer is. That is a 3" clamp that I had to modify a bit to get it to fit. I might recommend a 3 1/4" clamp for people who are gonna use these. You can get all of your goodies at siliconeintakes.com
Let me know if you need a hand doing any work. I'm in Baltimore and I just picked up an 89. It will be a little while before I can really start tackling my own truck but I'd be more than happy to give a hand.
how do people typically hold their batteries after a swap?
I need to grab 8ft of wire (unknown gage currently - advice?) for the afm harness. I'll extend the harness and piggy back on another part of the harness that is loomed and held under the top of the core support. I'll use that to carry the afm harness to the opposite side of the truck.
I'll bring the power for fuse box and a few other accessories to a secondary fuse block. Currently I power the fuse box, the subwoofer and the starter right off the battery.
I also need to run a new ground that runs to the block.
Now that I've been mocking up the Supra/Cressida AFM which forces me to move the battery to the driver side, I've started thinking about doing some wire harness management. Its starting to get crazy under the hood and I want to keep things clean, simple and safe. I've seen a lot of people go to a Blue Sea ST Blade series for their aux systems and they seem legit, so I'm leaning towards that as a hub.
Now, the question that I am still debating over is should I use a ST Blade Fuse Block - 6 Circuits with Negative Bus and Cover or should I use a ST Blade Fuse Block - 6 Circuits with Cover ? I'm inclined to use the Fuse Block with Negative Bus, but I don't believe that the T4R is wired in that same manner. Think about it, the Battery Negative Terminal is wired directly to ground (both on the block and the body). The Sub and all of the systems I can think about are wired in the same manner. So by deduction I feel like I should use that same design when setting this up.
As for battery terminals... I've been looking the NOCO TZKIT3 Lead-Free Military Grade Zinc Battery Terminal Kit because mine are trashed. The lead is deformed and they are incredibly difficult to remove.
Now I need to source all of the goodies. More to follow... I have two ten foot sections of this nice mil-spec 4 guage power wire...
has a nice braided shield over it and a high quality crimped bladed ring terminal on one end, just need to route and cut to length then crimp on a 2nd ring terminal.
So I'm looking for a clamp on style DRY (no-oil) air filter with a 3" interior diameter. OR, I need to grab the Supra/Cressida Air box.... and go with a paper filter.
I've also never had good luck with "high performance" air filters on my 5VZ-FEs... the oil never meshed well with the MAF sensors on those engines... so I figured I'll try to stick with stock filter like designs.
Feedback from 22RE Performance corroborates concerns. He said that looking for a paper filter or non-oiled filter is the correct thing to do, so I found the AEM 21-203BF-OS 3"x5" DryFlow Air Filter for $49 on amazon.
So I was putting the inner kick pannels back in the truck and I noticed that my carpet was damp on the passenger side (most likely due to my recent accidental window down mishap). So I pulled up the carpet to air it out. At the same time I figured itd be a perfect time to trouble shoot the passenger seat rails because the seat wouldn't release to move forward to let out passengers. Well after cleaning it, the slide rail fell apart. Even after trying to fix it, I gave up because I knew I wanted to do a seat upgrade anyways. After doing some research I found out that early 90's Honda Civic seats bolt right in. So I drove up to the local auto-junk yard in search for that whip. I spent about 40 minutes searching through all of the JDM cars and couldn't find a 90's Honda Civic two door, I did find late 90's Civic two doors, but the seats were trashed. Then I rolled up on this mid 2000's Acura RSX with a clean interior and nice seats. I pulled them real quick like, and asked to test the size. Boom BAM, fits snug as a bug, not too tall, in fact they sit about the same height as the 4Runner seats, the black covers didn't clash with the interior and the rails were about 1/2" off the width of the 4Runner rails. So I snagged them up, but they were more expensive because they had airbags. I'll remove the airbag assemblies and crazy seat belt assembly and sell them to get some money back. I'll also be selling the 4Runner seats to help re-coup on some money. Overall, pretty stoked about the recent pick up, just sucks that I ended up fixing something I wasn't planning on working on. I was really hoping to work on the AFM/Battery swap this weekend. Don't worry, pictures to come.

 Sep 4, 2015 | 04:44 AM