
Locked_SR5 1987 4Runner Build-Up Thread
 Jun 5, 2012 | 06:03 PM
#121
Registered User
Joined: Dec 2009
Posts: 2,762
Likes: 1
wow the motor is super clean. once you get it rebuilt. keep up on the oil changes with good oil. it should stay that clean under for a long time.
CBI Rear Bumper yoooouu SAY???? you better take tons of pictures. even if you dont wanna post them up. you can email them to me. i wanna see how the pieces are set and how much work it will be to put together. i been trying to get more info on these but im sure CBI doesnt wanna give out to much info so others dont copy it.
CBI Rear Bumper yoooouu SAY???? you better take tons of pictures. even if you dont wanna post them up. you can email them to me. i wanna see how the pieces are set and how much work it will be to put together. i been trying to get more info on these but im sure CBI doesnt wanna give out to much info so others dont copy it.
Jun 5, 2012 | 06:42 PM
#122
Thread Starter
Registered User
Joined: Aug 2010
Posts: 101
Likes: 1
From: Sacramento, CA
wow the motor is super clean. once you get it rebuilt. keep up on the oil changes with good oil. it should stay that clean under for a long time.
CBI Rear Bumper yoooouu SAY???? you better take tons of pictures. even if you dont wanna post them up. you can email them to me. i wanna see how the pieces are set and how much work it will be to put together. i been trying to get more info on these but im sure CBI doesnt wanna give out to much info so others dont copy it.
CBI Rear Bumper yoooouu SAY???? you better take tons of pictures. even if you dont wanna post them up. you can email them to me. i wanna see how the pieces are set and how much work it will be to put together. i been trying to get more info on these but im sure CBI doesnt wanna give out to much info so others dont copy it.
My build is on a public forum, so yes, I'll post pics of the CBI rear bumper on here, show the number of pieces, and maybe start a new thread on the assembly and install process.. I emailed them regarding my 1.5" body lift and they said to just incorporate that while you weld together
 ... I really like how the bumper is a hybrid of plate and tubing.. Goes really well with my ARB.. I think I'm going to have the front and rear bumper paint red to match the color of my truck, and I'm also going to incorporate some waterproof LED reverse lights into the rear bumper and for my rock lights. I want this 4Runner to be a sick-ass expedition/crawler/snow machine.. It's still a long way from where I want it to be and what its going to be..
 Jun 7, 2012 | 01:09 PM
#124
Thread Starter
Registered User
Joined: Aug 2010
Posts: 101
Likes: 1
From: Sacramento, CA
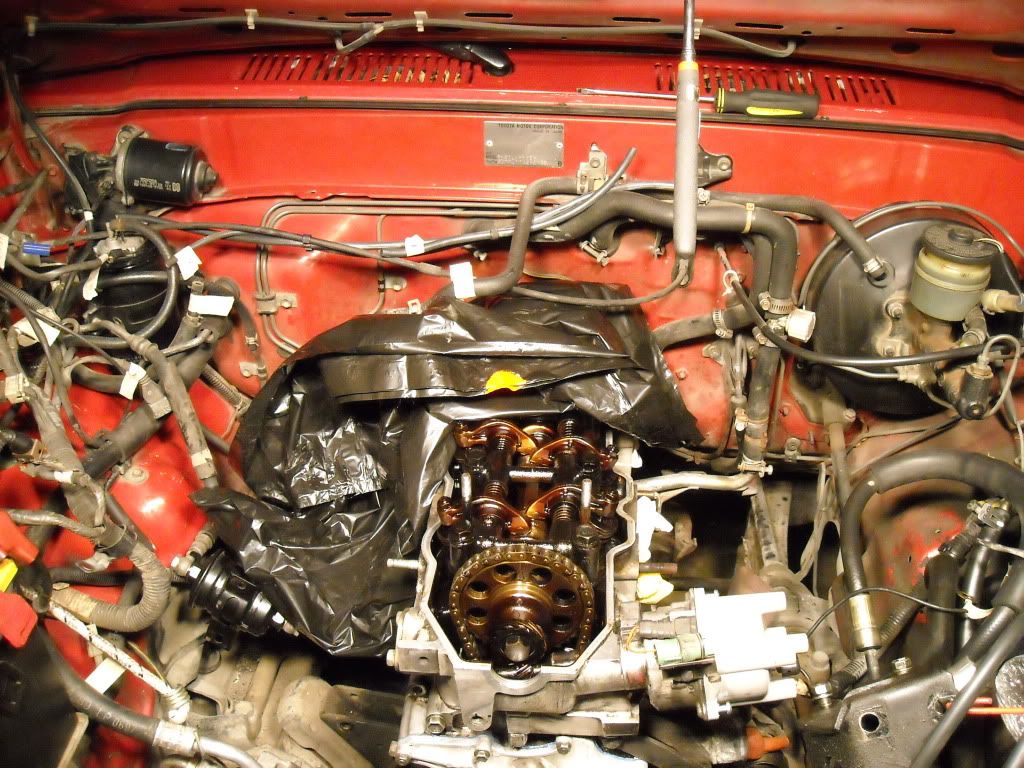
I dive into the 22re some more today.. I removed the exhaust manifold, disconnected the engine harness, spark plugs and the upper portion of the intake manifold..


This is my first time tearing into a 22re and would not know if the following pictures indicate a fouled or dirty MAF and intake manifold.. What do you guys think? What's a good way going about cleaning them?
Thanks


Before i start loosening the bolt heads, I need to make sure the engine is TDC and need to remove belts and associated equipment (power steering, etc).
This is my first time tearing into a 22re and would not know if the following pictures indicate a fouled or dirty MAF and intake manifold.. What do you guys think? What's a good way going about cleaning them?
Thanks
Before i start loosening the bolt heads, I need to make sure the engine is TDC and need to remove belts and associated equipment (power steering, etc).
Jun 8, 2012 | 12:46 AM
#125
Registered User
Joined: Dec 2009
Posts: 2,762
Likes: 1
for the intake manifold. if you remove it. you can soak it in a bucket of degreaser and water
for the throttle body, use some throttle body cleaner and a shop rag. can use this method for the intake manifold as well. its just oil and carbon build up. PCV dont work that well even when new.
for the throttle body, use some throttle body cleaner and a shop rag. can use this method for the intake manifold as well. its just oil and carbon build up. PCV dont work that well even when new.
Jun 8, 2012 | 10:40 PM
#126
Thread Starter
Registered User
Joined: Aug 2010
Posts: 101
Likes: 1
From: Sacramento, CA
for the intake manifold. if you remove it. you can soak it in a bucket of degreaser and water
for the throttle body, use some throttle body cleaner and a shop rag. can use this method for the intake manifold as well. its just oil and carbon build up. PCV dont work that well even when new.
for the throttle body, use some throttle body cleaner and a shop rag. can use this method for the intake manifold as well. its just oil and carbon build up. PCV dont work that well even when new.
Jun 8, 2012 | 11:14 PM
#127
Thread Starter
Registered User
Joined: Aug 2010
Posts: 101
Likes: 1
From: Sacramento, CA
Ok.. More progress today.. I have the head completely off..
The whole process seemed pretty straight forward and relatively easy.. Since the main reason I tore into the engine this far was the over heating and the fact that there was a heagasket leak near the 3 and 4 cylinders, would it be advisable to inspect the water pump and how would I know if the water pump isn't good?
Ok, back to the tear down.. I removed the head bolts according to manufacturer recommendations and noticed that the #2 bolt of that process wasn't as tight (torqued) as the others and so happens to be where the leak occurred. As evident in one of the pics you can see the emulsification of the oil and coolant on the bolt..
so with that said, I know you guys want pics..
head bolts removed and ready for head removal..

The head off.. pistons showed no damage or carnage.. That's always good to see.. I have a question regarding carbon deposits on top of pistons.. The #1 and #4 have very little to no carbon build up while the #2 and #3 pistons do.. Why the difference?

Picture of the #2 cylinder.. Seemed to be in good condition and no scaring or grooves on them.. However I do not see any hone markings. Should they still be evident if the motor was rebuilt 27k ago? #2 and #3 cylinders look like this and haven't rotated the crank to get those pistons flush so I can clean the carbon deposits and inspect the cylinder walls on #1 and #4..

Here is the emulsification I was talking about.. No doubt there was a headgasket failure.. Funny thing was, there wasn't obvious evidence of it.. The gasket was an MLS, so could it failure been between the layers? (that one head bolt wasn't that tight. I dunno

Ok.. Now to the head, and the intake/exhaust valves.. When looking at the bottom of the head, the #1, 2, and 4 have a similar apperrance, however the #3 has an wet look to it (the #3 sparkplug looked moist too, like it was fouled). Would water from the failed head gasket caused this and the misfire I previously posted about? Any input is welcome..

Here is a close up of the #3 and 4 valves.. Forgot to mention that the exhaust? valve on #4 has a different color from the others? what are the possible causes or is this of no concern?

Final thought.. what else should I look at regarding the cooling system? Thus far I will be replacing the headgasket and inspecting the water pump (replacing if needed). I just want to make sure I can drive the truck long enough so it'll pass smog in August.. Thanks all..
The whole process seemed pretty straight forward and relatively easy.. Since the main reason I tore into the engine this far was the over heating and the fact that there was a heagasket leak near the 3 and 4 cylinders, would it be advisable to inspect the water pump and how would I know if the water pump isn't good?
Ok, back to the tear down.. I removed the head bolts according to manufacturer recommendations and noticed that the #2 bolt of that process wasn't as tight (torqued) as the others and so happens to be where the leak occurred. As evident in one of the pics you can see the emulsification of the oil and coolant on the bolt..
so with that said, I know you guys want pics..
head bolts removed and ready for head removal..
The head off.. pistons showed no damage or carnage.. That's always good to see.. I have a question regarding carbon deposits on top of pistons.. The #1 and #4 have very little to no carbon build up while the #2 and #3 pistons do.. Why the difference?
Picture of the #2 cylinder.. Seemed to be in good condition and no scaring or grooves on them.. However I do not see any hone markings. Should they still be evident if the motor was rebuilt 27k ago? #2 and #3 cylinders look like this and haven't rotated the crank to get those pistons flush so I can clean the carbon deposits and inspect the cylinder walls on #1 and #4..
Here is the emulsification I was talking about.. No doubt there was a headgasket failure.. Funny thing was, there wasn't obvious evidence of it.. The gasket was an MLS, so could it failure been between the layers? (that one head bolt wasn't that tight. I dunno
Ok.. Now to the head, and the intake/exhaust valves.. When looking at the bottom of the head, the #1, 2, and 4 have a similar apperrance, however the #3 has an wet look to it (the #3 sparkplug looked moist too, like it was fouled). Would water from the failed head gasket caused this and the misfire I previously posted about? Any input is welcome..
Here is a close up of the #3 and 4 valves.. Forgot to mention that the exhaust? valve on #4 has a different color from the others? what are the possible causes or is this of no concern?
Final thought.. what else should I look at regarding the cooling system? Thus far I will be replacing the headgasket and inspecting the water pump (replacing if needed). I just want to make sure I can drive the truck long enough so it'll pass smog in August.. Thanks all..
Jun 8, 2012 | 11:17 PM
#128
Another thing you can do for the intake is ...... "POWER STEAMER AT THE CAR WASH" LOL... Seriously, Travis and a couple other guys on here did that. Worked great. They put it on the hot setting and just blasted the heck out of it once they had soaked it a lil bit. I think they brought the bottle brushes with them and gave the runners a few good reaming...
Just be careful, even with Throttle Body Cleaner, when cleaning the TBody... That TPS is sensitive, man.... Don't wanna soak it with any cleaners. ALTHOUGH, that one IS the quickest drying and eats that hardened carbon pretty well, while being pretty gentle on the rest. Just try not to give the TPS a bath, if you are leaving it on.
Best wishes, man... tore these things down 5 times in 2 years! lol. (No, I swear, it wasn't by my error, ..... which really makes me even more ticked! lol).
Watching and anxious FOR ya!
Jun 8, 2012 | 11:30 PM
#129
Thread Starter
Registered User
Joined: Aug 2010
Posts: 101
Likes: 1
From: Sacramento, CA
Another thing you can do for the intake is ...... "POWER STEAMER AT THE CAR WASH" LOL... Seriously, Travis and a couple other guys on here did that. Worked great. They put it on the hot setting and just blasted the heck out of it once they had soaked it a lil bit. I think they brought the bottle brushes with them and gave the runners a few good reaming...
Just be careful, even with Throttle Body Cleaner, when cleaning the TBody... That TPS is sensitive, man.... Don't wanna soak it with any cleaners. ALTHOUGH, that one IS the quickest drying and eats that hardened carbon pretty well, while being pretty gentle on the rest. Just try not to give the TPS a bath, if you are leaving it on.
Best wishes, man... tore these things down 5 times in 2 years! lol. (No, I swear, it wasn't by my error, ..... which really makes me even more ticked! lol).
Watching and anxious FOR ya!
Just be careful, even with Throttle Body Cleaner, when cleaning the TBody... That TPS is sensitive, man.... Don't wanna soak it with any cleaners. ALTHOUGH, that one IS the quickest drying and eats that hardened carbon pretty well, while being pretty gentle on the rest. Just try not to give the TPS a bath, if you are leaving it on.
Best wishes, man... tore these things down 5 times in 2 years! lol. (No, I swear, it wasn't by my error, ..... which really makes me even more ticked! lol).
Watching and anxious FOR ya!
Jun 8, 2012 | 11:47 PM
#130
Water pump? ; Look for seepage out the weep hole in the bottom, that's a tale tell sign. Also, if the turning of it hangs up in spots or makes a lil bit of 'squeeek' noise... That's not really good either. Mine have always, new, sounded very quiet and turned smoothly.
Cooling? ; I would DEFINITELY replace the o-ring on that wrap around pipe that you removed from the intake. That thing is NOTORIOUS for leaking once you try to button it back up. Don't use any sealer, nothing, just get a new 0-ring gasket at the dealer for 3.50$ and call it a day(it's a crush type o-gasket, and it probably stayed sealed all this time, right? But the second it hits air, it can start to harden VERY fast.) Mine was pretty tough, but I tried to reuse it(I had no idea) and VERY LUCKILY, I managed to get the fuel filter backed out(the pipe goes behind the fuel filter) and then lowered the pipe once I loosened the head block plate bolt that holds in it, then replaced the bolts with studs, slid the pipe back on with the new o-ring, .... AND IT LEAKED AGAIN! lol... Luckily, I had the studs in, which made it very easy to get into place when doing it AGAIN,.... And I found out, I cleaned the pipe too much, which wore away electrolysis that was, well, basically a 'seal' around the bead of copper/aircraft aluminum or whatever it is/at the flange-riser area. TOTA PITA! lol... So rule is, ... 1. replace the o-ring and 2. don't over clean that pipe, especially at the flange area
I also replaced all those coolant lines and clamps... Found some nice clean clamps at the pick-your-part..... PLENTY, and yoinked em/used em when I tore the motor out. Got all new hoses, between the dealer and the O'Reilly. Some of those, especially off the intake/timing cover, are pretty hard to get to, thereafter. Just felt better doing it. DON'T HAVE TO do it, I know, lol.... But I just redid all the vacuum and coolant hoses. They were dry and hard as a baseball bat in some cases, lol. Get a new Stat, too, obviously.
It should look like this when you're done>>>
http://lh6.ggpht.com/-U5yDTibwX5o/Sw...QQ/22r1mm3.JPG
HAHAHAHA! JK, ... So many nice pics to browse at out there, couldn't resist.
You think you had some blow by? Looks like a couple exhaust valves were normal and couple were VERY blackened/possibly heavily caked with carbon, right? Looks like a couple holes were a bit hotter than the others. Original intake valves on yours, but not sure on the exhaust(valves)... I think I have some pics of pretty normal burning head(from the bottom) at 254K.... If I find em I'll toss em to ya.
Best wishes, I'll be sure to toss any tips I can remember your way.
Jun 8, 2012 | 11:54 PM
#132
Can't remember, ... this motor was rebuilt?(the head was?) Normal tanning on the top end at higher miles... well, looks like a Bad Orange Tanning Booth Tan, hahaha...
So just curious as to what was done to this before?
So just curious as to what was done to this before?
Jun 9, 2012 | 08:40 PM
#133
Thread Starter
Registered User
Joined: Aug 2010
Posts: 101
Likes: 1
From: Sacramento, CA
Chef, where is this weep hole on the water pump you were talking about?
Ok.. more updates... I took the head to a machine shop to have it cleaned, checked for cracks, do a leak down, and see if there is any warping..
I spoke with the owner of the shop and asked him about the #3 cylinder valves.. he said to check to see if there is any blow-by on the rings.. said to put some tranny or gear oil in the cylinder and see if any passes the piston rings over a long period of time..
I checked after ten hours and no change to level of oil.
Also, finished cleaning the carbon off the pistons and found this...

0.20 stamped on the piston, so the motor was definately rebuilt, which is good to hear.. The motor is basically new and have visible proof the engine was rebuilt (even though I don't have paperwork for it).. So as of now the body of the runner has 206K, 27K on the rebuilt motor, and zero miles on front and rear thirds, trunion bearings and all wheel bearings.. sweet!
Ok.. more updates... I took the head to a machine shop to have it cleaned, checked for cracks, do a leak down, and see if there is any warping..
I spoke with the owner of the shop and asked him about the #3 cylinder valves.. he said to check to see if there is any blow-by on the rings.. said to put some tranny or gear oil in the cylinder and see if any passes the piston rings over a long period of time..
I checked after ten hours and no change to level of oil.
Also, finished cleaning the carbon off the pistons and found this...
0.20 stamped on the piston, so the motor was definately rebuilt, which is good to hear.. The motor is basically new and have visible proof the engine was rebuilt (even though I don't have paperwork for it).. So as of now the body of the runner has 206K, 27K on the rebuilt motor, and zero miles on front and rear thirds, trunion bearings and all wheel bearings.. sweet!
 Jun 10, 2012 | 08:05 PM
#135
Thread Starter
Registered User
Joined: Aug 2010
Posts: 101
Likes: 1
From: Sacramento, CA
Well, after 24 hours of letting the tranny oil sit in the #2 and #3 cylinders, I am pretty confident that the rings are good and do not have any blow by on the rings.
I also cleaned the block and removed the portions of the headgasket graphite by sanding with 600 grit wet sanding paper. I also went and cleaned the carbon buildup on the pistons..
Good as new

With the block done and waiting for the head, I compared the old headgasket with the new one.. notice the difference? Less reinforcement around the rings. Maybe that is why there was a headgasket failure..
Top is new, bottom is old

I also cleaned the block and removed the portions of the headgasket graphite by sanding with 600 grit wet sanding paper. I also went and cleaned the carbon buildup on the pistons..
Good as new
With the block done and waiting for the head, I compared the old headgasket with the new one.. notice the difference? Less reinforcement around the rings. Maybe that is why there was a headgasket failure..
Top is new, bottom is old
Jun 10, 2012 | 08:50 PM
#136
Wow, you did like me and went ALL crazy with the cleaning! hahaha. JK... looks great!
BTW, .... you chased those head bolt holes well, right sir? Couple of them were looking PREEEEEETTY caked with stuff begging to be ..... , yes, you guessed it... more....'CLEANING' hahaha.
Meh, just curious what the plan is.
He's checking the head right now? Hot tanking it? Checking valve guide clearances, etc.? New Seals while you're in there?
BTW, .... you chased those head bolt holes well, right sir?
Couple of them were looking PREEEEEETTY caked with stuff begging to be ..... , yes, you guessed it... more....'CLEANING' hahaha. Meh, just curious what the plan is.
He's checking the head right now? Hot tanking it? Checking valve guide clearances, etc.? New Seals while you're in there?
Jun 11, 2012 | 05:39 PM
#137
Thread Starter
Registered User
Joined: Aug 2010
Posts: 101
Likes: 1
From: Sacramento, CA
Wow, you did like me and went ALL crazy with the cleaning! hahaha. JK... looks great!
BTW, .... you chased those head bolt holes well, right sir? Couple of them were looking PREEEEEETTY caked with stuff begging to be ..... , yes, you guessed it... more....'CLEANING' hahaha.
Meh, just curious what the plan is.
He's checking the head right now? Hot tanking it? Checking valve guide clearances, etc.? New Seals while you're in there?
BTW, .... you chased those head bolt holes well, right sir?
Couple of them were looking PREEEEEETTY caked with stuff begging to be ..... , yes, you guessed it... more....'CLEANING' hahaha. Meh, just curious what the plan is.
He's checking the head right now? Hot tanking it? Checking valve guide clearances, etc.? New Seals while you're in there?
Yes, I cleaned and chased the head bolt threads in the block. The machine shop called me and told me the head was ready.. The PO said the head was rebuilt so I didn't check the valve guides... He just checked for cracks, cleaned, pressure tested, and put a vacuum on the valves..
 dancing!


