When you click on links to various merchants on this site and make a purchase, this can result in this site earning a commission. Affiliate programs and affiliations include, but are not limited to, the eBay Partner Network.
i need to do something like that. being able to get a nice welder for projects would be great.
i had previously been using a handy box fed by a 4 wire sjoow cord with a male twist lock plugged into a female twist lock on another length of sjoow wired into my main house panel. it brought 2 legs of 220, neutral, and ground to the garage to get the job done since the flood. this is s nice permanent improvement
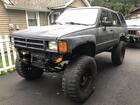
i drove it to work today!!!
it fired right up
brakes feel pretty good
need to re-center the steering wheel a little, but toe adjustment seems ok
height seems ok front to back so i'll probably trim the u bolts
but yeah, feels good after not driving it for over 2 years
got my ubolts cut off in a tremendously not pretty fashion
installed my new side view mirrors
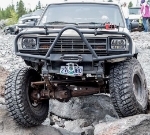
put some temporary blinkers on the front until i get my bumper made. they draw less than the stock ones so my blinkers hyperflash
research says 3 prong EP35 electronic load insensitive flasher (works with leds) or modify stock one according to:
if you happen to have the older flasher, 81980-16010, it doesn't seem to lend itself to modification, but the above 81980-22070 is a direct replacement. i will report back.
i got my new driver seat installed, and i'm pretty happy with the result
what i thought was adjustable lumbar was actually a raise/tilt function (which still works, along with slide and recline)
i unbolted the stock seat bottom from the stock slider, then cut off the vertical part that bolted to the stock seat back
i drilled out the pins holding the new seat to its sliders
then bolted the new seat to the old sliders
i machined 2 shouldered spacers for the front two mounts
stock sliders bolted back to stock location
seat is a little higher, but definitely comfortable
passenger seat up next
i also ordered a set of hinges from 4xinnovations as my driver side is so worn the door sags by a good half inch and its starting to ruin the latch
Seat looks pretty good. I scrolled back up again, but couldn't find what it came from?
i was told they are from an '05 rav4, no reason to doubt the seller, but i'm taking their word.
using the sliders from the rav4 seat made them sit waaayyyy too high, but with the stock sliders its good. i think most tacoma seats would have been a more straightforward swap, but i never found any black ones in my price range.
i replaced the driver side hinge, what a pain in the neck that was.
came out pretty good in the end, but since the passenger side isn't sagging, im going to leave that one alone until it wears, i want the doors off, or i make tube doors.
i also ordered a new heater control faceplate decal online from olathe toyota, as my faceplate survived but not the decal.
toyota part number 81942-89102
i got the passenger side seat in today. you have to use the recline handle to tilt it forward, and a new lever under the seat to slide it forward the way the stock seat would have. i did the same thing i did on the other side, cut the sliders off both and bolted together.
so i took a chance on some ebay roof mount grab handle repro's from thailand meant for an ln56, as i could not find a used or new grey one specified for my truck. i wanted one on the driver's side. the 6mm-1.0 tapped threads are hiding behind the headliner, in the same spot they are on the passenger side. i found them and poked through with an awl. the new handles had a bolt hole center of 150 mm, while my truck had 160 mm spacing. i did some drilling and filing, and used a 6mm bolt with a larger than factory head, and ended with this:
i had replaced my grille years ago with a non-oem one, and had decided it would be cool to omit the badge. it had been hanging on the wall of my garage and i decided i wanted to put it on the new grille on the truck.
i also started on my rear bumper. it is 2x4x3/16, laid down so bumper will be 2 high, 4 deep. i frenched in a spot for a receiver. i cut the ends on a curve that match the curve of the body right above where the ends are. they will get capped with the 2 pieces of strap. i have 2 pieces of rod to bend for safety chain attachments. i am adding a border of square stock around the end of the receiver to reinforce it. the whole assembly will get welded to the brackets on my frame caps, and then i will add two as-yet-undetermined diagonal pieces back to the frame for reinforcing/triangulation.
i got my all-pro transfercase parking brake installed. as per instructions, i checked the newer style wilwood caliper that came in the kit, and it was assembled with the lever facing left instead of right, i assume LH vs RH parts. i followed the instructions all-pro has on their website to re-orient the lever. i attemped to install it on my t-case, only to realize the instructions have you face the arrow the wrong way, meaning the return spring applied the brake and the cab handle released it. so everything came back out/apart to re-orient the lever with the arrow facing the opposite way. it took some time to get it adjusted, but it seems to hold pretty well. their site is correct, there is interference between the rotor and a reinforcement under the body because i have a 4runner with dual cases and no body lift. the location where the cab cable mounts to its bracket must have been on the torsion bar mount because i had cut it off, but saved it, thankfully. i bolted it to the frame after measuring and testing with it clamped there. not sure if it would have worked without moving this bracket because of the dual cases.



 May 3, 2021 | 05:24 PM