
ChefYota4x4's 1987 4Runner Build-Up Thread
 Jun 7, 2011 | 07:45 AM
#2482
Thread Starter
Registered User
iTrader: (5)
Joined: Jun 2009
Posts: 19,281
Likes: 20
From: Lake Havasu, AZ
Thanks, guys..... (and, I saved that link, RB )....
)....
I'm just having a lil trouble with those t-cover gaskets. Have to get some this AM, or at least the passenger side(as the driver side one seems to fit fine?????????)
Just to be clear again;
** When I TRY to line up the gasket over ALL the bolt holes...(just test fitting),.... it bows in the middle slim section fairly badly. I can't see it working, in other words. **
)....I'm just having a lil trouble with those t-cover gaskets. Have to get some this AM, or at least the passenger side(as the driver side one seems to fit fine?????????)
Just to be clear again;
** When I TRY to line up the gasket over ALL the bolt holes...(just test fitting),.... it bows in the middle slim section fairly badly. I can't see it working, in other words. **
Jun 7, 2011 | 07:56 AM
#2484
Registered User

Joined: Jan 2010
Posts: 3,795
Likes: 33
From: Bloodymore
Do you mean the Timing Cover gaskets?
Smear a thin coat of grease on them, or RTV(but that is time sensative) to hold them in place. I used RTV, because i was putting mine on, not test fitting.
Good luck
Smear a thin coat of grease on them, or RTV(but that is time sensative) to hold them in place. I used RTV, because i was putting mine on, not test fitting.
Good luck
Jun 7, 2011 | 08:08 AM
#2485
Thread Starter
Registered User
iTrader: (5)
Joined: Jun 2009
Posts: 19,281
Likes: 20
From: Lake Havasu, AZ
Brandon, ...yeah, they're pretty unique actually, ...the passenger side has several more bolt holes and has more gasket material because of the oil pump galleys, etc. Thanks though...always worth mentioning.
RB, ... Yeah, I don't want to try and force it.... it's just not lining up. Even down by the oil pump galleys, ..... aside from the upper bolt holes(coolant) and lower(oil pump galleys), even when I'm just placing the gasket over the bolt holes around the oil pump galley, ....the portion where the larger hole is, over the Large Oil Port, .....it's covering the top 1/8" or so of that oil pump port... That is VERY likely to leak, even if I did get the bolt holes to line up.
I PROMISE I'm not being paranoid, B, lol.... I'll get pics if I can before I install one that is shaped properly. This is why I went and got the Toyota Gasket, last time, ....because this one I had left over from the original rebuild just wouldn't line up, not even on the other block.
Jun 7, 2011 | 09:07 AM
#2487
Chef.. You going with your original engine color pattern? I tried to copy it on mine but couldnt keep it clean and get it shiny as yours was. Jason in tn did about the same and they look great.
Hope this goes alot smoother for you on this build. Looking forward to hearing it run.
Hope this goes alot smoother for you on this build. Looking forward to hearing it run.
Jun 7, 2011 | 09:42 AM
#2488
Thread Starter
Registered User
iTrader: (5)
Joined: Jun 2009
Posts: 19,281
Likes: 20
From: Lake Havasu, AZ
I will do so before installing the new ones......... btw, ......>>
** ROCK; GUY IN CHARGE OF CUTTING THE HOWEVER MANY GASKETS THAT DAY?>> stoned and drunk!
** FELPRO; DEAD ON DIRECT FIT!
Original is Dull Aluminum on the block? I thought they were always black, no? Anyway, .... yeah, I think these cans of aluminum paint I got for the block, being a different brand, are a lil shinier. I will see when I get the intake on. But they're close? lol. Thanks alot, buddy! Appreciate the compliment. To be honest, after all I've had to contend with? ..... COULD BE PINK, AND I WOULDN'T CARE! lol... >I just happened to have 2 cans of a different brand, I think,.... that I didn't use last time. So, why buy more red, right? lol. I liked the red, but I think the aluminum will note leaks better, don'tcha think? Hope so, lol.
** ROCK; GUY IN CHARGE OF CUTTING THE HOWEVER MANY GASKETS THAT DAY?>> stoned and drunk!
** FELPRO; DEAD ON DIRECT FIT!
Chef.. You going with your original engine color pattern? I tried to copy it on mine but couldnt keep it clean and get it shiny as yours was. Jason in tn did about the same and they look great.
Hope this goes alot smoother for you on this build. Looking forward to hearing it run.
Hope this goes alot smoother for you on this build. Looking forward to hearing it run.
Jun 7, 2011 | 08:29 PM
#2490
Thread Starter
Registered User
iTrader: (5)
Joined: Jun 2009
Posts: 19,281
Likes: 20
From: Lake Havasu, AZ
Hey guys! 
Well, the long block is together. I had to do a party for the Women's California Volleyball Association... Oh what a tough world! hahahaha! I'll just leave it at that
Before I left, I realized I didn't do the corners on the block before the head goes on.... so LUCKILY I hadn't bolted down the head yet! hahaha. Yoinked it, and GOD WILLING, the chain didn't move off the bottom sprocket. I worked with the tensioner and let the sprocket turn counter clockwise and down into the 'between the guides' trick, dabbed the corners and then back on with the head.
Anyway, ... I HOPE it all went smoothly, and I wont KNOW until it's runnin,....so tomorrow, hopefully, I'll slap it in.(Still have to clean the oil pan I have out and paint it, ... I'll probably stay up late to do that tonight, after adjusting the valves. I got some pics, but can't post them till I get the camera back....)
Just thought I'd stop in and say thanks, ........... soooo, ... "thanks" lol.
Jun 7, 2011 | 11:13 PM
#2492
Thread Starter
Registered User
iTrader: (5)
Joined: Jun 2009
Posts: 19,281
Likes: 20
From: Lake Havasu, AZ
Hahahahahaha...... Yeah, I needed that! WOW, what a day.
OK, well, looks like I missed your deadline, Dutch, ....sorry man! haha.
haha.
But, head is on, valves adjusted, cam and adjusters Crane Lubed..... and HOLY CRAPOLI AM I WIPED OUT! Lol.
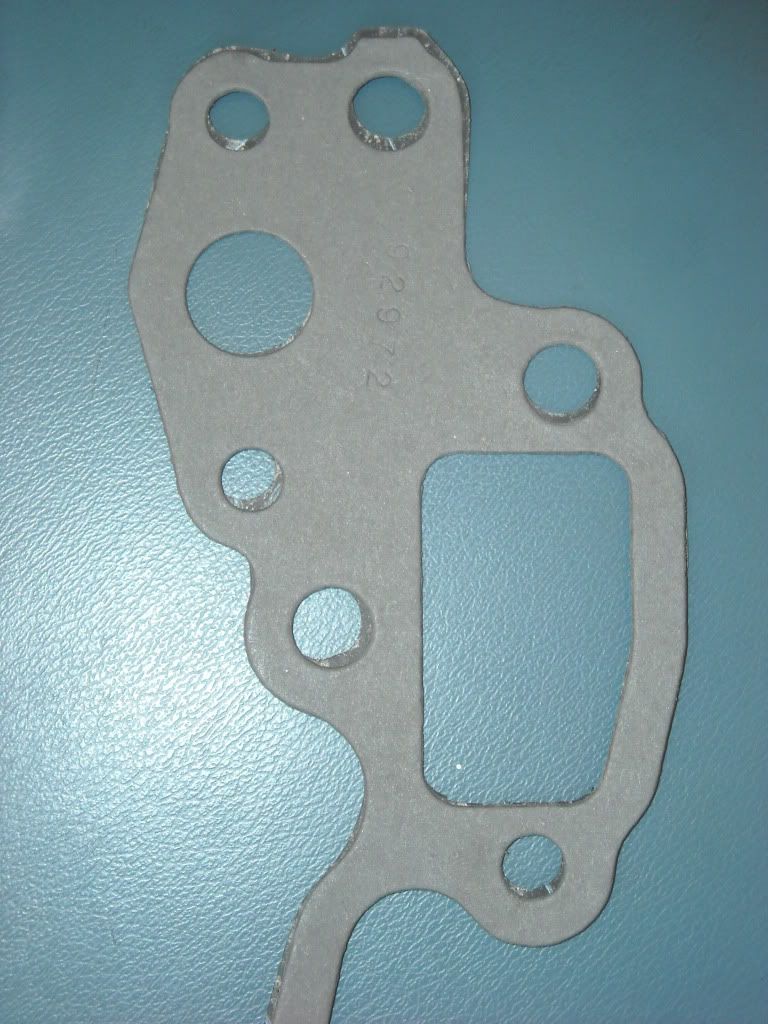
Here is the gasket... The felpro is on top, and I snapped a pic of the difference before I installed it...
Here is Old'new Betty! lol...........

This was before I left to do a 3 hour appearance at the banquet, ...then I came back, posted on here and went right out and, first, adjusted the valves, then I spent another 2 hours, til 20 min ago, trying to clean up this oil pan I just got......... GOOD LORD! Anyway, it's ready to paint tomorrow, then I'll bake it under the halogens, .....then it's on and this sucker SHOULD be up in the air, time allowed!
PS> I stopped by RC Engineering(Injector Pro's).... the day I was picking up the head... dropped them off, then picked them up..... he tested them, and after only 5K miles, not surprisingly, they all tested 186.2, give or take .2 on all four. At least I can plug those in and not have to worry. Hmmmmmmm, ....yeah, that's it for now, ... up at 5am to prep, serve then clean up, then back to it at around 8am(yeah, ...they've got guests, ....so no 'FULLY DAY OFF, HAVE FUN WITH THAT' from them, sadly! lol.
OK, well, looks like I missed your deadline, Dutch, ....sorry man!
haha. But, head is on, valves adjusted, cam and adjusters Crane Lubed..... and HOLY CRAPOLI AM I WIPED OUT! Lol.
Here is the gasket... The felpro is on top, and I snapped a pic of the difference before I installed it...
Here is Old'new Betty! lol...........
This was before I left to do a 3 hour appearance at the banquet, ...then I came back, posted on here and went right out and, first, adjusted the valves, then I spent another 2 hours, til 20 min ago, trying to clean up this oil pan I just got......... GOOD LORD! Anyway, it's ready to paint tomorrow, then I'll bake it under the halogens, .....then it's on and this sucker SHOULD be up in the air, time allowed!
PS> I stopped by RC Engineering(Injector Pro's).... the day I was picking up the head... dropped them off, then picked them up..... he tested them, and after only 5K miles, not surprisingly, they all tested 186.2, give or take .2 on all four. At least I can plug those in and not have to worry. Hmmmmmmm, ....yeah, that's it for now, ... up at 5am to prep, serve then clean up, then back to it at around 8am(yeah, ...they've got guests, ....so no 'FULLY DAY OFF, HAVE FUN WITH THAT' from them, sadly! lol.
Jun 8, 2011 | 06:23 AM
#2494
Registered User
Joined: Apr 2011
Posts: 428
Likes: 0
From: Southern Ontario
If you'd made my "deadline" it would only make me a hypocrite for not making the ones i give myself. Lot.s of really good steady progress here Chef. I'm rooting for you.
Last edited by Dutchbelly; Jun 8, 2011 at 08:14 PM.
Jun 8, 2011 | 06:31 AM
#2495
Registered User
Joined: Mar 2010
Posts: 413
Likes: 0
From: Mojave Desert, California
Chef, Your a machine! Great progress man! Whats your secret though, lol, seriously, I've tried functioning after just 4 or 5 hours of sleep and failed, lol. Keep up the good work man!
Jun 8, 2011 | 06:37 AM
#2496
That thing is looking great, looks like a new motor. Be glad you didnt forget to get the sealant on the corners. It would come back and haunt you.
You get alot done in a day from work to your motor. You dont let the grass grow under your feet. Great work.
You get alot done in a day from work to your motor. You dont let the grass grow under your feet. Great work.
Jun 8, 2011 | 07:48 AM
#2497
Thread Starter
Registered User
iTrader: (5)
Joined: Jun 2009
Posts: 19,281
Likes: 20
From: Lake Havasu, AZ
Hey Dudes! lol.....
Ok, I'm almost done for the morning with work, getting out to the rig, SOON, HOPEFULLY!
Seriously, thanks, so much, for giving me encouragement.... I need it, as, ...and I promise I'm not whining.... I'm REALLY physically hurting a bit, lol.... Just pushing myself a lil too much lately, I guess. lol. Far as the pace, lol..... I know NOTHING else but "GOOOOO" and "I MUST WIN" hahahahaha. The 'I must win' portion, .....that's mostly regarding INANIMATE OBJECTS!!! haha.... Geeesh, .... I hope it didn't hear me!!!!! .........lol.
I'll get pics as I can, Yota-Homies, ...
Mark
Jun 8, 2011 | 07:52 AM
#2498
Thread Starter
Registered User
iTrader: (5)
Joined: Jun 2009
Posts: 19,281
Likes: 20
From: Lake Havasu, AZ
PS> I have to add that, ......SO FAR, I'm really GRATEFUL that not a single bolt hole thread has given me TOO much trouble! I was really concerned about that, ya know? .... Never know what the KNOB before you did..... and BOY did I find that out the HARD AS DIAMONDS WAY! lol.


