
91 toyota ext-cab sr5 build
 Mar 12, 2014 | 07:21 PM
#22
Thread Starter
Registered User
Joined: Jan 2014
Posts: 153
Likes: 0
From: colorado
Yes eventually I want to it will be basically a bikini top that is on just the top and about 3-4 inches down the side and I will put eyelets over the top of the holes in the top angles so I can mount a basket on top of that when I get the money and time to build one. The too I will make with 10 oz water resistant canvas from big duck canvas it's like 10 dollars a yard and 60 wide so it's perfect fot it and I will just use my leather sewing machine to sew it up.
And up date on OBA I got the go ahead to get the oiler and filter/regulator. I have the 3.0 engine and it looks like the compressor is fairly low on the engine on passenger. Right? And has any one done this to the same engine? If so I would love some of your wisdom on whats what, goes where, and how you hooked things up.

Jake sr5.
Mar 12, 2014 | 07:29 PM
#23
Thread Starter
Registered User
Joined: Jan 2014
Posts: 153
Likes: 0
From: colorado
Last edited by Jakesr5; Mar 21, 2014 at 06:15 AM.
 Mar 13, 2014 | 05:29 AM
#25
Registered User
iTrader: (1)
Joined: Nov 2012
Posts: 358
Likes: 0
From: Elko NV, at the foot of the Rubys
Where do you get the water resistant duck canvas? I have a rack that is currently in the design phase, but I don't know if my wifes sewing machine will sew that thick of material! 
As far as OBA, yes, the A/C compressor is located directly below the power steering pump. You can really mount anything anywhere you want. If I were to do it, I would put my air connections behind the front bumper, but that is just me...
As far as OBA, yes, the A/C compressor is located directly below the power steering pump. You can really mount anything anywhere you want. If I were to do it, I would put my air connections behind the front bumper, but that is just me...
Mar 13, 2014 | 10:17 AM
#26
Thread Starter
Registered User
Joined: Jan 2014
Posts: 153
Likes: 0
From: colorado
Where do you get the water resistant duck canvas? I have a rack that is currently in the design phase, but I don't know if my wifes sewing machine will sew that thick of material!
As far as OBA, yes, the A/C compressor is located directly below the power steering pump. You can really mount anything anywhere you want. If I were to do it, I would put my air connections behind the front bumper, but that is just me...
As far as OBA, yes, the A/C compressor is located directly below the power steering pump. You can really mount anything anywhere you want. If I were to do it, I would put my air connections behind the front bumper, but that is just me...
http://www.bigduckcanvas.com/categor...of-canvas.html
The website looks like it is down right now but that's where I would get. It from.
The sewing machine is fairly bug it's a pull of the leaver beery stitch but I have done a bunch of holsters on it so it should not be that bad.
Thanks on the ac info do you know where the lines for air go on the compressor?
And wince I get time all post pics of my cad drawing of the rear bumper I'm going to do here soon hopefully. It will have 2 air outlets on it then for now until I build the front it will be an air chuck in the engine bay with every thing else.
 Mar 13, 2014 | 10:34 AM
#28
Registered User
iTrader: (1)
Joined: Nov 2012
Posts: 358
Likes: 0
From: Elko NV, at the foot of the Rubys
Here is a link
http://www.bigduckcanvas.com/categor...of-canvas.html
The website looks like it is down right now but that's where I would get. It from.
The sewing machine is fairly bug it's a pull of the leaver beery stitch but I have done a bunch of holsters on it so it should not be that bad.
Thanks on the ac info do you know where the lines for air go on the compressor?
And wince I get time all post pics of my cad drawing of the rear bumper I'm going to do here soon hopefully. It will have 2 air outlets on it then for now until I build the front it will be an air chuck in the engine bay with every thing else.
Mar 13, 2014 | 10:36 AM
#29
Registered User
iTrader: (1)
Joined: Nov 2012
Posts: 358
Likes: 0
From: Elko NV, at the foot of the Rubys
Forgot to add, the lines for the A/C Compressor: One line runs from the firewall, next to the fuel canister down to the compressor. The other runs over the top of the power steering pump to the front condenser. Pretty easy to locate. Both lines, if I remember right, bolt onto the side of the compressor. If you remove the power steering, you will easily see it.
Mar 13, 2014 | 05:40 PM
#30
Thread Starter
Registered User
Joined: Jan 2014
Posts: 153
Likes: 0
From: colorado
chukarhunt,
yes that's the best thing is that it will cost me thirty dollars for the whole top!
and thanks for the air line location. is the clutch for the compressor just one line? how hard is that to wire up to a new switch? thanks again for your help and if any one else has opinions or answers please share.
yes that's the best thing is that it will cost me thirty dollars for the whole top!
and thanks for the air line location. is the clutch for the compressor just one line? how hard is that to wire up to a new switch? thanks again for your help and if any one else has opinions or answers please share.
Mar 13, 2014 | 05:53 PM
#31
Thread Starter
Registered User
Joined: Jan 2014
Posts: 153
Likes: 0
From: colorado
so i went to the junk yard today after running around for my dad and i found a gold mine  i fount the brake reservoir cap for my truck (216$ quote for new) for 2.50$, got a new hinge for center console, new chain for tire Carrier,
second hook for the front of the truck, and the interior grab handle for the the console on the door panel.
unfortunately i did not find the light cover for the dome light or a new cup holder for the dash. and the side panel grip had some cracks in it not near as bad as the other one on the truck so i filled the cracks with epoxy and sanded it some what down and smooth and replaced that and every thing else this afternoon.
and i can post pics if any one has questions.
im also trying to get some pics for the CAD of my bumper im going to do
i fount the brake reservoir cap for my truck (216$ quote for new) for 2.50$, got a new hinge for center console, new chain for tire Carrier,second hook for the front of the truck, and the interior grab handle for the the console on the door panel.
unfortunately i did not find the light cover for the dome light or a new cup holder for the dash. and the side panel grip had some cracks in it not near as bad as the other one on the truck so i filled the cracks with epoxy and sanded it some what down and smooth and replaced that and every thing else this afternoon.
and i can post pics if any one has questions.
im also trying to get some pics for the CAD of my bumper im going to do
Mar 13, 2014 | 06:15 PM
#32
Registered User
iTrader: (1)
Joined: Nov 2012
Posts: 358
Likes: 0
From: Elko NV, at the foot of the Rubys
Glad i can help, but, sorry, I may have misunderstood you about the air lines, I thought you were asking about the current air conditioning lines and where they were. As far as airlines go, I am not sure as I don't have OBA. Sorry....
But as far as the switch, it is extremely easy. Just run new wire(s) from the cab to the plug and splice in. The existing wires disappear into the harness and would be a pain to trace inside the dash, at least that is what I would do.
Hope that helps! Sorry for the confusion.
Junkyard trips are about as fun as Disneyland lol .
Mar 13, 2014 | 06:30 PM
#33
Thread Starter
Registered User
Joined: Jan 2014
Posts: 153
Likes: 0
From: colorado
no chukarhunt you told me exactly what i needed on the location.
is the steering pump something that i can take off belt and undo bolts and do OBA them re bolt back on and put belt back on?
and bumper design
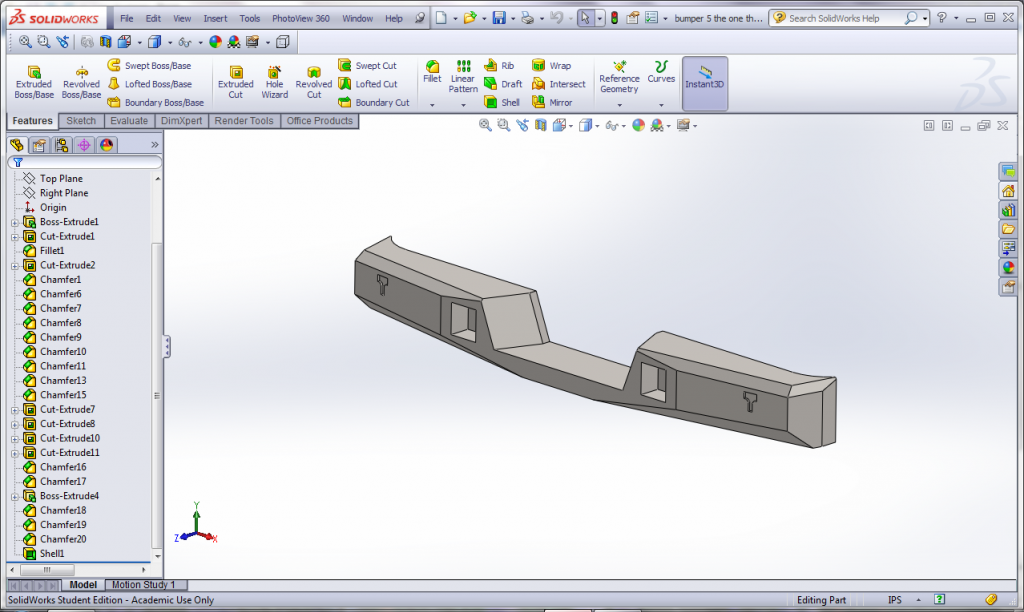
sorry its not the best pic but the only way i know how to get it
is the steering pump something that i can take off belt and undo bolts and do OBA them re bolt back on and put belt back on?
and bumper design

sorry its not the best pic but the only way i know how to get it


 how much should that cost to get water jet cut out i found one in vail. if not i am going to learn how to hate 4.5 inch and 8 inch angle grinders


