
88 EFI Stepside build
 Sep 6, 2013 | 10:58 AM
#1

Thread Starter
Registered User

Joined: Sep 2013
Posts: 96
Likes: 0
From: Oldest City West of the Mississippi
88 EFI Stepside build
3rd time trying to post this so this ones short and to the point


Picked it up yesterday chopped the cab corner from A pillar to mid back of window and starting the graft today... bio stuff to follow....
Picked it up yesterday chopped the cab corner from A pillar to mid back of window and starting the graft today... bio stuff to follow....
Last edited by Step Side 88; Sep 6, 2013 at 11:01 AM. Reason: photo fix
Sep 7, 2013 | 07:55 AM
#3
Thread Starter
Registered User
Joined: Sep 2013
Posts: 96
Likes: 0
From: Oldest City West of the Mississippi
Well since things posted up I guess it's bio time.
We had a 86 Tercel AWD wagon till about 5 months ago that was our run about rig. Handy for dump runs and parts hauling but it was getting a bit worn out.
I'm closing in on the end of a several year resto of a 58 GMC step side and may have developed a slight case of tunnel vision which might explain the direction for this build. We came across this project with only 47K miles on it and as it needs a bed a step side sounded like as good a look as a flat bed for it.
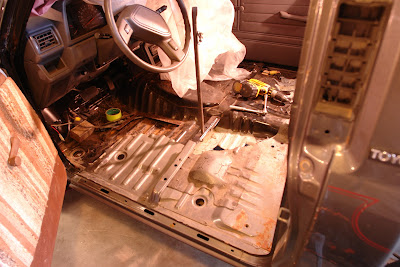
The Graft... well it came ready to weld (almost) just needed the old one cut off and fit for finish so that's what I did yesterday. All I had on hand was a short little 3" metal blade for my sawzall and some thin cut off disks for my grinder till late in the day when I finally got some decent sawzall blades. A miss step or two came in cutting the floor, but in the end I think it will all come together.
Her's some shots from yesterdays session and hopefully by the end of today I'll have all the cuts finished and prepped and a few tacks to hold things in alignment.
I'm currently thinking of using some panel adhesive on an overlap of the inner (2nd of four 'layers' #1 being the top skin) where I will have a difficult time getting a weld bead but everything else is accessible for welding. I'm also going to add some structural support to reinforce the bracing in the supports that were cut.
Any suggestions are we welcome as this is my first real go at a reconstruction like this... My GMC only needed the cab corners done. I guess this is the same ( at least thats what I'm telling myself) just a bigger corner!


We had a 86 Tercel AWD wagon till about 5 months ago that was our run about rig. Handy for dump runs and parts hauling but it was getting a bit worn out.
I'm closing in on the end of a several year resto of a 58 GMC step side and may have developed a slight case of tunnel vision which might explain the direction for this build. We came across this project with only 47K miles on it and as it needs a bed a step side sounded like as good a look as a flat bed for it.
The Graft... well it came ready to weld (almost) just needed the old one cut off and fit for finish so that's what I did yesterday. All I had on hand was a short little 3" metal blade for my sawzall and some thin cut off disks for my grinder till late in the day when I finally got some decent sawzall blades. A miss step or two came in cutting the floor, but in the end I think it will all come together.
Her's some shots from yesterdays session and hopefully by the end of today I'll have all the cuts finished and prepped and a few tacks to hold things in alignment.
I'm currently thinking of using some panel adhesive on an overlap of the inner (2nd of four 'layers' #1 being the top skin) where I will have a difficult time getting a weld bead but everything else is accessible for welding. I'm also going to add some structural support to reinforce the bracing in the supports that were cut.
Any suggestions are we welcome as this is my first real go at a reconstruction like this... My GMC only needed the cab corners done. I guess this is the same ( at least thats what I'm telling myself) just a bigger corner!
Sep 7, 2013 | 03:54 PM
#4
I cant help with welding suggestions, but there are some great ones on here. If you are wanting to do a step side bed, I did one that had the late 70s Chevy fenders on it. I can post a pic if you want, but dont want you to think I am hijacking your thread. My brother bought it off of me and gets alot of compliments on it. Welcome to Yotatech and look forward to your build. I always enjoy seeing major teardowns and rebuilds.
Sep 7, 2013 | 06:33 PM
#5
Thread Starter
Registered User
Joined: Sep 2013
Posts: 96
Likes: 0
From: Oldest City West of the Mississippi
Thanks Terry, I figured this was a good build thread project. We want it as our driver in 4 weeks so we have a deadline...but the box is still uncertain.
Our seat is a 40/20/40 with a 7.5" indent and the arm rest that folds down off of the pass. side out of an 83 PU.
We plan to order new covers. If there are any tips for getting the correct set the first time like an item/part # that would be great. I plan on ordering a 40/20/40 with the arm rest pass side and 1" indent and make the adjustment so we have a bit fuller bench if such a beast is pre-made.
Did an image search for comparisons of different makers fenders and right now I'm leaning towards early 90's ranger style. I think the sharper lines go with the 88 and are more in proportion with the whole truck.... from my imagination and some pictures but it may take some time for that to pop up. We'll see.
Sep 9, 2013 | 09:20 PM
#6
Thread Starter
Registered User
Joined: Sep 2013
Posts: 96
Likes: 0
From: Oldest City West of the Mississippi
Got all set to start tacking this afternoon and... the auto darkening helmet took a dump.
All the edges are prepped and cleaned thanks to my wife Rose and everything fit's at all the key points of reference. So we're welding tomorrow after I score a new helmet in the morning
.
From the pic's I took I can see the cab corner needs to come up a tad and will add a shim at the mounting bracket as well as check the door back edge seal but some of that comes as I get it tacked and snug I hope.
Last edited by Step Side 88; Sep 9, 2013 at 09:21 PM.
Sep 12, 2013 | 07:36 AM
#7
Thread Starter
Registered User
Joined: Sep 2013
Posts: 96
Likes: 0
From: Oldest City West of the Mississippi
Got the top and floor close to finished and the support braces underneath welded in... all the hard stuff so hopefully today is going to be less frustrating. Still this is some thin ass metal compared to what is in my GMC and I would of used an oxy/acy if I had one. The Lincoln I borrowed from my friend would only run wire, no sparky so I wound up using my HF POS for all of it.
maybe that's where my frustration is originating from.
Still have to work the top some to get the crown right...
maybe that's where my frustration is originating from.
Still have to work the top some to get the crown right...
Trending Topics
Sep 12, 2013 | 07:50 AM
#8
I have heard several others cuss about how Toyota metal is difficult to weld. One day I hope to find out when I get a welder. I hear it is easy to burn thru. Looks like your are making progress.
Sep 12, 2013 | 09:40 AM
#9
Thread Starter
Registered User
Joined: Sep 2013
Posts: 96
Likes: 0
From: Oldest City West of the Mississippi
Where I have a good solid fit and tight copper backing it's not to bad, I get good spots and can lap them but any gap or loose copper fit behind and you'd think I was a preacher it's so holey.
I also noticed I had tried to go over an area that still had the undercoating and that was nasty too. So I made sure all the rest is ready for the push today.
I also noticed I had tried to go over an area that still had the undercoating and that was nasty too. So I made sure all the rest is ready for the push today.
Sep 12, 2013 | 12:19 PM
#11
I remember using coat hangers for brazing. Worked great in my old cars years ago. Guess that may be considered old school, but it worked then and it will work again.
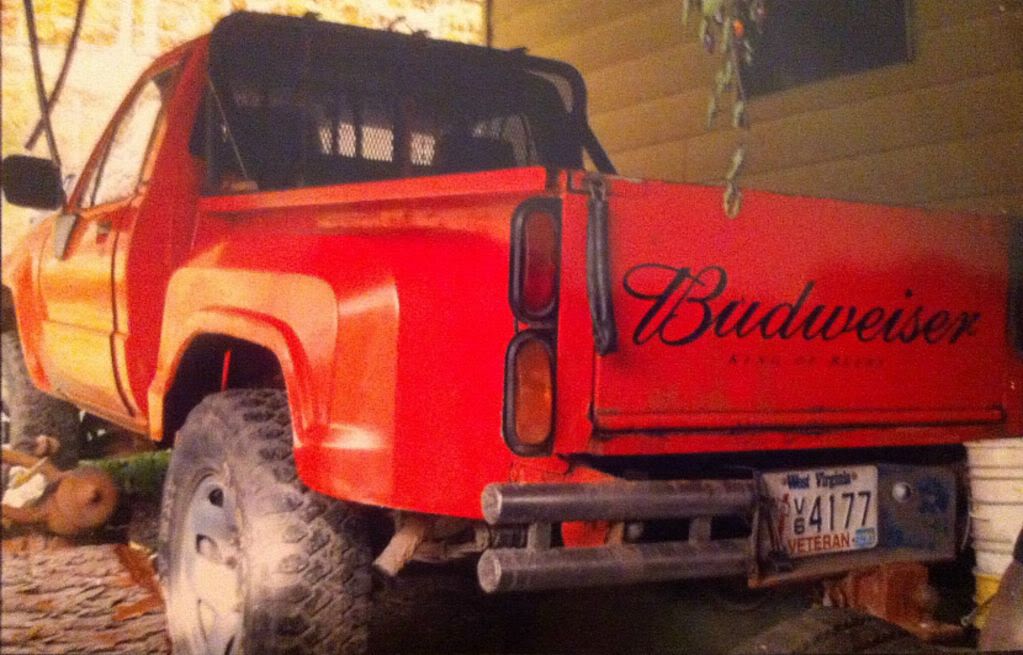
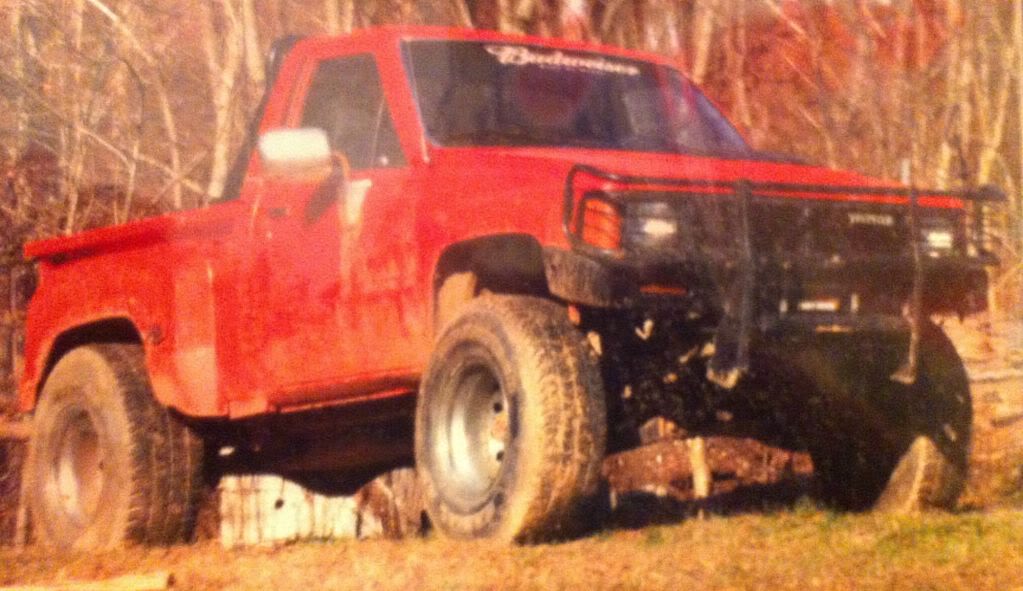
I am looking forward to seeing a Rangers bed. Here is what the early 80s fenders look like. I eventually want to come up with a step side conversion for trucks around here in my area. This is one is my brothers truck now and people do like seeing it and dont think you fix them up fast enough to sell them.
I am looking forward to seeing a Rangers bed. Here is what the early 80s fenders look like. I eventually want to come up with a step side conversion for trucks around here in my area. This is one is my brothers truck now and people do like seeing it and dont think you fix them up fast enough to sell them.
Sep 13, 2013 | 08:27 AM
#13
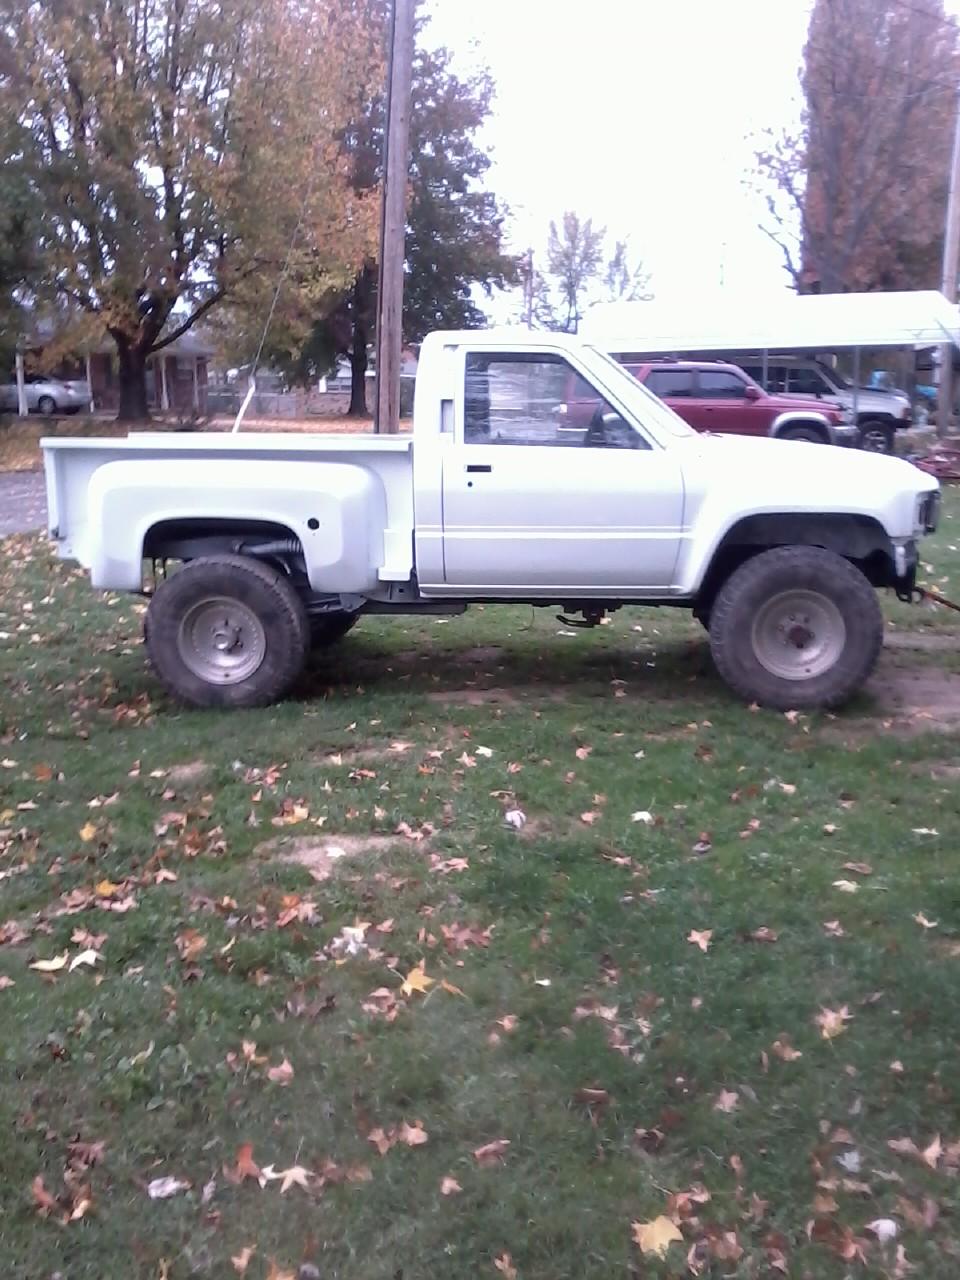
When I first joined Yotatech, there was a guy that was going to do the same thing with a early 80s bed and that was what I thought. He ws going to use the whole bed and it was to wide. The box on the white one is alot smaller then what the standard size Chevy bed is and I think it looks alot better with a bed that is the appropriate size.
I have the Downey bed Link>> https://www.yotatech.com/forums/f199...l#post51942724 and I like how my brothers bed looks compared to the Downey bed. These beds were made by NWOR (if I am correct about that), I dont like the long space behind the rear of the fenders to the tailgate. I am looking forward to seeing what you have planned with the Rangers and how they look.
I have the Downey bed Link>> https://www.yotatech.com/forums/f199...l#post51942724 and I like how my brothers bed looks compared to the Downey bed. These beds were made by NWOR (if I am correct about that), I dont like the long space behind the rear of the fenders to the tailgate. I am looking forward to seeing what you have planned with the Rangers and how they look.
Sep 16, 2013 | 12:28 PM
#14
Thread Starter
Registered User
Joined: Sep 2013
Posts: 96
Likes: 0
From: Oldest City West of the Mississippi
Well it's ready for cosmetics... first a good scrubbing with the grinder then die grinder and a foundation of JB Weld to fill the gaping as well as pin holes.
While that sets up today we'll begin stripping the door decals and prepping for epoxy primer where ever I can find any rust showing up. (as in get rid of the rust)
It took some doing as this was my first attempt at this sort of build but I've been studying on the HAMB and YTube for years so just approached it like a lab session back in college.
Using a combination of hammer dolly and heat I was able to get the roof line reasonably close I think. (ATC) The final touch I came up with to really help get the crown to set was my old Mic stand which I could raise up and hold a dolly in place under tension then when I hit it with heat and cooled it it had a 'stop' of sorts and spread the contraction out or slowed it down... I don't know, like I said I just came up with the idea and tried it.
Last edited by Step Side 88; Sep 16, 2013 at 12:30 PM.
Sep 16, 2013 | 12:51 PM
#15
Not to hijack but here's my steps use build I done back in high school...
It's really easy to do man...
I added a little lip to my fender tho... Plywood and bondo lol...
So what was wrong with your truck for all this work..... Totaled, rusted ???
It's really easy to do man...
I added a little lip to my fender tho... Plywood and bondo lol...
So what was wrong with your truck for all this work..... Totaled, rusted ???
Sep 16, 2013 | 01:19 PM
#16
Thread Starter
Registered User
Joined: Sep 2013
Posts: 96
Likes: 0
From: Oldest City West of the Mississippi
Yes I'm considering that but looking for something close I can refab rather. $$$ to fab new.
It was T'd in the drivers door, Branded title, and another guy picked it up as a project and had most of what was/is needed already, but needed to let it go.
as for rust... well there's a few spots that are just beginning on the original and an area in the drivers corner where tire chains or something sat. minor really.
OK back to printing out the FU section of the FSM...
Sep 19, 2013 | 07:33 AM
#17
Thread Starter
Registered User
Joined: Sep 2013
Posts: 96
Likes: 0
From: Oldest City West of the Mississippi
Well While I gave the JB a chance to cure up real good we took a day (and a half) to see about firing up this engine. After plowing through the FSM and getting lots of good help on the 'fix it' forum here we discovered a missing EFI relay from the drivers side fuse panel was the culprit.
I was able to verify each component OTHER than that relay, works (and reads AOK according to the FSM's diagnostics pages) in the process of discovering what wasn't there however, so I'm OK with the time it took.
So back to the body blows, cosmetic creams and hardeners I guess.... and I need a muffler.
Last edited by Step Side 88; Sep 19, 2013 at 07:36 AM.
Sep 20, 2013 | 05:19 AM
#18
Alot of people say the FSM is the only book you need. I have a FSM and a Haynes and I use my Haynes alot more then the FSM. The FSM has helped with a couple of areas and I am glad I have it, but Haynes does great for most of the problems you will run into. I dont care for Chiltons at all, they leave alot of information out.
Sep 20, 2013 | 10:21 AM
#19
Thread Starter
Registered User
Joined: Sep 2013
Posts: 96
Likes: 0
From: Oldest City West of the Mississippi
While it's not what I was thinking of using last week, a 56 GMC bed has turned up in my neck of the woods. So I did a quick mock up and held one of my finished fenders up to it and I think with a chop and channel of the fenders and steps I might have my 'direction' for this bed. I'll have to widen the bed if anything but at least I know the GMC metal will weld a little easier...
Last edited by Step Side 88; Sep 20, 2013 at 10:22 AM.
Sep 22, 2013 | 06:09 PM
#20
Thread Starter
Registered User
Joined: Sep 2013
Posts: 96
Likes: 0
From: Oldest City West of the Mississippi
Well the weld seams are all cleaned up and sealed in 2 coats of SPI epoxy primer, on the bottom I'll let it cure and then top it with something closer to the original outer corrosion protection. I'm thinking a panel adhesive maybe?
The top is ready for a couple coats of build primer to block out into the original... that's left.

And here's a shot of the quick mock up we did with my yet to be buffed out fender, just to get a idea if the idea works.

The top is ready for a couple coats of build primer to block out into the original... that's left.
And here's a shot of the quick mock up we did with my yet to be buffed out fender, just to get a idea if the idea works.
Last edited by Step Side 88; Sep 22, 2013 at 06:12 PM.


