
An '86 4runner followed me home today.
 May 13, 2014 | 05:01 AM
#41

Thread Starter
Registered User
Joined: Jan 2008
Posts: 276
Likes: 0
What did you do as far as paint prep goes? sand it down with 320? What did you wipe it down with before you rolled it?
My guess is thinner or something that left a residue that geeked the paint. That's a bad reaction there...has to be a containment.
I wont lie...your truck looked badass that blue color.
Bummer you have to sand/repaint.
My guess is thinner or something that left a residue that geeked the paint. That's a bad reaction there...has to be a containment.
I wont lie...your truck looked badass that blue color.
Bummer you have to sand/repaint.
May 13, 2014 | 07:25 AM
#42
Registered User
Joined: May 2010
Posts: 2,587
Likes: 7
From: Ofallon Missouri
Unfortunately I have not figured out the starting issue. I'm leaning towards the fuel pump or the cold start injector, but that is basedentirely on a hunch.
I saned it with 300 and wiped it down with acetone. Same thing I did the second time. I don't think so, but the only explanation I can come up with is I jacked up the ratios (not enough hardener and thinner) and applied it to thick.
I saned it with 300 and wiped it down with acetone. Same thing I did the second time. I don't think so, but the only explanation I can come up with is I jacked up the ratios (not enough hardener and thinner) and applied it to thick.
May 14, 2014 | 12:27 PM
#43
Thread Starter
Registered User
Joined: Jan 2008
Posts: 276
Likes: 0
May 29, 2014 | 04:59 PM
#44
Thread Starter
Registered User
Joined: Jan 2008
Posts: 276
Likes: 0
Its been a while since I have worked on the 4runner. I have on of the best jobs in the world right now, with the best hours but even it gets busy every now and then. I also had to get the crawler prepped for the East Coast wheeling season. I took the crawler to the VA4WD members only run at Gore. It was an awesome weekend. The weather was perfect during the day. The only carnage was I managed to run low on gas and was stalling off camber. Then I managed to loose my gas cap. OOPS.
Anyway I finally got back to working on the 4runner. The winch plate is ordered from www.trail-outfitters.com. Its just the standard trail-gear base. I'm going to build a plate bumper out of it. The LED for the turn signals also came in from Amazon.
Finally got the rock sliders mocked up and the legs welded. I can't weld them to the frame until I finally finish the paint. I'm still fighting the paint system. At this point I have enough time, energy and money in it I wish I had just sent it out. I just need a clear day to finish painting.
Jun 7, 2014 | 01:25 PM
#45
Thread Starter
Registered User
Joined: Jan 2008
Posts: 276
Likes: 0
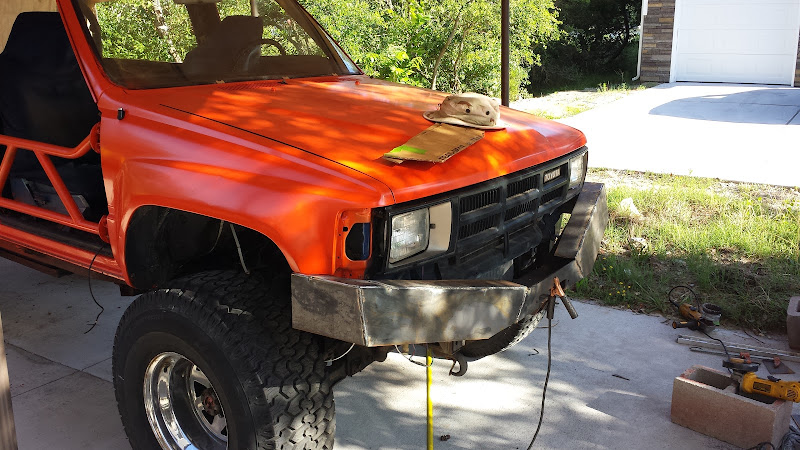
Made a little more progress today. Parts are finally going back on the truck instead of coming off. Feels like success.
Its getting hot working in the driveway. I'm also not planning on putting the top back on until this winter. As a result I need to upgrade my parking. So today the truck got a new home. I have to say it is a huge improvement. I have sides and a front door, but I'm not going to put them on until I'm done welding.

Put the rear seat covers on and installed them in the truck for the final time.

I took the bumper off, installed the winch plate, and started some CAD work to get the angles for the front bumper.

Its just a first draft and a little rough. I didn't take the time to even cut straight lines. I just wanted to see how it was going to look. So far I like it. I'm debating putting an additional angle in the front face. Not sure it would actually match the lines of the truck though.
Next week is a rough week at work and we have company coming so it may be a while before the bumper takes shape. It is the last major project for the summer. I'm going to run it as is this summer, but I'm working on sourcing an Elocker and a solid axle for the fall. I may put an ausie in the front, but that is not a major project.
Its getting hot working in the driveway. I'm also not planning on putting the top back on until this winter. As a result I need to upgrade my parking. So today the truck got a new home. I have to say it is a huge improvement. I have sides and a front door, but I'm not going to put them on until I'm done welding.
Put the rear seat covers on and installed them in the truck for the final time.
I took the bumper off, installed the winch plate, and started some CAD work to get the angles for the front bumper.
Its just a first draft and a little rough. I didn't take the time to even cut straight lines. I just wanted to see how it was going to look. So far I like it. I'm debating putting an additional angle in the front face. Not sure it would actually match the lines of the truck though.
Next week is a rough week at work and we have company coming so it may be a while before the bumper takes shape. It is the last major project for the summer. I'm going to run it as is this summer, but I'm working on sourcing an Elocker and a solid axle for the fall. I may put an ausie in the front, but that is not a major project.


 Jun 8, 2014 | 04:38 AM
#48
Thread Starter
Registered User
Joined: Jan 2008
Posts: 276
Likes: 0
I did end up using tractor supply paint. I had a gallon of it and only used a quart the first go around. I used to recommend it. I don't recommend it anymore. It is just to temperamental. One coat would go on great. The next would not. I mixed them all the same using all majestic chemicals. I'm still working on the tail gate. Everything was going great, but the second coat on 24 later IAW the directions and the paint cracked and the first coat lifted.
The seats are Wet Okole. They are made of neoprene and mostly waterproof. The fronts have seat heaters in them for the fall. They are expensive, about $650 for the set, but are fairly awesome. They are Hawaii based. I used them when I loved in Hawaii for a couple of beach trucks when I lived out there.
The seats are Wet Okole. They are made of neoprene and mostly waterproof. The fronts have seat heaters in them for the fall. They are expensive, about $650 for the set, but are fairly awesome. They are Hawaii based. I used them when I loved in Hawaii for a couple of beach trucks when I lived out there.
Jun 23, 2014 | 04:18 PM
#51
Thread Starter
Registered User
Joined: Jan 2008
Posts: 276
Likes: 0
Back at it after a couple of slow weeks,
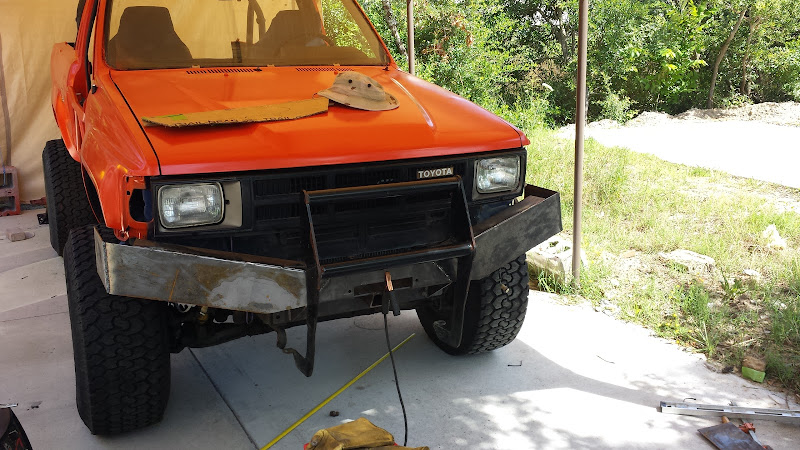
Front bumper is almost done
So I have this very 1980s brush guard that came with the truck
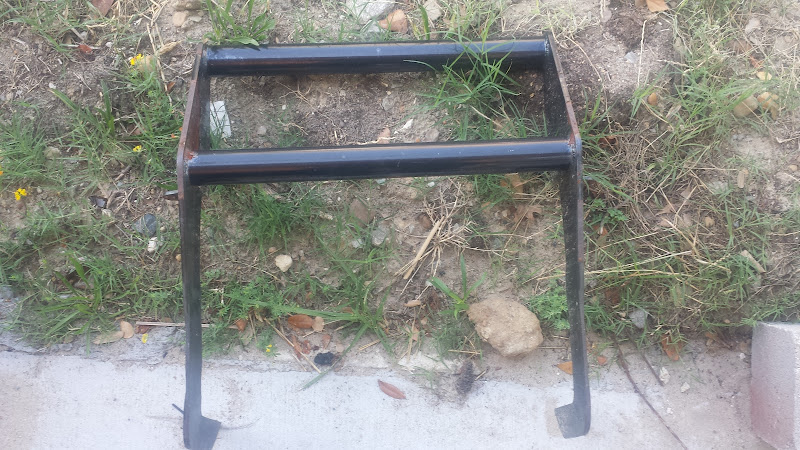
At fist I was just going to pitch it. Then I realized I have a 1980s truck. Maybe it would be retro/cool on the new bumper. It would also protect the grill as this truck will be bashing around in the woods.

It would be back a little more, and I would cut the bottom off and weld it to the bumper. What say Yotatech?
Front bumper is almost done
So I have this very 1980s brush guard that came with the truck
At fist I was just going to pitch it. Then I realized I have a 1980s truck. Maybe it would be retro/cool on the new bumper. It would also protect the grill as this truck will be bashing around in the woods.
It would be back a little more, and I would cut the bottom off and weld it to the bumper. What say Yotatech?
Jun 24, 2014 | 06:46 PM
#53
Thread Starter
Registered User
Joined: Jan 2008
Posts: 276
Likes: 0
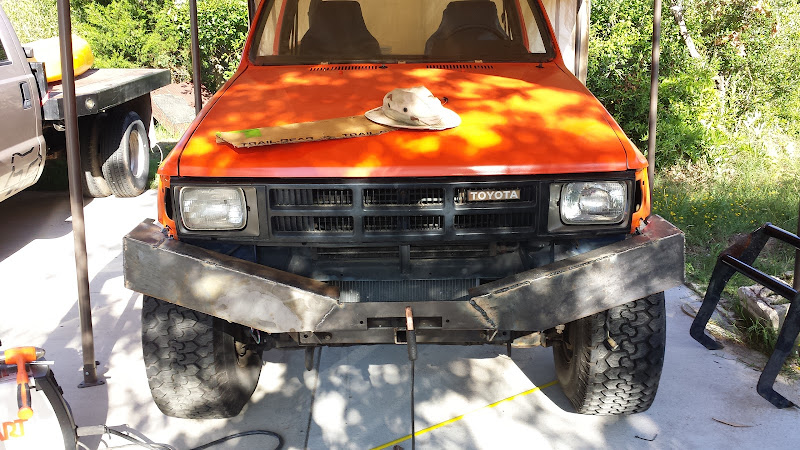
The more I look at it, I've realized my truck is smiling. If i was going to do it over I would probably bring the center up. I'm not going to do it again though.
Getting the proportions right with the body lift is a pain. I was afraid if I tried to go straight across the bumper would either be huge or high with a winch sticking our from under it.
Getting the proportions right with the body lift is a pain. I was afraid if I tried to go straight across the bumper would either be huge or high with a winch sticking our from under it.
Jul 10, 2014 | 10:34 AM
#55
Thread Starter
Registered User
Joined: Jan 2008
Posts: 276
Likes: 0
Progress to report, unfortunately no relevant pictures.
I mentioned earlier that the truck was a little hard to start and was running a little rich. I finally sorted that problem out. The boot between the AFM and the plastic intake tube was ripped. IT had been patched with duct tape. It looked solid but was leaking. One $6.99 part from Autozone I was back to running perfect

The bumper is painted and installed. I ended up screwing up the cut on the brush guard so I didn't end up using it.
I ran into a strange issue with a battery drain. I posted about it separately in the tech section. I had a parasitic drain that was killing my battery. IT self resolved. That makes me a little nervous, but I'll take it. I'll start dealing with it again if it comes back.
Weather has been a little extreme on the coast of Virginia this week, but I was able to drive the truck to work today. Still drives like an 80s truck. Not what I would want to commute in every day, but it was fun and got lots of attention.
I have had a spare winch sitting in my garage fpr the better part of 5 years. Warn M8000 so a good quality winch. It was on the front of my old 4runner for about 6 months before I blew the engine and bought the crawler. The plan was/is to put it on the new 4runner. I need to unspool some cable to get it through the fairlead and found the release was jammed.


The inside is just caked in rust and nastyness. I got everything apart and freed up on the gear side. I need to finish cleaning it up. Tonight I'm going to tackle the brake and drive side.
I mentioned earlier that the truck was a little hard to start and was running a little rich. I finally sorted that problem out. The boot between the AFM and the plastic intake tube was ripped. IT had been patched with duct tape. It looked solid but was leaking. One $6.99 part from Autozone I was back to running perfect
The bumper is painted and installed. I ended up screwing up the cut on the brush guard so I didn't end up using it.
I ran into a strange issue with a battery drain. I posted about it separately in the tech section. I had a parasitic drain that was killing my battery. IT self resolved. That makes me a little nervous, but I'll take it. I'll start dealing with it again if it comes back.
Weather has been a little extreme on the coast of Virginia this week, but I was able to drive the truck to work today. Still drives like an 80s truck. Not what I would want to commute in every day, but it was fun and got lots of attention.
I have had a spare winch sitting in my garage fpr the better part of 5 years. Warn M8000 so a good quality winch. It was on the front of my old 4runner for about 6 months before I blew the engine and bought the crawler. The plan was/is to put it on the new 4runner. I need to unspool some cable to get it through the fairlead and found the release was jammed.
The inside is just caked in rust and nastyness. I got everything apart and freed up on the gear side. I need to finish cleaning it up. Tonight I'm going to tackle the brake and drive side.
Jul 10, 2014 | 11:52 AM
#56
Thread Starter
Registered User
Joined: Jan 2008
Posts: 276
Likes: 0
And in less then two hours we found the winch was not salvageable. The break is completely seized to the drum, the motor is shot, and one end plate is cracked. It could be fixed, but by the time you pay for all the parts it would cost more then buying a new one.
Jul 31, 2014 | 01:34 PM
#57
Thread Starter
Registered User
Joined: Jan 2008
Posts: 276
Likes: 0
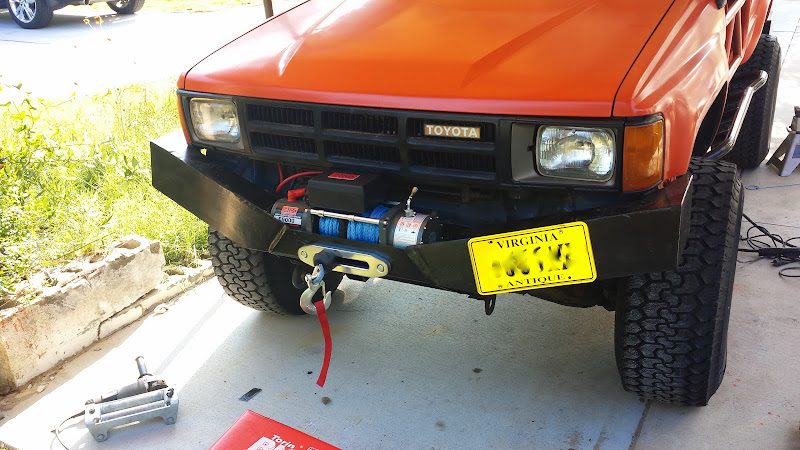
Finally made some more progress on the truck. A winch is installed. I went with an ENGO. Not bad at $500 with a synthetic line. Looks exactly like my old M8000 outside and inside with the exception of the brush holders on the motor. I'm not sure I would trust an import if I honestly though I was going to need a winch often, but the way I'm planning on using this truck I'm not to concerned.
Also got the rock sliders welded on.

I've been driving it to work every day this week. It is extremely popular.
It looks like I will be moving to Hawaii in January. I'm going to have to start looking at some serious theft protection for the truck. The steering wheel lock already doesn't work. I'm thinking of going ahead and taking the entire lock cylinder out. Some meth head will eventually do it for me if I don't and wiring in a remote controlled relay, an on switch, and a start button. Anyone see a downside that I'm missing?
Also got the rock sliders welded on.
I've been driving it to work every day this week. It is extremely popular.
It looks like I will be moving to Hawaii in January. I'm going to have to start looking at some serious theft protection for the truck. The steering wheel lock already doesn't work. I'm thinking of going ahead and taking the entire lock cylinder out. Some meth head will eventually do it for me if I don't and wiring in a remote controlled relay, an on switch, and a start button. Anyone see a downside that I'm missing?
Aug 20, 2014 | 08:16 AM
#59
Thread Starter
Registered User
Joined: Jan 2008
Posts: 276
Likes: 0
a little more progress.
I've been driving the truck. Still drives like an 80's truck  Ii did however manage to break a tail light loading my surf board into the back of the truck. That is a special talent. Anyway, the sun had take an toll on the lamps so I decided both needed to be replaced.

I also got the incab for the winch working:
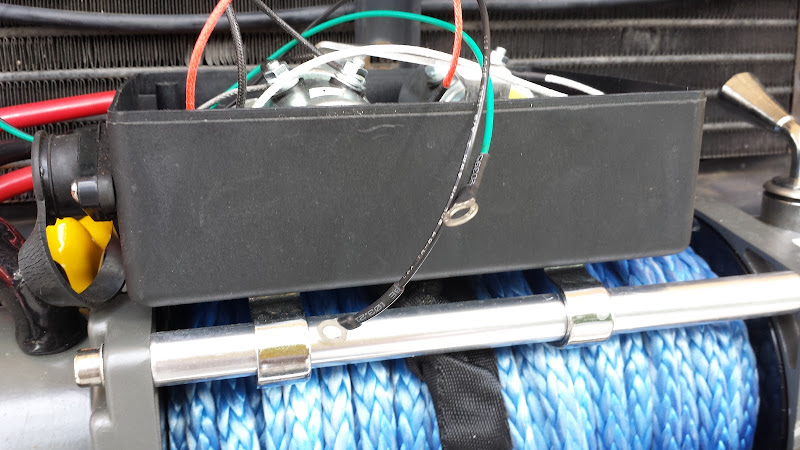
Started out looking like this

Start by drilling a hole in the control box.

Add a bulked connector and thread two wires in.
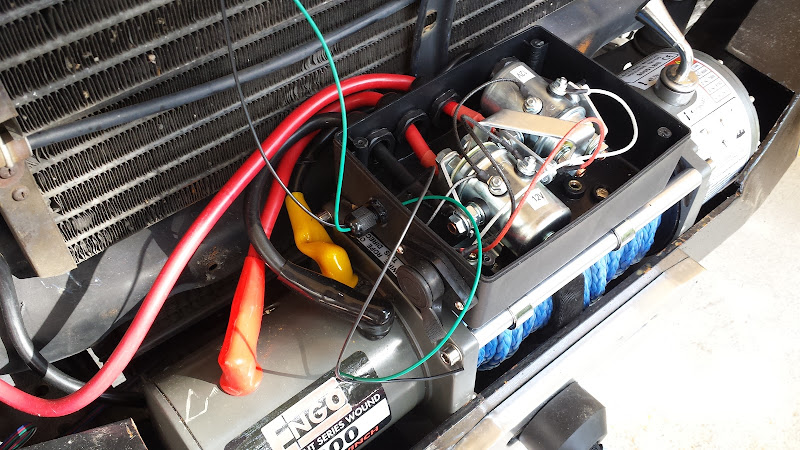
crimp and heat shrink some ring terminals
Hook up the wires to the solenoids.
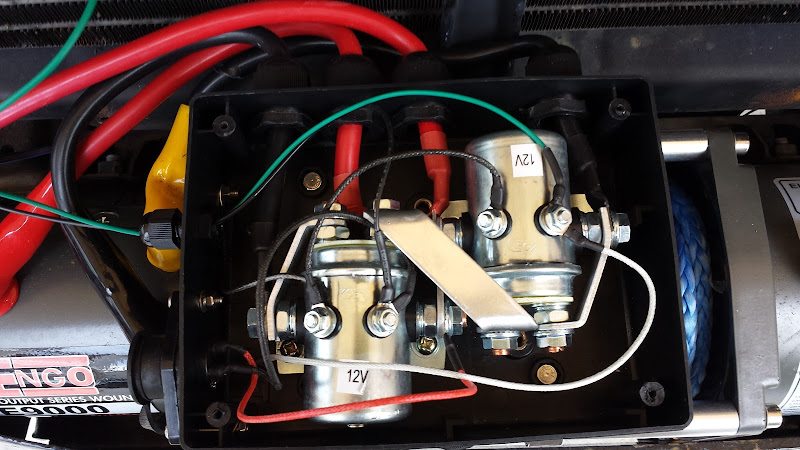
You may remember my switch panel from several pages ago.

The bottom switch second from the right is the enable switch to keep from having accidental movements of the winch. The bottom right is a on-off-on momentary that controls the winch. It is really simple to wire. +12 comes into the first switch. The output of the switch is wired to the input of the second switch. The two outputs of the second switch are the green and black wires headed out to the winch. With everything I have about 20 bucks in it.
The hand held remote is still functional if you so desire. Wiring is slightly different in the control box for a 4 solenoid warn controller, but the idea is the same.
Ii did however manage to break a tail light loading my surf board into the back of the truck. That is a special talent. Anyway, the sun had take an toll on the lamps so I decided both needed to be replaced. I also got the incab for the winch working:
Started out looking like this
Start by drilling a hole in the control box.
Add a bulked connector and thread two wires in.
crimp and heat shrink some ring terminals
Hook up the wires to the solenoids.
You may remember my switch panel from several pages ago.
The bottom switch second from the right is the enable switch to keep from having accidental movements of the winch. The bottom right is a on-off-on momentary that controls the winch. It is really simple to wire. +12 comes into the first switch. The output of the switch is wired to the input of the second switch. The two outputs of the second switch are the green and black wires headed out to the winch. With everything I have about 20 bucks in it.
The hand held remote is still functional if you so desire. Wiring is slightly different in the control box for a 4 solenoid warn controller, but the idea is the same.
Aug 27, 2014 | 10:39 AM
#60
Thread Starter
Registered User
Joined: Jan 2008
Posts: 276
Likes: 0
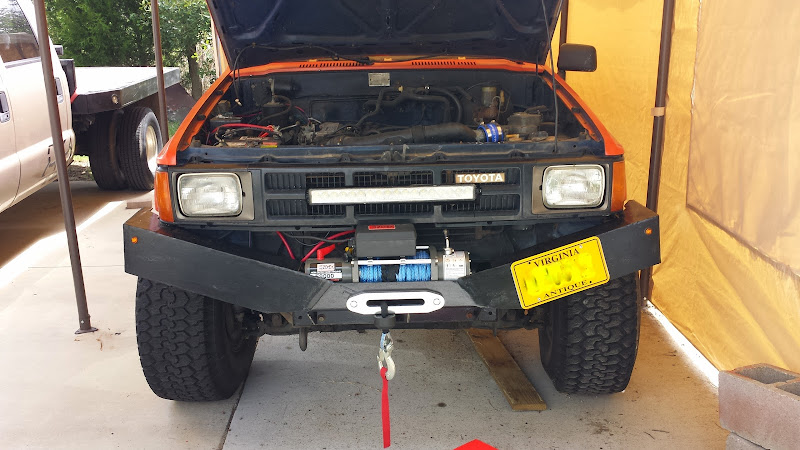
Using the corner lights as blinkers wasn't doing it for me. As much as I'm driving the truck being 100% legal seemed like a good idea. I added some 3/4 LED blinkers to the corners of the bumper. They are bright.
I got stuck out after dark one evening. I had forgotten how much 80's sealed beam headlights suck. I had Hella E-codes on my old 4runner, but I can't seem to find them for a reasonable price. On a whim I bought a 41" LED light bar off Amazon for $125. I was origionally going to mount it on the cab. However after talking to several people I determined that it was a bad idea. Mounted above the windshield like that tends to create a lot of glare. If not on the rook, I couldn't find a good place to mount the light. I ended up sticking it on my F350 and tacking the 27" bar I've had for years and sticking it on the 4runner. I frenched it into the grill. It actually bolted right up to the mounts for one of the coolers. I'm a little concerned about how much air flow I'm blocking, but I'll keep an eye on it.
I got stuck out after dark one evening. I had forgotten how much 80's sealed beam headlights suck. I had Hella E-codes on my old 4runner, but I can't seem to find them for a reasonable price. On a whim I bought a 41" LED light bar off Amazon for $125. I was origionally going to mount it on the cab. However after talking to several people I determined that it was a bad idea. Mounted above the windshield like that tends to create a lot of glare. If not on the rook, I couldn't find a good place to mount the light. I ended up sticking it on my F350 and tacking the 27" bar I've had for years and sticking it on the 4runner. I frenched it into the grill. It actually bolted right up to the mounts for one of the coolers. I'm a little concerned about how much air flow I'm blocking, but I'll keep an eye on it.


