
1987 4Runner Cyber Dude
 Mar 25, 2014 | 12:28 PM
#441
Thread Starter
Registered User
iTrader: (1)
Joined: May 2012
Posts: 835
Likes: 2
From: South Florida
I watched those videos. Phil was a great guy. I got some PMs from him and always enjoyed reading his post. 35 and was just married for 7 years. Seems like life was just getting going for him, but he gave it up for someone else and just shows how great of a guy he must have been. Still a tough loss for those that knew him.
Terry,
The times I communicated with him, he was very friendly and willing to go the extra miles. I personally am shocked and sad every time I think about it. He was a really nice guy and all around generous with his knowledge. I say i miss him on this board.
Mar 25, 2014 | 12:37 PM
#442
Thread Starter
Registered User
iTrader: (1)
Joined: May 2012
Posts: 835
Likes: 2
From: South Florida
Terry or anyone else, I have a question about BUTYL TAPE that is required to glue back the windows onto the topper. Where can you get these BUTYL TAPE? I've search everywhere homedepot, lowes, ace hardware, etc... I just contacted a company who manufactures something similar a 1/4" round butyl tape part number MB-10a & MH-19 MB-10a seems easier to get, but the manufacture doesn't think that it will be a good adhesive to hold the windows in place. It'll probably work good for the fixed glass, but not the sliding glass as that is all that holding that in place. MH-19 seems to be a better product for it as it is used more so on RV's and sealing windows, but adhesion is questionable. The manufacture on their response stated that they don't think this is a good product to adhese the windows to the topper.
Anyone have any idea as to where to get the right product?
Anyone have any idea as to where to get the right product?
Mar 25, 2014 | 12:46 PM
#443
Thread Starter
Registered User
iTrader: (1)
Joined: May 2012
Posts: 835
Likes: 2
From: South Florida
Topper
Just an update to finish spray paint the topper. A couple of things have happened along the way.
1) Nissan Transmission almost fubar haven't decided on which way to go, shell out $3600 for a rebuilt / remanufactures or rebuild the one myself for $500 in parts, its an automatic.
2) Water heater bit the dust started leaking for the heating element and shorted out the thermos. Purchased a new one and replaced it.
3) Well pump took a dump seized motor, purchase and replaced.
So back onto the Topper, wiped it down and taped up the opening to avoid any over spray of black on the inside of the topper. I keep forgetting to pickup a coupling for the air for the spray gun I picked up at HF. I think this gun should work out for this job as the topper is textured and a little orange peel from it won't hurt it'll give back that textured look.
Now I have a little time, I think I'll run down to the HD or Lowes and pickup that coupling. Maybe I can spray it tomorrow. Oh and I do want to pickup another one of those spray guns from HF with this coupon I get it for $9.99 talk about disposable if it fails to work after a couple of uses chuck it.
Mar 26, 2014 | 08:20 AM
#444
Thread Starter
Registered User
iTrader: (1)
Joined: May 2012
Posts: 835
Likes: 2
From: South Florida
Okay on the butyl tape, I think I found it at the auto parts store. It's called window-weld by 3M. They sale 2 sizes at the store near me one is 3/8" x 15' and the other is 5/16" x 15'. They both are price pretty close about $19.99. I checked and the only available size at the store is 3/8" (.37) round a little bulky for the sliding glass that requires .25 or 1/4" and the fixed glass requires .35 or 23/64". I maybe able to get by on the rear glass and may have to fiddle with the sliding glass to get this to work.

 Mar 26, 2014 | 11:54 AM
#446
I have never had to reinstall the glass. I hear you can reuse the old stuff but not sure on that. As I understand it, you can heat with a heat gun.
I am eventually going to install a headliner in mine. I have removed them before but never installed one. Practice in the boneyard and I think you will be suprised at how easy I think it would be. Mine has stains on it and waiting to find one. I think I know where one is at and will get it soon as I get a chance to get out to the yards.
I hear you on getting whammed with several things, taxes, doctor bills, dental, and something else I cant recall right off. 2014 has started out with a bang. I am trying to get some of these projects wrapped up so I can flip a few trucks to off set some of the things going on. I am going to be busy this year.
Mar 30, 2014 | 12:43 PM
#447
Thread Starter
Registered User
iTrader: (1)
Joined: May 2012
Posts: 835
Likes: 2
From: South Florida
Terry, I don't think I can reuse the old butyl to reinstall the glass. I don't think it will seal up good.
The headliner is bothering me. Every time I drive the truck I have to look up at it even though it's on the drivers side. Well some day I'll have to get around to it, I found a few aftermarket companies with replacements.
Yeah, well the only good news to happen this week was getting 4 out of 6 number for the lottery. not much but at least a few bucks.
Mar 30, 2014 | 12:58 PM
#448
My headliner is stained and I cant get it clean, when I get a chance to the yard I will see what it is like to replace one. I dont think it will be bad. Two more numbers and you would of had life on easy street.
Mar 30, 2014 | 01:19 PM
#449
Thread Starter
Registered User
iTrader: (1)
Joined: May 2012
Posts: 835
Likes: 2
From: South Florida
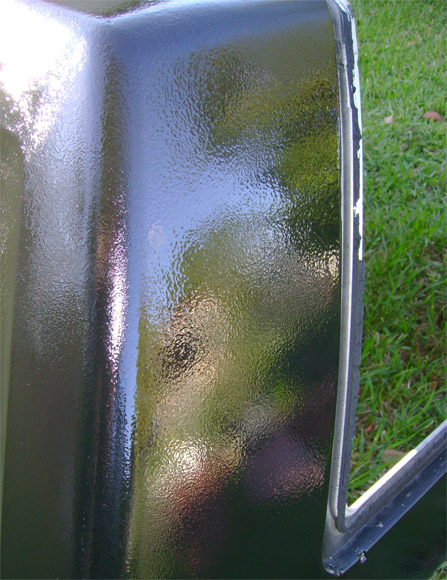
I have been on and off on the topper with less attention to the fix and clean up of the windows for the topper.
As you all know I painted the topper first with a furry roller, bad news. I sanded down the topper, but ended up with little porcupine needles sticking up about 1/16". Upon Terry's suggestion to singe the roll I took a torch and lightly singed those 1/16" hairs on the topper andit worked out great.
https://www.yotatech.com/52176288-post417.html
The next go around I decided to spray paint with a spray gun, and it looks great until it dried (didn't take photos of that to embarrassed on that out come). You can see the haze marks of the spray. but as usual you should be able to sand with 1000 or better and then buff it. That worked out to some degree, but I couldn't get it where you couldn't see it. Since the topper is textured I couldn't get down into those points. So next step is rolling it again this time with a foam roller and a foam brush. which is my next step this week. I have to leave town again and will be back on Tuesday.
Mar 30, 2014 | 01:21 PM
#450
Thread Starter
Registered User
iTrader: (1)
Joined: May 2012
Posts: 835
Likes: 2
From: South Florida
You ain't kidding on those numbers, but like my wife said to me this morning I'm to simple minded and prefer to do things the hard way. Yeah, I can buy things a little easier, but I'd still be driving my 4runner. Hope you get something at the bone yard I'd sure like to see how you replace it.
Apr 2, 2014 | 05:41 AM
#451
Thread Starter
Registered User
iTrader: (1)
Joined: May 2012
Posts: 835
Likes: 2
From: South Florida
topper Paint
Okay I think this is where I'm at with painting the topper. I've got about 4 coats of Rust-oleum on there trying out different ways of painting it.
1) the first time I painted it was with what I call a furry roller, that was a very bad idea, but terry had a good idea to singe the roller prior to using it. I didn't do that when I did my rolling so I had hairy fibers all through out the paint. I ended up sanding and got a 5 o'clock shadow. I ended up singe the 5 o'clock shadow with a torch right off the topper. Cleaned up those hairy fibers pretty good.
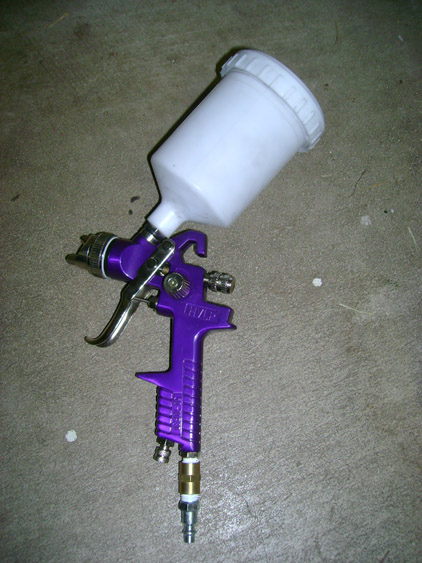
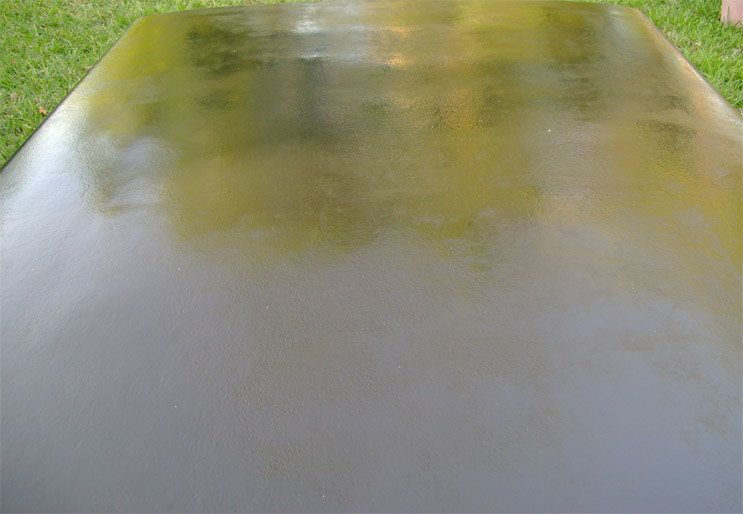
2) Next I tried painting with a air sprayer and thinned out paint. Looked good when it went on. Once it dried I noticed that there where over spray lines on the topper. I realized that the topper is textured and sanding it wouldn't help much, but I didn't like what I was looking at. After sanding I buffed it with one of those drill type buffing kits you get at HF for a few bucks. That still didn't help, so I decided to spray again. It came out better, but I myself was too pleased. That puts me at 3 layers of paint.

3) this is my last layer of paint, but it came out So So as I looked at it this morning after it dried this morning. A little better than be for, I must of added to much thinner to the paint as I can see some marks on it a little to light in some areas and in some areas that its just looks like its to much. Got to work on those issues.
These pictures are from yesterday late afternoon early evening.
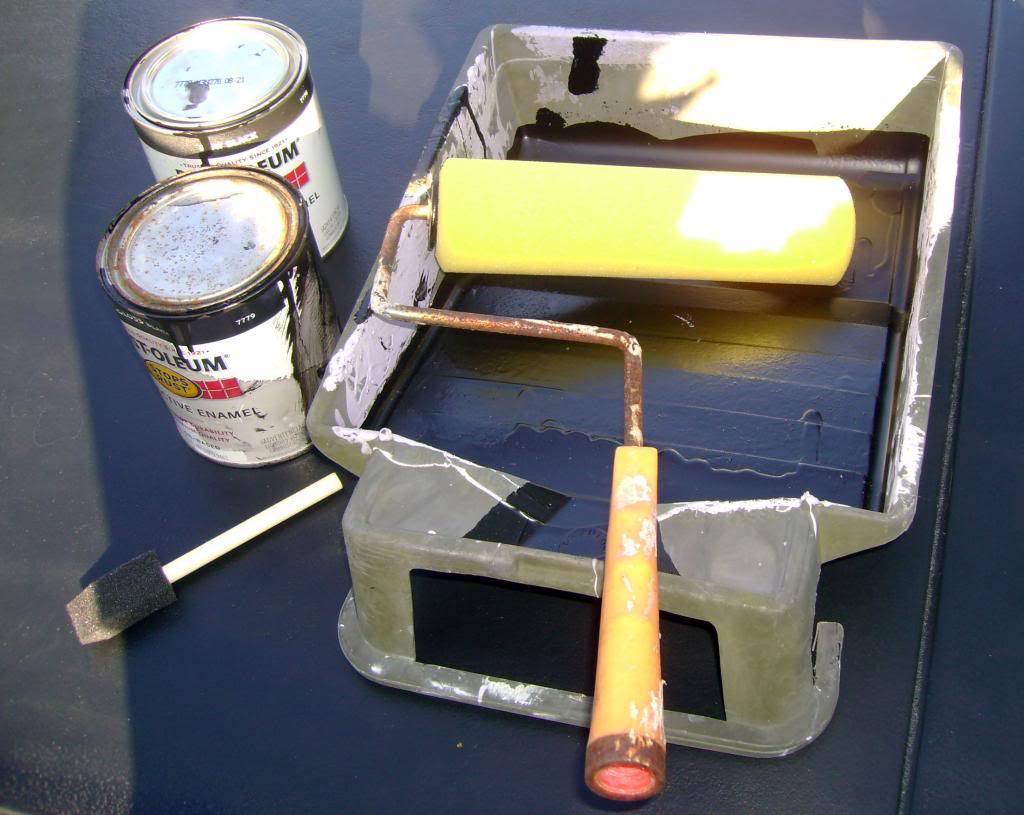
Same paint it as when i started so that would put me at $13 for paint still after 4 coats. A foam roller and a foam brush just to catch those areas that the roller couldn't get. All this will help me with the other topper and hopefully the turn out would be much better. Remember this topper is from the 86 4Runner which I plan on putting it back on that truck since the interior is different in color. I may repaint this one again once I start the 86 4runner and put this back on it.
These next 2 photos are from last night just after I finish rolling it which is completely different now that it is dry.
1) the first time I painted it was with what I call a furry roller, that was a very bad idea, but terry had a good idea to singe the roller prior to using it. I didn't do that when I did my rolling so I had hairy fibers all through out the paint. I ended up sanding and got a 5 o'clock shadow. I ended up singe the 5 o'clock shadow with a torch right off the topper. Cleaned up those hairy fibers pretty good.
2) Next I tried painting with a air sprayer and thinned out paint. Looked good when it went on. Once it dried I noticed that there where over spray lines on the topper. I realized that the topper is textured and sanding it wouldn't help much, but I didn't like what I was looking at. After sanding I buffed it with one of those drill type buffing kits you get at HF for a few bucks. That still didn't help, so I decided to spray again. It came out better, but I myself was too pleased. That puts me at 3 layers of paint.
3) this is my last layer of paint, but it came out So So as I looked at it this morning after it dried this morning. A little better than be for, I must of added to much thinner to the paint as I can see some marks on it a little to light in some areas and in some areas that its just looks like its to much. Got to work on those issues.
These pictures are from yesterday late afternoon early evening.
Same paint it as when i started so that would put me at $13 for paint still after 4 coats. A foam roller and a foam brush just to catch those areas that the roller couldn't get. All this will help me with the other topper and hopefully the turn out would be much better. Remember this topper is from the 86 4Runner which I plan on putting it back on that truck since the interior is different in color. I may repaint this one again once I start the 86 4runner and put this back on it.
These next 2 photos are from last night just after I finish rolling it which is completely different now that it is dry.
Apr 2, 2014 | 02:04 PM
#452
Thread Starter
Registered User
iTrader: (1)
Joined: May 2012
Posts: 835
Likes: 2
From: South Florida
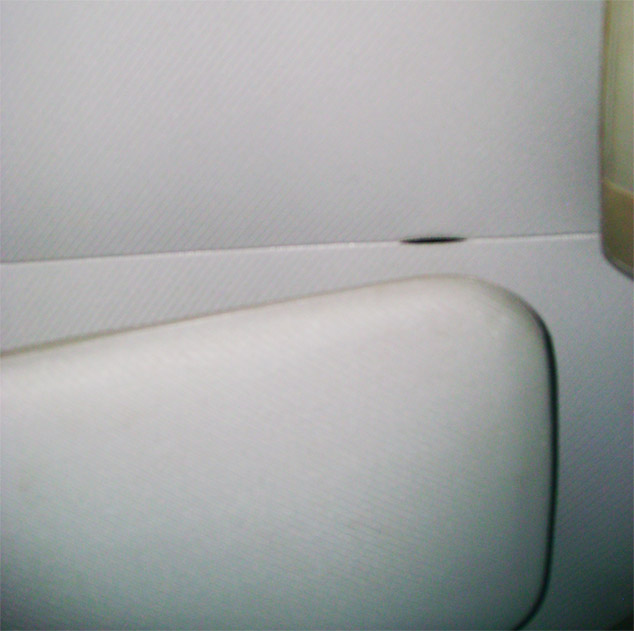
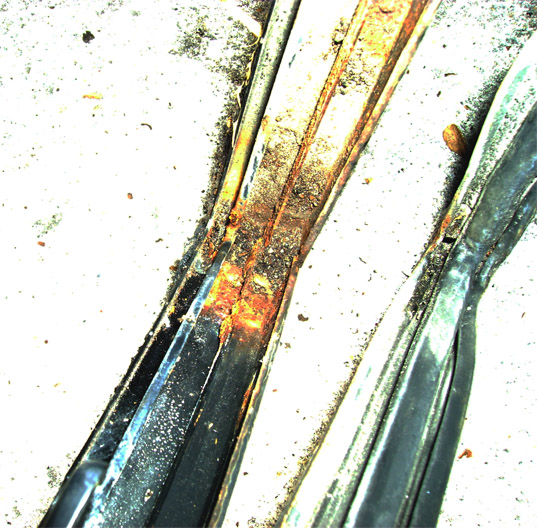
In the mist of all this paint and drying I've been playing with the sliding glass frame which is a common issue of rust on the frame and the L trim. Of course that would have to be because of age. I can see one of the biggest factors of these frames rusting out is because the drain holes getting all clogged up.

This is back corner of the sliding glass frame, clogged up with crud like this keeping it moist and causing it to rust. The rubber seal and guide have dried up and it feels brittle plus all that same garbage is stuck on the rubber. I took a small wire brush and scrubbed it down. Then soaked it in a bucket of water to loosen up the dirt and scrub some more.
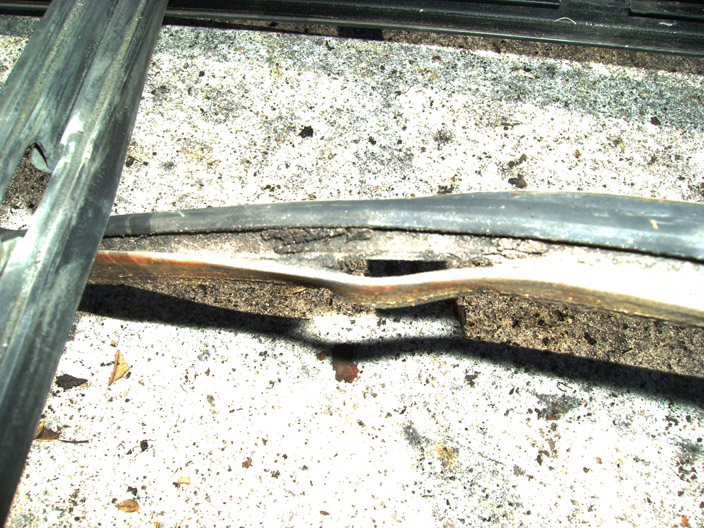
These pieces were mounted with the center bar top and bottom. i'm guessing some sort guide for the glass.


The bottom of the frame drain holes were also clogged up with the same causing more rust. The rubber seal at the bottom of the frame is very hard and dry, mostly because of the crud. That crud at the bottom of the rubber seal needs to be cleaned up so it doesn't hold water again as that stuff will absord moisture and hold it longer. Once I finished cleaning it up I notice that the rubber seal was much softer. I'll get a picture of that later. I plan on spraying it up with some silicone spray by Blaster to revitalize the rubber.

I was able to wire wheel the channel that's rusted, but the design of the lower channel is a little complicated. There's rust under a part of the lower frame that you can't get too. Here's what I'm talking about.

I poured a little paint thinner in there in hopes to clean it out that part of the channel I can't get to, but that does little to nothing. I'm going to see if i can spray some rust converter or reformer which ever I can find.
This is back corner of the sliding glass frame, clogged up with crud like this keeping it moist and causing it to rust. The rubber seal and guide have dried up and it feels brittle plus all that same garbage is stuck on the rubber. I took a small wire brush and scrubbed it down. Then soaked it in a bucket of water to loosen up the dirt and scrub some more.
These pieces were mounted with the center bar top and bottom. i'm guessing some sort guide for the glass.
The bottom of the frame drain holes were also clogged up with the same causing more rust. The rubber seal at the bottom of the frame is very hard and dry, mostly because of the crud. That crud at the bottom of the rubber seal needs to be cleaned up so it doesn't hold water again as that stuff will absord moisture and hold it longer. Once I finished cleaning it up I notice that the rubber seal was much softer. I'll get a picture of that later. I plan on spraying it up with some silicone spray by Blaster to revitalize the rubber.
I was able to wire wheel the channel that's rusted, but the design of the lower channel is a little complicated. There's rust under a part of the lower frame that you can't get too. Here's what I'm talking about.
I poured a little paint thinner in there in hopes to clean it out that part of the channel I can't get to, but that does little to nothing. I'm going to see if i can spray some rust converter or reformer which ever I can find.
Apr 3, 2014 | 02:21 AM
#453
Top is looking good. I use a high pressure air hose to get alot of that crud out. I am sure some still trapped in somewhere but I work if from different directions. The way it is designed it is a big trap area.
Apr 3, 2014 | 03:58 PM
#454
Thread Starter
Registered User
iTrader: (1)
Joined: May 2012
Posts: 835
Likes: 2
From: South Florida
Oh and on your post about the Plugs, i meant the spark plugs. Wire can be very expensive and where you try to get it. But on those spark plugs, I'm surprised that I can get them at the dealer way less than the local auto parts store.
Apr 3, 2014 | 04:10 PM
#455
Thread Starter
Registered User
iTrader: (1)
Joined: May 2012
Posts: 835
Likes: 2
From: South Florida
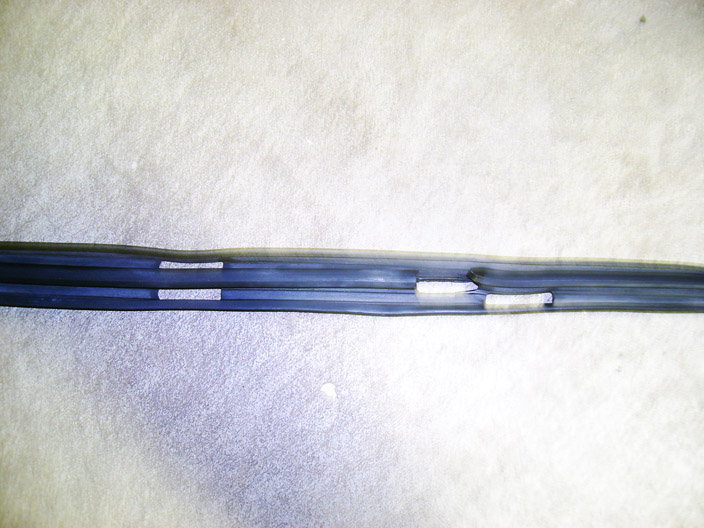
Thanks to Terry about using silicone on the rubber gaskets and seals in his prior postings about using it on the door windows, I used it on the seal for the sliding glass on the topper. First i soaked for about 1/2hr in some soapy water then scrubbed some more. Let is dry over night and then sprayed it with PB Silicone Spray. Not to shabby for over 25 years of wear and it is softer.


Apr 3, 2014 | 04:19 PM
#456
Thread Starter
Registered User
iTrader: (1)
Joined: May 2012
Posts: 835
Likes: 2
From: South Florida
Didn't get much done on the topper, kind of late and had a bunch of honey do's to get done.
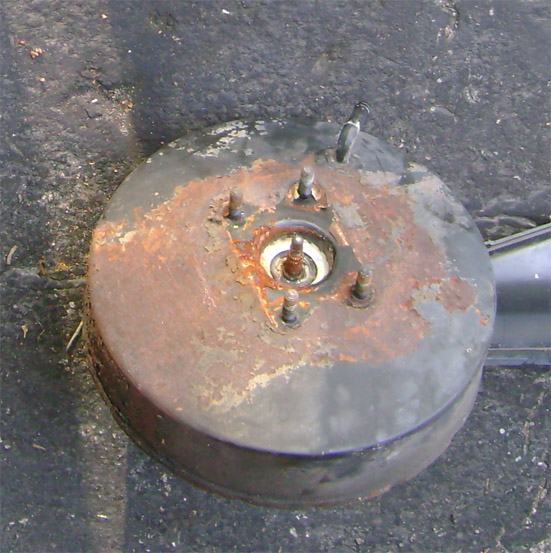
You all remember the Brake booster that I picked up at the other day. I did get that all cleaned up and just painted it today.
Here's the before i cleaned it up.
Here's the after

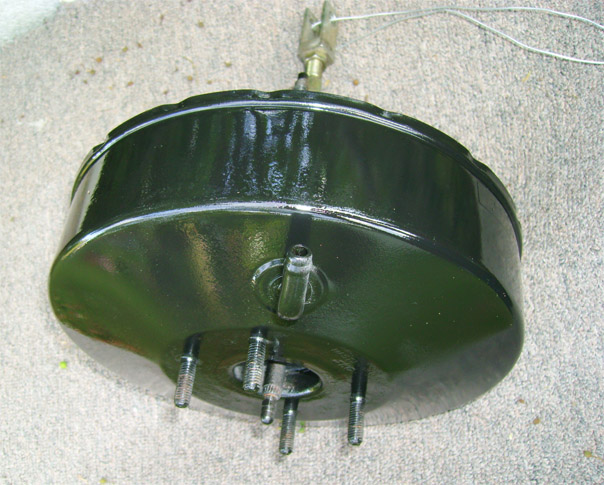
Can't beat that price... Free from the scrap yard and a little muscle to clean, wire brush, and sand, and some left over engine paint. I'll end up pulling the one in the truck and putting this one in and cleaning up the one I pull out. I really can't beat the price FREE.
You all remember the Brake booster that I picked up at the other day. I did get that all cleaned up and just painted it today.
Here's the before i cleaned it up.
Here's the after
Can't beat that price... Free from the scrap yard and a little muscle to clean, wire brush, and sand, and some left over engine paint. I'll end up pulling the one in the truck and putting this one in and cleaning up the one I pull out. I really can't beat the price FREE.
Apr 3, 2014 | 04:24 PM
#457
Thread Starter
Registered User
iTrader: (1)
Joined: May 2012
Posts: 835
Likes: 2
From: South Florida
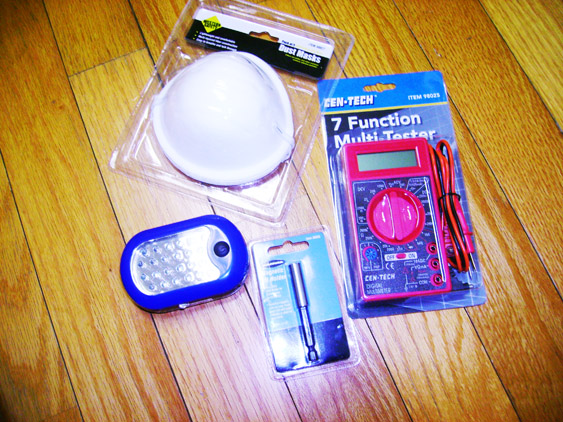
This afternoon i drove by HF and picked up a few items that I wanted. I needed an extra mag bit holder as someone is always pilfering mine. And I thought I'll pick up a couple of dust masks. Strange though, everything I picked up was a $1.00 and I had some coupons that i used so all this you see below was $2.00.


 Apr 4, 2014 | 10:18 AM
#459
Thread Starter
Registered User
iTrader: (1)
Joined: May 2012
Posts: 835
Likes: 2
From: South Florida
Well, had a little time this morning so I fooled around with a Master Brake Cylinder I have that was given to me from Coryc85. I emailed him about it and he said they were working that he upgraded his Brake MC for the 1" Bore. He said they worked much better.
Knowing what I had done in the past with these trucks and won't be doing them anytime soon, I thought these brakes were just fine when I bought the truck brand new in 1986. I think i mentioned here before that I towed a great amount weight I'd say a lot. Back in the 80's a buddy and I rented a tandom u-haul and loaded it up. Went running down the highway about 60mph until we notice smoke coming out the back of the trailer. The wheel well on the trailer were sitting on the tires with all the weight in there. Max GVW was 4,400 but with the wheel well touching the tire you know we had more weight in there.
Anyhow I need to work on the brakes and the simplest way is to just rebuild then replace. So with this Brake MC i took it a part and I think I can see what the problem is. The line is clogged up with crud. My cheap snap ring tool broke so I have to wait to take the whole this apart, but here is what I've taken apart so far.
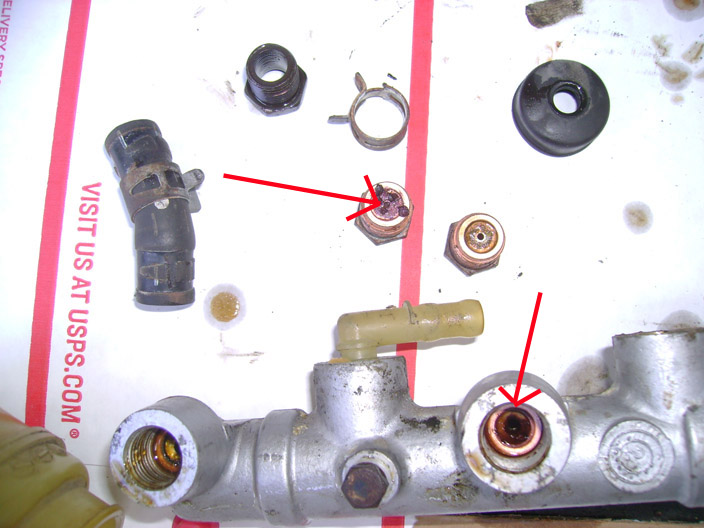
Those arrows there are pointing are things that are in question. The arrow on the right that port looks to be clogged with crud, the one on the left is that fitting and it is plugged up as well, but the stuff you see on top is that fell out from behind when I took the fitting off. I can't wait to get a snap ring plier to pull the rest out and see if what needs to be replaced. I'm looking at replacing all the rubber pieces if the piston isn't bad.
Knowing what I had done in the past with these trucks and won't be doing them anytime soon, I thought these brakes were just fine when I bought the truck brand new in 1986. I think i mentioned here before that I towed a great amount weight I'd say a lot. Back in the 80's a buddy and I rented a tandom u-haul and loaded it up. Went running down the highway about 60mph until we notice smoke coming out the back of the trailer. The wheel well on the trailer were sitting on the tires with all the weight in there. Max GVW was 4,400 but with the wheel well touching the tire you know we had more weight in there.
Anyhow I need to work on the brakes and the simplest way is to just rebuild then replace. So with this Brake MC i took it a part and I think I can see what the problem is. The line is clogged up with crud. My cheap snap ring tool broke so I have to wait to take the whole this apart, but here is what I've taken apart so far.
Those arrows there are pointing are things that are in question. The arrow on the right that port looks to be clogged with crud, the one on the left is that fitting and it is plugged up as well, but the stuff you see on top is that fell out from behind when I took the fitting off. I can't wait to get a snap ring plier to pull the rest out and see if what needs to be replaced. I'm looking at replacing all the rubber pieces if the piston isn't bad.
Apr 4, 2014 | 10:25 AM
#460
Thread Starter
Registered User
iTrader: (1)
Joined: May 2012
Posts: 835
Likes: 2
From: South Florida
Your 4Runner is looking great, and so is your buddy's truck. Amazing how the 84 truck is coming out.


