
Xyphus42's 85 4Runner Build-Up Thread
 May 7, 2011 | 08:30 PM
#1
Thread Starter
Registered User
Joined: Mar 2011
Posts: 103
Likes: 0
From: New Castle, CO
Well to start things out.....
Blew the motor in my 85 threw the rod out the side of the block on #3....
That being said I thought I would attempt a 3RZ stroker, that failed miserably!
So being that I bought a 81-82 engine for that failed attempt, I will be converting it to a 22RE Tall block.
I had just rebuilt my head 300 miles before throwing the rod so that work is all done. Just a little clean up in the chambers. I wouldn't have thought that 300 miles would have gunked the valves and chambers that much. But it did.
So, in the head I have all new rockers (old shafts but will be replacing them for the high oil type during the rebuild ) I had also bought the 261C Crawler cam from Engnbldr during that head job.
Now for a little of the fun stuff.
Doing my research, I have found that I will be needing a half link for the timing chain and a adjustable timing gear. I already have the link popper, so no biggie. Reason behind this is that the heads have a difference in the Head Deck Height. Distance from the head sealing surface to the center line of the cam. According to LCE:
Deck height on a cylinder head is the distance between the bottom of the "Camshaft Journal" to the "Surface of the Cylinder Head" itself. Toyota 20R, 22R and 22RE cylinder heads have these factory deck heights:
Early 20r/22R Heads 75-84 3.290"
Late 22R/22RE Heads 85-95 3.130"
I have not measured mine but I know it was milled a little during the last head job. again 300 miles not going to worry about it... gasket was in great shape when I pulled the head/engine this afternoon.
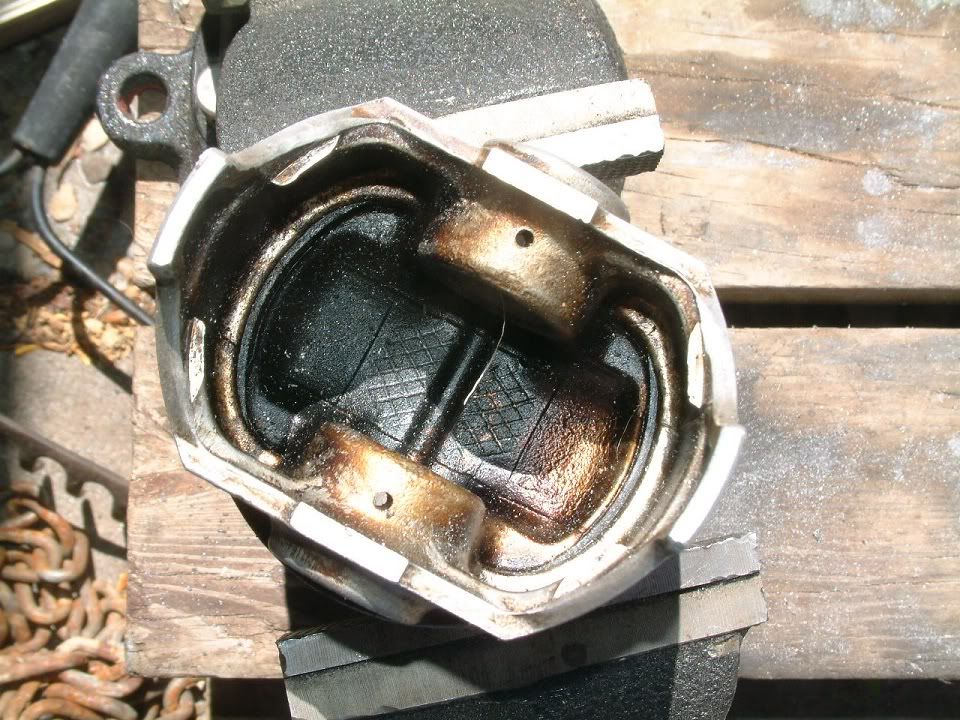
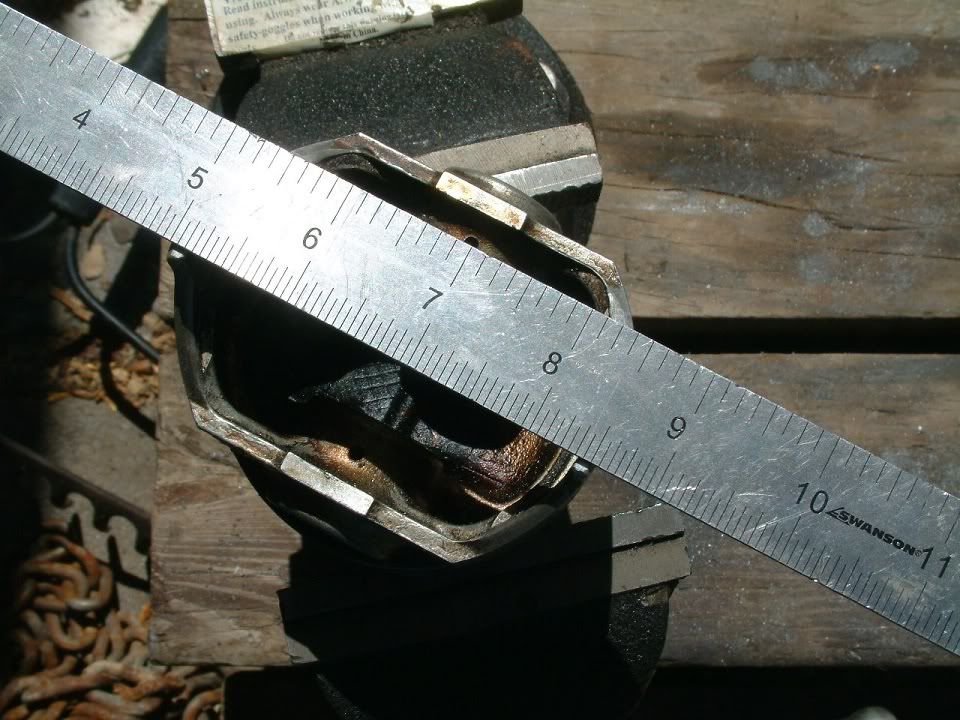
As a side note... Cylinder #1 was the only one in the engine that came up to proper quench... apparently the engine was redone before my father bought it many years ago. Cyl's 2 and 4 were at least 1/8" below deck height... cyl 3 have no idea it was blown out.
Blew the motor in my 85 threw the rod out the side of the block on #3....
That being said I thought I would attempt a 3RZ stroker, that failed miserably!
So being that I bought a 81-82 engine for that failed attempt, I will be converting it to a 22RE Tall block.
I had just rebuilt my head 300 miles before throwing the rod so that work is all done. Just a little clean up in the chambers. I wouldn't have thought that 300 miles would have gunked the valves and chambers that much. But it did.
So, in the head I have all new rockers (old shafts but will be replacing them for the high oil type during the rebuild
) I had also bought the 261C Crawler cam from Engnbldr during that head job.Now for a little of the fun stuff.
Doing my research, I have found that I will be needing a half link for the timing chain and a adjustable timing gear. I already have the link popper, so no biggie. Reason behind this is that the heads have a difference in the Head Deck Height. Distance from the head sealing surface to the center line of the cam. According to LCE:
Deck height on a cylinder head is the distance between the bottom of the "Camshaft Journal" to the "Surface of the Cylinder Head" itself. Toyota 20R, 22R and 22RE cylinder heads have these factory deck heights:
Early 20r/22R Heads 75-84 3.290"
Late 22R/22RE Heads 85-95 3.130"
I have not measured mine but I know it was milled a little during the last head job. again 300 miles not going to worry about it... gasket was in great shape when I pulled the head/engine this afternoon.
As a side note... Cylinder #1 was the only one in the engine that came up to proper quench... apparently the engine was redone before my father bought it many years ago. Cyl's 2 and 4 were at least 1/8" below deck height... cyl 3 have no idea it was blown out.
May 8, 2011 | 09:29 AM
#4
Thread Starter
Registered User
Joined: Mar 2011
Posts: 103
Likes: 0
From: New Castle, CO
James Woods:
Stroker failed because the main bearings were 24 mm on the 3RZ crank which caused the cylinder bores to be way off. 1 and 4 were pushed to the front and back respectively by about 1/4 inch in each direction. the rods would have been riding on the edge of the piston boss... not good and the main bearings would have had a huge gap at 1-2 and 4-5. As well as the rear main seal was way too thin. it would have been in the farthest back section of the seal housing. Total redo/fab on the housing was only way to have it fit. That would have caused the flywheel to be 1/4"+ too far forward.
Ocdropzone:
As a straight swap you are right... domes would hit the head and be a big mess. But looking around i found that some of the ford and chevy guys who did circle track would actually cut the tops off their pistons to make the "Flat Top" rule.
So after measuring the thickness of the 22r dome pistons, I found that they have .200" in the thinnest part when you cut all the dome off. the circle track guys said they would go no less then .125" So I figure the .200" was thick enough. The machine shop will be lathing (sp?) the tops off the pistons for me and as well putting in the stock valve reliefs in position of the 22re pistons. when he gets them cut down I will mock up and check for valve clearance and send them back for fine tuning. All told ~$200 for the set with the machining. Cheaper then $600 set of customs.
May 8, 2011 | 10:02 AM
#5
Thread Starter
Registered User
Joined: Mar 2011
Posts: 103
Likes: 0
From: New Castle, CO
Other things that will be going into this build/rebuild...
Port match all surfaces.
Speaking of, has anyone ported the timing cover to improve water/oil flow? There is a ton of ledges and flash on the timing cover, just wondering if anyone has done it if it is even a good idea.
Balance internals/externals. Crank, rods, harmonic balancer, and flywheel.
I was considering porting my head but after reading up on some of it, I have decided against it. Reason being I do not wish to lose ANY low end torque. The porting causes the torque go up in the rpm band. Not what I want. This is a primarily hunting/4Wheeling vehicle and all the low end I can get the better. I don't want power in the high 4k rpm range I need it more in the 2-3k range.
One thing I may do however is "trough" the short radius area of the intake. Take a small amount out of the swirl ledge on the intake side.
But I am not sure on that one either.
May 8, 2011 | 10:10 AM
#6
Thread Starter
Registered User
Joined: Mar 2011
Posts: 103
Likes: 0
From: New Castle, CO
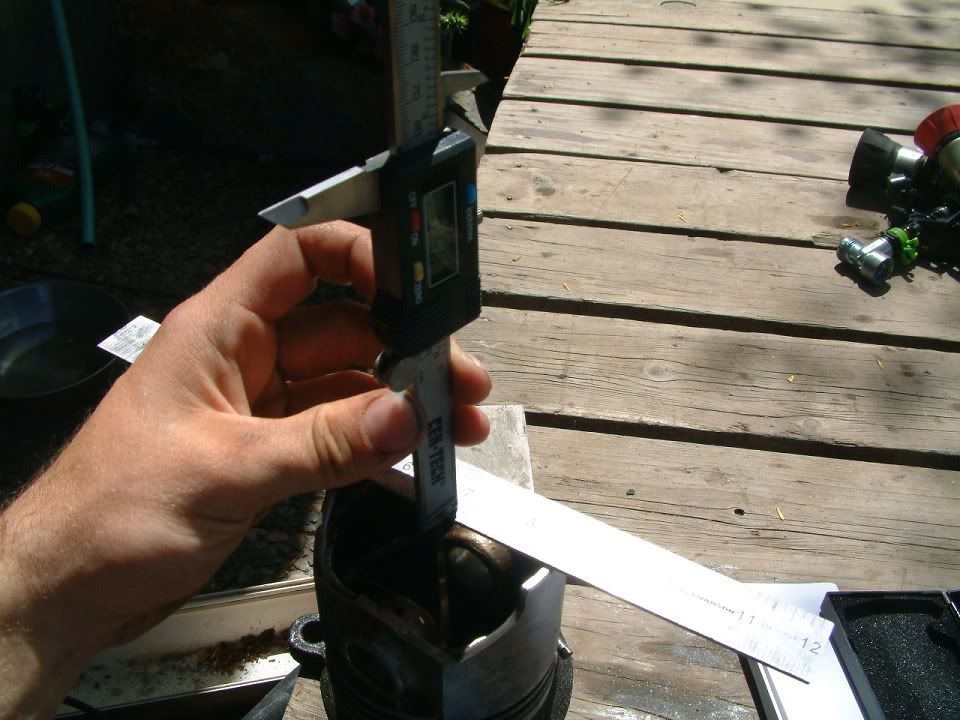
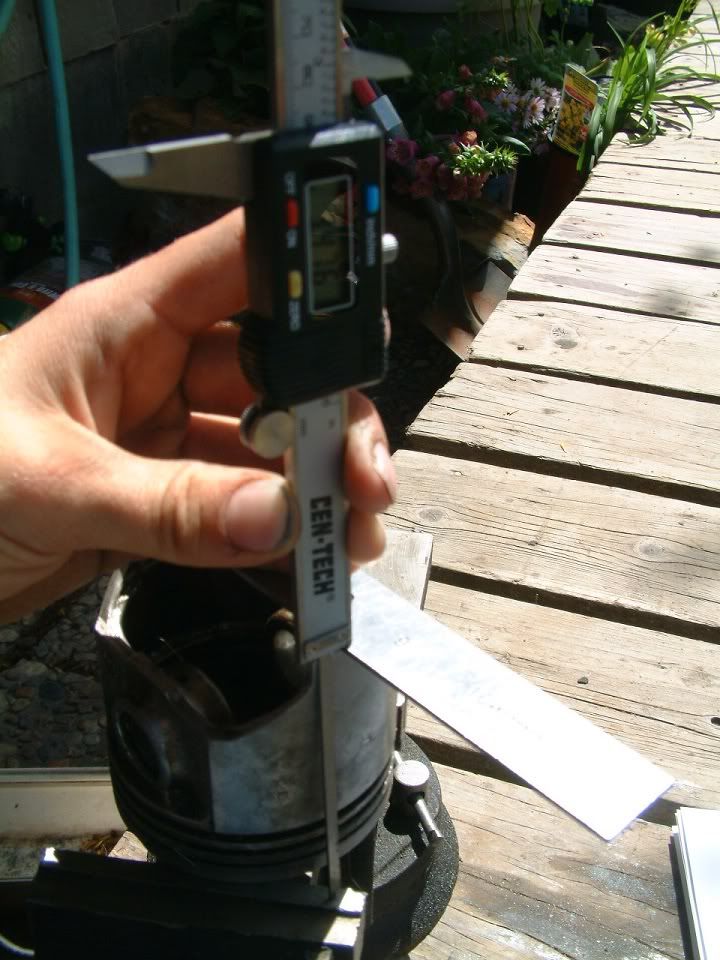
Update on the pistons:
looks like they have more like .235" thickness in the thinnest area. Got a better caliper in and used it just now.
Measurements as follows:
set the piston in a vise or other flat surfaced area to accommodate the dome. Use a straight edge across the skirts. Take a measurement out side the piston from the straight edge down to the vise/block. Take more measurements inside the piston inside the low areas. Subtract the inside numbers from the outside number. If you end up with a negative number then cutting is impossible. Or to be safe anything with less then .150"
Trending Topics
May 8, 2011 | 10:37 AM
#8
Thread Starter
Registered User
Joined: Mar 2011
Posts: 103
Likes: 0
From: New Castle, CO
Oh almost forgot...
Since this is a build up thread. I forgot to say what kind of half link...
Its a British standard 3/8" pitch link. Part number 06B-1 found one on amazon, after shipping it was $8.50. Only downside I see to it is that its a cotter pin style, with a "D" shaped hole on the cotter pin side. I will try and re-shape it to a circle because I don't trust cotter pins, especially when they are that small. And with the rpm's of this chain I don't want the pin to wear through and explode in the timing cover.
May 8, 2011 | 10:46 AM
#9
Thread Starter
Registered User
Joined: Mar 2011
Posts: 103
Likes: 0
From: New Castle, CO
will post some pics when the camera finishes charging
its a cen-tech steel caliper digital read out accurate to .001"
will also post some of the set-up pics on the measurements...
sorry for the confusion, the method above i found was for a quick and easy way to see if it is possible for cutting. it was not intended to be a "super" accurate way to find the dome thickness. Ocdropzone is correct, the only way to have a truly accurate measurement is to cut the piston section and micrometer it. If you have a spare piston that is.
 May 8, 2011 | 04:20 PM
#12
Registered User
Joined: Apr 2010
Posts: 43
Likes: 0
From: Floriduh & South Africa
I went with these and never looked back... http://www.summitracing.com/parts/UEM-9070-1-5MM/ Good slugs for under $80. Mine are 94mm. When I built my engine, I decked the block .010" and the head .015" Crank was spun ballanced and drilled for weight, rods gound for matching weight and flywheel weighted for torque. I was going to o-ring it, but decided against for various reasons. I did not "port" the heads, but did cut for big valves and a moderate cam. I have an LCE adj timing gear-did not need half link. The big kick came from gasket matching the intake. My next goody after getting mine back on the road will be offy intake and 2300 holley. My current setup turned 203hp at 5730rpm and 216 ft lb at 3190rpm on a chassis dyno. Another 45hp would rock. It smokes all 4 bfg mud terrains as is on tar
Last edited by BigRob; May 8, 2011 at 04:24 PM.
May 8, 2011 | 10:33 PM
#13
Thread Starter
Registered User
Joined: Mar 2011
Posts: 103
Likes: 0
From: New Castle, CO
Yeah that looks real nice. 
Were you using the early style block? Thats the only one I have.
$80 per slug is cheap... sort of J/K
J/K
I'm looking at <$200 for the set less then $50 per slug
Have a very tight budget on this. So the extra $120 can go to other parts.
As well as I am using EFI. I like that EFI never stalls due to bouncing and steep inclines. Which is where i find my self most of the time, bouncing on a steep hill
Were you using the early style block? Thats the only one I have.
$80 per slug is cheap... sort of
J/KI'm looking at <$200 for the set less then $50 per slug
Have a very tight budget on this. So the extra $120 can go to other parts.
As well as I am using EFI. I like that EFI never stalls due to bouncing and steep inclines. Which is where i find my self most of the time, bouncing on a steep hill
May 8, 2011 | 10:41 PM
#14
Thread Starter
Registered User
Joined: Mar 2011
Posts: 103
Likes: 0
From: New Castle, CO
Tore into the old motor some more this afternoon...
my pickup tube is mangled but hopefully salvageable. Learned a trick from a plumber friend for straightening bent and squished pipe.
Take a crescent wrench and size it to slightly bigger then the piece of good pipe. spin the wrench around the pipe and work your way over the squished or ovaled section.
Takes some work but will save me a bunch of money.... those pipes are PRICEY!!!
May 8, 2011 | 11:05 PM
#15
Thread Starter
Registered User
Joined: Mar 2011
Posts: 103
Likes: 0
From: New Castle, CO
One thing I was looking at....
The oil gallery for the rocker arms... That seems to me like a very very tiny passage for all the rockers... and restrictive to boot. The oil has to pass by the head bolt/stud by way of a cut out in the gasket and small relief in the head surface. I may see if I can open that up a little. Possibly drill the gallery out a little bit and open up the relief a little.
I still haven't heard if anyone opens up the timing cover ports...
Liquids are just like air, as far how they flow so I would think it would help to remove the restrictions. Just like a clogged artery in your heart, so too is the oil/water galleries in your engine. Only instead of a heart attack you either over heat or lock up a bearing.
May 9, 2011 | 02:01 AM
#16
Registered User
Joined: Apr 2010
Posts: 43
Likes: 0
From: Floriduh & South Africa
Last edited by BigRob; May 9, 2011 at 02:09 AM.
May 9, 2011 | 09:25 AM
#17
Thread Starter
Registered User
Joined: Mar 2011
Posts: 103
Likes: 0
From: New Castle, CO
Yep those are the late style pistons... the compression height is not right for the tall block.
If I were doing a laser style block those would definitely be going in.
As it is I'm working on a tall block and need the old style pistons because of compression height. And the $200 is for the pistons and rings and the machining. I did look however at the KB's and found the 9059h. Its an old style piston in hypereutectic that is still full height. Not destroked like quite a few of them are.
Its $130/set from summit with out the rings and machining. Rings and machining would put me closer to $300-350/set.
Here's the link to summit:
http://www.summitracing.com/parts/UEM-9059H-1-0MM/
 May 10, 2011 | 07:55 PM
#20
Thread Starter
Registered User
Joined: Mar 2011
Posts: 103
Likes: 0
From: New Castle, CO
Ordered a big list of parts from Parts Dinosaur....
I know you get what you pay for but hey, check the list, best price on most of it and the shipping was minuscule.
1 Permatex Engine Assembly Lube PX81950 -ET $4.95
1 Permatex RTV Ultra Grey Sealer PX82194 -ET $5.99
1 22R Toyota Timing Kit with STEEL Guide (1983 -84 only) TS11810HD -PCI $44.00
1 22R/RE Toyota Pistons & Rings Package 1981 -84 RY6114 -ITM .040 (1.0mm) o/s $102.60
1 22R 22RE Toyota Connecting Rod Bushings PB900 -Rock $8.80
1 22R 22RE Toyota Thrust Bearings (1981 -7/84) TW908 -Rock $8.66
1 20R 22R 22RE Toyota Brass Freeze Plugs 96-40MMx6 -QualCast $10.95
1 22R Toyota Timing Cover Gasket Set (1981 - '84 only) TC908 -Rock $8.49
1 22R 22RE Toyota 2.4 Oil Pan Gasket PG900 -Rock $6.97
1 22R 22RE Toyota Head Gasket Set (85 -UP) (pear-shaped exhaust ports) AHS8020 -Apex $38.00
1 20R 22R 22RE 7MG Toyota Crank Rear Seal Repair Sleeve MS346 -MicroSleeve $8.95
1 22R Toyota Oil Pump 1981 - 84 OP948 -Rock $48.00
1 20R 22R 22RE Toyota Harmonic Balancer Repair Sleeve MS233 -MicroSleeve $7.95
Product Total $304.31
PD Discount -$9.13
Subtotal $295.18
UPS Ground $17.12
Tax Total: No Tax (0.00%) $0.00
Total $312.30
And pretty much the sealer and lube come free after the discount.


