
navyRedneck's 1985 Pickup Build-Up Thread
 Nov 10, 2007 | 01:14 PM
#162
Thread Starter
Contributing Member
Joined: May 2006
Posts: 377
Likes: 0
From: South Carolina
I wheel every day... I wheel it back and forth to work, and every day that I go into the woods.  Unless we move to where I can rock crawl I'll use it for what I need it (DD and woods runner).
The good thing is that as a DD it's easier to justify to my wife why I need to keep spending money on it...
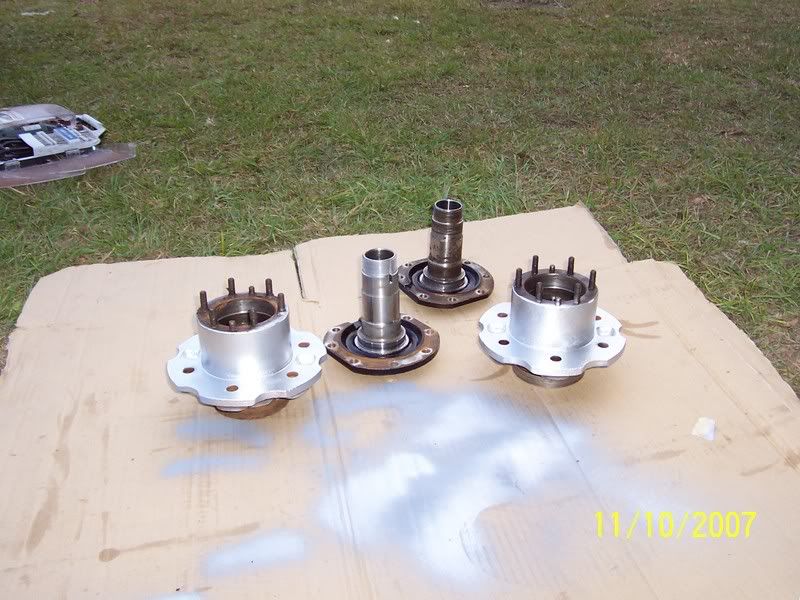
I painted the hubs and spindles today. I decided to only ceramic coat the outside surfaces of the hubs. The rest got some black brightside that I had sitting around. After the hubs cook for an hour and a half I'll paint the other side with the black brightside.
I'm also still trying to figure out what I need to use for the FROR floating rear axle kit. Here's a pieced together schematic of a stock SFA.
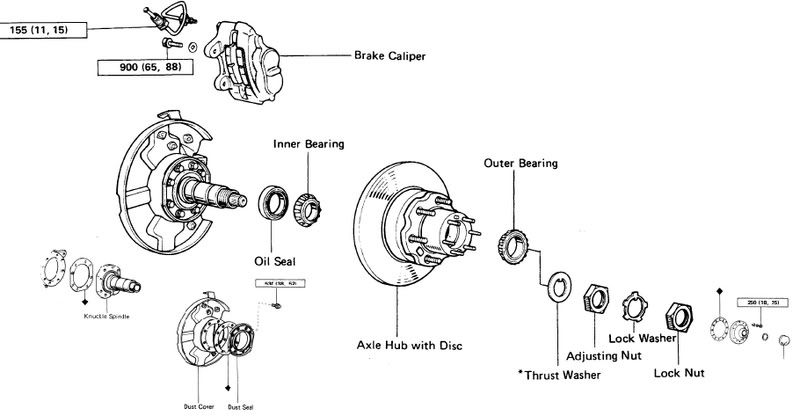
In order from inside to outside, I have an adapter ring, gasket, spindle, dust cover, gasket #2, dust seal, oil seal, bearings, rotor, hub.
Do I need the dust cover and dust seal?
What are the benefits of running the extra seals?
Realistically I think this won't get done until the last week of this month. I'm waiting as long as possible to order the rotors from Advance and all the misc gaskets from the stealership. Helps spread out the costs a little.
Unless we move to where I can rock crawl I'll use it for what I need it (DD and woods runner).The good thing is that as a DD it's easier to justify to my wife why I need to keep spending money on it...
I painted the hubs and spindles today. I decided to only ceramic coat the outside surfaces of the hubs. The rest got some black brightside that I had sitting around. After the hubs cook for an hour and a half I'll paint the other side with the black brightside.
I'm also still trying to figure out what I need to use for the FROR floating rear axle kit. Here's a pieced together schematic of a stock SFA.
In order from inside to outside, I have an adapter ring, gasket, spindle, dust cover, gasket #2, dust seal, oil seal, bearings, rotor, hub.
Do I need the dust cover and dust seal?
What are the benefits of running the extra seals?
Realistically I think this won't get done until the last week of this month. I'm waiting as long as possible to order the rotors from Advance and all the misc gaskets from the stealership. Helps spread out the costs a little.
Nov 10, 2007 | 02:44 PM
#163
 You'll get extra trunnion bearings and some of the knuckle wiper stuff you won't need, but then you'll have some trail spares.
The extra seals make is easy to service if needed, as opposed to RTVing it all up and then you can carry one knuckle service kit as a trail spare and service the front or rear if need be.
Instead of the dust shield just get the dust shiel eliminator plates.
I'd be happy to help you through the install or make other recommendations...and/or help you with the parts.
Just let me know.
 Feb 12, 2008 | 11:28 AM
#164
Thread Starter
Contributing Member
Joined: May 2006
Posts: 377
Likes: 0
From: South Carolina
I now know why EFI was such a big deal in the 80's...
I had to put the truck on hold for a while since the pace at my job picked up. Looks like I'll be heading to Boston, MA in April or May for a 3 year tour there.
I installed the weber 34/34 DGEC on my truck. Bought it from JT Outfitters with the claim "Plain and simple, we sell more Weber Conversions for Toyotas than ANYONE. This means you get our instructions, and we set them up. Sure, you may be able to get one from somewhere else, but we have the knowledge and experience to get it right the first time." The truth is that they don't know anything about carbs and refer you to Weber immediately at the first technical question.
On first install, it ran like crap, blowing thick, black smoke. Here was the stock jet sizes for the carb:
secondary (on the left side from front of motor) was a 47.5
primary or idle (on the choke side) was a 55
I called and got new jets, a 40 for the secondary and a 50 for the idle.
Still blowed black smoke although my mechanic switched them and it ran okay for a while but still too rich (and eventually too lean when I corrected some incorrect vacuum hose paths.) I finally plugged all vacuum lines with the exception of the one leading to both charcoal canisters, the brake booster one, the vacuum advance, the pcv hose, and the valve cover vent. I'm convinced that they are the absolute minimum.
I called Weber (a lot) and got the following info from Jose at ext 103 (IMHO the 22r expert at Weber): "You have a torque cam and oversize valves which results in more fuel/air which means too much for your stock size cylinders. You need to reduce the amount of fuel so keep jetting it down. The idle jet is the one on service nearly all the time. It is the one that you need to fix and then make sure the secondary is a smaller jet" Then I ordered a 45 after noticing the 47.5 on secondary and 40 on idle was too lean and I couldn't get it to run rich.
Enter the latest attempt: 40 on the secondary and 45 on the idle. It runs like a dream now. The tail pipe has not yet cleaned up and I'm waiting for my spark plugs to clean up just a bit more before I install the new NGK set. The power that it has now makes me think I am driving a race car. It still idles rough and loud but it has a lot more power. Hopefully this is not just another one of 80 times that I've said that I've finally fixed the carb.
I have a buddy with an oxygen sensor and air fuel meter. Still debating if I need to pay to get a bung welded on the exhaust pipe to measure the exhaust while at idle and driving down the road. This is probably the only way to dial it in just right. Right now I think I have other priorities (listed below).
Other projects:
Baked my hubs for 4 hours in the propane grill last night to bake on the ceramic finish. Hoping to finally install rear disc brakes soon!
Pulled off the inner bedsides and found lots of rust. Will probably herculine it soon.
Would like to finally install power steering but want to make sure the engine is A-okay first. Brian of wabfab sent the last parts that I needed.
Still haven't gotten around to welding up the rear bumper and rear axle shock tabs to flip the u-bolts. I'm tentatively hoping to tackle this later this week.
In the meantime, I'm packing up my family's junk, figuring out a way to get my truck towed to Boston, finding housing in Boston, and painting/cleaning up the current house. Looks like the next few months will be rough.
My current plan to tow the truck is behind a Budget/Penske 24' truck. I just hate paying the $300 to either company to rent a trailer. I'm watching craigslist hoping a trailer appears around $1000 that I could use and then resell in Boston. Paying someone seems to be around $600 on www.uship.com.
 Feb 12, 2008 | 08:34 PM
#166

You can read about most of the things you may need to deal with when installing a body lift:
- http://www.4crawler.com/4x4/ForSale/...ft_HowTo.shtml
- http://www.4crawler.com/4x4/ForSale/...ft_HowTo.shtml
 Feb 14, 2008 | 04:41 AM
#168
Thread Starter
Contributing Member
Joined: May 2006
Posts: 377
Likes: 0
From: South Carolina
Thanks, Squiddy! I'll probably be living on Hanscom AFB. How far are you from it? Do you know of any really good mechanics up there? I have one here who is awesome and I will definitely miss him. He's been really good at fixing the stuff that is beyond me.
Been finishing up the bedsides. Bought a herculiner kit yesterday for the bed and ordered my disc rotors and loaded calipers. Going to see the welder buddy today to see what we can do with the bumper and shock mounts.
Feb 15, 2008 | 06:20 AM
#169
Thread Starter
Contributing Member
Joined: May 2006
Posts: 377
Likes: 0
From: South Carolina
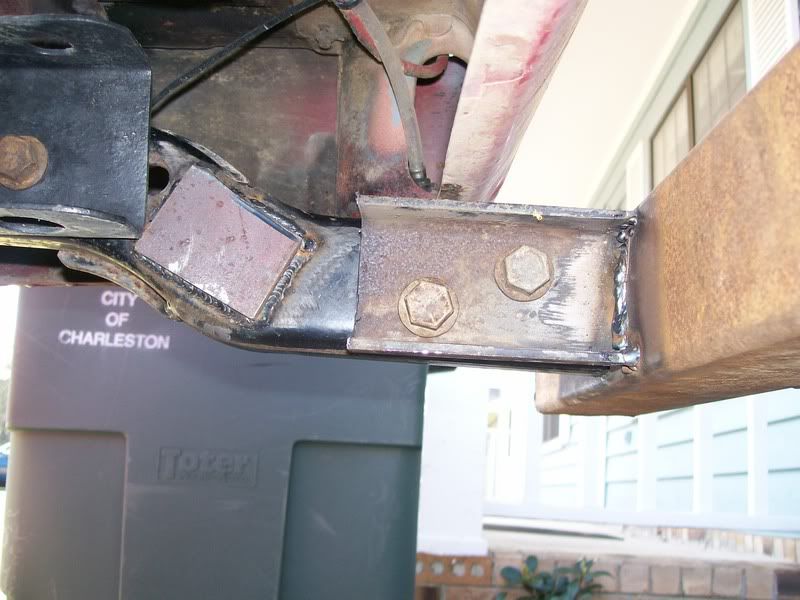
bumper is welded up and ready to paint
It took us about 4 hours to get all of this done. My buddy never went to welding school. He just bought a welder and started. I think it looks awesome!
I started with this some months ago:
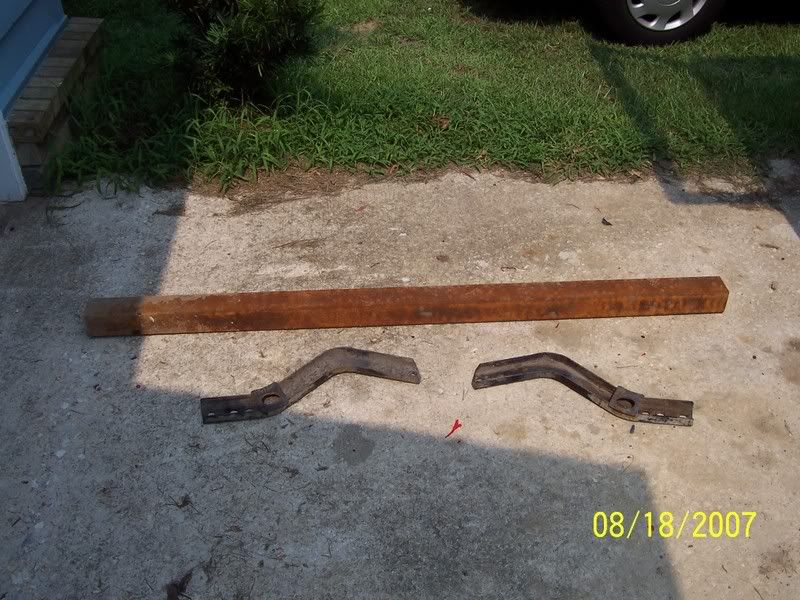
The 3/16" steel came from a scrapyard which cost me 6 bucks after I turned in some scrap. The brackets came free from a friend's junkyard. They came off a 2wd 87 toyota truck. I also took the bolts that went with the brackets
First I created a carboard template of the bracket and then did a Z cut on the bracket to shorten it how I wanted on the template. Then I transfered the template to the bracket and started cutting and welding:
My buddy saw some offroad truck show where they showed that the Z cut would be stronger. And yes, the brackets are on the outside of the frame because I couldn't fit it inside the way I wanted.
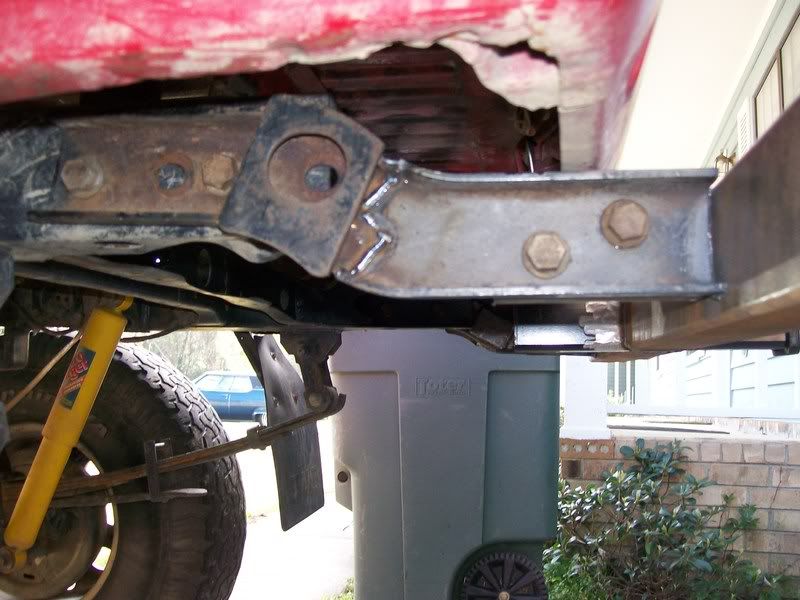
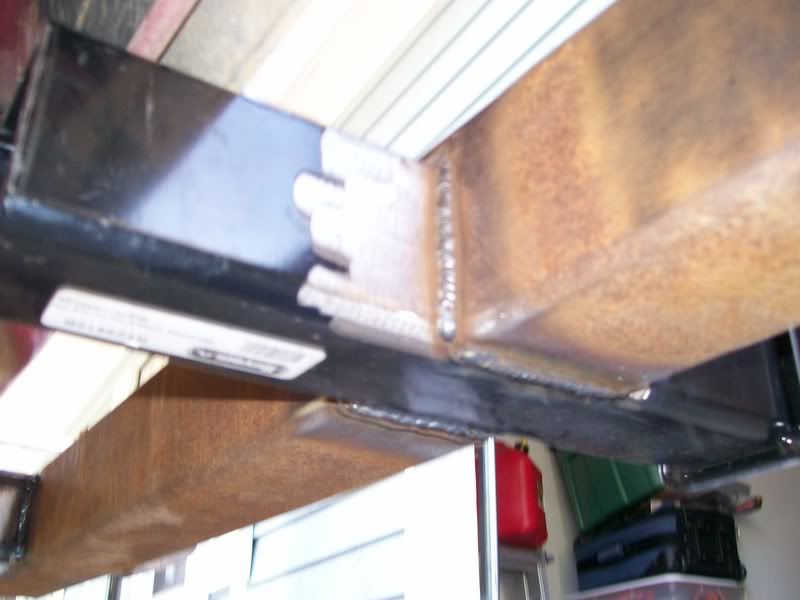
Then we cut and welded 1/4" steel plate on the other side to strengthen it up.
Next I took the piece we cut out of the middle and sheared both ends. Then I mated it up next to the end of the new bracket and drilled through both ends to reuse the bolts I pulled off of the junkyard yota.
Next we cut along the bottom of the bumper to install the hitch flat with the bottom of the bumper and then welded it in. I think the hitch was $24 from a local store. No, I do not plan on any serious towing with this hitch. It's there for someone to hit me and take the force of the impact in case of an accident. Hopefully it will save the rear axle and most of the bed.
Next we welded the D-rings on that came courtesy of www.rockstomper.com. They cost $15 per which brings my cost to $60.
Then I parked the truck on near level ground and put a level on the frame and then transferred that same level to the bumper which I held while my friend tack-welded the brackets to the bumper.
Next we tack-welded some 1/8" steel as caps, ground down the edges, and then welded it in and finished the welds on the brackets. The 1/8" steel was from some scrap that my buddy had.
Finished bumper (with some grinding and painting left to go)
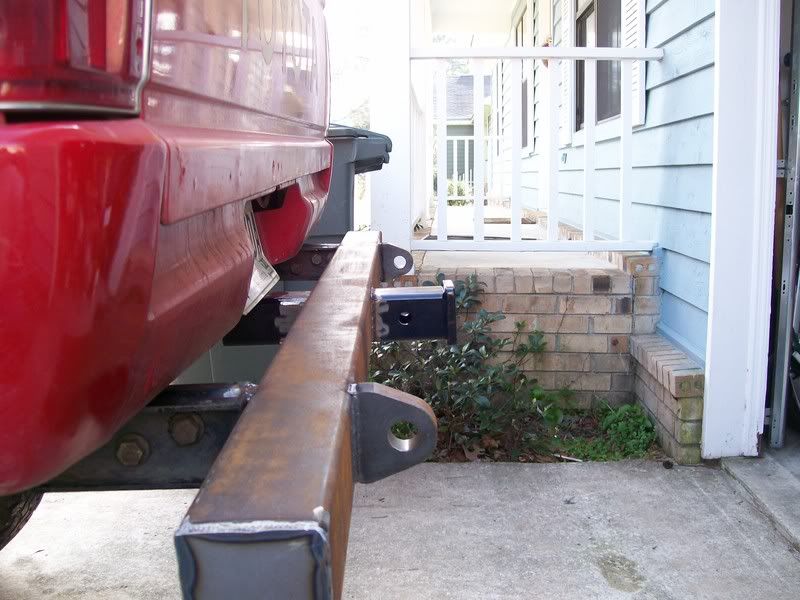
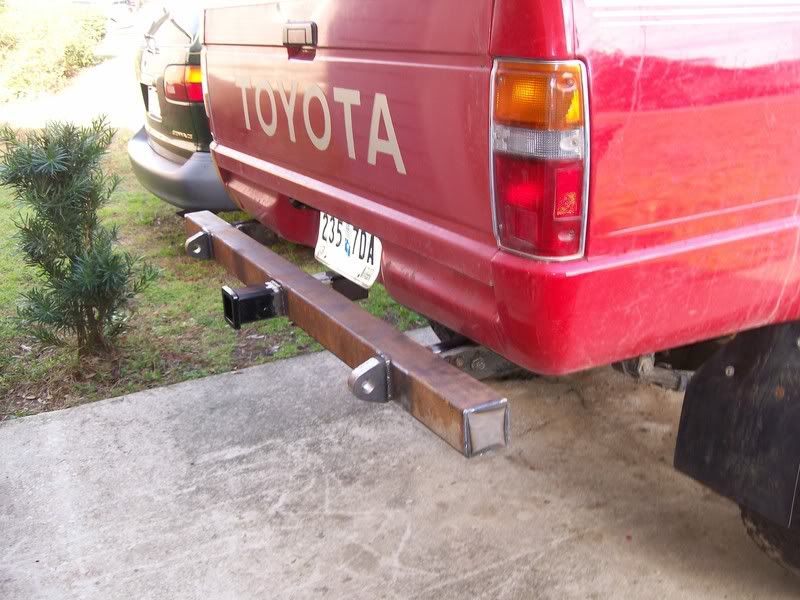
I decided to go with bolting the brackets onto the bumper so I wouldn't have to weld up everything when I change my BL which I will probably do if I change my spring height. Now I'll only have to weld new brackets and then transfer the whole bumper to the new brackets. Not bad for $60 and a few hours spent welding and grinding.
Look at this shot:
My bed is leaning. What are the chances that this is due to a failing left, rear spring? (another reason I had to get the bumper level with the frame and not with the ground)
I started with this some months ago:
The 3/16" steel came from a scrapyard which cost me 6 bucks after I turned in some scrap. The brackets came free from a friend's junkyard. They came off a 2wd 87 toyota truck. I also took the bolts that went with the brackets
First I created a carboard template of the bracket and then did a Z cut on the bracket to shorten it how I wanted on the template. Then I transfered the template to the bracket and started cutting and welding:
My buddy saw some offroad truck show where they showed that the Z cut would be stronger. And yes, the brackets are on the outside of the frame because I couldn't fit it inside the way I wanted.
Then we cut and welded 1/4" steel plate on the other side to strengthen it up.
Next I took the piece we cut out of the middle and sheared both ends. Then I mated it up next to the end of the new bracket and drilled through both ends to reuse the bolts I pulled off of the junkyard yota.
Next we cut along the bottom of the bumper to install the hitch flat with the bottom of the bumper and then welded it in. I think the hitch was $24 from a local store. No, I do not plan on any serious towing with this hitch. It's there for someone to hit me and take the force of the impact in case of an accident. Hopefully it will save the rear axle and most of the bed.
Next we welded the D-rings on that came courtesy of www.rockstomper.com. They cost $15 per which brings my cost to $60.
Then I parked the truck on near level ground and put a level on the frame and then transferred that same level to the bumper which I held while my friend tack-welded the brackets to the bumper.
Next we tack-welded some 1/8" steel as caps, ground down the edges, and then welded it in and finished the welds on the brackets. The 1/8" steel was from some scrap that my buddy had.
Finished bumper (with some grinding and painting left to go)
I decided to go with bolting the brackets onto the bumper so I wouldn't have to weld up everything when I change my BL which I will probably do if I change my spring height. Now I'll only have to weld new brackets and then transfer the whole bumper to the new brackets. Not bad for $60 and a few hours spent welding and grinding.
Look at this shot:
My bed is leaning. What are the chances that this is due to a failing left, rear spring? (another reason I had to get the bumper level with the frame and not with the ground)
Feb 16, 2008 | 01:33 PM
#170
Registered User
Joined: Aug 2007
Posts: 5,334
Likes: 4
From: Vian, OK
so what ended up happening to the 2 other carbs you had...i would love to have one..as they looked like weber..but im not sure...is either one of the rebuilt...i have a 20R...would a 22R carb work for my truck..since the 22R is just slightly bigger than my 20R..
Feb 16, 2008 | 04:42 PM
#171
Thread Starter
Contributing Member
Joined: May 2006
Posts: 377
Likes: 0
From: South Carolina
pm sent, camo31
I started painting the rear bumper and I finally ordered new rotors and new loaded calipers for the rear disc brake upgrade. I drained the rear diff, disconnected the rear driveshaft, suspended it with rope, then jacked up the vehicle and disconnected brake lines, unbolted the 4 bolts, pulled both axle shafts, and then pulled the rear diff.
I took the rear diff to my mechanic who replaced the rear pinion seal. He also torqued the bolt at the front of the diff that he said might have been causing the clunks. The diff is now in and I have the adapters bolted in. I had to call Brian at WabFab to figure out the O-ring that was there that I overlooked.
Biggest problem this far has been getting the snapring off that is required to be removed to pull the axle from the brake drums and even bigger than that has been finding the stupid lug studs that I need. You CANNOT reuse the rear ones. I spent about 4 hours today getting the studs that I need. All the computers were referring me to the wrong ones and then, after I found a link on here that told me the right ones, no one had them or... I drove the 30 minutes to the one store that had them only to be told by the same guy that I told to check twice that the box he found that said had plenty has only 3.
You basically have to ask for an 83 toyota 4wd front wheel studs. The part numbers that you need:
WAGNER Part # BD61172 (can't find around these parts)
DORMAN Part # 610264 (which I couldn't hammer in with a 10 lb sledge slammed from 3 above a steel rod)
NAPA Part # 641-3126 (went in pretty easy with about 10 swings of the hammer)
So now that I have 12 studs and a newly installed diff I'm gonna go borrow a 10 ton press to fix those studs. I would have pictures but I can't find my camera.
Feb 16, 2008 | 05:22 PM
#172
pm sent, camo31
I started painting the rear bumper and I finally ordered new rotors and new loaded calipers for the rear disc brake upgrade. I drained the rear diff, disconnected the rear driveshaft, suspended it with rope, then jacked up the vehicle and disconnected brake lines, unbolted the 4 bolts, pulled both axle shafts, and then pulled the rear diff.
I took the rear diff to my mechanic who replaced the rear pinion seal. He also torqued the bolt at the front of the diff that he said might have been causing the clunks. The diff is now in and I have the adapters bolted in. I had to call Brian at WabFab to figure out the O-ring that was there that I overlooked.
Biggest problem this far has been getting the snapring off that is required to be removed to pull the axle from the brake drums and even bigger than that has been finding the stupid lug studs that I need. You CANNOT reuse the rear ones. I spent about 4 hours today getting the studs that I need. All the computers were referring me to the wrong ones and then, after I found a link on here that told me the right ones, no one had them or... I drove the 30 minutes to the one store that had them only to be told by the same guy that I told to check twice that the box he found that said had plenty has only 3.
You basically have to ask for an 83 toyota 4wd front wheel studs. The part numbers that you need:
WAGNER Part # BD61172 (can't find around these parts)
DORMAN Part # 610264 (which I couldn't hammer in with a 10 lb sledge slammed from 3 above a steel rod)
NAPA Part # 641-3126 (went in pretty easy with about 10 swings of the hammer)
So now that I have 12 studs and a newly installed diff I'm gonna go borrow a 10 ton press to fix those studs. I would have pictures but I can't find my camera.
I started painting the rear bumper and I finally ordered new rotors and new loaded calipers for the rear disc brake upgrade. I drained the rear diff, disconnected the rear driveshaft, suspended it with rope, then jacked up the vehicle and disconnected brake lines, unbolted the 4 bolts, pulled both axle shafts, and then pulled the rear diff.
I took the rear diff to my mechanic who replaced the rear pinion seal. He also torqued the bolt at the front of the diff that he said might have been causing the clunks. The diff is now in and I have the adapters bolted in. I had to call Brian at WabFab to figure out the O-ring that was there that I overlooked.
Biggest problem this far has been getting the snapring off that is required to be removed to pull the axle from the brake drums and even bigger than that has been finding the stupid lug studs that I need. You CANNOT reuse the rear ones. I spent about 4 hours today getting the studs that I need. All the computers were referring me to the wrong ones and then, after I found a link on here that told me the right ones, no one had them or... I drove the 30 minutes to the one store that had them only to be told by the same guy that I told to check twice that the box he found that said had plenty has only 3.
You basically have to ask for an 83 toyota 4wd front wheel studs. The part numbers that you need:
WAGNER Part # BD61172 (can't find around these parts)
DORMAN Part # 610264 (which I couldn't hammer in with a 10 lb sledge slammed from 3 above a steel rod)
NAPA Part # 641-3126 (went in pretty easy with about 10 swings of the hammer)
So now that I have 12 studs and a newly installed diff I'm gonna go borrow a 10 ton press to fix those studs. I would have pictures but I can't find my camera.
Feb 18, 2008 | 03:46 PM
#173
Thread Starter
Contributing Member
Joined: May 2006
Posts: 377
Likes: 0
From: South Carolina
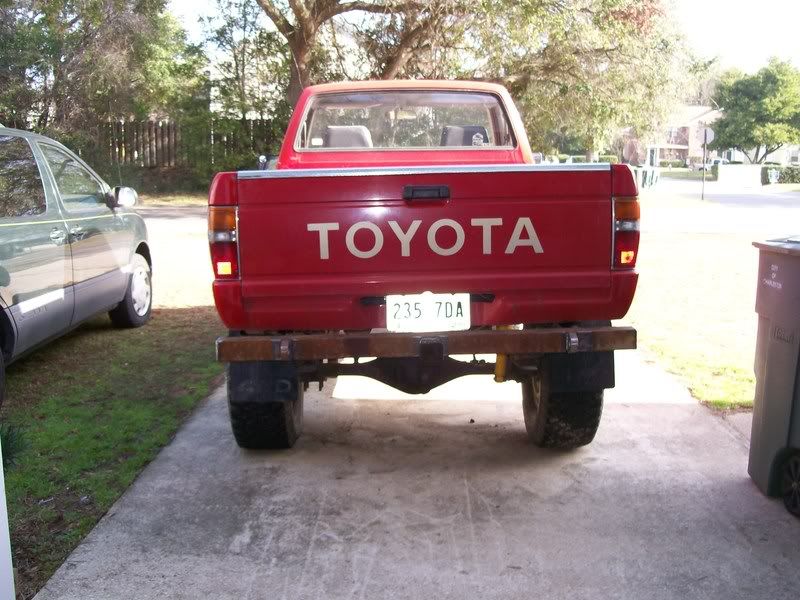
FROR floating rear axle and disc brakes installed.
per FROR, the dorman studs are about 10/1000th too big. I used them anyway as I couldn't find anything else today. The kit is installed although I need to recut my steel brake lines to rig that like I want it. I'm hoping to cut those tomorrow, weld on some brake line brackets, and weld on the shock tabs to finally install the u-bolt flip kit.
Braking is really nice now with the truck stopping on a dime. It feels like the pedal has to travel really far though. This seems to me to be because I'm needing more fluid. Does this mean I need a larger piston master cylinder, like the FJ ones that we can swap in? I did try killing the engine and holding the brake pedal pushed with no sinking which means there are no leaks, right?
I've also got to find a dirt road to check the proportioning valve. Currently it's set to 1.5 turns open.
Feb 18, 2008 | 03:58 PM
#174
per FROR, the dorman studs are about 10/1000th too big. I used them anyway as I couldn't find anything else today. The kit is installed although I need to recut my steel brake lines to rig that like I want it. I'm hoping to cut those tomorrow, weld on some brake line brackets, and weld on the shock tabs to finally install the u-bolt flip kit.
Braking is really nice now with the truck stopping on a dime. It feels like the pedal has to travel really far though. This seems to me to be because I'm needing more fluid. Does this mean I need a larger piston master cylinder, like the FJ ones that we can swap in? I did try killing the engine and holding the brake pedal pushed with no sinking which means there are no leaks, right?
I've also got to find a dirt road to check the proportioning valve. Currently it's set to 1.5 turns open.
Braking is really nice now with the truck stopping on a dime. It feels like the pedal has to travel really far though. This seems to me to be because I'm needing more fluid. Does this mean I need a larger piston master cylinder, like the FJ ones that we can swap in? I did try killing the engine and holding the brake pedal pushed with no sinking which means there are no leaks, right?
I've also got to find a dirt road to check the proportioning valve. Currently it's set to 1.5 turns open.
So you have the stock brake MC? You need one that has a rear residual valve like the FJ80 ones, for rear discs.
Feb 19, 2008 | 06:58 AM
#175
Contributing Member
Joined: Sep 2007
Posts: 137
Likes: 0
From: St. Geroge, Utah
I used Dorman studs for myu conversion. I had a hard time getting them to pull through too. Finally got them through by using the flat side of the lug nut, and using a good amount of antiseize on the nut. They came right through. just clean up the antiseize after you are done.
Feb 23, 2008 | 03:47 PM
#177
Thread Starter
Contributing Member
Joined: May 2006
Posts: 377
Likes: 0
From: South Carolina
Next in line...
Currently working on finishing up the braking system. Ordering stainless steel brake lines from trailgear and an FJ master cylinder from Brian at WabFab. Also will be installing a dual diaphragm brake booster from govt.mule. I'm hoping this will get me until I rebuild the front axle which is hopefully many years away. At that point I may redo the front brakes with v6 calipers and rotors.
I also finally got my shock tabs welded in so I will be flipping the rear u-bolts as soon as I can get my truck on a lift. We decided not to try it in the driveway as I didn't have jack stands that would reach the frame.
I am also planning on painting the truck with Interlux Brightside Fireside Red. I have two quarts. Still not sure whether I am rolling or spraying. As soon as that is done I will be rolling on herculiner on the bed.
The engine surging issue was pretty bad last week. I'm still not positive that it is the carb or the throttle cable. I put a big spring on the carb throttle linkage and that's overcoming whatever was keeping the throttle open. Also getting a new throttle cable to see if that fixes that problem so I can ditch the massive spring. Either way the truck is running good now although the tailpipe is still too black. I'm thinking that I may need to consider the air-fuel meter to get it 100% adjusted.
As soon as I get a chance I will post up some pics to show all the newly installed stuff.


