
csuviper's Junktrk (84 Yota Pickup) Build
 Aug 18, 2011 | 09:14 PM
#25
Thread Starter
Registered User
Joined: Feb 2011
Posts: 199
Likes: 1
So I am getting ready to start looking for material for the interior door panels. So which should I build? Wanting cheap and easy.
- Black Plastic
- Aluminum sheet metal
- Aluminum diamond plate
- Leather with Wood or cardboard backing for support
- Fabric with Wood or cardboard backing for support
- Replica OEM or used OEM


https://www.yotatech.com/attachments...80cdcec374.jpg


Im really thinking the aluminum sheet metal looks the best but not sure about the flimsiness of it.
- Black Plastic
- Aluminum sheet metal
- Aluminum diamond plate
- Leather with Wood or cardboard backing for support
- Fabric with Wood or cardboard backing for support
- Replica OEM or used OEM
https://www.yotatech.com/attachments...80cdcec374.jpg
Im really thinking the aluminum sheet metal looks the best but not sure about the flimsiness of it.
Last edited by csuviper; Aug 18, 2011 at 09:22 PM.
Aug 18, 2011 | 09:28 PM
#27
Thread Starter
Registered User
Joined: Feb 2011
Posts: 199
Likes: 1
 , not that I could keep anything in them while wheeling.
 I was actually planning on putting two of them in the bed of my 07 for tools and straps. The third was either an option of the center console or just a parts/tool bin for the 84. It will fall in place as I get closer.
Aug 18, 2011 | 09:31 PM
#28
Thread Starter
Registered User
Joined: Feb 2011
Posts: 199
Likes: 1
Aug 18, 2011 | 09:40 PM
#29
Registered User
Joined: Nov 2009
Posts: 1,965
Likes: 0
From: Bailey, Colorado
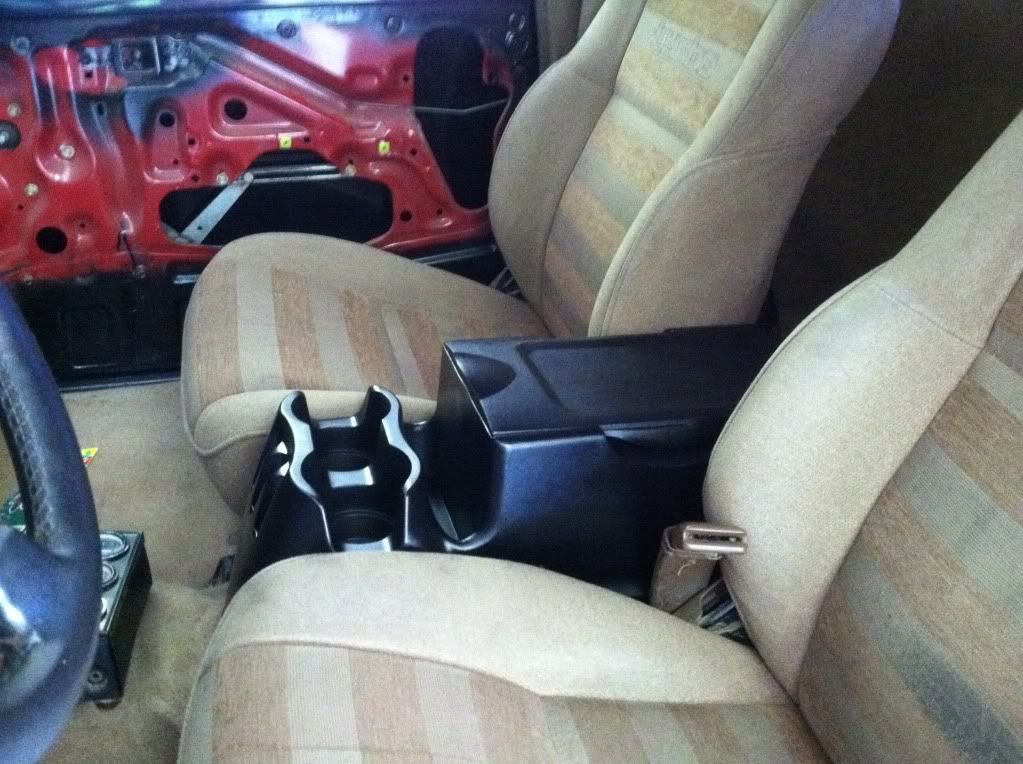
Yea I saw that. It is definitely a good option. My truck came with a kinda flimsy but still decent center console. I might stiffen it up a little and make it work. It has cup holders , not that I could keep anything in them while wheeling.
I was actually planning on putting two of them in the bed of my 07 for tools and straps. The third was either an option of the center console or just a parts/tool bin for the 84. It will fall in place as I get closer.
, not that I could keep anything in them while wheeling. I was actually planning on putting two of them in the bed of my 07 for tools and straps. The third was either an option of the center console or just a parts/tool bin for the 84. It will fall in place as I get closer.
That does seem kinda flimsy, but then again the OEM ones are too. Mine are all sorts of busted up. I would want something like 12 or 14 ga so that itll be a little stronger
Aug 22, 2011 | 06:56 AM
#30
Thread Starter
Registered User
Joined: Feb 2011
Posts: 199
Likes: 1
Really wanted to get JUNKTRK started up this weekend. I put the oil and coolant in. Ended up with a coolant leak because I missed a hose connection. Wasted most the day Sunday fixing the E-brake and installing new drum brake pads.
Painted the center console
Cut the arm to the rear brake load sensing purportioning valve and added adjustment to it from the top. This way I can actually have rear brakes.

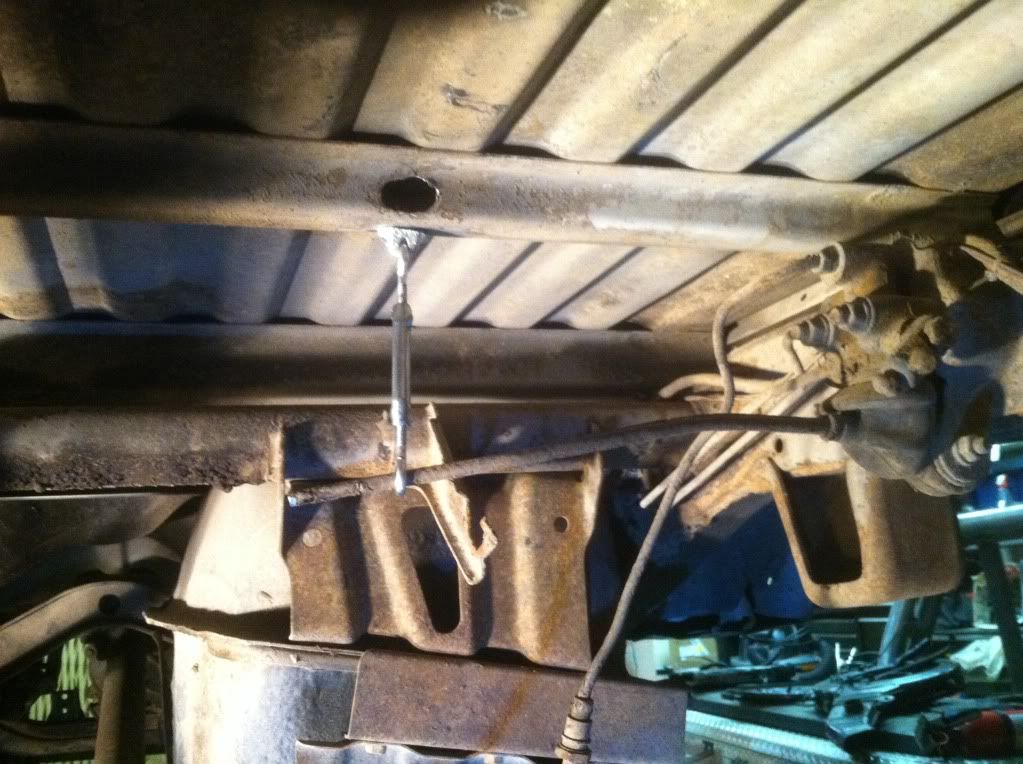
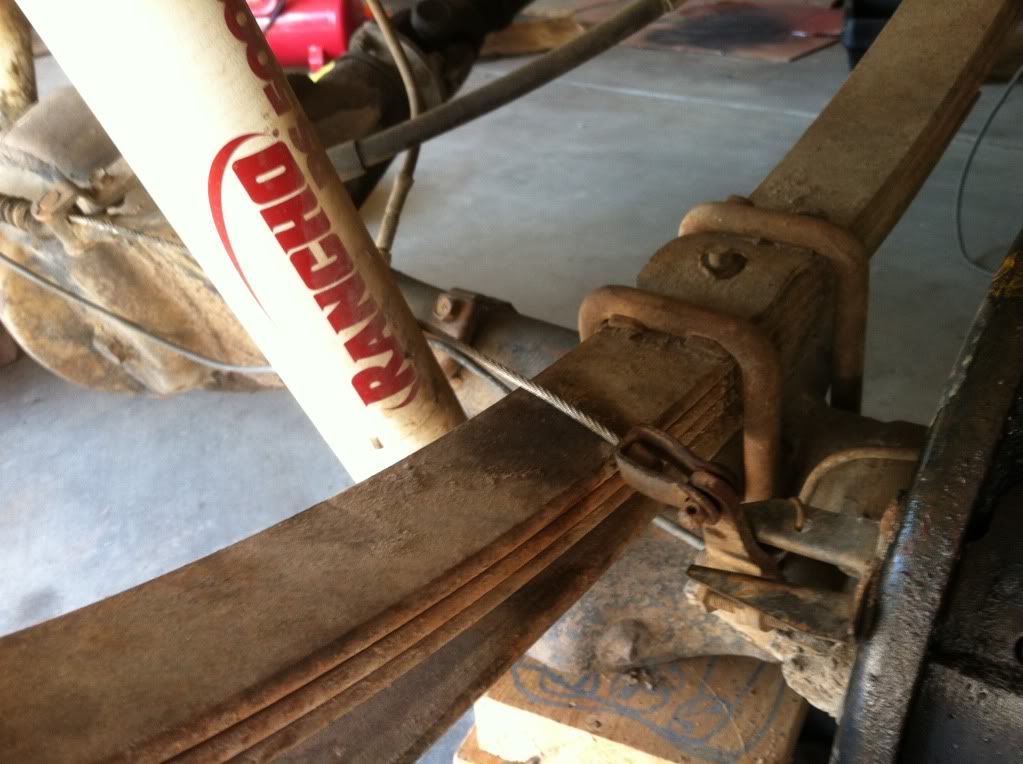
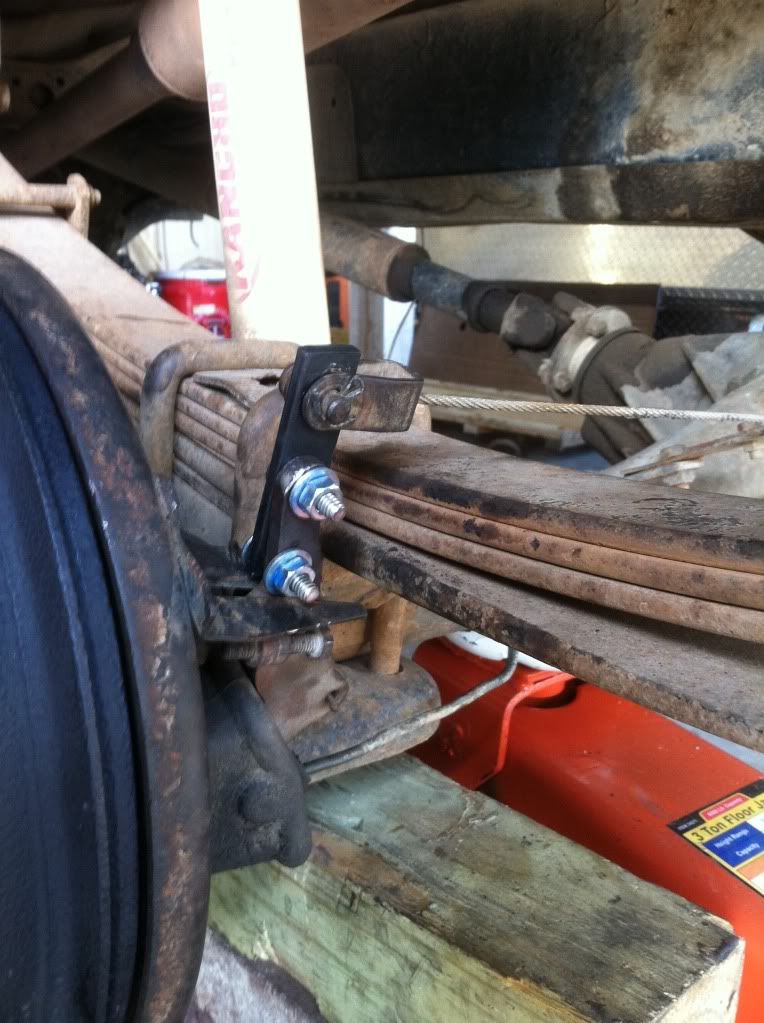
Added brackets to the e-brake cable connections to avoid the leaf springs and the shock. Now I can park on slopes.
[IMG]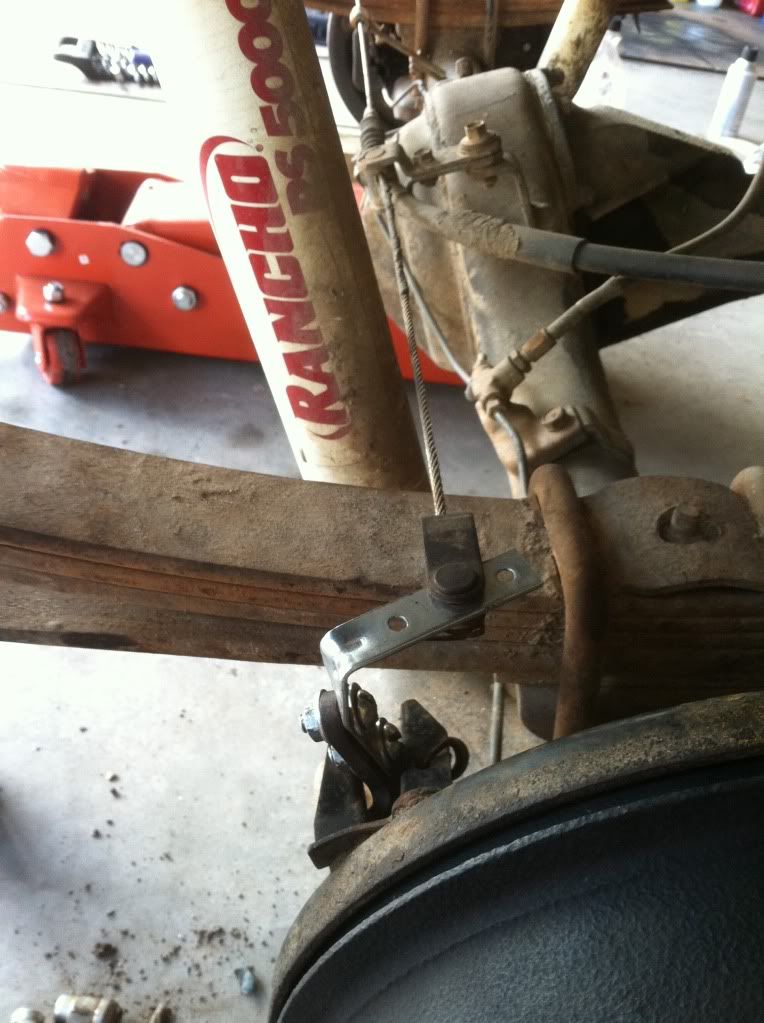
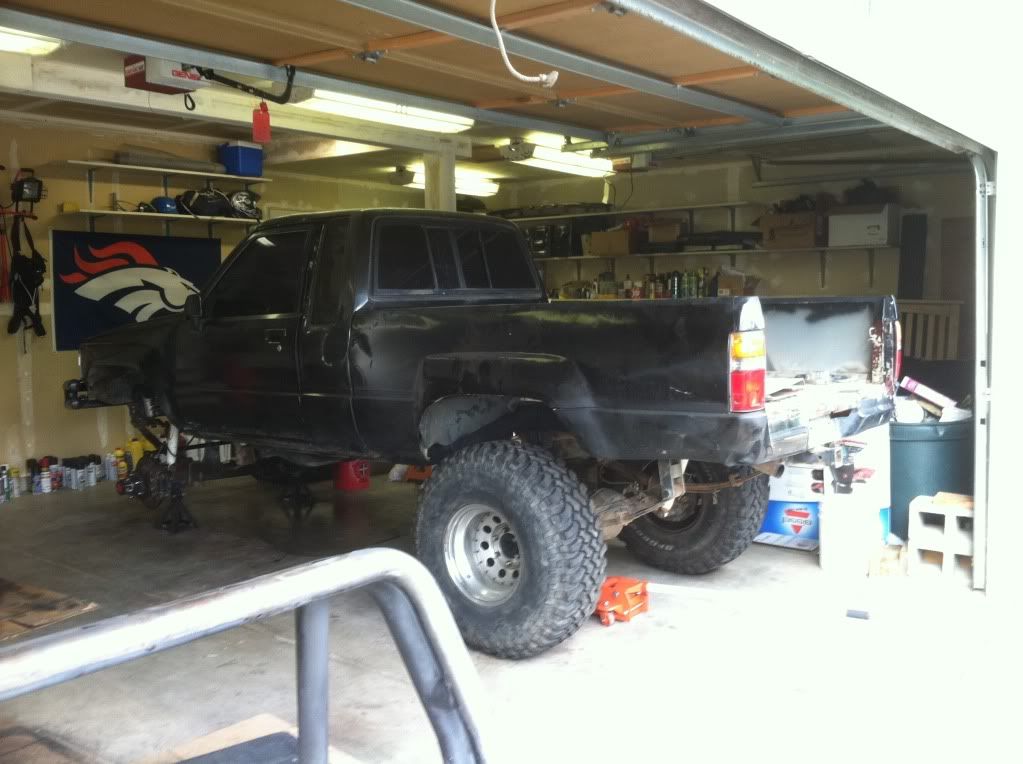
Finished the rear drum brakes so i decided to put the tires back on. Wow, forgot how big this thing is.
Painted the center console
Cut the arm to the rear brake load sensing purportioning valve and added adjustment to it from the top. This way I can actually have rear brakes.
Added brackets to the e-brake cable connections to avoid the leaf springs and the shock. Now I can park on slopes.
[IMG]
Finished the rear drum brakes so i decided to put the tires back on. Wow, forgot how big this thing is.
Aug 22, 2011 | 09:22 PM
#31
Thread Starter
Registered User
Joined: Feb 2011
Posts: 199
Likes: 1
GOT IT RUNNING TONIGHT!!!!!!!!!!!!!!!!!!!!!
Started up rough, played with the distributor to get the timing right but the idle was really rough any lower than 1100-1200 RPM. Suspecting it has to do with the carb so my awesome friend is taking my spare carb home to rebuild it tomorrow (purchased the kit a while back).
Took it for a quick little test drive since it was late. Rides high and bumpy with the knobby tires but AWESOME. Can't wait to get to the mountains.
Aug 22, 2011 | 09:36 PM
#32
Registered User
Joined: Nov 2009
Posts: 1,965
Likes: 0
From: Bailey, Colorado
GOT IT RUNNING TONIGHT!!!!!!!!!!!!!!!!!!!!!
Started up rough, played with the distributor to get the timing right but the idle was really rough any lower than 1100-1200 RPM. Suspecting it has to do with the carb so my awesome friend is taking my spare carb home to rebuild it tomorrow (purchased the kit a while back).
Took it for a quick little test drive since it was late. Rides high and bumpy with the knobby tires but AWESOME. Can't wait to get to the mountains.
Started up rough, played with the distributor to get the timing right but the idle was really rough any lower than 1100-1200 RPM. Suspecting it has to do with the carb so my awesome friend is taking my spare carb home to rebuild it tomorrow (purchased the kit a while back).
Took it for a quick little test drive since it was late. Rides high and bumpy with the knobby tires but AWESOME. Can't wait to get to the mountains.
 [/IMG]
Aug 23, 2011 | 07:39 AM
[/IMG]
Aug 23, 2011 | 07:39 AM
#34
Thread Starter
Registered User
Joined: Feb 2011
Posts: 199
Likes: 1
Looking for Vacuum Line help!!!!
Just found out that if I don't have the HAC then the ports get plugged. All the lines seemed to have a home when I tore it down so I am confused. I do not have the HAC though, im sure of that.
Is the HAC necessary to run at higher altitude or is it just a requirement for emissions?
Now where do the vacuum lines go to that were originally plugged into the HAC ports on the carb? Are those supposed to be plugged as well?
I will post up pics tonight of what I am dealing with.
Aug 24, 2011 | 11:37 AM
#35
Thread Starter
Registered User
Joined: Feb 2011
Posts: 199
Likes: 1
My nice friend helped out by taking the extra carb home to rebuild it for me with all new O-rings and needle/seat. We are planning to put it back together today and fingers crossed it will be running like a champ.
Also going to Seafoam the fuel system and then gas it up with some good stuff.
Couple more things to do before taking it in for emissions.
Also going to Seafoam the fuel system and then gas it up with some good stuff.
Couple more things to do before taking it in for emissions.
Aug 24, 2011 | 08:22 PM
#36
Thread Starter
Registered User
Joined: Feb 2011
Posts: 199
Likes: 1
Put the rebuilt carb on and 3 hours later it was timed. Ran like crap at first. The carb needed adjusted and the it the distributor was defiantly off a tooth or two.
Also had to deal with the gas running out and the battery going dead a couple times.
Took it for a nice ride on a very rutted out dirt road. It ran great.
There is a bad rattle when slowing down, thinking something with the front brakes.
I didn't do the rear main seal as a part of this rebuild and its leaking a little. I will get to that over the winter. Just want to get it to the mountains now.
The rear definitely has a locker. The wheels squeal around every corner if I give it some gas. I also was able to put it in 4low and make it up the driveway without touching the throttle. The rear axle will be pulled apart and checked this winter as well.
Going to try to get the emissions done in the next couple days. Wish me luck.
I need to swap out wheels with my 07 because the emissions place doesn't accept 35's. I hope they work.


