When you click on links to various merchants on this site and make a purchase, this can result in this site earning a commission. Affiliate programs and affiliations include, but are not limited to, the eBay Partner Network.
I have been more active on some other forums, but after finding a needed part here, I decided to share this build with you all. Most of these will be copy & pasted posts, but feel free to interject and ask questions or comment.
I saw this truck listed on Craigslist back in May, and emailed the guy about his price.
He got back to me quickly and we exchanged a few more emails & texts including these pictures that I shared with Marlin. His advice was that the asking price of $1700 might be a little high, but it looked to be in good shape.
The tags on the truck were from 2008, and when the owner checked with DMV, they told him the back fees were over $600, so he dropped the price to $1100. It was a 2+ hour drive into the mountains for me, but after we cleaned up from a yard sale on Saturday May 30, I loaded my 2 older sons, several tools, a battery, & all 3 wheels/tires from my camping trailer.
It was advertised as non-running and needing to be hauled away. I knew it needed a battery and at least one tire that would hold air. First thing I did was drop my extra battery in and try cranking it over. It turned over nicely, but starting fluid in the carb did nothing. A quick check showed no spark, with further checking finding nothing simple. It would be over a week later before that was resolved--more details to come.
When I got there, the guy had the right rear jacked up and had tried to inflate the flat spare, but the bead was unseated. I started getting my tires put on and at that point, I was committed. The left front looked flat but wasn't on the ground. It turned out there were a couple cinder blocks under the front axle. Just to clarify, the guy selling this was not the original owner, but his girlfriend's deceased brother was. They had driven out from Michigan to settle his estate, and were wanting to head home that Tuesday.
I made the deal that Saturday, and had been in touch with my uncle who has a truck & trailer. He promised to go after work on Monday to pick it up. As it turned out, he got home earlier than expected on Sunday, so we headed up that evening and brought it home.
Actually brought it to work (auto shop) so I could work on it during free time.x
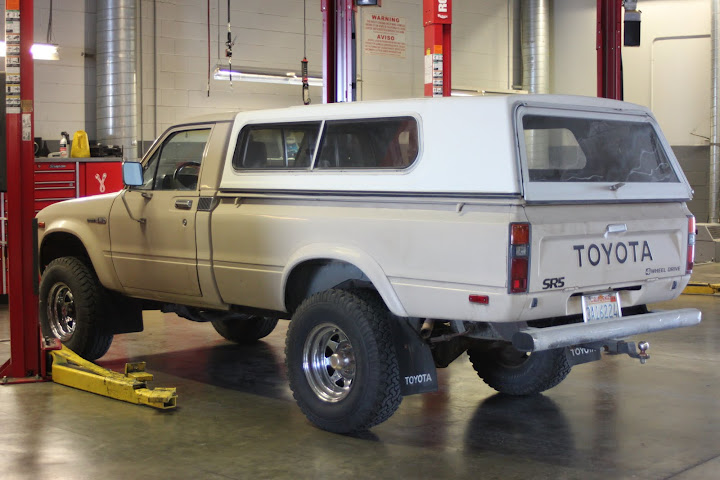
It is almost as good as a barn find, with the exception of the roof. Sitting at 5700' elevation, the pine cones & snow wreaked a little havoc.
Engine compartment.
Some exterior pics.
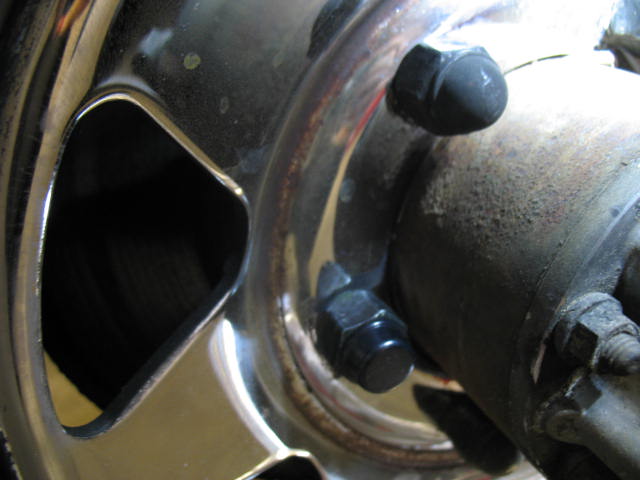
The only thing that had been done at this point was getting a pair of better tires on the wheels, and cleaning up the wheels themselves. I had done a quick cleaning with degreaser & the pressure washer, but they didn't look much better until one of the guys offer to go after it with wheel cleaner & steel wool.
I need another 6 lug nuts, because 2 have the cap portion broken off and I'm not putting the difficult wheel locks back on.
Last edited by ToyotaDon; Feb 19, 2016 at 11:09 AM.
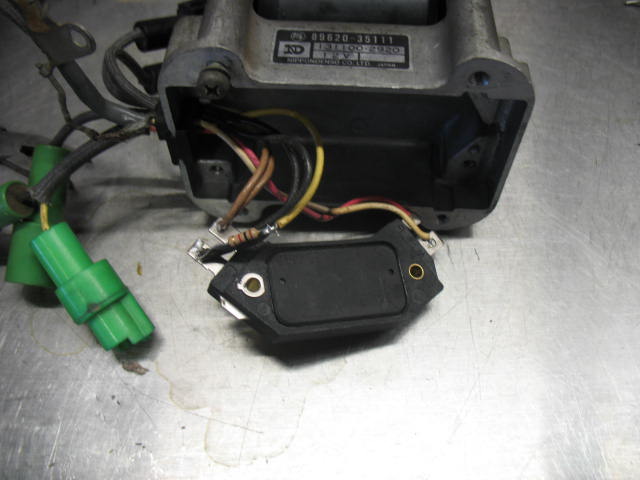
So in my attempts to get it running, I made a few errors. First off, when checking for the ground signal to the ignition coil, I had something. A test light would flash dimly, and a meter would read Hertz. This made me assume the coil was the culprit, though it appeared the PO had put a newer one in at some point. I decided to go with Napa instead of OEM, but there were some delays in getting it.
Finally, on Monday I had a new coil, but when I plugged it in and cranked the engine, there was still no spark. In the meantime, I'd been researching on the forums, and found that coils rarely go out, but Igniters do. With the 22R, you can substitute a GM ignition module from the early HEI systems, so Tuesday morning, I picked one up from Napa on the way to work.
On lunch break, I fashioned a quick set of wires with connectors and plugged them into the factory harness.
After doing this, cranking it over produced a nice spark on the tester at the coil wire. :shocking: Connected the coil wire to the distributor cap and started cranking and pumping the accelerator. After popping a few times, it started to fire, but ran pretty rough. I'd read that the wires from the pickup coil in the distributor could be switched & cause problems, so I tried connecting them the other way. All I got was backfiring, so the original way was right. The next day was my day off, so I spent a little time making the GM module a more permanent part of the system.
De-soldered from the old board and soldered to the new. Added a 1 K-ohm resistor to the tachometer circuit, which worked like a charm.
I tried to add a piece of aluminum inside to mount the module to, but there just wasn't enough room. I ended up mounting it to the base plate instead, providing a good ground, but possibly less heat dissipation.
All put together!
After that, I celebrated by giving her a quick bath. Looking better already.
Last edited by ToyotaDon; Feb 19, 2016 at 11:11 AM.
I'm sure some are wondering what direction I will go with this build. The options are pretty endless, but here are a few.
1. Full restoration to factory original condition (I don't have that kind of coin).
2. Resto-mod with a newer FI engine, like the 22RE or 2RZ/3RZ (doable if I could find a donor truck for cheap).
3. Crawler build with tons, big block, and exocage! (who wouldn't want this?)
What I will likely be doing is a "driver-quality" restoration, leaving a lot of the paint & patina as-is, cleaning & fixing the interior & wiring, and just enjoying it for awhile. My oldest son turns 15 in April, and he's already excited that this will be his truck in a couple years. He wants to learn to drive a stick shift, and get some experience on the trails even before he hits the streets.
Mods will probably come as extra funds come available, mostly subtle things to make it more capable & add some body protection. Post up any opinions about what to do.
Got a small pile of parts today. Still need to source the belts and power steering pump seals, if anyone has the info on those.
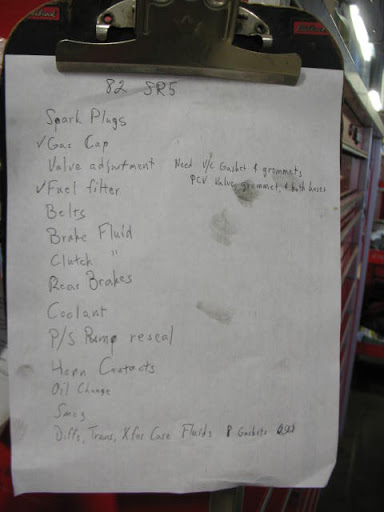
To do list, with a couple items checked off already.
Accomplished a few things on lunch break today. No picture, but hit the engine bay with degreaser and the pressure washer.
Got a genuine Toyota fuel filter. The old Carquest one was a little hard to blow through.
New gas cap, as the old aftermarket one had a cracked seal.
Last edited by ToyotaDon; Feb 19, 2016 at 02:52 PM.
I would like to clean up the roof and get it a little more rust free, but hoping to not make everything look new.
Tried using the can of tan Rustoleum I had in the garage. It's a little too light. :gap:
Oh yeah, after getting the fuel filter changed, it seemed to idle a little better. I tried taking it out on the street, and the lack of power in 1st gear around the parking lot became even more evident when I shifted to 2nd, so I turned around and brought it back. Need to see if the valves are tight, and whether the vacuum advance is working.
On a good note, I tried the A/C and got cold air from the old R12 system. :chillpill: We'll see how long that lasts.
It looks like I forgot to mention that I also went into AAA on my day off last Wednesday. Signed up for a membership and took advantage of the DMV services all in one visit (I'd already driven by the DMV and seen the line out the door). The fees, tax, & registration came to $798. The only way it could have been reduced was if I didn't know it wasn't current, and those forms are not available at AAA. I already had the cash set aside, so got it all handled.
The level of originality is pretty neat to discover.
I'm thinking the valve cover has to have been off before, but these ties were still in place, etc.
Inside of the cover had some varnish, but most of it has already come off in the parts washer.
Got to use my 13/16" spark plug socket that's sat in the toolbox for awhile.
The compression numbers don't look too bad after the valve adjustment. Three of the exhaust valves were slightly tight, and a couple of the intake valves were slightly loose.
lol @ $798. to get your tags. I remember them days living in Palm Springs and paying their crap every year and the smog checks.....poopoo. Got out of there 9 years ago and now we pay 59.00 bucks for two years and they don't care if it's been tag less for years. If I remember correctly
6 new lug nuts, not quite the right style, but the originals are no longer available from Mr. T.
Drained some fluids and shot some more underside pics. Installing allen head drain plugs in everything.
Leaky knuckles, but found the front diff only about a pint low.
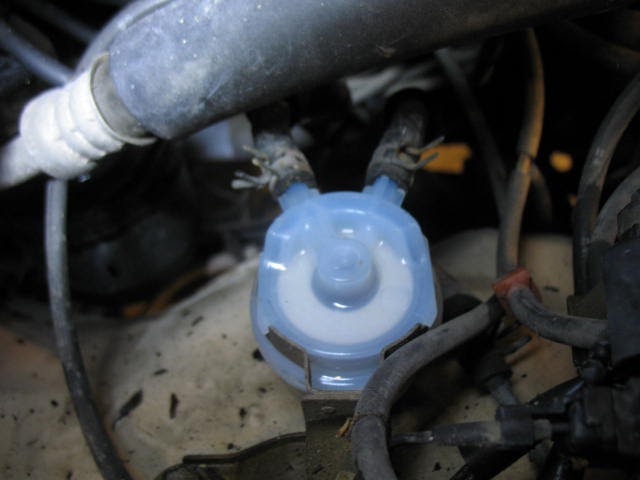
Also confirmed the distributor advance unit is faulty. The inner diaphragm holds no vacuum, while the outer one will move the plate, but will not hold. Ordered a replacement from LC Engineering to save a little.
I spent a little time with carb cleaner and steel wool, getting all the old clear coat off the valve cover. Worked carefully to preserve the 22R label, though.
Inside turned out nice as well.
All installed.
With the ties back in place on the new PCV hose, and new insulator/stud for the air cleaner.
I also pulled the heat shield off the exhaust manifold, and put a torque wrench on all the bolts/nuts. The last one I touched in the very front just turned and wouldn't tighten up, so I got out the heli-coil kit. Borrowed a right-angle drill and got it to the proper size & depth, tapped new threads, and got the insert in place. The problem came when I was putting the stud back in, it screwed in, but the nut wouldn't turn on it. Left it there for the weekend with some penetrant, to try again on Monday.
That Monday I got to work and found the truck had been pushed out of the shop by some of my coworkers, hopefully not left unlocked all weekend.
I hadn't filled it with oil before, so did that and installed the new set of spark plug wires (pics to come). The ones for the '82 are no longer available, but '83+up were, so that's what I went with. Stuck a couple vacuum plugs & caps on, since the air cleaner is still off and drove it into the shop for another try at the exhaust manifold stud/nut.
The nut was still stuck on the stud and wouldn't turn either direction...I found that out when I tried to reverse it off with an impact wrench...the stud came with it. At that point, my best option was to find a matching bolt, which torqued down nicely. Eventually, I know I'll have to get the manifold off there, and heli-coil all the remaining holes. I'll get new matching studs & nuts at that point.
Just a seat of the pants observation when pulling it into & out of the shop later; it seems to be idling a lot smoother and have better acceleration since the full tune up. Now I just need to get the vacuum advance put on, and it should be good to go.
So another coworker/friend gave me these when I first got the truck, he just happened to have the set in his toolbox.
Heat shield insulators.
You can also see the new plug wire set installed. The only issue I had was one of the brackets was 90� to the clip that goes on it. Looking closer, I think the bracket may have been twisted by someone in the past, I just need to take a pair of pliers to it.
Heat shield all back on, with no audible exhaust leak.
If I was you i would remove that heat shield and leave it off. Heat build up will crack that manifold if it hasn't already..is that a fault in the metal right up front there?
No cracks in the metal, sorry that the picture is out of focus. Have not heard that before about heat shields, though I know some of the newer Camrys have them eliminated for lower emissions.
The spare wasn't holding air, but it's too cool to get rid of.
Dunked it in the water, and found bubbles coming from the wheel weight, so I added a little bead sealer to the weight and stuck it back on. Soapy water showed bubbles around the whole outer bead, so unseating, cleaning, & sealing fixed that. It's been holding air ever since.
When checking the emissions, I saw the temperature wasn't rising very high. Got the thermostat replaced, needed all new radiator hose, and the coolant looked like straight water. It sat for awhile with the system open after I flushed it out, but got it all back together. I kind of needed it running, because my Cruiser ended up losing a brake booster over the weekend.
Yes, I drove it home that night and back to work the next. Temperature climbed right up to normal, and the A/C blew cool all the way home. Took each of the three older kids for a ride around the block after dinner.
Got to thinking about the heat shield some more, and unfortunately in California, they are part of the Smog required Thermostatic Air Cleaner system.
Going to keep posting the saga, sorry that it's not in real-time yet. When I checked emissions, it showed to be running rich, and a check of the O2 Sensor signal showed the same thing. A common failure on the carburetor is the diaphragms, so I replaced both of those today.
Ran it for awhile and rechecked emissions, but the diaphragms didn't make enough difference out the tailpipe, so I ended up putting a cat on it. I have a picture of that on my cell, but need to swap it over to PC. With the smog inspection passed--got it insured, and have been driving it a couple times a week since.
As fall came on, and the days were getting shorter, I started to worry about headlight output. I knew it wasn't good, then realized one day that the RH headlight wasn't even on.
I went by Autozone and got a discount on a pair of the Sylvania Silverstars. Here's a couple of before & after pics.
The running lights with clear bulbs almost put out more light than the headlight(s).
Now for these bad boys!
Okay, it was still daylight, and those shots were a couple hours apart, but I'm thinking I'll be pretty happy with these for awhile.
In keeping with the theme, I made some more lighting improvements.
The reverse lights weren't working at all, and when I tried to take a quick look at the switch, I found it is harder to get to than some. So I figured, why not have a look at the bulbs.
Both bulbs had turned white, and the socket portion was rusty...
...as well as the socket itself.
Took some sandpaper & rust penetrant to the socket, and glass cleaner to everything else, then upgraded to some LED 1156 bulbs from Napa. Probably should go back in there and chrome paint the housing for better reflection.

 Feb 18, 2016 | 10:12 PM