
1981 toyota pickup DLX Project
 Feb 9, 2014 | 08:20 AM
#61

We installed block/tranny/t-case together on frame


My girlfriend took appart my starter, cleaned all contacts and greased all the gears, we followed these instructions: http://www.instructables.com/id/How-...r-motor-for-a/


Doug thorley tri-Y, a bit bruised and re-welded and missing the collector flange but better than a new pacesetter at half the price.

Here you can see the crack that's been welded. also at the head flange you can see rings for better seal which is just welds that have been milled down, maybe that can give some people ideas.

A couple of coats of silver vht header paint.

Next we'll install drive-shafts, fuel and brake lines, head and we build an exhaust, fun stuff.
I have two moog u-joints and two beck/arnley u-joints coming, I would think the moog ones are stronger or at least better quality, should I place them on the front drive shaft or rear? Thanks.
My girlfriend took appart my starter, cleaned all contacts and greased all the gears, we followed these instructions: http://www.instructables.com/id/How-...r-motor-for-a/
Doug thorley tri-Y, a bit bruised and re-welded and missing the collector flange but better than a new pacesetter at half the price.
Here you can see the crack that's been welded. also at the head flange you can see rings for better seal which is just welds that have been milled down, maybe that can give some people ideas.
A couple of coats of silver vht header paint.
Next we'll install drive-shafts, fuel and brake lines, head and we build an exhaust, fun stuff.
I have two moog u-joints and two beck/arnley u-joints coming, I would think the moog ones are stronger or at least better quality, should I place them on the front drive shaft or rear? Thanks.
Last edited by gillesdetrail; Feb 9, 2014 at 08:22 AM.
Feb 9, 2014 | 08:38 AM
#62
Check to make sure that you have the right u-joints. You should have 5 total to do the front and rear. Both joints on the rear driveshaft and the single joint on the front shaft are the same. The two joints in the double cardan in the front shaft are different (and a PITA to replace). If you are planning on doing that double cardan then I would also recommend replacing the self centering bearing since you'll likely destroy it or loose needle bearings while taking it apart. There are two sizes for the centering bearing as well - moog carries both of them, but you'll want to measure the size of the post that the bearing sits on. Let me know if you have any question with it, I've done it before.
 Feb 10, 2014 | 06:32 AM
#65
I would imagine that the u-joints should be the same, but I'm fairly certain that all first gen pickups came with a front double cardan driveshaft so you may not have an original. If you want to check the measurements, you need to grab some calipers to measure the u-joint from the inside of the yokes (basically from the outside of the snap ring groves on the caps) and then the actual diameter of the caps.


 Feb 15, 2014 | 05:54 AM
#67
Thanks everyone! So I definately don't have the original front drive-shaft. I bolted it up front and the two pieces don't even fit into one another, way too short. I have about 3'' lift total with my shackles (1.5'' longer so 0.75'' lift) and old 3'' lift springs which probably gives me about 2'' true lift. I think I will wait for all the weight to be on the chassis (head, header, exhaust, cab, hood, fenders, bumper etc. Then I will probably make a custom drive shaft with tractor PTO tube or find a longer stock front driveshaft that fits. What do you guys suggest?
And here is a little update, I found a location for my fuel pump, it's hard to place it below the lowest point of the fuel tank yet not have it vulnerable to rocks and things, so I make a skid plate for it (pics once finalized).
And here is parts I have to keep me busy for a while.
Hard and soft fuel lines, fuel filter, 4 quality u-joints, ngk plugs, 6 soft brake lines, 3 hard lines and a 2,5'' flex pipe.
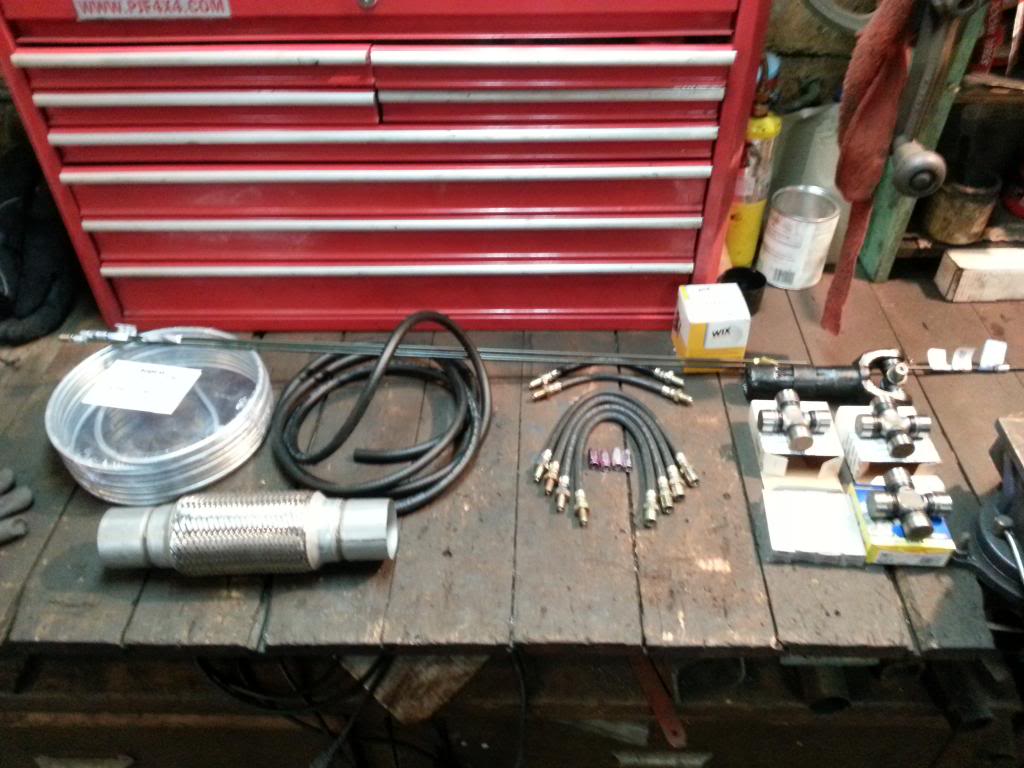
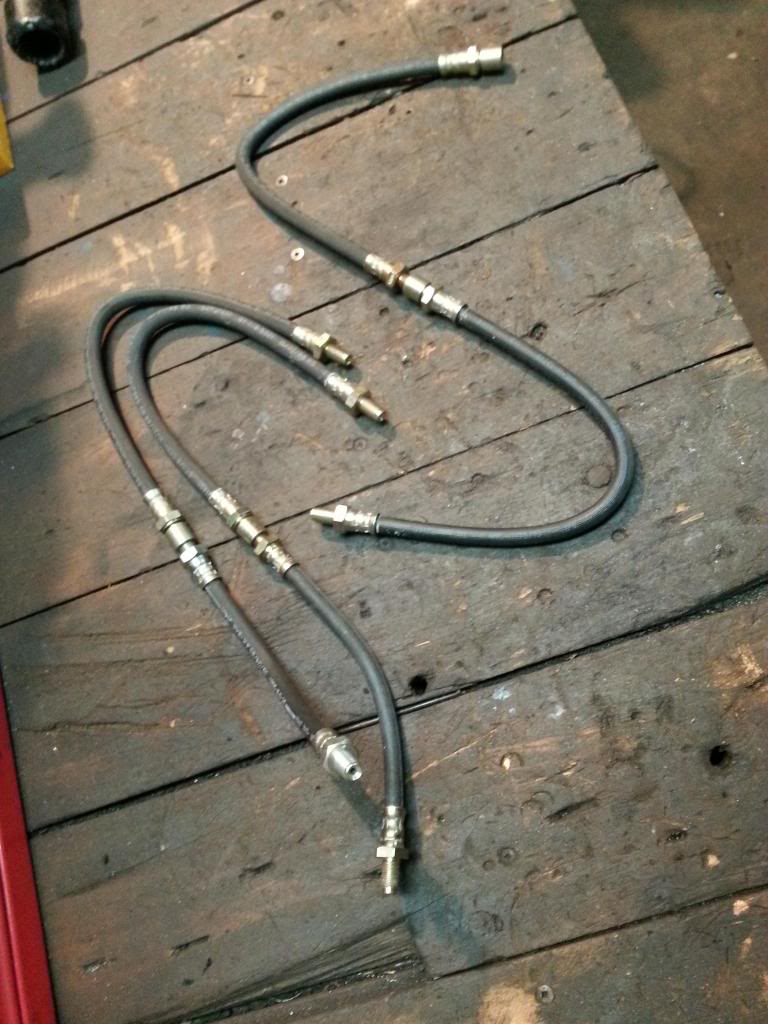
I ordered 2 2WD front brake lines, 4 rear 4WD brake lines. I joined the 2wd front line (shorter than stock) to the 4wd rear brake line (longer than stock front lines) to make extended brake lines for really cheap (rockauto closeout sale), for the back I joined the two 4wd lines together.
And here is a little update, I found a location for my fuel pump, it's hard to place it below the lowest point of the fuel tank yet not have it vulnerable to rocks and things, so I make a skid plate for it (pics once finalized).
And here is parts I have to keep me busy for a while.
Hard and soft fuel lines, fuel filter, 4 quality u-joints, ngk plugs, 6 soft brake lines, 3 hard lines and a 2,5'' flex pipe.
I ordered 2 2WD front brake lines, 4 rear 4WD brake lines. I joined the 2wd front line (shorter than stock) to the 4wd rear brake line (longer than stock front lines) to make extended brake lines for really cheap (rockauto closeout sale), for the back I joined the two 4wd lines together.
Last edited by gillesdetrail; Feb 15, 2014 at 05:55 AM.
Feb 15, 2014 | 06:06 AM
#70
Honestly I have no idea about the double cardamom or simple thing. Don't know what it means lol. I didn't have to modify anything after the lift but I do know if I jack the truck up by the frame and let the axle hang the front shaft will slip apart. But I don't ever flex y truck like that so I'm not concerned with it. Seems to make enough contact between the two pieces with the weight on the springs.
Feb 23, 2014 | 02:44 PM
#71
Thanks 83Toyota88
So last weeks update!
Gas lines and brake lines are pretty much done, appart from the 90 degree npt fittings on the fuel pump and the brake lines going to the master. Everything is very solid and nothing rubs.

Does anybody see a problem with the fact that I've installed my fuel filter on the side? I used and modified the oem engine bay bracket.

I had to mount the fuel pump lower than the lowest point of my gas tank, which made it pretty vulnerable to rocks and other things on the trail. So I made a pump guard. I tested it pretty hard with my size 14 steelcaps a couple of times and it didn't buldge so it should do the job.

I got the head back from the machinist, I am VERY happy with the work that was done, here is a list and I am probably forgetting some:
-acid dipped
-0.015'' mill on head surface
-resurfaced intake and exhaust
-machined valve seats for 0.5mm oversize stainless valves and installed viton seals
-3 angle performance valve job (oem is 2 angle)
-line bore on cam
-polished cam and caps
-installed helicoil on 2 stripped exhaust stud holes
-installed helicoil and studs on 2 egr ports on exhaust side for better header flange seal
-Blocked all EGR ports
-rethreaded all threads
-shimed valve springs to make them stiffer
-assembled everything
all for 350$, he said he had a lot of fun doing it.


Can somebody tell me if this is normal? bottom is at top dead center, top dot is between the two bright links but it is not pointing up at 12'o clock.

Like I said above I now have 2 more exhaust studs for a better seal around the exhaust ports, I know header leaks are common with these engines and I absolutely don't want any. I drilled the header flange for the new studs.

There were welds around the exhaust flange on the header so I smoothed them out and opened the diameter 2mm more for anti-reversion.

I passed the re-threader in all of the head bolt holes on the block, cleaned them and slightly lubed the head bolts. Torqued them down in three steps to 59 lbs-ft (1 more than manufacturer just because, well, I like to think I know better even if it's not true ) with a snap-on digital torque wrench freshly calibrated (not mine), no pre-mature head gasket failure for me! I adjusted the valve to a tight 0.08 and 0.012'' and gapped the spark plugs to 0.035''.


I then removed the engine from the tranny because I forgot to install the tranmission fork clip...I hate going backwards

My engine wiring harness had roten clips and almost burnt wires so my gf had great fun rebuilding it with new connectors and same colour wires. She asked me to bring her my interior harness too since it needs work as well, woohoo what a keeper, I hate wiring

Tomorrow we are transforming my 2.5'' stainless steel civic exhaust into a 81 pickup exhaust, a part I had been waiting a long time for!! And after that, well time for cab work!
So last weeks update!
Gas lines and brake lines are pretty much done, appart from the 90 degree npt fittings on the fuel pump and the brake lines going to the master. Everything is very solid and nothing rubs.
Does anybody see a problem with the fact that I've installed my fuel filter on the side? I used and modified the oem engine bay bracket.
I had to mount the fuel pump lower than the lowest point of my gas tank, which made it pretty vulnerable to rocks and other things on the trail. So I made a pump guard. I tested it pretty hard with my size 14 steelcaps a couple of times and it didn't buldge so it should do the job.
I got the head back from the machinist, I am VERY happy with the work that was done, here is a list and I am probably forgetting some:
-acid dipped
-0.015'' mill on head surface
-resurfaced intake and exhaust
-machined valve seats for 0.5mm oversize stainless valves and installed viton seals
-3 angle performance valve job (oem is 2 angle)
-line bore on cam
-polished cam and caps
-installed helicoil on 2 stripped exhaust stud holes
-installed helicoil and studs on 2 egr ports on exhaust side for better header flange seal
-Blocked all EGR ports
-rethreaded all threads
-shimed valve springs to make them stiffer
-assembled everything
all for 350$, he said he had a lot of fun doing it.
Can somebody tell me if this is normal? bottom is at top dead center, top dot is between the two bright links but it is not pointing up at 12'o clock.
Like I said above I now have 2 more exhaust studs for a better seal around the exhaust ports, I know header leaks are common with these engines and I absolutely don't want any. I drilled the header flange for the new studs.
There were welds around the exhaust flange on the header so I smoothed them out and opened the diameter 2mm more for anti-reversion.
I passed the re-threader in all of the head bolt holes on the block, cleaned them and slightly lubed the head bolts. Torqued them down in three steps to 59 lbs-ft (1 more than manufacturer just because, well, I like to think I know better even if it's not true
) with a snap-on digital torque wrench freshly calibrated (not mine), no pre-mature head gasket failure for me! I adjusted the valve to a tight 0.08 and 0.012'' and gapped the spark plugs to 0.035''.I then removed the engine from the tranny because I forgot to install the tranmission fork clip...I hate going backwards
My engine wiring harness had roten clips and almost burnt wires so my gf had great fun rebuilding it with new connectors and same colour wires. She asked me to bring her my interior harness too since it needs work as well, woohoo what a keeper, I hate wiring
Tomorrow we are transforming my 2.5'' stainless steel civic exhaust into a 81 pickup exhaust, a part I had been waiting a long time for!! And after that, well time for cab work!
Last edited by gillesdetrail; Feb 23, 2014 at 02:47 PM.
Feb 23, 2014 | 08:37 PM
#72

Registered User
Joined: Jan 2013
Posts: 30
Likes: 0
From: California
"Can somebody tell me if this is normal? bottom is at top dead center, top dot is between the two bright links but it is not pointing up at 12'o clock."
I think so, I remember my folkses mechanic saying that the double links don't line up with the timing marks and the dot everytime, only every 3 or 4 times or something silly like that. He said ignore the links and and line the dot up 12 o'clock with the top dead center mark and it will be sure to fire. This was after I took my head off and put it back together 180 degrees off timing cuz of them silly links.
I think so, I remember my folkses mechanic saying that the double links don't line up with the timing marks and the dot everytime, only every 3 or 4 times or something silly like that. He said ignore the links and and line the dot up 12 o'clock with the top dead center mark and it will be sure to fire. This was after I took my head off and put it back together 180 degrees off timing cuz of them silly links.
Feb 24, 2014 | 06:26 AM
#73
Thanks for the reply, as far as the bright links go I think I'm fine, my concern is that the dot is not pointed straight up at 12 o clock, more like 11:30 haha. I think it's ok though since when I turned by hand I have good compression and at tdc on the crank the distributor is pointed straight at number one. I just wanted info from someone who has done it before to make sure.
Feb 24, 2014 | 11:27 PM
#74
Registered User
Joined: Jan 2013
Posts: 30
Likes: 0
From: California
Well, what I meant was, don't factor in the bright links. make sure the dot is at 12 o'clock when the timing mark is at top dead center and the distributor is pointing at number one cylinder and you will be on the money. Unfortunately you will have to loosen the head bolts and take the chain off to line up the camshaft, and, if you're like me, you will have spilt coolant on the floor because you forgot to empty the radiator before you took the head off, and, you will spill it again because you filled it back up before you got everything lined up . Anyhow, at 11:30 you may get it to turn over better than I did at 6 o'clock but I think it will run best at 12.
. Anyhow, at 11:30 you may get it to turn over better than I did at 6 o'clock but I think it will run best at 12.
Feb 26, 2014 | 06:32 PM
#75
Damn you are making me doubt! I made a thread in the tech section to get more answers to see if the timing is correct or not.
Anyways here is monday's and tonight's progress. I have started to make the exhaust. I just tack welded it since with my rod welder it would burn through as soon as I had fusion even at 40 amps with 1/16'' rod. I will finish it with my friends mig welder when I start welding on the cab
Here is what I started with, 2.5'' OD stainless steel ebay exhaust from my old 91 civic plus misc piping.

and the semi-final product. I think I will make the tips longer, but we'll see. 2.36 ID header collector to flex pipe, 2,36'' ID piping, and two resonators.


I've always wanted a twin-tip side exit!
I still have a bit to do on the chassis, but the cab work is stressing me and I want it done by the 1st of april, which gives me about 50 hours work, so I started tonight.


Sorry for the bad pics, I think my phone is started to screw up on me. So I will start by replacing/rebuilding the rockers, then the floors, I should be getting new metal by next monday to make braces too and get my tunnel printed out.
Anyways here is monday's and tonight's progress. I have started to make the exhaust. I just tack welded it since with my rod welder it would burn through as soon as I had fusion even at 40 amps with 1/16'' rod. I will finish it with my friends mig welder when I start welding on the cab
Here is what I started with, 2.5'' OD stainless steel ebay exhaust from my old 91 civic plus misc piping.
and the semi-final product. I think I will make the tips longer, but we'll see. 2.36 ID header collector to flex pipe, 2,36'' ID piping, and two resonators.
I've always wanted a twin-tip side exit!
I still have a bit to do on the chassis, but the cab work is stressing me and I want it done by the 1st of april, which gives me about 50 hours work, so I started tonight.
Sorry for the bad pics, I think my phone is started to screw up on me. So I will start by replacing/rebuilding the rockers, then the floors, I should be getting new metal by next monday to make braces too and get my tunnel printed out.
Last edited by gillesdetrail; Feb 26, 2014 at 06:34 PM.
Feb 26, 2014 | 07:11 PM
#76
Registered User
Joined: Jan 2013
Posts: 30
Likes: 0
From: California
Oh, sorry! I thought I was being clear. Your timing in that picture is not correct, the dot in the cam sprocket should be at 12 o'clock with the timing marks at TDC and the distributor firing at number 1 cylinder. What I meant with my other post was, it may run as is, slightly off, but since you haven't put it completely together yet, it'll be easier to line it up correctly now and not have to fix it later. Hope I dispelled the doubt I instilled! 
Feb 26, 2014 | 07:22 PM
#78
Registered User
Joined: Jan 2013
Posts: 30
Likes: 0
From: California
On another note, These pics are from your phone?! I guess I'm out of the smart phone loop what with my oldy flip phone. At least it lasted a year longer than my last three. Only one pic that's a little weird, the rest are very crisp! Also noticed yer grinder setting on its side 
Feb 26, 2014 | 07:25 PM
#79
Registered User
Joined: Jan 2013
Posts: 30
Likes: 0
From: California
Feb 27, 2014 | 05:28 AM
#80
Your rusty cab floors are making me feel really good about my floors. Just make sure you get your vision down first and make a good plan to get to where you want to be. Cutting corners will kick your ass here. Also, watch the heat on you welds so you don't get a lot of shrinkage. If you are doing flat floor pans like mine then I would tack everything in and then weld short 1-2 inch beads at a time and let them cool before adding another 1-2 inch bead to the seam. The one seam on my floor pan that I didn't do this on caused me to get some shrinkage on the driver side so now I have a little bit of a "pop" in the metal if I were to stand on it. I may try to heat it up with my Oxy torch to chase it out.


