
Outlander Sherpa II trailer
 Mar 28, 2010 | 03:24 AM
#21
Co-Founder/Administrator
iTrader: (1)
Joined: May 2002
Posts: 32,242
Likes: 21
From: Auburn, Washington
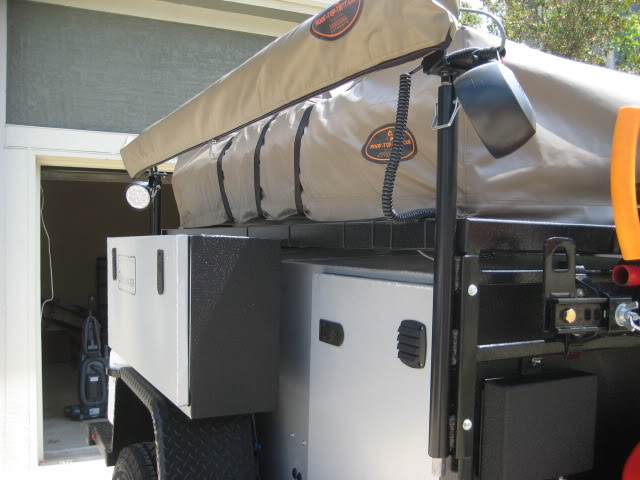
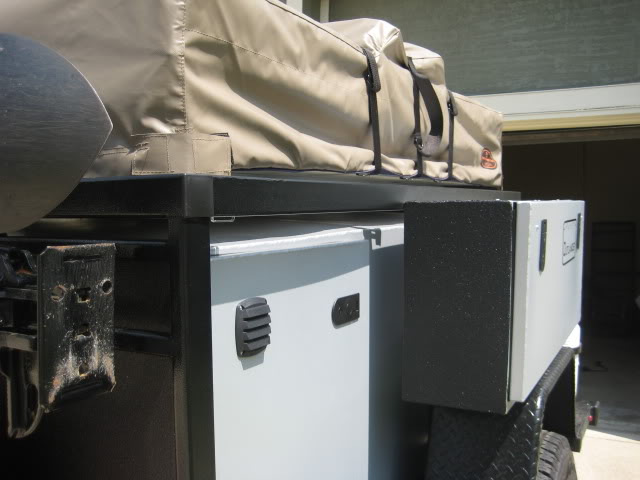
I used two of the new hinges for the new side, but I did not install a new clasp lock on the opposite side.
The stock lock on the front does an excellent job keeping the lid down tight.
The stock lock on the front does an excellent job keeping the lid down tight.
Mar 28, 2010 | 04:03 AM
#22
Thread Starter
Registered User
Joined: Jan 2007
Posts: 125
Likes: 0
Regards,
BWJ
Mar 28, 2010 | 04:06 AM
#23
Thread Starter
Registered User
Joined: Jan 2007
Posts: 125
Likes: 0
Update...Tent options and ancillary equipment.
Got some more 'photochopped' pics of what I want to attempt with the Mombasa Adventure II tent and the Oztent RV-3. I think that the RV-3 is a better option due to the width being 8 feet versus the RV-2 being 6' 6". My vision of the setup would be to use the 'awning' portion of the Oztent as a 'courtyard' for the Mombasa ladder:
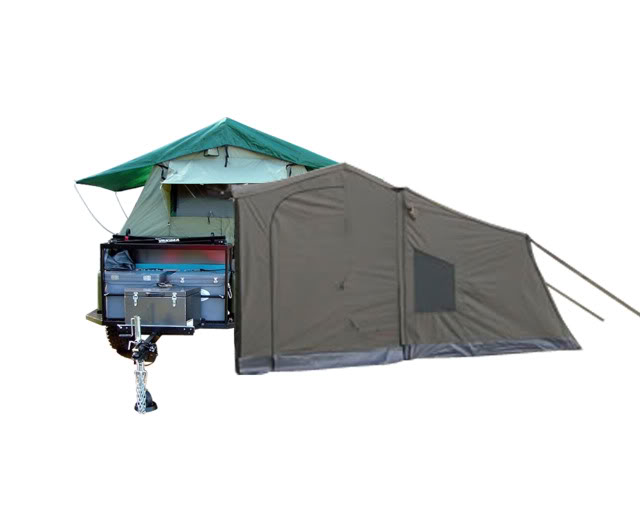
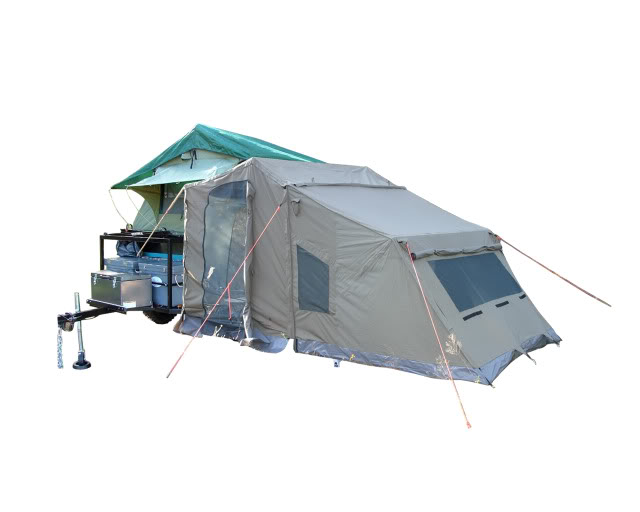
I would then get a custom fabricated wall that would enclose the wall that the tent to fit into.
Other possibilities include these tents from Cabelas.

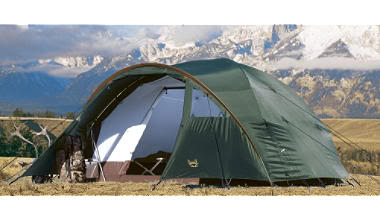
My only concern here is that the vestibule many not be wide enough to serve as both points of the entry. Don't know as of yet what to do...Got some irons in the fire as too what to do next...Stay tuned.
Got back from Cabelas again and got some other 'stuff'. My dear wife tells me that I go there to 'relax', Oh does she know me well...
Roll top table ~ Pretty 'heavy' compared to the other option there. I may decide to take this one back and go with the lighter option...

Cabelas shower shelter ~ Taking this one back...Took about an 'act' of congress to get this up...Going with the Trekker Fold-A-Privy instead...


Pett toilet ~ Told my son that we were going to Cabelas to buy a TOILET...Haven't said that ever, he had a look of bewilderment to say the least ...
...

By the way, all you Engel experts, do you need one or two hinge locks for the fridge?
Progressing!
Regards,
BWJ
I would then get a custom fabricated wall that would enclose the wall that the tent to fit into.
Other possibilities include these tents from Cabelas.
My only concern here is that the vestibule many not be wide enough to serve as both points of the entry. Don't know as of yet what to do...Got some irons in the fire as too what to do next...Stay tuned.
Got back from Cabelas again and got some other 'stuff'. My dear wife tells me that I go there to 'relax', Oh does she know me well...
Roll top table ~ Pretty 'heavy' compared to the other option there. I may decide to take this one back and go with the lighter option...
Cabelas shower shelter ~ Taking this one back...Took about an 'act' of congress to get this up...Going with the Trekker Fold-A-Privy instead...
Pett toilet ~ Told my son that we were going to Cabelas to buy a TOILET...Haven't said that ever, he had a look of bewilderment to say the least
...By the way, all you Engel experts, do you need one or two hinge locks for the fridge?
Progressing!
Regards,
BWJ
Last edited by bigwapitijohnny; Mar 28, 2010 at 01:10 PM.
Mar 28, 2010 | 05:22 AM
#24
Co-Founder/Administrator
iTrader: (1)
Joined: May 2002
Posts: 32,242
Likes: 21
From: Auburn, Washington
For all the rough back country/logging roads I drive on when I go camping, the stock locking hinge on front works fine.
The author even stated in a thread that the stock one should be fine, but he offers the two new ones for the side if anyone wants to install them.
If you install the Transit Bag, you will have to cut the bag to modify it.
I have never used my bag, it is tucked away in the spare bedroom closet.
As earlier, I am running the guy's hinge relocation kit with just two hinges on the long side.
 Mar 31, 2010 | 07:50 PM
#25
Thread Starter
Registered User
Joined: Jan 2007
Posts: 125
Likes: 0
Update...More tent options
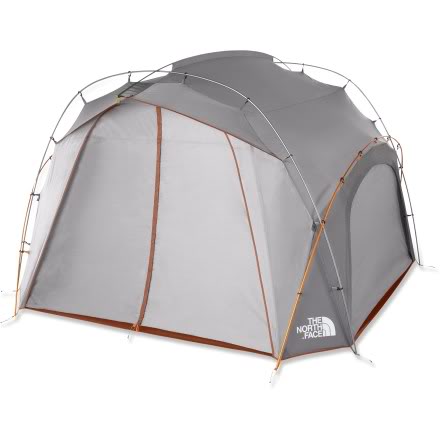
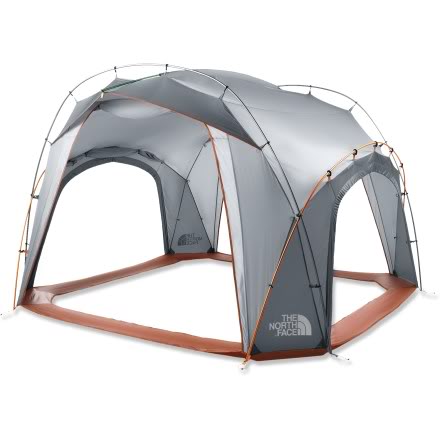
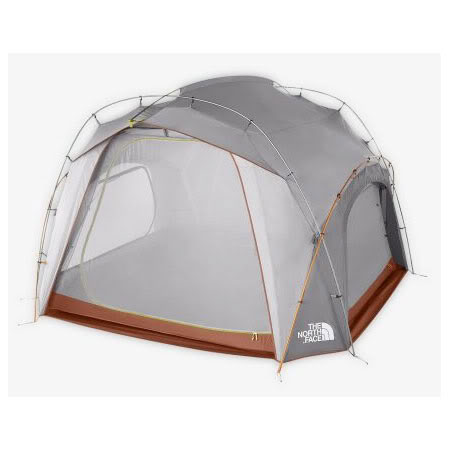
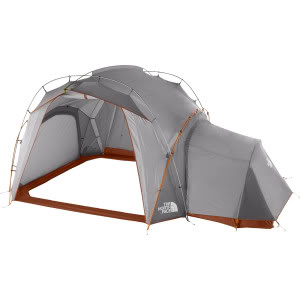
Just found this system from the North Face. It is called the 'Docking Station'. It consists of the 6 man common area which can then have several 4 man / 2 man 'rooms' zipped to the 3 remaining panels...Pretty interesting to say the least...
Screen room with floor
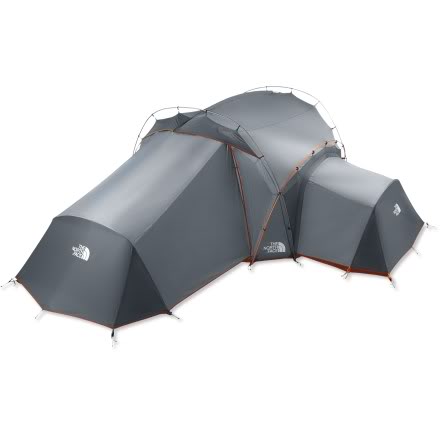
Quick dimensions:
Packed weight ~ 19 lbs. 4 oz
Floor dimension ~ 10 x 10 ft
uses 5 DAC 17 aluminum poles
Packed size ~ 12 x 29
Price point is very competitive...
The awning area is reported 79" tall...I bet I could put my Fold-A-Privy in the common area for my wife, as well as, the folding picnic table if we had too.
Very interesting...I'll investigate this system further...
Regards,
BWJ
It is called the 'Docking Station'. It consists of the 6 man common area which can then have several 4 man / 2 man 'rooms' zipped to the 3 remaining panels...Pretty interesting to say the least...Screen room with floor
2 person room attached...
4 person room attached along w/ a 2 person room...
Quick dimensions:
Packed weight ~ 19 lbs. 4 oz
Floor dimension ~ 10 x 10 ft
uses 5 DAC 17 aluminum poles
Packed size ~ 12 x 29
Price point is very competitive...
The awning area is reported 79" tall...I bet I could put my Fold-A-Privy in the common area for my wife, as well as, the folding picnic table if we had too.
Very interesting...I'll investigate this system further...
Regards,
BWJ
Last edited by bigwapitijohnny; Apr 1, 2010 at 03:09 AM.
Jun 1, 2010 | 08:26 PM
#26
Thread Starter
Registered User
Joined: Jan 2007
Posts: 125
Likes: 0
The build has begun...
It has been quite a long time since I posted. I have been very busy with projects on my 4runner. I had the original 4 way flat vehicle connector converted to a 7 way round connector. In addition, I took my Armorology bumpers and got them sandblasted and coated with Ameraguard coating. The powder coating was taking a beating driving on gravel roads during hunting season, and the winter road salt was taking its toll on them. This bumper project was a PITA, however, looking at it now, it was worth it. Just had to keep my eye on the prize and NOT the process...


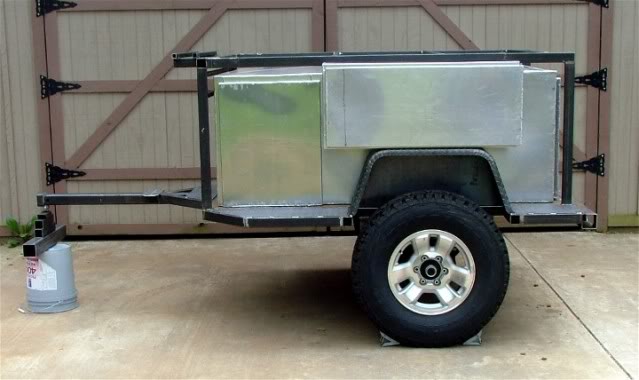
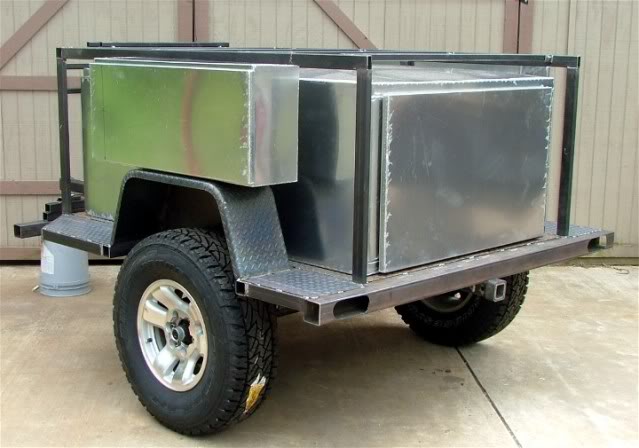
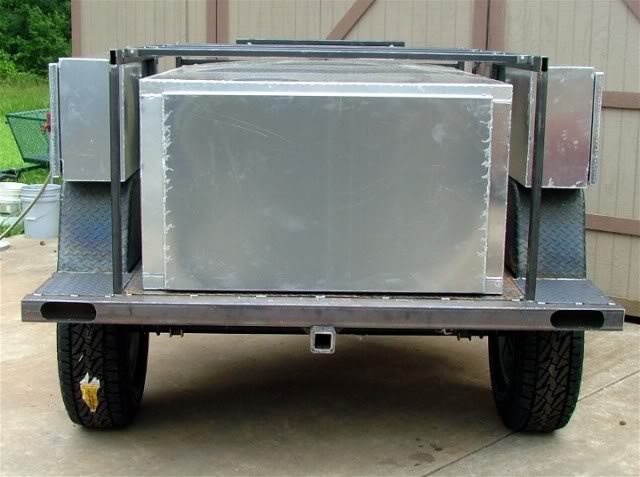
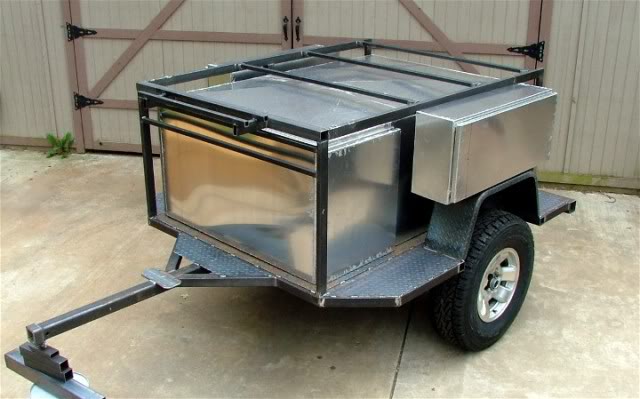
Meanwhile, the build has begun on my Sherpa II. I now have pics of MY trailer versus others (Thanks again to 2Bcamping!). Here are some preliminary pics...I did go with a 14 gauge treadplate floor so that I would be able to load firewood / ZTR mower / ATV when needed...
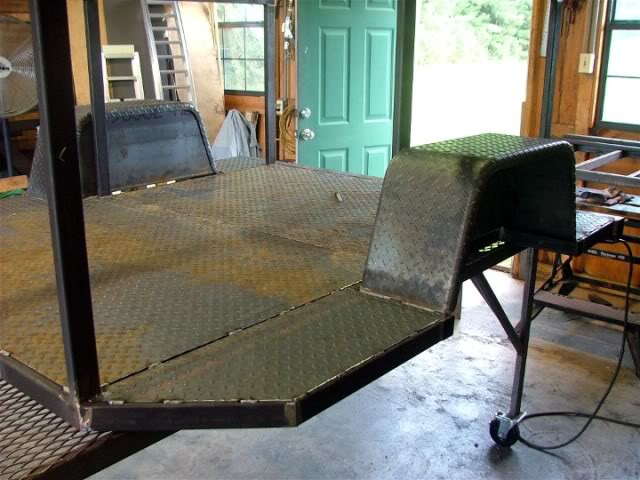
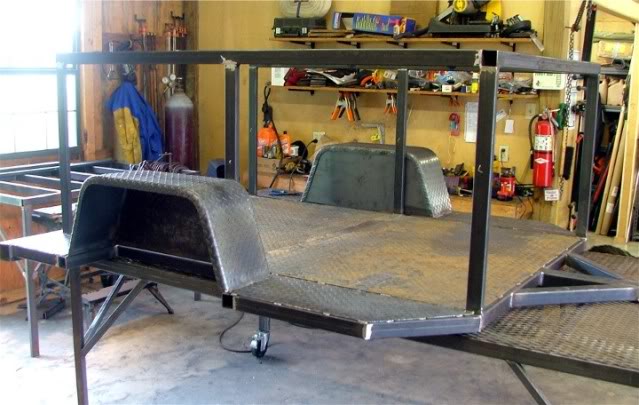
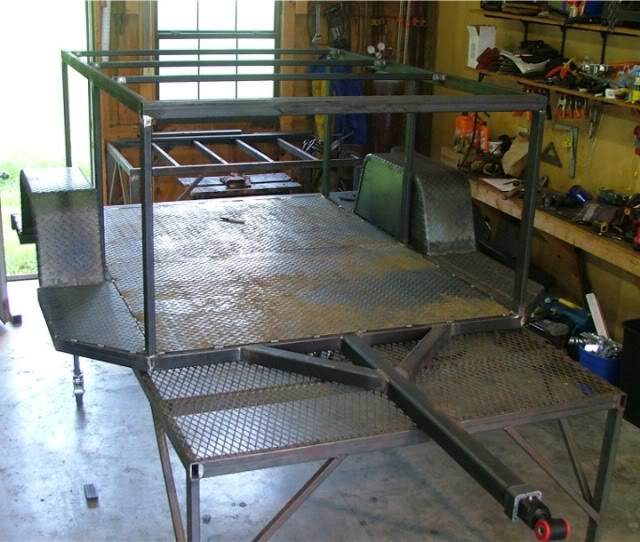

Stay tuned...Tool mounts are next...Axe / Shovel / Hi-lift jack...
Regards,
BWJ
Back from the Sandblaster...
Ameraguard being sprayed on the front...
Ameraguard is on...
Meanwhile, the build has begun on my Sherpa II. I now have pics of MY trailer versus others (Thanks again to 2Bcamping!). Here are some preliminary pics...I did go with a 14 gauge treadplate floor so that I would be able to load firewood / ZTR mower / ATV when needed...
Robert will seal the floor seams as well...
Yes, that is a Max coupler that you see...
Stay tuned...Tool mounts are next...Axe / Shovel / Hi-lift jack...
Regards,
BWJ
Jun 3, 2010 | 07:17 AM
#27
Thread Starter
Registered User
Joined: Jan 2007
Posts: 125
Likes: 0
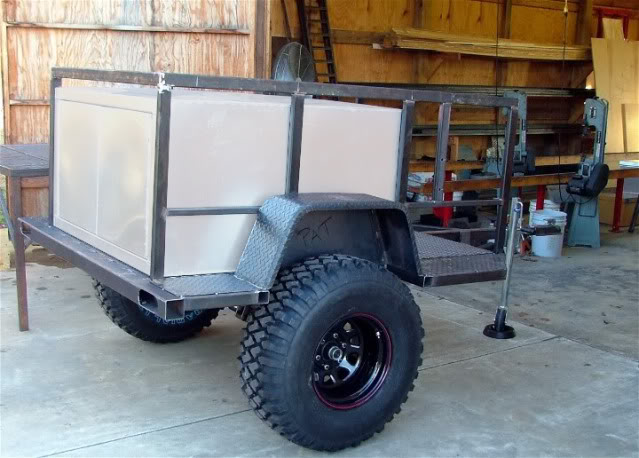
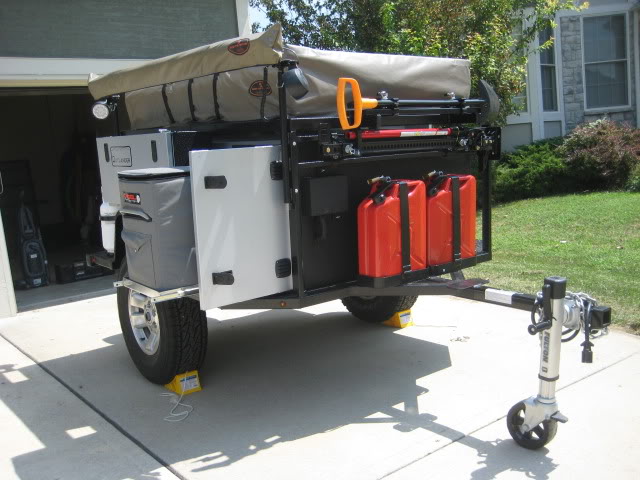
Powder coating and Tool mounts...
Powder coating color: I have decided to powder coat the boxes Anodized Silver. Rationale for the this color choice would be to minimize the heat build up of the boxes during the day.

Robert did give the me the option of adding additional vents to the boxes if the color was going to be darker, but that would then add additional problems regarding the seal.
Tool mounts: I did not like the tool mounts on the Baja Rack due to COG issues, and it being a pain accessing these implements.
Instead, Robert and I are working on some 'custom' tool mounts on the Sherpa II. I bought a Hi-lift Baja Rack mount, as well as a Fiskars shovel and axe mount. I will use these on the Sherpa.
Here are the preliminary photos of the mounts that are going on. Caveat: One issue was placement of these tool mounts. The mounting locations available on this trailer is not too abundant so we had to be creative. Robert came up with a solution that I think will be great.
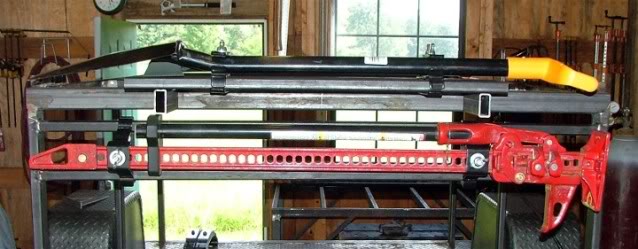
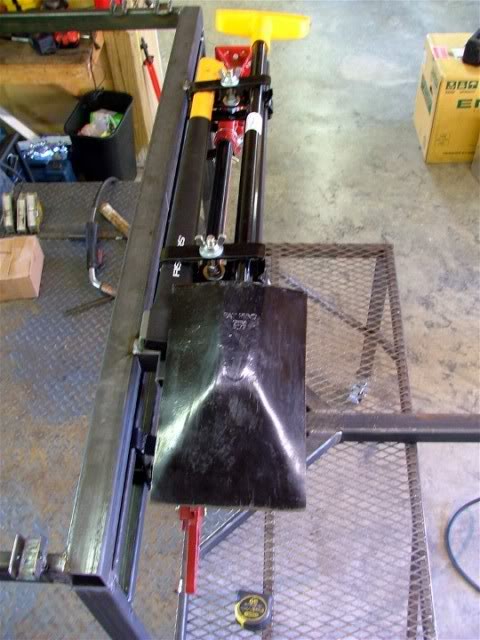
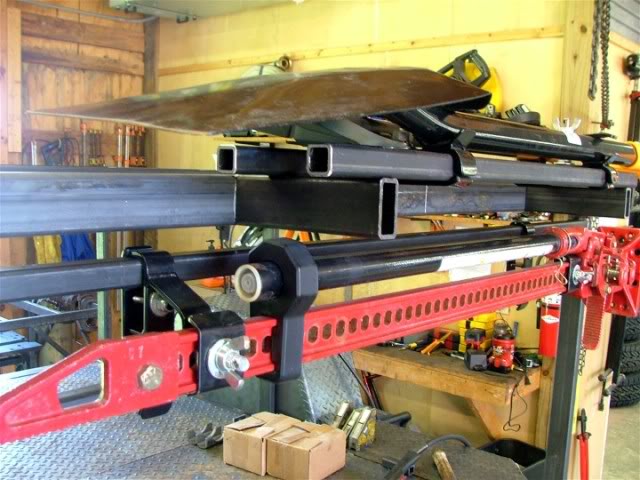
** Please disregard the location of the shovel / axe mount on the last pic. This option was not going to work because of the size of the Mombasa trailer tent.**
More pics later...
Regards,
BWJ
Robert did give the me the option of adding additional vents to the boxes if the color was going to be darker, but that would then add additional problems regarding the seal.
Tool mounts: I did not like the tool mounts on the Baja Rack due to COG issues, and it being a pain accessing these implements.
Instead, Robert and I are working on some 'custom' tool mounts on the Sherpa II. I bought a Hi-lift Baja Rack mount, as well as a Fiskars shovel and axe mount. I will use these on the Sherpa.
Here are the preliminary photos of the mounts that are going on. Caveat: One issue was placement of these tool mounts. The mounting locations available on this trailer is not too abundant so we had to be creative. Robert came up with a solution that I think will be great.
** Please disregard the location of the shovel / axe mount on the last pic. This option was not going to work because of the size of the Mombasa trailer tent.**
More pics later...
Regards,
BWJ
Jun 7, 2010 | 06:12 PM
#30
Thread Starter
Registered User
Joined: Jan 2007
Posts: 125
Likes: 0
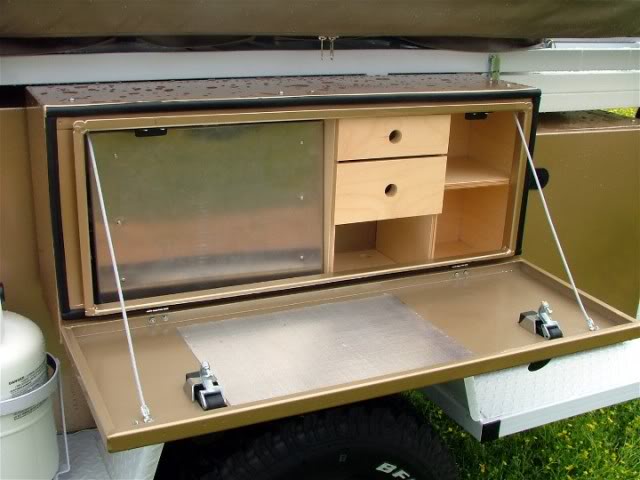
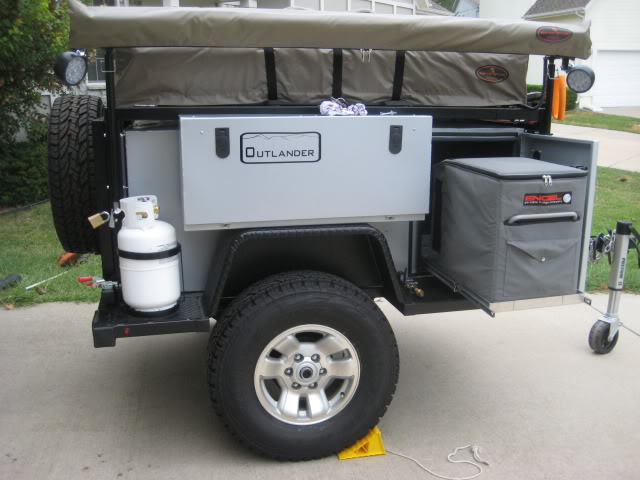
Suspension, axle and wheels on...Galley option pondering...
Got some pics of the trailer today. Rims are my OEM wheels that came with the 4runner. Tires are Bridgestone Dueler A/T Revo 2 (265/75r16).
Rear tire carrier to follow...
Considering the galley option in the passenger side galley box. I will not be getting a Partner stove since I got a Coleman at a screaming good price...

More pics to follow...
Regards,
BWJ
Rear tire carrier to follow...
Galley options
Considering the galley option in the passenger side galley box. I will not be getting a Partner stove since I got a Coleman at a screaming good price...
More pics to follow...
Regards,
BWJ
 Aug 18, 2010 | 02:53 PM
#32
Thread Starter
Registered User
Joined: Jan 2007
Posts: 125
Likes: 0
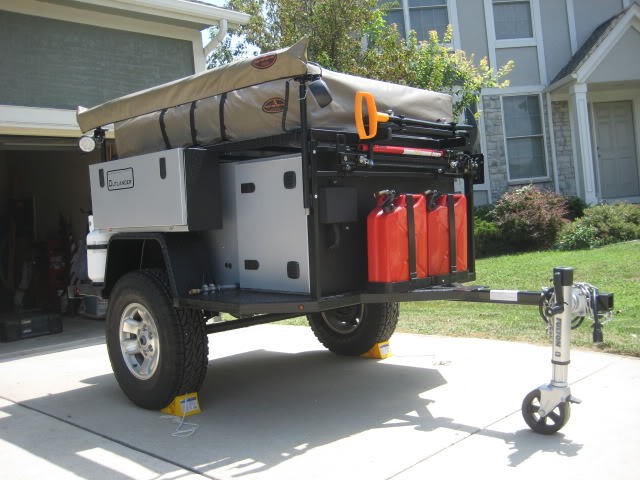
Here she is...
Here are the pics that I have been able to get. I must say that this process has been 3 years in the making, and it has been worth every minute of it. Big props to all of the fine craftsmen that took part in the build. I could not have done this by myself...Robert Shepherd was GREAT to work with. I have called this man for 3 years bouncing ideas off of him, and this dream is finally realized. I am sure that his shop phone is finally getting a rest. Currently, I am getting my trailer and rig ready to participate in the ORCC / Bass Pro Shops event in early September. Sorry for the driveway pics, I have taken the Sherpa out twice now and it has been Great...
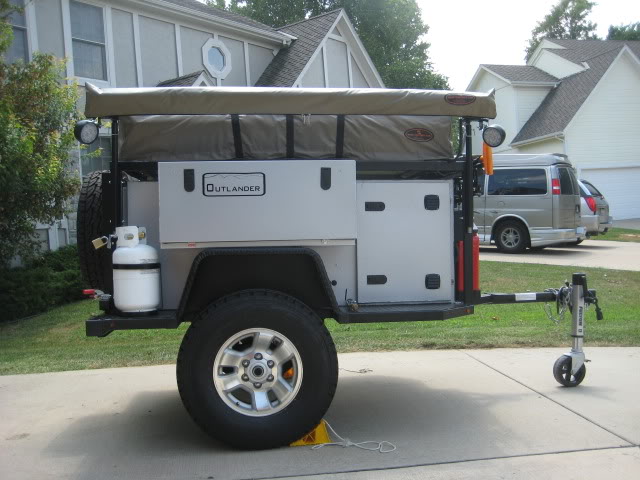
I had all of the front surfaces of the main and fender boxes coated with the Ameraguard coating. Dan Cusumano (Ameraguard of Lee's Summit) did a PHENOMENAL job with the coating. I removed the fuel can holders and implements (Jack, shovel, axe) but other than that He taped it all off. It is a great exercise to see true pros 'do their thing'...Thanks Dan!
More pics to come!
Regards,
BWJ
Looks like a need an ExPo sticker...By the way, if a trailer and it's cargo is less than 2,000 lbs total, it does NOT need to be registered in the state of KS!
Closer view of the fender boxes
I had all of the front surfaces of the main and fender boxes coated with the Ameraguard coating. Dan Cusumano (Ameraguard of Lee's Summit) did a PHENOMENAL job with the coating. I removed the fuel can holders and implements (Jack, shovel, axe) but other than that He taped it all off. It is a great exercise to see true pros 'do their thing'...Thanks Dan!
More pics to come!
Regards,
BWJ
Aug 20, 2010 | 05:35 PM
#33
Thread Starter
Registered User
Joined: Jan 2007
Posts: 125
Likes: 0
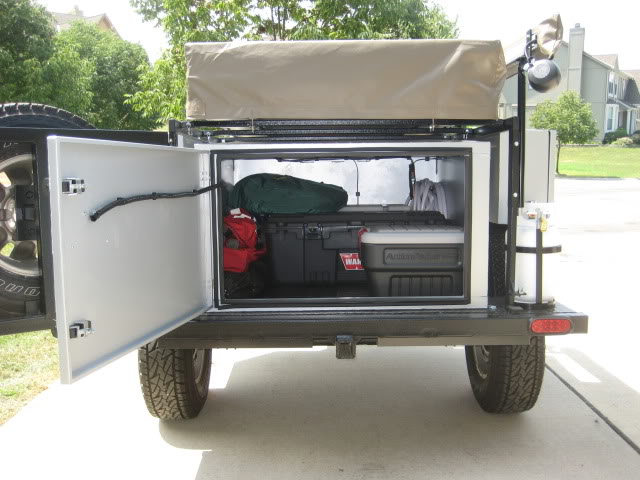
Rear compartment / Fender boxes
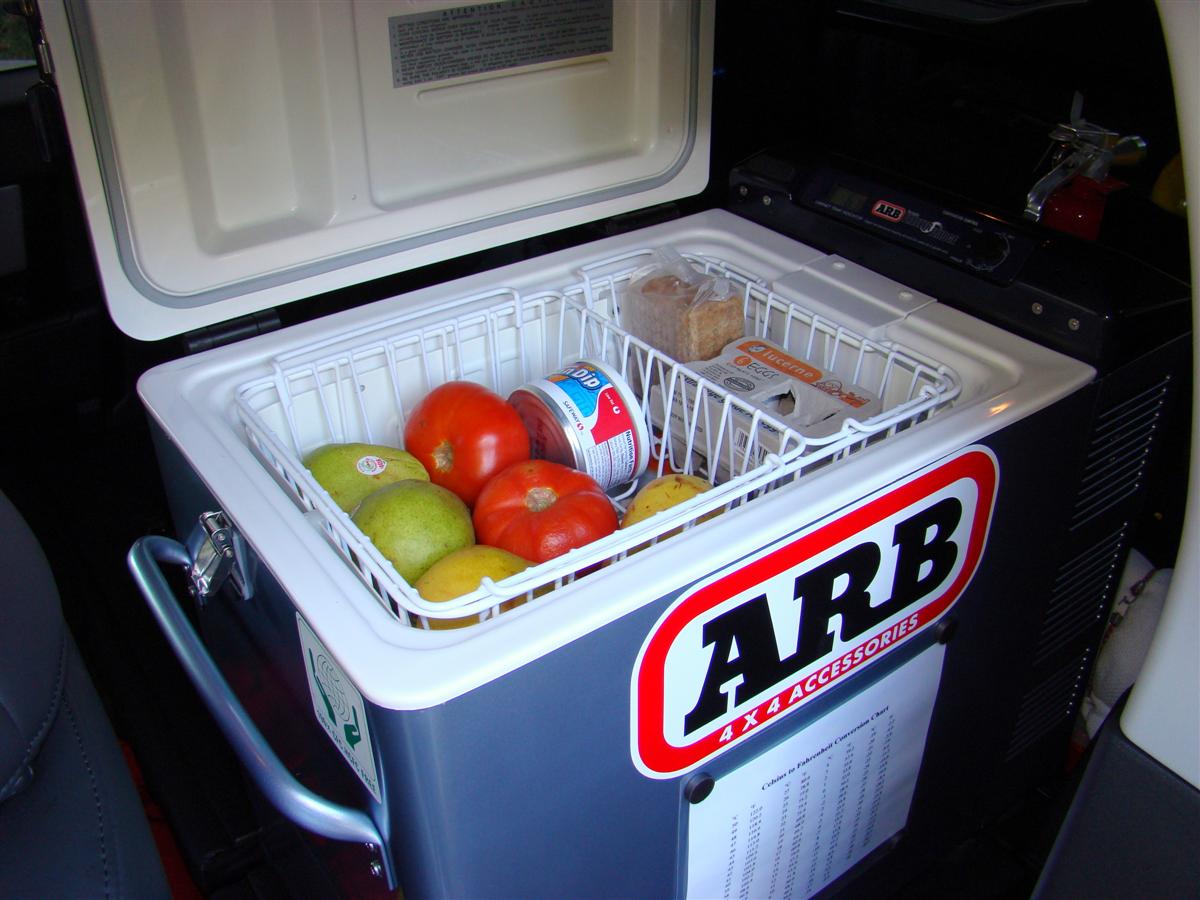
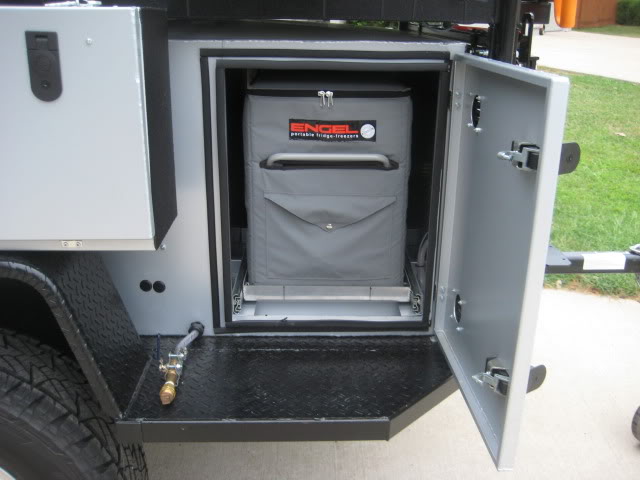
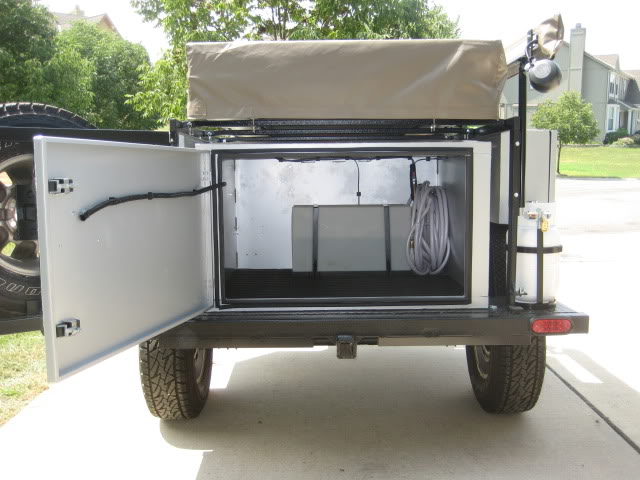
Got the transit bag for the Engel 45 installed. Fridge is on a custom tray fabbed up by Robert. If you ask me, it's about a perfect fit for front compartment...

The Engel is locked into place with a quick release pin. Even the small details are addressed...
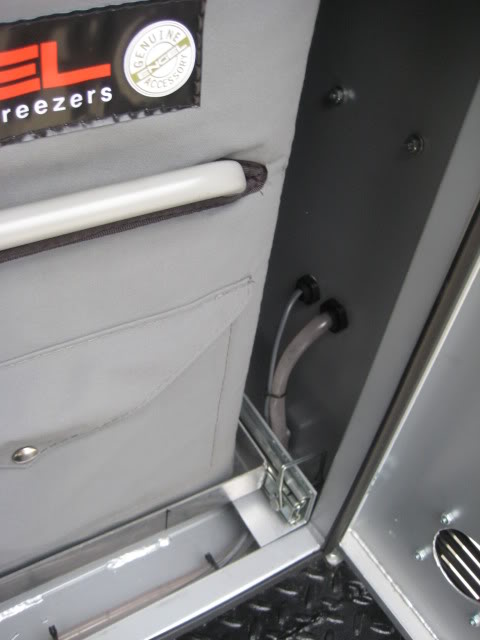
The great thing about the location is that with the awning deployed with the screen room, I'm cooking in total comfort...:chef: I'm still trying to figure out a system for the galley box...That is the fun part of it isn't it?...
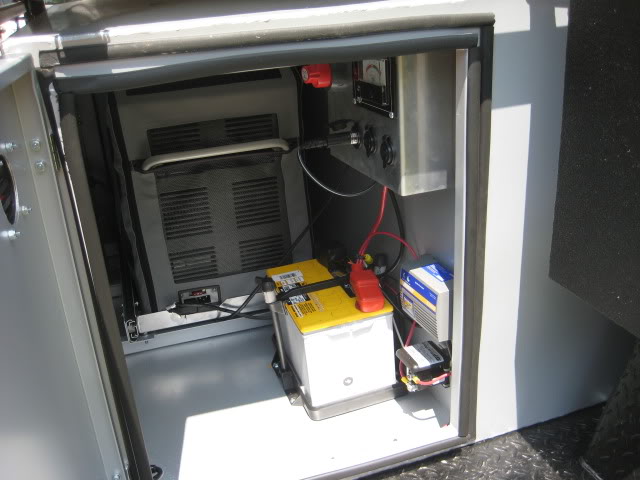
The other side of the front compartment houses the eletrical system. Eventually, my Honda EU1000iA will fit there perfectly. Don't need a tray for that, just some d-rings to tie it down. The battery will run my CPAP machine for about 18 hrs if need be with the Engel shut off...So it looks like I will be needing the Honda pretty soon...or else the entire campsite will suffer from my snoring...
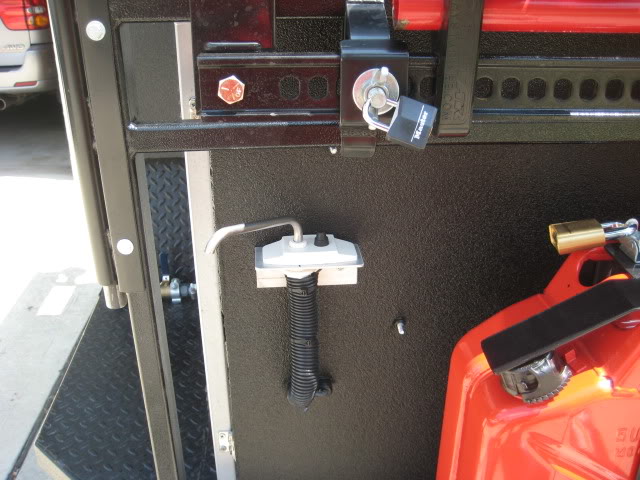
The Faucet location was somewhat of an issue as to where to place it. We finally decided to go with the front of the box. Robert fabbed up a custom aluminum box cover for it. Here it is coated with Ameraguard...It is removable with two wing nuts.
More pics to follow...
Regards,
BWJ
The Engel is locked into place with a quick release pin. Even the small details are addressed...
The great thing about the location is that with the awning deployed with the screen room, I'm cooking in total comfort...:chef: I'm still trying to figure out a system for the galley box...That is the fun part of it isn't it?...
The other side of the front compartment houses the eletrical system. Eventually, my Honda EU1000iA will fit there perfectly. Don't need a tray for that, just some d-rings to tie it down. The battery will run my CPAP machine for about 18 hrs if need be with the Engel shut off...So it looks like I will be needing the Honda pretty soon...or else the entire campsite will suffer from my snoring...
The Faucet location was somewhat of an issue as to where to place it. We finally decided to go with the front of the box. Robert fabbed up a custom aluminum box cover for it. Here it is coated with Ameraguard...It is removable with two wing nuts.
More pics to follow...
Regards,
BWJ
Last edited by bigwapitijohnny; Aug 20, 2010 at 05:38 PM.
Aug 20, 2010 | 05:40 PM
#34
Thread Starter
Registered User
Joined: Jan 2007
Posts: 125
Likes: 0
Rear compartment / Fender boxes
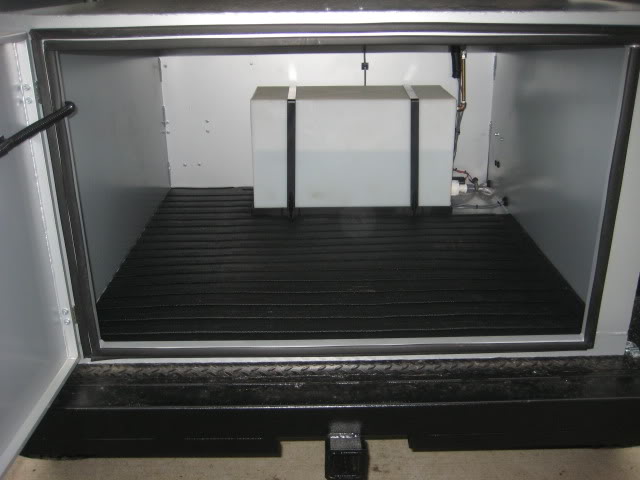
The rear compartment was configured with a 15 gallon water tank. We had decided to have the fill valve on the fridge side. Got a brass cap to plug the valve while in transit...
Rear compartment:
I bought an truck bed mat at Tractor Supply and cut it to fit the back. That stuff was tough to cut, thank goodness that I had some straight edged shears to make fitting easy. As you can see there is plenty of storage available.
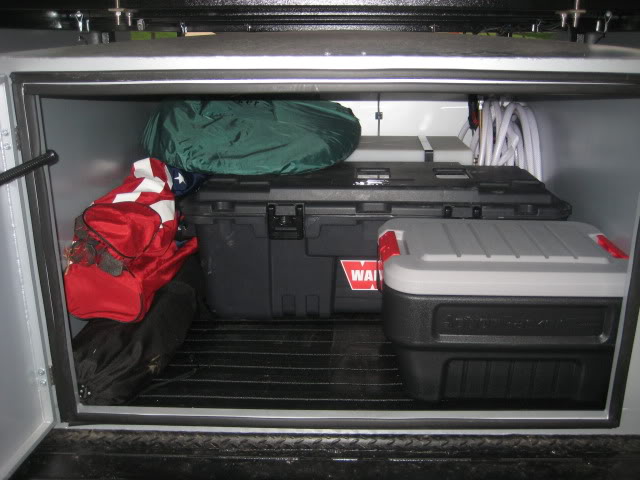
I currently have a PETT toilet / Trekker Fold-a-privy / 2 lawn chairs / Cabela's large folding table / Plano Sportsman trunk with camping gear / Rubbermaid Action packer (dry food storage) / 60 ft of RV drinking water hose...As you can see, there is plenty of room after all the gear is in...
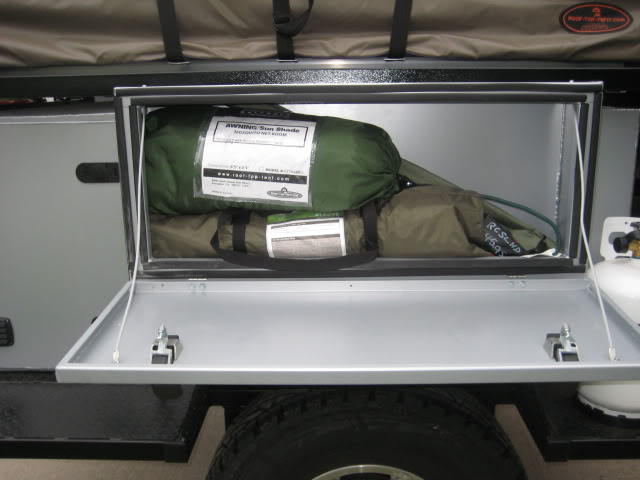
Fender boxes:
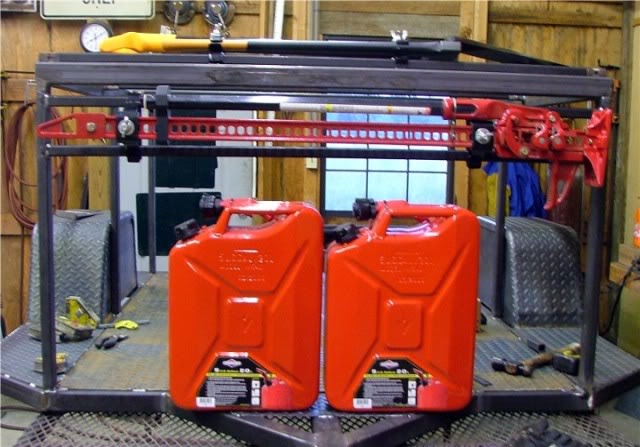
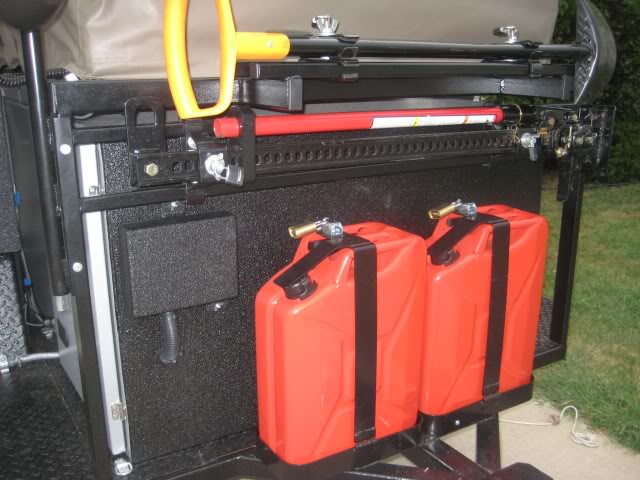
The driver side fender box 'under' the tent is used for storage for other ancillary equipment. I've got my Mombasa awning screen room / REI Alcove / Mombasa rain fly rods / Custom trailer wheel lock...More on the lock later
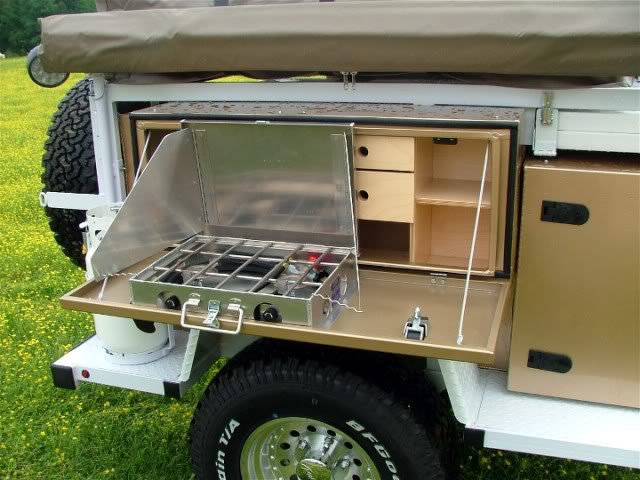
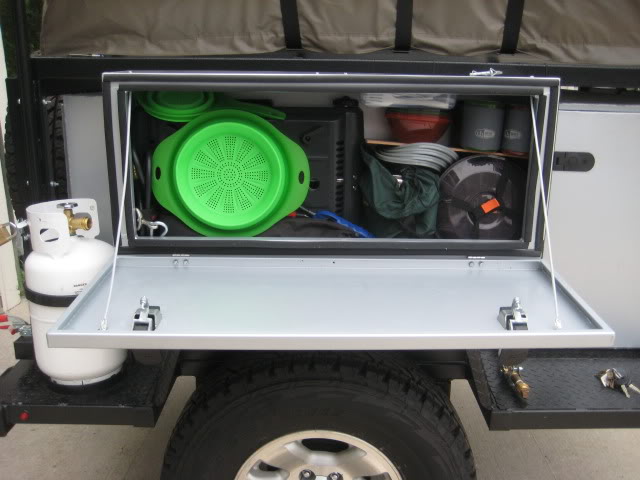
The galley box is currently 'stuffed' with my Coleman stove / GSI Outdoors pinnacle base camper set / GSI Outdoors Infinity 4 person set / Century 2 piece safety post and propane hose / collapsible strainer / 2 BBQ grill lighters...This system has been MONEY. So far I have cooked some good chow and I am looking for a dutch oven as well...
I am still looking for galley options...as it sits, it works well, HOWEVER, well...you guys know...IT NEVER ENDS!
More pics later!
Regards,
BWJ
Rear compartment:
I bought an truck bed mat at Tractor Supply and cut it to fit the back. That stuff was tough to cut, thank goodness that I had some straight edged shears to make fitting easy. As you can see there is plenty of storage available.
I currently have a PETT toilet / Trekker Fold-a-privy / 2 lawn chairs / Cabela's large folding table / Plano Sportsman trunk with camping gear / Rubbermaid Action packer (dry food storage) / 60 ft of RV drinking water hose...As you can see, there is plenty of room after all the gear is in...
Fender boxes:
The driver side fender box 'under' the tent is used for storage for other ancillary equipment. I've got my Mombasa awning screen room / REI Alcove / Mombasa rain fly rods / Custom trailer wheel lock...More on the lock later
The galley box is currently 'stuffed' with my Coleman stove / GSI Outdoors pinnacle base camper set / GSI Outdoors Infinity 4 person set / Century 2 piece safety post and propane hose / collapsible strainer / 2 BBQ grill lighters...This system has been MONEY. So far I have cooked some good chow and I am looking for a dutch oven as well...
I am still looking for galley options...as it sits, it works well, HOWEVER, well...you guys know...IT NEVER ENDS!
More pics later!
Regards,
BWJ
 Aug 25, 2010 | 03:14 PM
#36
Thread Starter
Registered User
Joined: Jan 2007
Posts: 125
Likes: 0
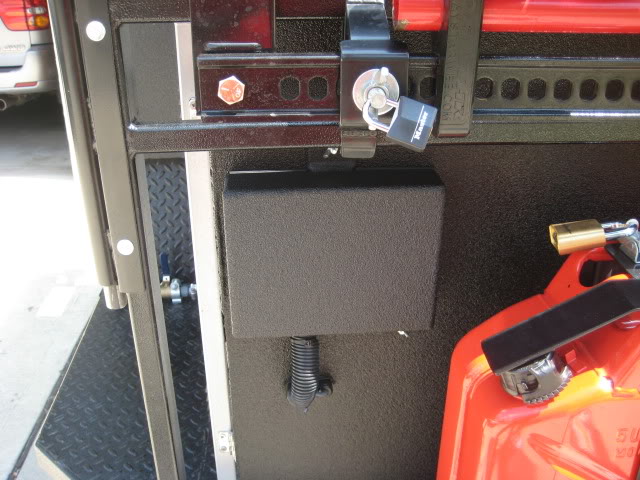
Custom Wheel lock...
Finally, the Sherpa II wheel will be 'locked' using a custom wheel lock from Truck Trailer and Hitch of Kansas City. They were the ones that helped me out with the brake controller installation and wiring. If you ever need anything for your trailer, this is the place to go in Kanas City. Ask for a gentleman named 'RC'. This guy knows trailers like no one else.
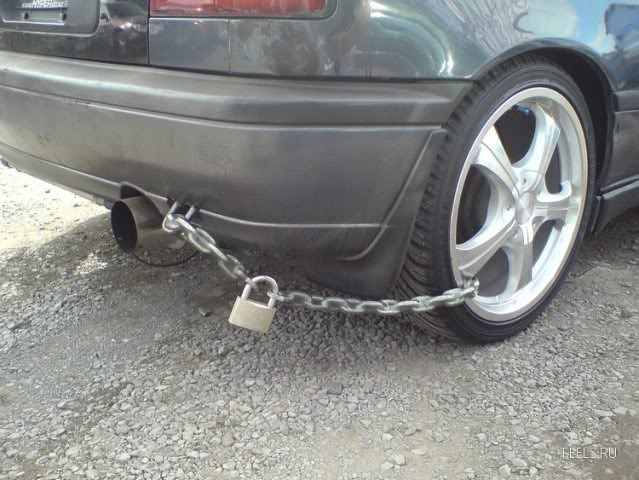
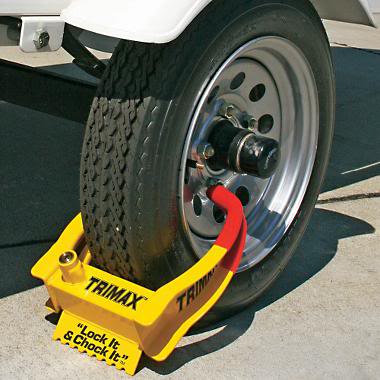
Anyway, I considered several different kind of wheel locks. The selection ranged from heavy chains 'laced' throughout the trailer to a variety of wheel locks.

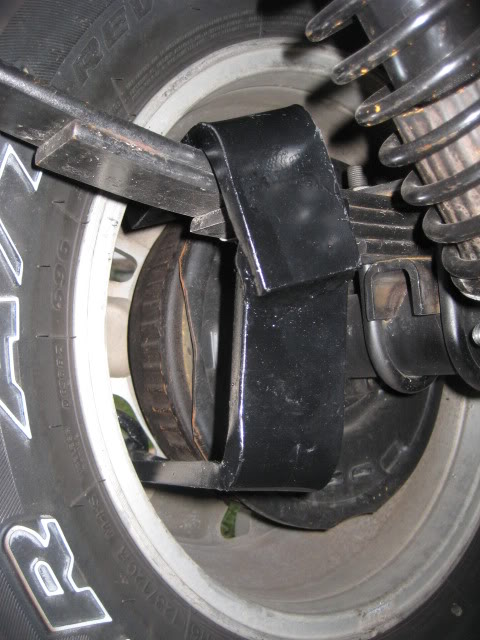
When I asked 'RC' about wheel lock options for the Sherpa II, he immediately showed me this one. It is his custom design and I give him big props for the ingenuity of it. Simple yet effective...
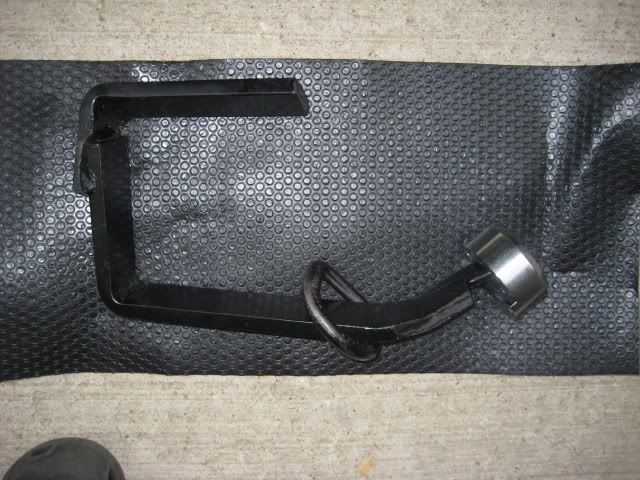
It is made of heavy gauge steel. It consists of a sleeve that rests above the spring of the trailer and pops out the wheel spoke. 'RC' said that the 'traditional' chains and wheel locks are vulnerable to cordless sawzalls where as this one would be 'less' prone to sawing due to the proximity of lock, and the damage that would ensue cutting it off...I know that no system is fool proof, however, if they want it that bad, it is going to take quite a bit of effort to get this thing off compared to the other locks.
Here is a close up of the lock fitting over the spring...
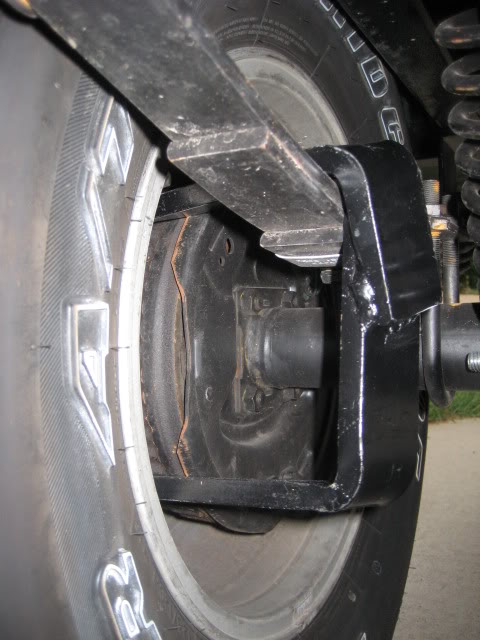
I'm thinking this would be a PITA to saw off, perhaps this would be enough to encourage them to go on to the next trailer...
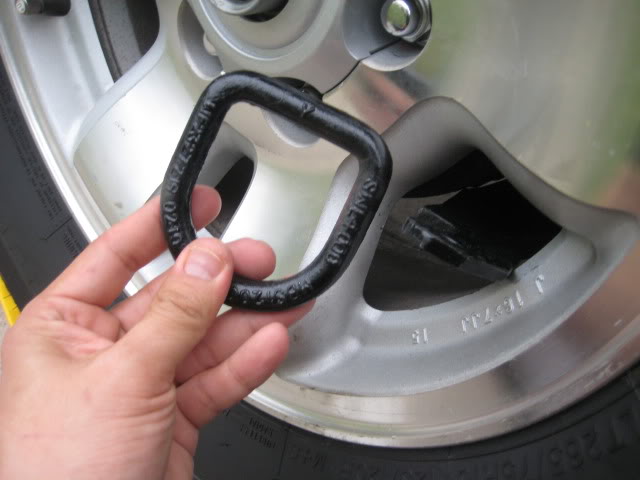
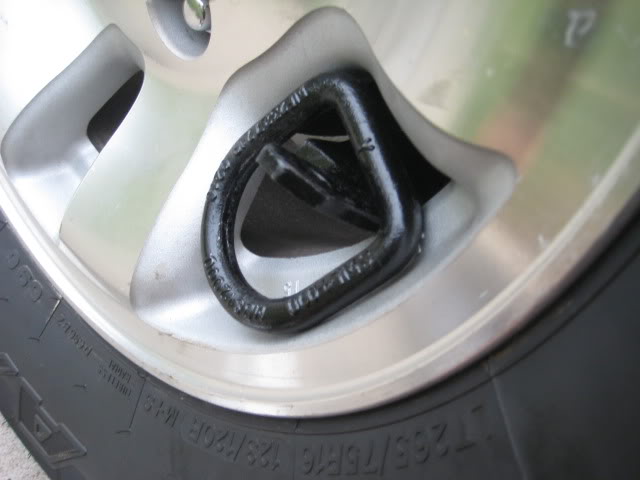
Here is the pic of the lock on the other side of the wheel. We had to use an additional D-ring to prevent the hockey puck lock from moving too much. Remember, this lock is made for small trailer wheels, not 16" Toyota rims...
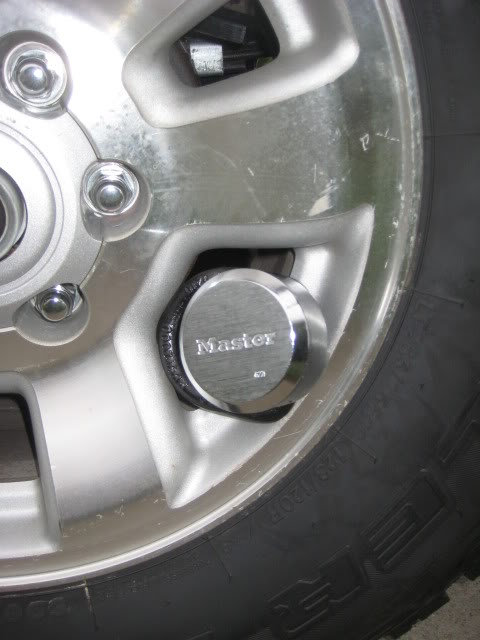
Final pic of the lock on. Pretty hard to notice this lock from far away. I figure with a Max-coupler removed with a hitch pin hole locked, and this wheel lock on. If the stinkin' thieves overcome all of these obstacles, they can have this trailer.
More field pics to come!
Regards,
BWJ
Anyway, I considered several different kind of wheel locks. The selection ranged from heavy chains 'laced' throughout the trailer to a variety of wheel locks.
When I asked 'RC' about wheel lock options for the Sherpa II, he immediately showed me this one. It is his custom design and I give him big props for the ingenuity of it. Simple yet effective...
It is made of heavy gauge steel. It consists of a sleeve that rests above the spring of the trailer and pops out the wheel spoke. 'RC' said that the 'traditional' chains and wheel locks are vulnerable to cordless sawzalls where as this one would be 'less' prone to sawing due to the proximity of lock, and the damage that would ensue cutting it off...I know that no system is fool proof, however, if they want it that bad, it is going to take quite a bit of effort to get this thing off compared to the other locks.
Here is a close up of the lock fitting over the spring...
I'm thinking this would be a PITA to saw off, perhaps this would be enough to encourage them to go on to the next trailer...
Here is the pic of the lock on the other side of the wheel. We had to use an additional D-ring to prevent the hockey puck lock from moving too much. Remember, this lock is made for small trailer wheels, not 16" Toyota rims...
Final pic of the lock on. Pretty hard to notice this lock from far away. I figure with a Max-coupler removed with a hitch pin hole locked, and this wheel lock on. If the stinkin' thieves overcome all of these obstacles, they can have this trailer.
More field pics to come!
Regards,
BWJ
Aug 27, 2010 | 07:56 AM
#38
Thread Starter
Registered User
Joined: Jan 2007
Posts: 125
Likes: 0
Empty (RTT / Awning) ~ 800lbs; Fully loaded (Fuel / Water / Food in Engel / Gear) ~ less than 2,000. I will weigh this sometime at a truck scale when I get a chance.
As far as the 4runner is concerned, I wish the engine were bigger towing through the hills. Coming back from the Ozark mountains, it labored...I can imagine what it would do in the Rockies...When we go out West, we will take my wife's Sequoia with the iForce V8. I may start looking for a new platform to build up. Either a Full size Tundra / Taco / or newer 4runner...
Regards,
BWJ
Last edited by bigwapitijohnny; Aug 27, 2010 at 08:00 AM.
Nov 21, 2010 | 05:59 PM
#39
Thread Starter
Registered User
Joined: Jan 2007
Posts: 125
Likes: 0
Power, power and more power...
All,
I am going to upgrade the electrical system over the winter...I have taken the trailer out 8 times this fall, and it is excellent. Still working out the 'kinks' of the Sherpa...
The changes to the trailer will be the following:
1) Bought a Yamaha EF2000iS from Cabela's for a screaming deal. Since I am a Cabelas club member, I got 4x points on my upgraded card in addition to activating two cash cards...When the smoke cleared from the deal, I ended up getting about $500 worth of Cabelas bucks from the purchase... Luv Cabelas...
2) I will have Robert put in another 55 ah battery and upgrade the charger / controller...Giving me a total of 110ah to work with...Wiring will also be upgraded and shored up. Also will replace the galley lights with some newer brighter LEDs...
3) My Baja rack is not being used, so I am going to have a solar option put in as well. The rack will house a 100watt panel and will charge my trailer batteries while traveling. Thus, there will be two 'plug in' receptacles on the trailer...One 110volt and another a solar...
3 ways for power when Spring rolls around...Vehicle alternator / Yamaha Generator / Solar...
Regards,
BWJ
Mar 17, 2011 | 08:52 PM
#40
Thread Starter
Registered User
Joined: Jan 2007
Posts: 125
Likes: 0
Sherpa upgrades...
All,
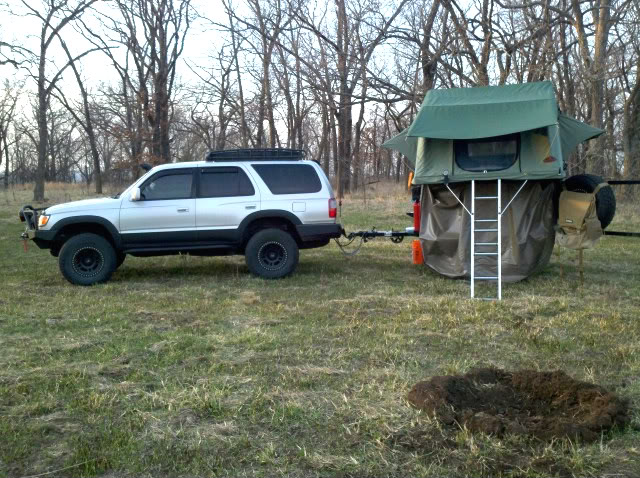
Just got back from a backcountry adventure with my son :safari-rig:. It was a blast! The upgrades to the Sherpa are top-notch. The galley lights are much brighter, and I really like the way the junction boxes / switches are set up. Here are some pics of our adventure...Look ma, no driveway pics! :wings:
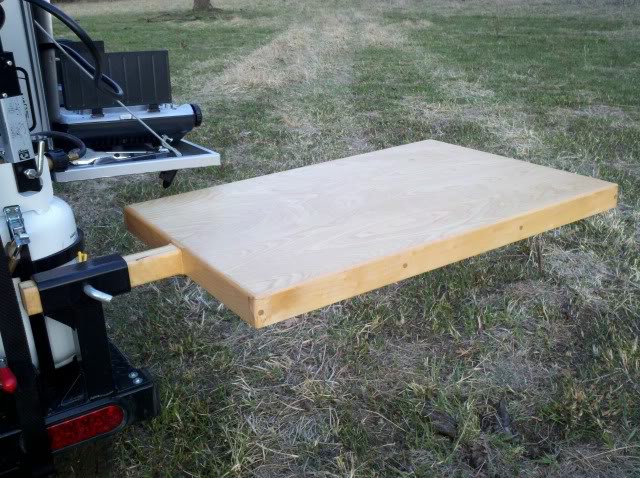
The table and sink are what I consider 'money in the bank'. The table weighs in at a cool and wispy 15 pounds...Not bad for an all wood table. Still working on getting a custom made cover for this. If any of you know of a good seamstress in the KC area, I'm all ears...This is the first production table and sink from Outlander. Robert did a fine job as usual...Very pleased with the results...

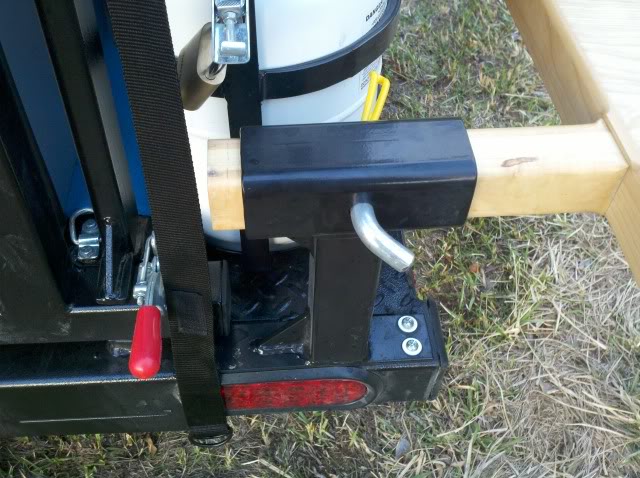
Close up of the table mounting system...
Here are some images of the sink. Honestly, I did not think that the sink was going to be this nice! Currently using a 5 gallon bucket for the water...Used biodegradable soap and snuffed out the campfire with the water...
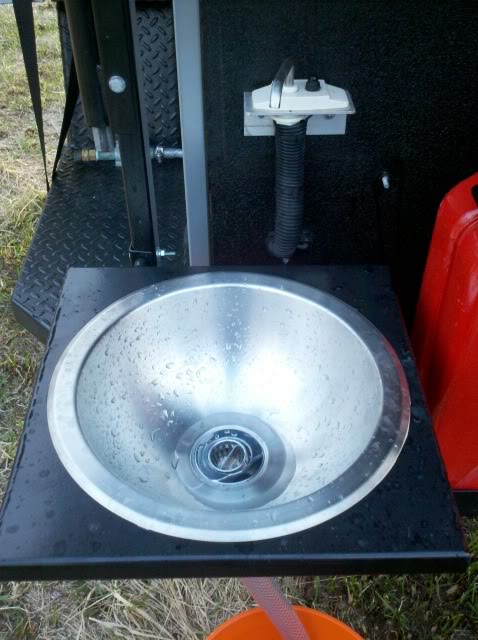
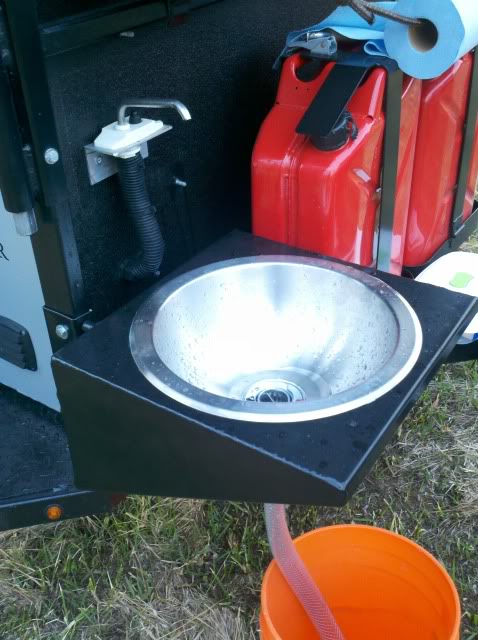
Notice the improvised towel 'rack' in the last pic. The sink is too nice to drill a towel rack into it. Besides, to make it match, I would have to go with a $25 'brushed nickel' towel rack...NO THANKS!
Anyway, enjoy! All I have to add onto my Sherpa now is miles and memories!
Regards,
BWJ
Just got back from a backcountry adventure with my son :safari-rig:. It was a blast! The upgrades to the Sherpa are top-notch. The galley lights are much brighter, and I really like the way the junction boxes / switches are set up. Here are some pics of our adventure...Look ma, no driveway pics! :wings:
The table and sink are what I consider 'money in the bank'. The table weighs in at a cool and wispy 15 pounds...Not bad for an all wood table. Still working on getting a custom made cover for this. If any of you know of a good seamstress in the KC area, I'm all ears...This is the first production table and sink from Outlander. Robert did a fine job as usual...Very pleased with the results...
Close up of the table mounting system...
Here are some images of the sink. Honestly, I did not think that the sink was going to be this nice! Currently using a 5 gallon bucket for the water...Used biodegradable soap and snuffed out the campfire with the water...
Notice the improvised towel 'rack' in the last pic. The sink is too nice to drill a towel rack into it. Besides, to make it match, I would have to go with a $25 'brushed nickel' towel rack...NO THANKS!
Anyway, enjoy! All I have to add onto my Sherpa now is miles and memories!
Regards,
BWJ


