When you click on links to various merchants on this site and make a purchase, this can result in this site earning a commission. Affiliate programs and affiliations include, but are not limited to, the eBay Partner Network.
Get the factory service manual, there are links out on the interwebs still available for download, try searching hilux ewd...electrical wire diagram. . I'd also have a wiring diagram for the vehicle your engine was installed in so that I could cross reference any issues. There are lots of great references but nothing beats the factory service manuals for accurate information and detail.
I think you only need the ecu for cruise, and the. It's just input from the vss.
Ok, I did some reading, and it looks like cruise has its own computer, with only 1 wire going to the ECM. I'm not sure what exactly it does, but I'll find out. In the meantime, pulled the ECU/ECM and now the engine is ready to depart.😁
It's been a while since I posted, so this is what's happened.
-V6 is out, and ready for sale
-Timing belt /water pump kit arrived
-I ordered a tach off eBay ( gotta figure out how to make it work ☺)
-replaced water pump
-started on the intake cleanup.
The intake manifold has been a chore to remove! The last nut was behind the injection pump, which has a blind nut as well. After several hours of messing around, I finally jerry-rigged a set up which allowed me to access the final nut on the IM without removing the pump. Now I can finish intake cleanup, and timing belt replacement.
Goals for this week are:
-Finish intake cleanup
-Finish timing belt replacement
-Remove auto transmission from truck
-Power wash the engine bay
-Pick up donor truck (manual transmission)
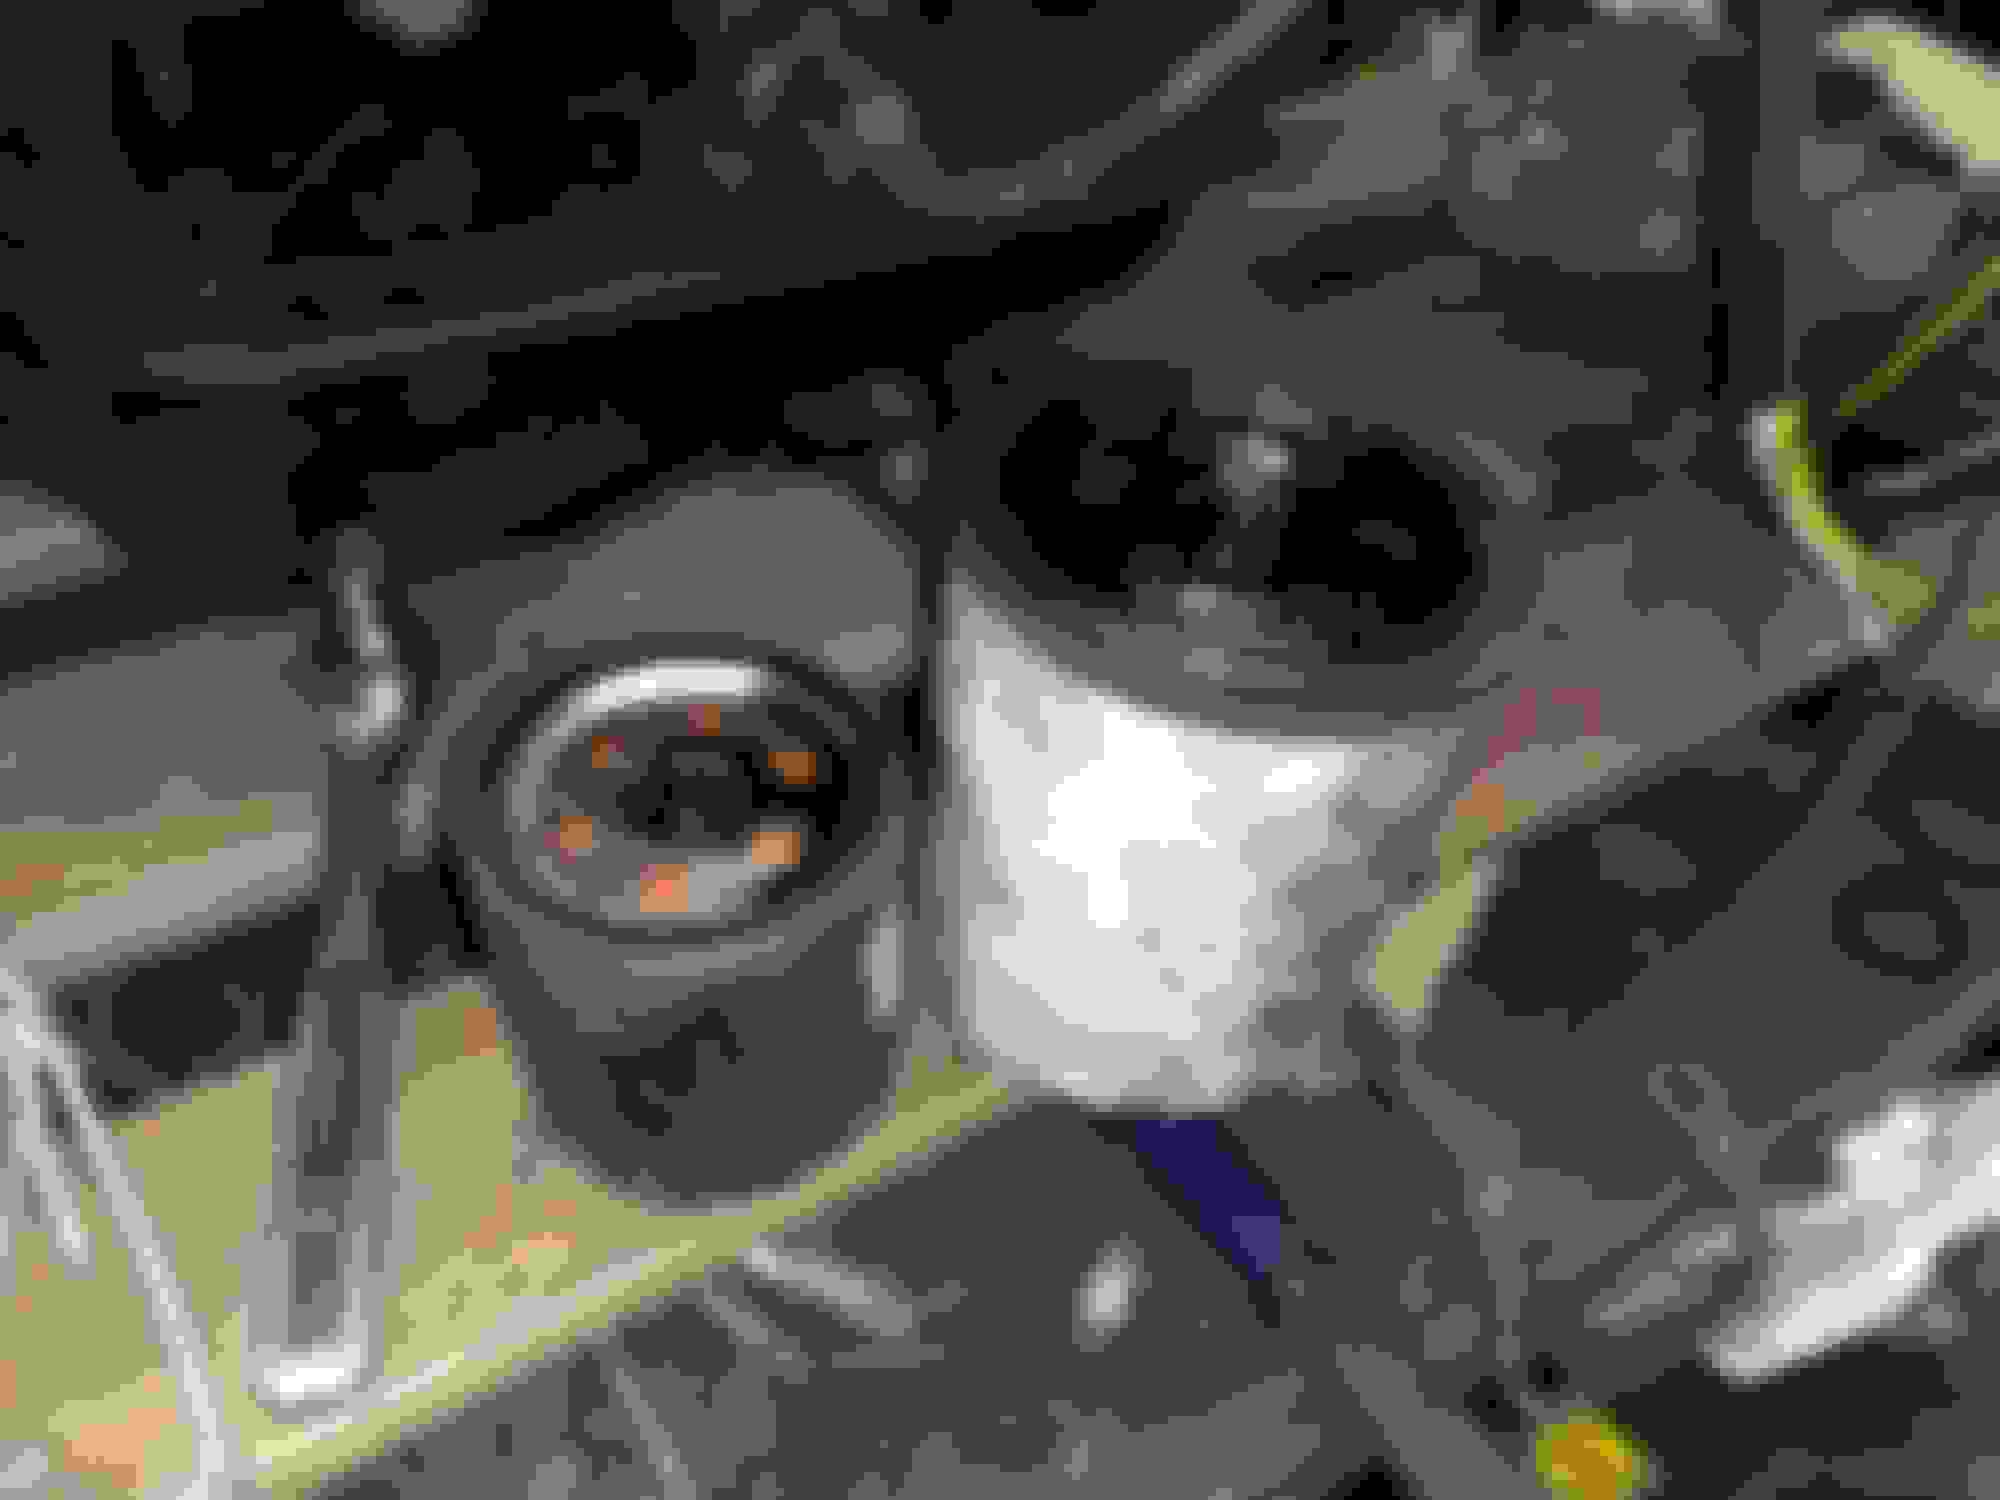
Ok, I have a small problem, I need to fix. I'm relocating my oil filter for a couple reasons, and am unable to locate a kit that is designed for an L series engine. I know they exist, but haven't located one yet.
The first reason I'm relocating, is for ease of maintenance. The second is for easy access to pressurized oil for my turbocharger.
The problem lies in the sizes of my filters. I mistakenly assumed that the thread size was the same as my RE, and VZE.... It's not. It's BIGGER 😁
Gonna hit Napa in a day or so, and see what they say.
RE filter on the left, 3L filter on the right.
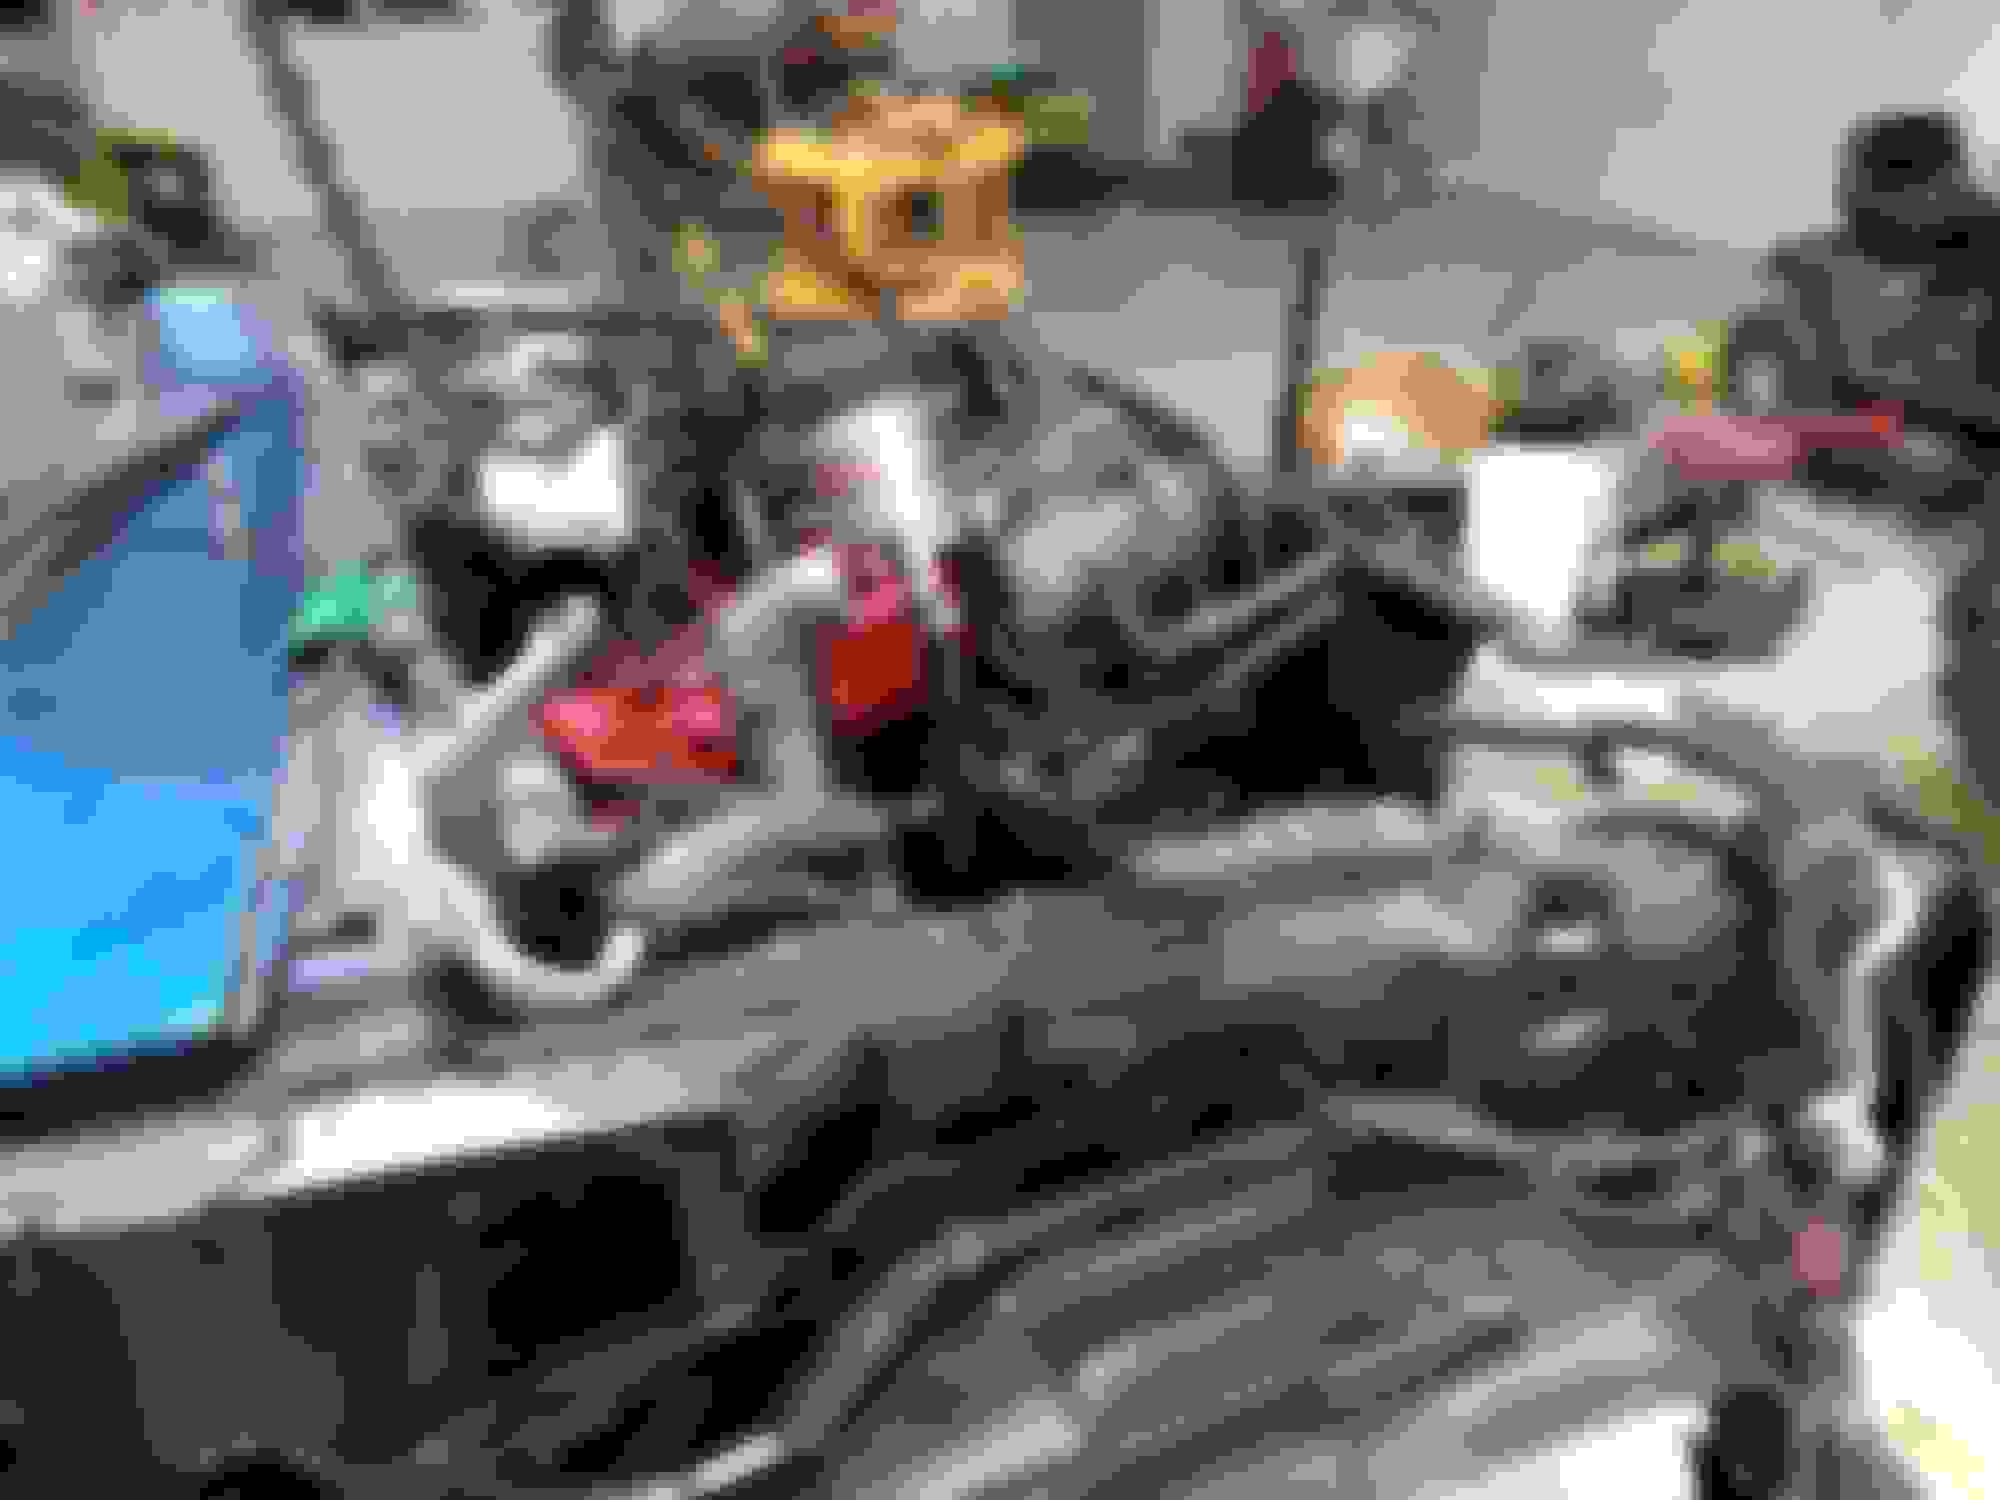
Well, it's been a long time since I was on here, so I think an update is in order. After some running around on the internet, I have finally come up with an oil filter relocating unit. I purchased a relocater from jegs, that had a 22x1.5 thread. My thread pitch on the engine is 24x1.5. I removed the nipple from the oil filter mount, and took it to a machine shop, had it re-threaded to The correct size.
Now, the relocater unit itself is not big enough around to work properly, so I acquired a 1/4 in. piece of aluminum, and cut an adapter washer to bridge the gap.
My turbo is almost all the way set up now. I just need to have my manifold adapter finished up, and the remaining oil and water piping plumbed in. The oil drain on the turbo is Lower on this turbo than a stock CT20 so, I can't use the drain from the alternator. I will put a port in the oil pan to accommodate this.
I have finally narrowed down my belt sizes for power steering, a/c and alternator systems, so now the engine is on its home stretch before installation. My clutch master cylinder, and pedal set were installed about 2 weeks ago, I ordered a flywheel from Australia, and a friction set from the UK, and all of that is now in place and ready for business.
Parts fresh from the machine shop! Bell housing in place, and the SAAB turbo on the manifold adapter. I think a master cylinder under the hood is cool 87 cluster swap too
Last edited by Rustbucket1990; Sep 9, 2017 at 05:58 AM.
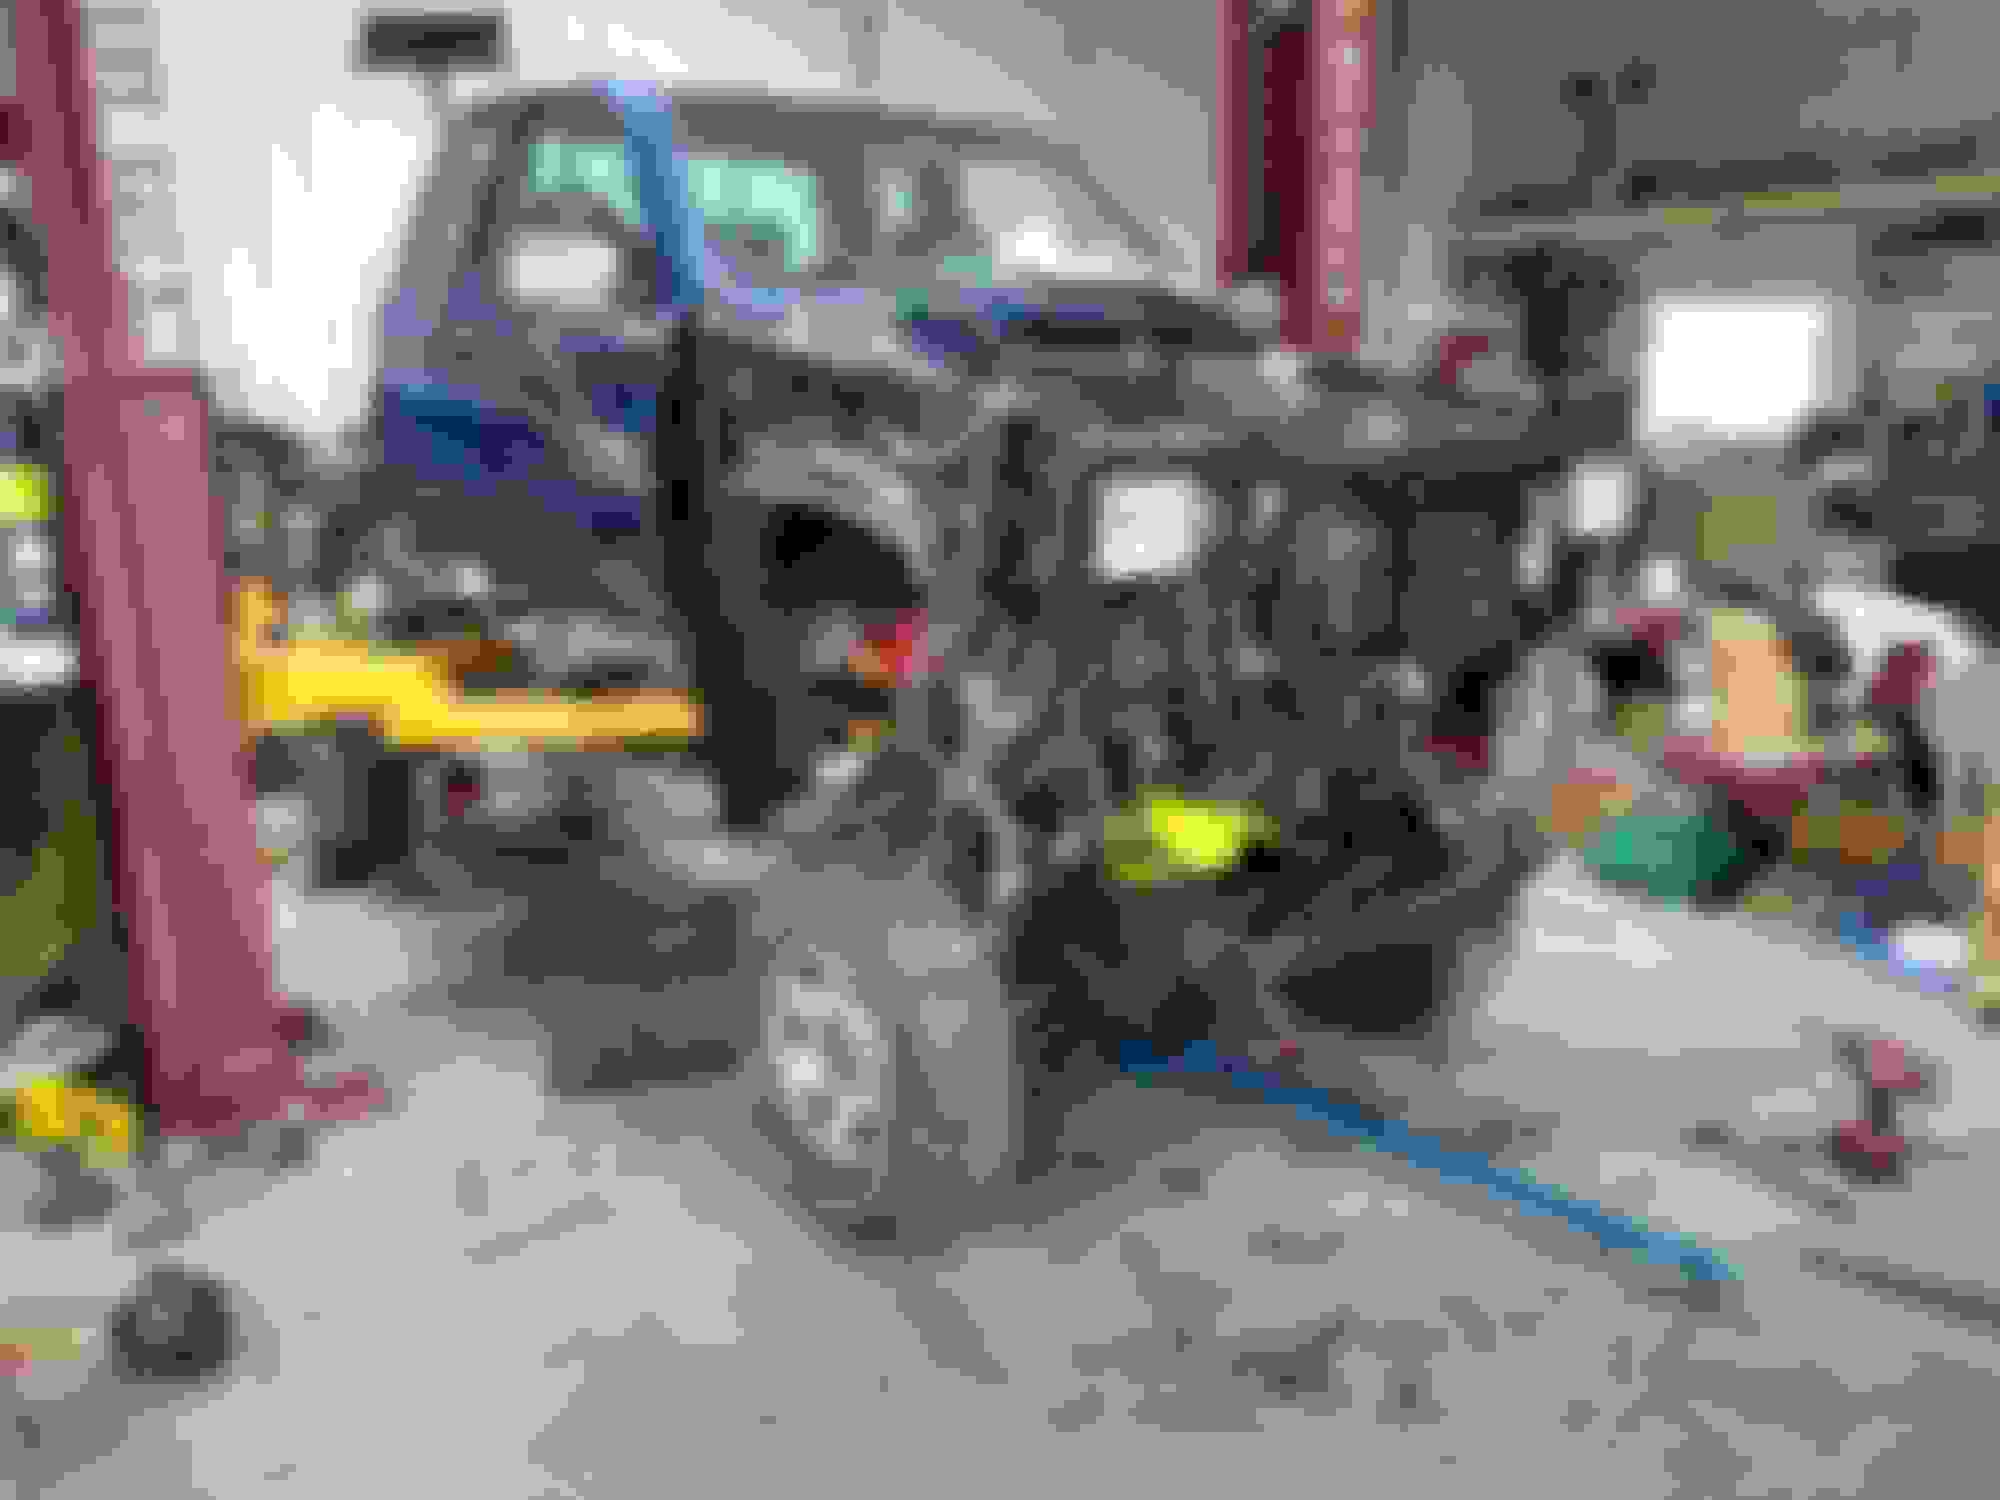
Ok, so I dropped it in tonight, and, just as expected, I ran into the same clearance issues the 2lt guy from Oregon did. So, I'm going to start with a 2 inch body Lift, and maybe do some kind of spacer to fix my oil pan issue. I'm way behind schedule on this swap, so, I at least want to have this thing on the road while I search for an oil pan. Suspension lifting is expensive, starting at $500, so, I'll try not to go that route.
more pics to follow
Made some progress last night, and it looks like I can use the stock engine mount locations after all! The 22re mounting place is so far forward, I wouldn't have room for my radiator. So, we jacked the cab up, and lined the mounts up for the engine, and and test fit the transmission cross member. That will need an adapter made up, because the holes are about 2in. off. As far as the oil pan goes, if I make 1 inch spacers for the engine mounts, it clears the diff, and the drain is accessible. If I had an easy way to drop the diff 1 inch, I'd do it in a heartbeat!
Jacked the cab off for ease of access
Everything is coming together nicely now, and the headaches are becoming rewarding milestones
Ok, if anyone ever reads this, they will probably have questions about my turbo. I should point out that Toyota never put a turbo on the 3L. For those who do it right, you want to source a turbo manifold from a 2LT so you can use the stock CT20, or CT12 turbo. This can be quite costly: about $150-200 for the manifold, and about the same for a turbo.
After a long fruitless search for a manifold, I opted to do my own, using the existing manifold. Here's what I did.
At many salvage yards one can find turbocharged gassers that have high red-line RPM limits. High rpms, on a 2.3, is close to the low rev exhaust volume of a 2.8. So, I got one off a Saab 2.3 for $70 at Weller Self serve. This one happens to be water cooled like the CT20.
When I got home, I took the down-pipe off the V6 (which incidentally fits perfectly) cut it off parallel with the ground about 6 inches down, and welded a plate on that matches the turbo mounting flange. We're still using the gasket that was on when we pulled the turbo from the car.
In a previous post, I hinted at where oil is sourced from: a line from my oil relocation kit. On "non-jerry-rigged" setups the dump for turbo oil goes in a T in the alternator oil dump. However, with this setup, the turbo is too low for this. My dump goes in a hole I popped in the side of the oil pan.<br />Plumbing the dump is a story of its own. On a stock Saab turbo, the oil flows out a stainless flex-pipe directly into the block. It isn't long enough for my application, so a suitable adapter needed to be found. After fiddling around with different things, I finally cut all but 1/2 inch of the dump pipe off, removed the flange, and threaded it to 1/2 inch NPT, in order to accept a 90� street elbow with a barb fitting. The threads that protruded from the flange after the elbow was fitted were cut, and filed flush to facilitate reinstallation.<br />As mentioned previously, this particular turbo is water cooled, so, T's were placed in the water lines to the thermowax for coolant supply. Other folks who have turbocharged 3L's have done this as well.<br />This method can be used for nearly any turbo.<br />I have yet to fire this thing up, so, all of this looks good right now, but the moment of Truth is coming. I'm waiting on my starter to get back from the shop.
Here's the Saab turbo. Notice the stainless flex pipe. I also picked up an intercooler from a VW 1.9 TDI at the salvage yard. The down pipe turbo adapter as it hangs after a couple coats of heat paint The stainless flex pipe was cut off, the flange threaded, and a 1/2 NPT 90� street elbow fitted with a barb installed.
Boost will be regulated to 10 PSI, and all air will be intercooled.
Last edited by Rustbucket1990; Oct 9, 2017 at 05:04 PM.
Reason: Typographical error
You think you might have issues with oil pooling in the oil return line? I had that issue on a turbo Honda I had and the return line did not last very long.
You think you might have issues with oil pooling in the oil return line? I had that issue on a turbo Honda I had and the return line did not last very long.
Boy, I hope not! The return line I'm using is leftover from the oil filter relocating kit, so it should hold up to hot oil. I'm actually modifying the down pipe adapter to raise the turbo up because my turbo was hitting the frame. That'll for sure help with the potential pooling issues.
Boy, I hope not! The return line I'm using is leftover from the oil filter relocating kit, so it should hold up to hot oil. I'm actually modifying the down pipe adapter to raise the turbo up because my turbo was hitting the frame. That'll for sure help with the potential pooling issues.
Hey, thanks for the feedback!!!
Yeah it looked like it was sitting super low, and that will help the oil get out of the drain faster. Every bit helps with going for dependability.
Ok, all of the above was before putting the engine in the truck. I recommend doing your piping after the engine is in place, so you can get it right the first time. The elegant sweeping pipe in the previous posts put the turbo too low, causing it to interfere will my chassis. This condition forced me to cut it apart, and severely modify it. This however isn't all bad, as it helps with my possible oil drain issue.
All hacked up, ready for the mock-up tack-up in my pickup Ready to tack up. It is important to tack all the pieces together in the vehicle where they go to ensure a proper fit. Painted up, and bolted up in my pickup. (Interesting side note: this turbo came out of a Saab, but has a Mitsubishi stamp on it🤐
So, I mounted the engine and transmission with the body off for ease of installation, however, I see now that the 4cyl position is more ideal, as the head now is an inch and a half too far aft. But, I can't move it forward because of my oil pan, and turbo placement. So, I'm faced with a dilemma, and 2 solutions. Either cut the firewall to make room, or move the body back. I think it will be a combination of both.
Yep, it was a combination of both solutions proposed in my last post. The firewall slopes forward towards the top, and that was where the modification was needed. A 3 sided incision the width of the head was made with an angle grinder, then beat back. Next, new mounts had to be fabricated for the body with mounting holes 1_1/2 inches aft of stock.
This helped with my firewall issue, but created other problems, and if I were starting this swap over, I think I'd go with the 22RE mounting location, add another inch to my engine (and body) lift and build my turbo adapter accordingly. My first came with the realization that when you move the firewall back, you also move the radiator back: something I was trying to stay away from by going with an aft engine mounting position. With everything bolted down now, I see my fears of the fan being too close to the radiator were unfounded as there's plenty of space there now. Next, that requires the lengthening of the steering shaft. Not difficult, but annoying. There were a few other complications I have forgotten right now as well.
So, with that figured out, I decided to start the engine before putting the cab back down. I'd already had issues with the starter before installing the engine in the truck, and had the brushes, armature and bearings replaced by my local auto electric service center. Next I bought a new battery with plenty of cranking amps. Then, I tried to crank it over again. Everything sounded right, and even ran for about 15 seconds one time off starter spray but never off the diesel.
This had me worried. I obviously had compression, and it seemed like there was fuel getting injected because of all the white smoke I got in the exhaust.
I pulling the glow plugs and tested them. Cyl. 2&3 lit, 1&4 didn't. So, off to eBay again to order plugs from Australia ( they were cheaper than sourcing them in the US🤔.
While I waited for the plugs I mentally backtracked, trying to think of anything I could have changed from the last time the engine ran (at the salvage yard in Malaysia). The only thing I could come up with was the timing belt. So, with little else to do, the timing cover came off to check timing and belt tension. All is good there.
After putting everything back together there, my plugs were in, so I replaced them, pulled 2 of the injection lines off and cranked. White smoke again, and there was time jets of fuel coming from the lines. Heating the plugs made it crank a little faster, and then boom! It idled on 2 cylinders! When I hooked the other two lines up it fired on all four.
while this was exciting, it refused to review up. Any change in throttle setting made it run rough, then shut down altogether. It was obviously not getting enough fuel somehow. The next day I messed with it some more, however the problem only worsened making me afraid I'd sucked some crud into the pump. After a frantic afternoon searching for answers online a friend dropped by with a lift pump. We hooked it up, and instantly we had a healthy diesel. 🤔😀
It was my understanding that the L series injection pumps can supply their own lift. I guess mine was just a little weak on that side, and needed a little extra prime. For those who are putting this in a rig with an existing lift pump: leave it in the system-- you'll be glad you did. Just install a partial bypass just before the pump so it isn't over pressurized and damaged in some way.
Sorry guys for not posting my progress. A lot has happened since my last post, and I'll try to catch you up as best I can.
After the first start, I still needed to shorten the drive shaft, properly mount the body install me shift levers, build a proper exhaust, run wiring, intake piping, and swap the battery location.
Drive shaft marked, and chopped
Last edited by Rustbucket1990; Mar 6, 2018 at 01:18 PM.
Reason: To be continued
As far as the exhaust is concerned, I considered 3 options. Dump in front of the right tire, behind the right tire, or stock: behind the left wheel. I decided to go with the 2nd option. Coming off my turbo, the pipe is 1.5. all of the bends that were given to me were 3.5 so, I built this adapter setup to get it as big as possible as fast as possible.

 Jun 6, 2017 | 06:22 PM