
Oregon's Lone Wolf 3.4 swap
 Jan 24, 2015 | 05:36 PM
#41
Thread Starter
Registered User
Joined: Mar 2012
Posts: 162
Likes: 0
From: Redmond, OR
engine mounts swapped.......check
3.0 oil pan swapped with proper pick up tube.......check
Battery tray installed.......check
fuse box mounted.....check
Radiator overflow can mounted......check
3.0 Oil pressure sensor swapped......check
3.0 alternator rebuilt and mounted with 3.4 lower bracket with 4 washers at mount........check
3.0 starter rebuilt...........check
Fuel rail flipped.......check
crossover pipe installed.........check
dipstick tube installed and old hole filled........check
new rear crank seal installed with sleeve....check
Clutch inspected.....almost 1/8th of an inch left on the clutch plate before it hits rivets could prob go for a couple years....BUT...New Aisin 3.0 clutch kit ordered as I'm just sticking with the 3.0 starter and flywheel.
New rear heater hoses mounted..........check
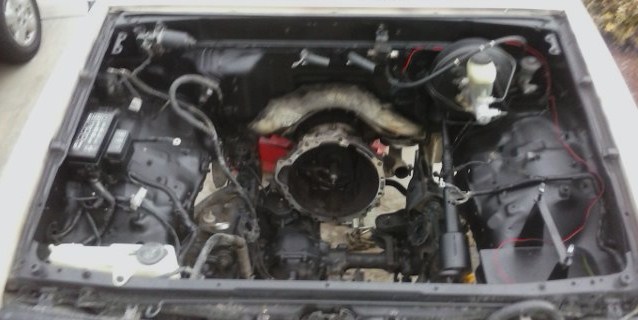
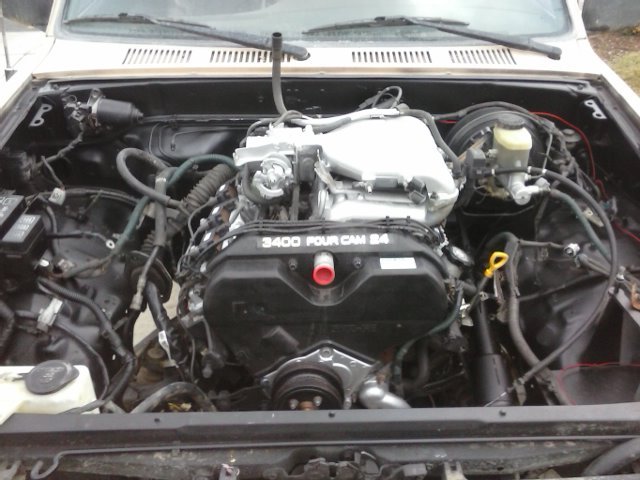
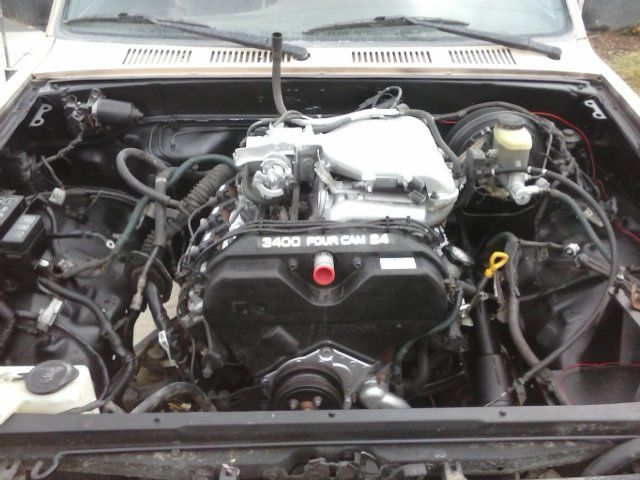
Engine bay cleaned and painted satin black........check.
Engine will be dropped in when the clutch gets here.........one step at a time.
Just another picture of a painted engine bay......nothing exciting. Oh yeah, I have to clean the bell housing.......oops.
3.0 oil pan swapped with proper pick up tube.......check
Battery tray installed.......check
fuse box mounted.....check
Radiator overflow can mounted......check
3.0 Oil pressure sensor swapped......check
3.0 alternator rebuilt and mounted with 3.4 lower bracket with 4 washers at mount........check
3.0 starter rebuilt...........check
Fuel rail flipped.......check
crossover pipe installed.........check
dipstick tube installed and old hole filled........check
new rear crank seal installed with sleeve....check
Clutch inspected.....almost 1/8th of an inch left on the clutch plate before it hits rivets could prob go for a couple years....BUT...New Aisin 3.0 clutch kit ordered as I'm just sticking with the 3.0 starter and flywheel.
New rear heater hoses mounted..........check
Engine bay cleaned and painted satin black........check.
Engine will be dropped in when the clutch gets here.........one step at a time.
Just another picture of a painted engine bay......nothing exciting. Oh yeah, I have to clean the bell housing.......oops.

Last edited by Oregon'sLoneWolf; Feb 7, 2015 at 06:06 PM.
Jan 26, 2015 | 03:25 PM
#42
Thread Starter
Registered User
Joined: Mar 2012
Posts: 162
Likes: 0
From: Redmond, OR
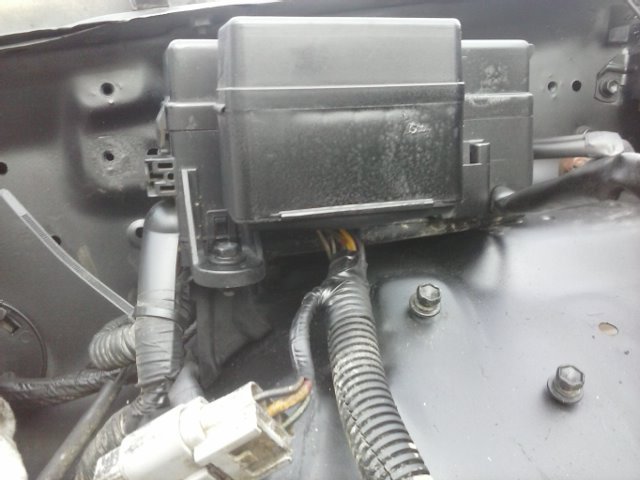
Using 3.0 fuse box mount bracket for swap
In all of my reading, I never noticed this addressed. My fuse box didn't come with the mounting ear some use to mount it to the engine bay wall. Here is how I adapted the original bracket for use with mounting the fuse box sideways.
Just cut the section off the top left corner of the bracket shown here. The angle will match the slope of the inner wheel well perfectly.
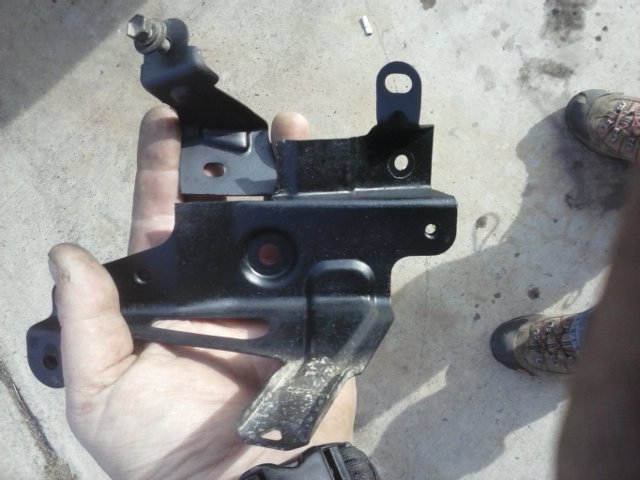
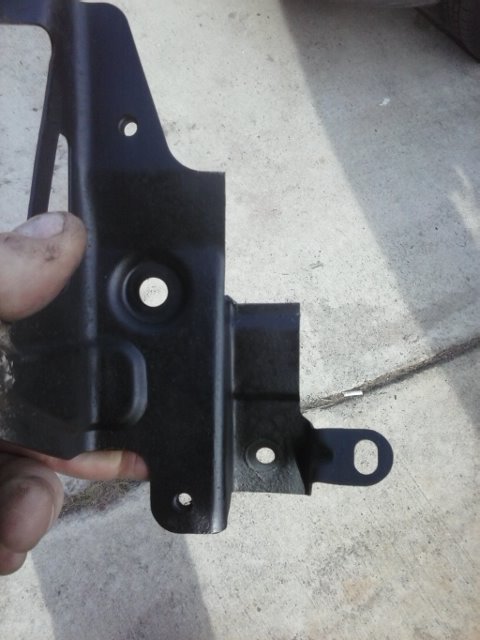
Then just drill the hole and attach to the fuse box screw hole.......done deal.
Just cut the section off the top left corner of the bracket shown here. The angle will match the slope of the inner wheel well perfectly.


Then just drill the hole and attach to the fuse box screw hole.......done deal.
 Jan 28, 2015 | 04:39 PM
#43
Thread Starter
Registered User
Joined: Mar 2012
Posts: 162
Likes: 0
From: Redmond, OR
Seems like I recall reading that the 3.4 pilot bearing is needed for the 3.0 clutch set up for the swap. However, I learned that the part number is the same. Could this person just have been mistaken?
Last edited by Oregon'sLoneWolf; Feb 5, 2015 at 02:17 PM.
Jan 28, 2015 | 05:05 PM
#44

Ok, this is strange. I read that if a person is going to use the 3.0 clutch set up including the starter for the swap, then they NEED the 3.4 pilot bearing. My confusion is, they are the exact same part number at the auto parts store.........have I completely lost my marbles? What gives?
Jan 28, 2015 | 05:52 PM
#45
Registered User
Joined: Oct 2005
Posts: 736
Likes: 1
From: Auburn/Sacramento, CA
Ok, this is strange. I read that if a person is going to use the 3.0 clutch set up including the starter for the swap, then they NEED the 3.4 pilot bearing. My confusion is, they are the exact same part number at the auto parts store.........have I completely lost my marbles? What gives?
The advice to use the 3.4 pilot bearing and not the 3.0's was likely one of ignorance (not knowing they were the same part) and helping to make sure that the correct pilot bearing was used (i.e. use the one that is supposed to be used with that motor).
You're over-thinking it.
Jan 29, 2015 | 11:28 PM
#46
Thread Starter
Registered User
Joined: Mar 2012
Posts: 162
Likes: 0
From: Redmond, OR
Jan 30, 2015 | 10:27 PM
#47
Thread Starter
Registered User
Joined: Mar 2012
Posts: 162
Likes: 0
From: Redmond, OR
 Feb 1, 2015 | 12:36 AM
#49
There was a time when it seemed everyone was convinced that you couldn't use an auto motor in a manual trans rig because it didn't have a provision for a pilot bearing... then people started looking into that and it became a false fact. It happens.
Feb 5, 2015 | 01:28 PM
#50
Thread Starter
Registered User
Joined: Mar 2012
Posts: 162
Likes: 0
From: Redmond, OR
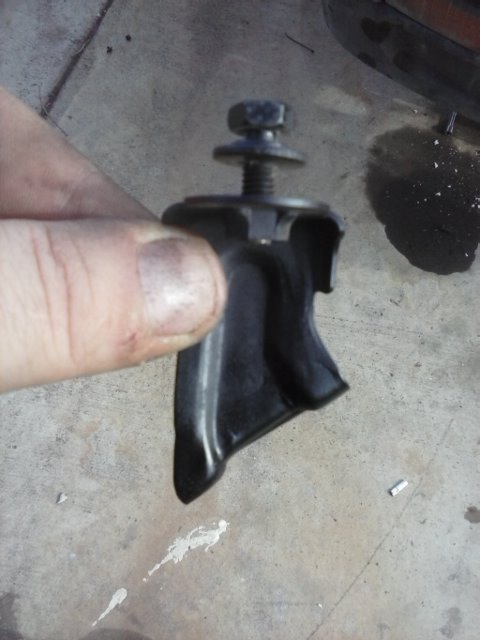
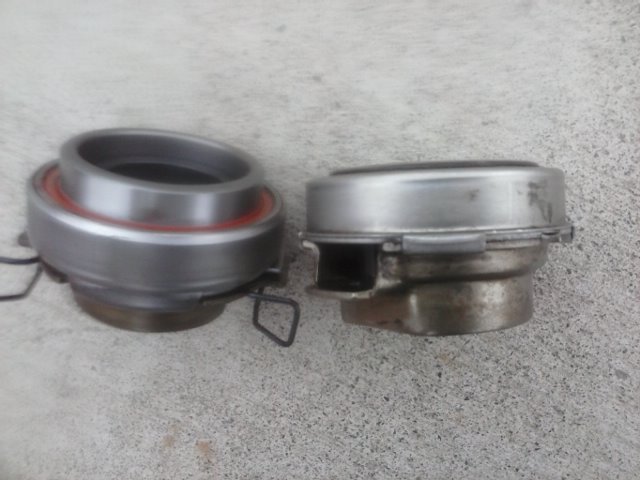
Do 3.0 TO bearing look different?
SO there I was, ready to drop the engine in on a day that wasn't cold and heavy downpour. When it was time to swap out the TO bearings for the new one from the Toyota OEM kit (on left) I noticed they looked different compared to my 3.0 that was already in there.
From my research, it appears the one that was in there was originally for a Toy Supra from the pics I saw on Ebay. ? Am I wrong in thinking this? How could this have worked since the transmissions are different from my understanding. Would it work differently? Seems like my clutch always did engage close to the top of the pedal stroke and adjustment was almost out. If I'm thinking about it correctly, could this be the result due to the design of the old bearing on the right.?
Is the new one the correct one? My guess is yes, but would be great to have this confirmed as taking it apart would be a PITA! Sure would hate to find out they included a 3.4 TO on accident. Any thoughts?

Last edited by Oregon'sLoneWolf; Feb 5, 2015 at 02:20 PM.
Feb 5, 2015 | 01:33 PM
#51
Thread Starter
Registered User
Joined: Mar 2012
Posts: 162
Likes: 0
From: Redmond, OR
Last edited by Oregon'sLoneWolf; Feb 5, 2015 at 03:35 PM.
Feb 6, 2015 | 01:21 AM
#53
Thread Starter
Registered User
Joined: Mar 2012
Posts: 162
Likes: 0
From: Redmond, OR
Feb 6, 2015 | 08:47 PM
#54
Thread Starter
Registered User
Joined: Mar 2012
Posts: 162
Likes: 0
From: Redmond, OR
But you did have useful info man. I was checking around and page one of your build had the pics I needed to confirm it. Since mine is close to the look of the Marlin TO you put in and the one that was in your tranny prior to changing it looked like the one I pulled, I'm good to go. Pretty cool when you helped and didn't even know it
Feb 7, 2015 | 09:56 AM
#55
Registered User
Joined: May 2012
Posts: 39
Likes: 0
From: Vernon, BC, Canada
AWesome!
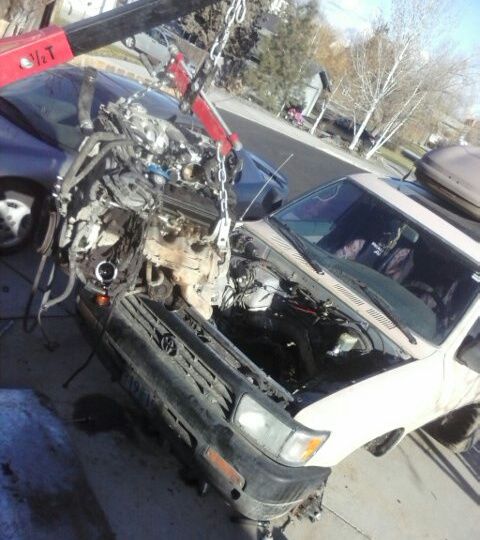
Thanks for the vote of confidence guys. Well, I pulled the engine today as we finally had a clear in the cold and wet weather. Yup, lowering the transmission is the way to go to get the damn top transmission bolt out on the drivers side. Other than that it came out without a hitch.
Tomorrow I clean the engine bay and paint it, move the engine mounts, the oil pan and swap the clutch out as I will just be using all the parts from the 3.0. If the flywheel is ok then cool......if not, I'll take it down to have it turned. I'm thinking maybe I should replace the clutch while I am in there.........hmmmm. Sure will be a pain to get to it again. I'll know more when I tear into it and check for wear.
Baby steps.......

Check this out:
http://www.toyota-4runner.org/3rd-ge...onversion.html
And my replacement:
http://www.toyota-4runner.org/3rd-ge...-progress.html
Love what you're doing! I'll be enjoying your progress!
Feb 7, 2015 | 05:28 PM
#56
Thread Starter
Registered User
Joined: Mar 2012
Posts: 162
Likes: 0
From: Redmond, OR
That's great! I must admit you're going beyond what I did, dropping that trusty 3.4L in your 2nd gen.... I did a straight replacement of my 1998 3.4L with a 2001 3.4L JDM..... no wiring issues thank god, just hardware--- essentially a long block swap. You're going to have one fantastic truck when you're done!!
Check this out:
http://www.toyota-4runner.org/3rd-ge...onversion.html
And my replacement:
http://www.toyota-4runner.org/3rd-ge...-progress.html
Love what you're doing! I'll be enjoying your progress!
Check this out:
http://www.toyota-4runner.org/3rd-ge...onversion.html
And my replacement:
http://www.toyota-4runner.org/3rd-ge...-progress.html
Love what you're doing! I'll be enjoying your progress!

Good job on the engine replacement! I know nothing about what I am doing, but, I"m just researching this best I can and taking it slow. Lucky for me I live within a mile of everything I need and work from my home so it is a no stress adventure. I am both nervous and excited to turn the key. I sure as heck hope I have done everything right. BUT, I'm having fun doing it all myself. If I can accomplish this, I'm confident I can do about anything to my Runner. Take it easy..thanks for the comments.
Feb 7, 2015 | 06:02 PM
#57
Thread Starter
Registered User
Joined: Mar 2012
Posts: 162
Likes: 0
From: Redmond, OR
Well, I got er IN, and I feel like a super hero as I did it without help. 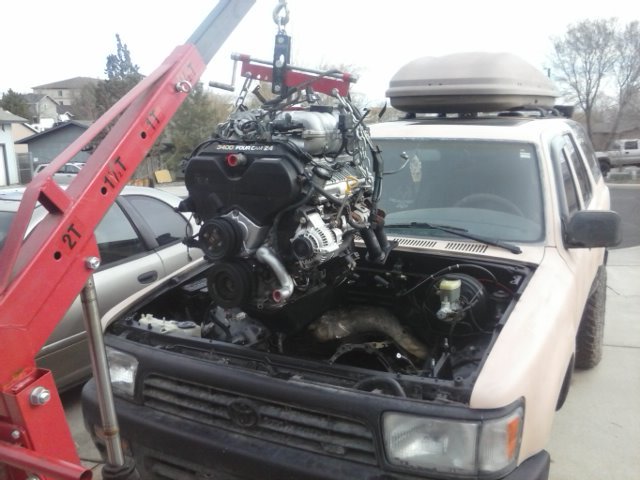
Perhaps I just got real lucky as I had NO problem with everything lining up. It took me about 1.5 hours and I spent a lot of time doing this. I must have had the tranny at the right angle as when it was 1/4 or so above the mounting brackets, I just gave her a little shove and it just slid right on to the spindle.
  Nope I didn't grease the shaft. I did have to use the bolts to snug it up tight though. I would guess that having the alternator off really helped as did removing my OME steering stabilizer. Plenty of distance from my alt bracket and drive shaft too. Tomorrow I will figure out how to bleed the clutch then it will be off for the BIG 3 wire upgrade. following these instructions. YES this is for a 3gen...I will have to confirm this will work on my 2gen first. http://www.toyota-4runner.org/3rd-ge...unner-how.html
I don't have to take my Runner through emissions so I won't have to worry about all of the vacuum lines for the EVAP as I just wont put it in. I"m sure it will save a lot of headache and keep it clean I'll post a write up as I could not find one specific to the topic.
I have my EVAP 3.4 can for sale if anyone is looking for one.


Perhaps I just got real lucky as I had NO problem with everything lining up. It took me about 1.5 hours and I spent a lot of time doing this.
I must have had the tranny at the right angle as when it was 1/4 or so above the mounting brackets, I just gave her a little shove and it just slid right on to the spindle. Nope I didn't grease the shaft. I did have to use the bolts to snug it up tight though. I would guess that having the alternator off really helped as did removing my OME steering stabilizer. Plenty of distance from my alt bracket and drive shaft too. Tomorrow I will figure out how to bleed the clutch then it will be off for the BIG 3 wire upgrade. following these instructions. YES this is for a 3gen...I will have to confirm this will work on my 2gen first. http://www.toyota-4runner.org/3rd-ge...unner-how.htmlI don't have to take my Runner through emissions so I won't have to worry about all of the vacuum lines for the EVAP as I just wont put it in. I"m sure it will save a lot of headache and keep it clean I'll post a write up as I could not find one specific to the topic.
I have my EVAP 3.4 can for sale if anyone is looking for one.
Last edited by Oregon'sLoneWolf; Feb 8, 2015 at 04:05 PM.
Feb 7, 2015 | 09:57 PM
#58
Registered User
Joined: May 2012
Posts: 39
Likes: 0
From: Vernon, BC, Canada
Well, I got er IN, and I feel like a super hero as I did it without help.
Perhaps I just got real lucky as I had NO problem with everything lining up. It took me about 1.5 hours and I spent a lot of time doing this.I must have had the tranny at the right angle as when it was 1/4 or so above the mounting brackets, I just gave her a little shove and it just slid right on to the spindle. Nope I didn't grease the shaft. I did have to use the bolts to snug it up tight though. I would guess that having the alternator off really helped as did removing my OME steering stabilizer. Plenty of distance from my alt bracket and drive shaft too. Tomorrow I will figure out how to bleed the clutch then it will be off for the BIG 3 wire upgrade. following these instructions. YES this is for a 3gen...I will have to confirm this will work on my 2gen first. http://www.toyota-4runner.org/3rd-ge...unner-how.html
As a disabled vet, I don't have to take my Runner through emissions so I won't have to worry about all of the vacuum lines for the EVAP as I just wont put it in. I"m sure it will save a lot of headache and keep it clean. I have a general idea on how to hook it up without evap. Someone offered some info about running without a can so I will get more clarification. I'll post a write up as I could not find one specific to the topic. Anyone willing to share some insight on what to hook up and what vacuum hose to cap off? Any help would be awesome and will be helpful for a write up I can't seem to find in a search.
Perhaps I just got real lucky as I had NO problem with everything lining up. It took me about 1.5 hours and I spent a lot of time doing this.
I must have had the tranny at the right angle as when it was 1/4 or so above the mounting brackets, I just gave her a little shove and it just slid right on to the spindle. Nope I didn't grease the shaft. I did have to use the bolts to snug it up tight though. I would guess that having the alternator off really helped as did removing my OME steering stabilizer. Plenty of distance from my alt bracket and drive shaft too. Tomorrow I will figure out how to bleed the clutch then it will be off for the BIG 3 wire upgrade. following these instructions. YES this is for a 3gen...I will have to confirm this will work on my 2gen first. http://www.toyota-4runner.org/3rd-ge...unner-how.htmlAs a disabled vet, I don't have to take my Runner through emissions so I won't have to worry about all of the vacuum lines for the EVAP as I just wont put it in. I"m sure it will save a lot of headache and keep it clean. I have a general idea on how to hook it up without evap. Someone offered some info about running without a can so I will get more clarification. I'll post a write up as I could not find one specific to the topic. Anyone willing to share some insight on what to hook up and what vacuum hose to cap off? Any help would be awesome and will be helpful for a write up I can't seem to find in a search.

Looks like you'll be cruisin' soon! I can think of a bunch of things I wouldn't want to worry about----- throttle cables, exhaust, rad and rad hoses, and fuel system... great job! Looking forward to your next steps!
Feb 8, 2015 | 07:57 PM
#59
Thread Starter
Registered User
Joined: Mar 2012
Posts: 162
Likes: 0
From: Redmond, OR
Don't bow just yet, you might jinx me........i haven't turned the key yet. ANYTHING can happen.
Feb 8, 2015 | 10:15 PM
#60
Registered User
Joined: May 2012
Posts: 39
Likes: 0
From: Vernon, BC, Canada
Ya know, it really isn't that difficult.........so far. Yeah, there is the obvious learning curve of it all for me, but with enough study and confidence to take it on, anyone can do it really.
Don't bow just yet, you might jinx me........i haven't turned the key yet. ANYTHING can happen.
Don't bow just yet, you might jinx me........i haven't turned the key yet. ANYTHING can happen.
Luckily, on this site and t4r, there's a large pool of experience to draw upon. There's always someone that's done "it" or had "that" problem!
When members post experiences like yours, mine and others, together with the explanations, photos and the enthusiasm we provide, I believe, this creates the impedious for others to possibly do and try things they wouldn't have otherwise attempted. The average guy can do it, with the right mix of encouragement and knowledge!! AND money! Let us know how it goes!!


