
Dipstick relocation on a 3.4 swap.
 Jun 10, 2011 | 03:04 PM
#1
Thread Starter
Registered User
Joined: May 2011
Posts: 43
Likes: 1
From: YKM, WA
Dipstick relocation on a 3.4 swap.
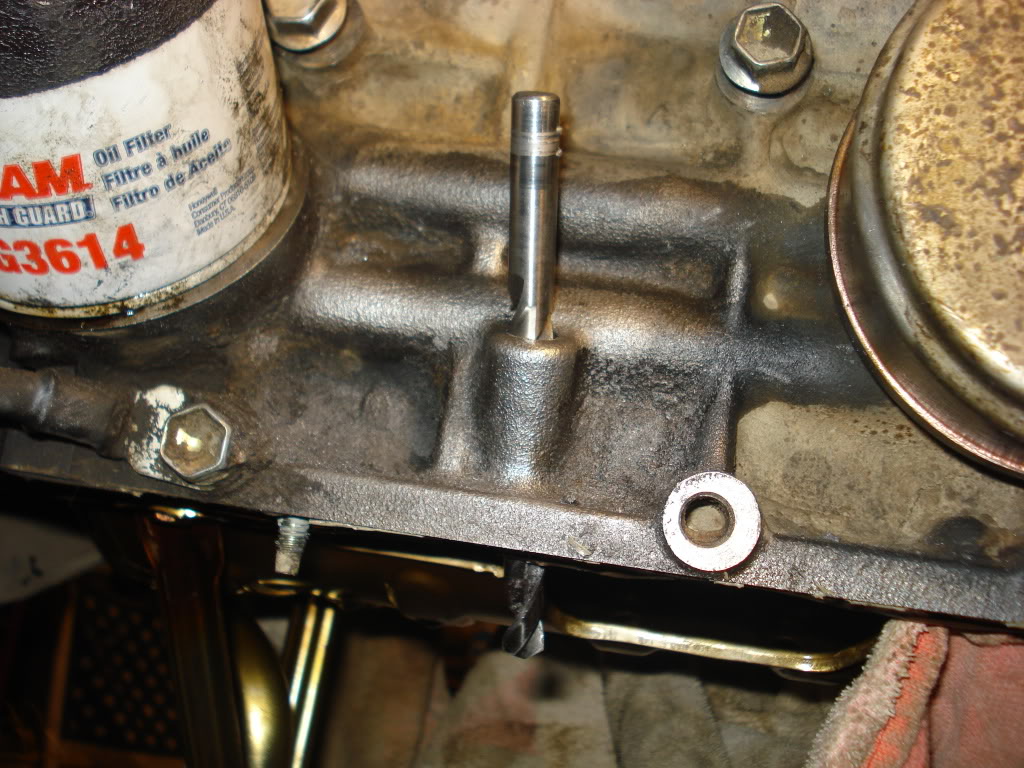
I'm in the process of a 3.4 swap and I've read differing posts about how to do the T100 dipstick mod so if I can get some clarification I'd appreciate it. The engine is from a 2003 Tacoma. Is the yellow arrow where I'm supposed to drill out for the new dipstick (driver side, aft of the oil filter)?

 Jun 10, 2011 | 04:24 PM
#4

Registered User
Joined: Sep 2006
Posts: 421
Likes: 0
From: Junction City, OR
Don't the kit's you can buy go from the top down? Is there a cut out in on the under side of the block for it? If not I would go top down. Because the hole is right on the edge of the block on the inside. If that makes sense. 
Jun 10, 2011 | 04:43 PM
#5
Thread Starter
Registered User
Joined: May 2011
Posts: 43
Likes: 1
From: YKM, WA
There's not a cut or a hole anywhere on my block. It's smooth all around in the vicinity of where the hole gets drilled. That's why I was asking if it's best practice to drill from the top down or from the bottom up. :-\
Jun 10, 2011 | 08:53 PM
#6
Registered User
Joined: Mar 2010
Posts: 52
Likes: 0
From: center o' CO
One would imagine it to be easier to drill from the bottom since the pesky engine is in the way coming from the top side... but I have been wrong a time or two in the past. I have to do this mod in the future as well and from what I have read/seen the "way" to do this is from the bottom.
Again, I could be wrong; this is the internet after all....
>>Dan
Again, I could be wrong; this is the internet after all....
>>Dan
Jun 10, 2011 | 09:30 PM
#7
I say top down so you can try to get the angle needed for the dipstick as true as possible.
You've probably seen my truck zooming around Kirkland, especially the Juanita/ fin hill area. Go Rebs!
You've probably seen my truck zooming around Kirkland, especially the Juanita/ fin hill area. Go Rebs!
Trending Topics
Jun 11, 2011 | 03:49 PM
#8

Registered User
Joined: Jan 2010
Posts: 119
Likes: 3
From: Raleigh, NC
Dipstick hole
On my 97 block, there was a hole partically thru the block that was cast in from the bottom side. Therefore, drilling from the bottom side was ideal in my situation. It automatically set the angle and location.
Jun 15, 2011 | 10:22 AM
#9
Thread Starter
Registered User
Joined: May 2011
Posts: 43
Likes: 1
From: YKM, WA
How big does the dipstick union hole need to be drilled? What size drill bit? Nobody seems to have mentioned this in any of their write-ups. I had to order my dipstick parts from Toyota. They won't be here for several days, but I want to get the hole drilled now so if anyone can advise which drill bit offered the correct fit, I'd appreciate it.
BTW, these are the parts I ordered...
Dipstick - Toyota 15301-62060
Dipstick Guide - Toyota 11452-62060
Union - Toyota 90405-10033 (some members here listed 0405-10033, but the Toyota guy insisted that is an invalid part number.)
BTW, these are the parts I ordered...
Dipstick - Toyota 15301-62060
Dipstick Guide - Toyota 11452-62060
Union - Toyota 90405-10033 (some members here listed 0405-10033, but the Toyota guy insisted that is an invalid part number.)
Jun 15, 2011 | 11:16 AM
#10
How big does the dipstick union hole need to be drilled? What size drill bit? Nobody seems to have mentioned this in any of their write-ups. I had to order my dipstick parts from Toyota. They won't be here for several days, but I want to get the hole drilled now so if anyone can advise which drill bit offered the correct fit, I'd appreciate it.
BTW
I went from the top, down as said before to make your hole as true as possible for the union. I believe I used a chisel to tap a starting hole to keep the bit from slipping. Be sure to stuff some towels in the bottom end to prevent shavings from going anywhere they shouldnt. Also, when you press the union in be sure to take it one hit at a time. One too many and it will crack the block around the union and will require JB weld from there... just FYI


 Jun 15, 2011 | 04:53 PM
#14
Registered User

Joined: Jan 2009
Posts: 1,908
Likes: 5
From: Fresno, Ca.
According to the ORS instructions, it seems that he is advising to use a 3/8 bit.
I still think that I would start a few sizes smaller and work my way up, testing it at each new drill.
http://www.offroadsolutions.com/tech.html#engine
I still think that I would start a few sizes smaller and work my way up, testing it at each new drill.
http://www.offroadsolutions.com/tech.html#engine
Jun 15, 2011 | 05:32 PM
#15
Thread Starter
Registered User
Joined: May 2011
Posts: 43
Likes: 1
From: YKM, WA
 Jun 16, 2014 | 09:03 PM
#17
Registered User
Joined: Jan 2009
Posts: 1,908
Likes: 5
From: Fresno, Ca.
Jun 17, 2014 | 07:43 AM
#18

Registered User
Joined: Mar 2014
Posts: 29
Likes: 1
The correct size for the hole is metric size U, although 3/8" is supposed to work also.
If you're drilling the hole without a guide it's probably best to go in from the bottom unless you have a 90 degree drill handy.
I had to do this a couple months ago and I'm glad I bought a drill guide (which I still have). That's a tricky angle.
If you're drilling the hole without a guide it's probably best to go in from the bottom unless you have a 90 degree drill handy.
I had to do this a couple months ago and I'm glad I bought a drill guide (which I still have). That's a tricky angle.


Thread
Thread Starter
Forum
Replies
Last Post
Steven.m.paulk
86-95 Trucks & 4Runners
4
Jun 7, 2020 10:45 AM
primordialbeast117
86-95 Trucks & 4Runners
11
Dec 19, 2015 12:23 PM
dlaiben
3.4 Swaps
0
Sep 3, 2015 09:57 AM


