
2001 5vz-fe Swap into a 93 4Runner
 May 9, 2009 | 01:48 PM
#21
Thread Starter
Contributing Member
Joined: Apr 2008
Posts: 654
Likes: 1
From: Colorado Springs, Colorado
Today I cleaned out the bell housing on the transmission. I am using the 3.0 throw out bearing.

Bought some form in place pasket and the Haynes book for general reference info for the engine. I find it to be better than Chiltons. Always good as reference.

Had to modify the engine mount on the passenger side do to some little pipe sticking out and the A/C mounting bracket, just shaved it down a little with the grinder. Anyone know what that little pipe is?

Re-bent the oil dipstick for the new hole and so it was out of the way of the exhaust. I bent the one that came with the 3.4, but could have used either I suppose. I did a trial fit and she slides right in I know it looks kinked but thats just how the photo made it look. Took steel weld and sealed the old oil dipstick whole in the front and the bottom of the new location. Then some on the engine mounting bracket and the alternator bracket so it was secure.

Put the new clutch kit on. Using all 3.4 parts. Using my 3.0 throw out bearing. Used denatured alcohol to clean everything off.

Unfortunately my cousins graduating party is this afternoon otherwise I think I would be ready to drop her in. Till tomorrow...

Bought some form in place pasket and the Haynes book for general reference info for the engine. I find it to be better than Chiltons. Always good as reference.
Had to modify the engine mount on the passenger side do to some little pipe sticking out and the A/C mounting bracket, just shaved it down a little with the grinder. Anyone know what that little pipe is?
Re-bent the oil dipstick for the new hole and so it was out of the way of the exhaust. I bent the one that came with the 3.4, but could have used either I suppose. I did a trial fit and she slides right in I know it looks kinked but thats just how the photo made it look. Took steel weld and sealed the old oil dipstick whole in the front and the bottom of the new location. Then some on the engine mounting bracket and the alternator bracket so it was secure.
Put the new clutch kit on. Using all 3.4 parts. Using my 3.0 throw out bearing. Used denatured alcohol to clean everything off.
Unfortunately my cousins graduating party is this afternoon otherwise I think I would be ready to drop her in. Till tomorrow...
Last edited by yodathespian87; May 21, 2009 at 12:54 PM.
May 11, 2009 | 04:44 AM
#23
Thread Starter
Contributing Member
Joined: Apr 2008
Posts: 654
Likes: 1
From: Colorado Springs, Colorado
Well I dropped her in the engine bay. Its a snugg fit getting her down there but I did it. It didn't take any time at all, maybe an hour and thats cause I stopped every couple of inches just to make sure I wasn't crushing anything, and I was by myself so wanted to make sure I'm not dragging on the back side. Haven't bolted anything up yet I decided to go to a Rockies game. I will have some photos up later tonight.
Last edited by yodathespian87; May 21, 2009 at 01:00 PM.
May 11, 2009 | 04:00 PM
#24
Thread Starter
Contributing Member
Joined: Apr 2008
Posts: 654
Likes: 1
From: Colorado Springs, Colorado
Here she is on her way in.
And she sits nice and comfy in there. I bolted her all up today. Got the bolts in there with no problem as there is no crossover in the way.
 So now to start all the little stuff.
May 14, 2009 | 10:24 AM
So now to start all the little stuff.
May 14, 2009 | 10:24 AM
#25
Thread Starter
Contributing Member
Joined: Apr 2008
Posts: 654
Likes: 1
From: Colorado Springs, Colorado
Stuffed the harness through the fire wall. Not a lot of extra wire length to play with but I should be alright. Going to tuck the harness right be hind the EVAP canister so its out of the way. The fuel line looks like I will have plenty of room down there for it to be out of the way of the exhaust. Put all the spark plugs back in, after I cleaned them up. I had taken them out and had then engine upside down for a week to get any oil out of there the come out. The wrecked Tacoma had spilt oil up in there. Should be good now. May be a little smoky when I start her up. I will get some photos up tonight after I play around a little more. By the way anyone know the reason for swapping out the alternator harness? Cause it looks as thoughmy 3.4 will work.
May 17, 2009 | 08:50 PM
#26
Thread Starter
Contributing Member
Joined: Apr 2008
Posts: 654
Likes: 1
From: Colorado Springs, Colorado
Stuffed the wiring harness through. Started putting parts back on the engine bay walls.

ECU plugged in there isn't a lot of extra wire but it looks as though it will suffice.

Starting to look like an engine bay again. Bolting everything back into its place.

ECU plugged in there isn't a lot of extra wire but it looks as though it will suffice.
Starting to look like an engine bay again. Bolting everything back into its place.
May 19, 2009 | 07:59 PM
#28
Thread Starter
Contributing Member
Joined: Apr 2008
Posts: 654
Likes: 1
From: Colorado Springs, Colorado
Thanks RMA. So I really need to stop with the PS3 cause I'm not being as nearly as productive as I should be, Call of Duty Stop being so much fun! So did a trial fit for the A/C. Everything looks ok except for the fact that the 3.4 has the screw stud sticking out instead of bolting it up I will use 2 nuts and sleeve the inside so its snug. And there is a little extra hose but thats not a problem. I also have to get a 3.4 power steering pressure feed tube. Tomorrow I'm going download all I can from TIS for the 93 4Runner and the 2001 Tacoma.
So did a trial fit for the A/C. Everything looks ok except for the fact that the 3.4 has the screw stud sticking out instead of bolting it up I will use 2 nuts and sleeve the inside so its snug. And there is a little extra hose but thats not a problem. I also have to get a 3.4 power steering pressure feed tube. Tomorrow I'm going download all I can from TIS for the 93 4Runner and the 2001 Tacoma.
May 20, 2009 | 07:13 AM
#29
Thread Starter
Contributing Member
Joined: Apr 2008
Posts: 654
Likes: 1
From: Colorado Springs, Colorado
Just to let everyone one know. https://techinfo.toyota.com
Is $15 for 2 days. Soon as I get off its downloading time.
Just downloaded everything for both vehicles and it may have took 30-45 min. So easy. There is bunches of information available.
Is $15 for 2 days. Soon as I get off its downloading time.
Just downloaded everything for both vehicles and it may have took 30-45 min. So easy. There is bunches of information available.
Last edited by yodathespian87; May 20, 2009 at 02:55 PM.
May 23, 2009 | 10:14 PM
#30
Thread Starter
Contributing Member
Joined: Apr 2008
Posts: 654
Likes: 1
From: Colorado Springs, Colorado
Okay so reading some of your guys threads you say you only had to splice 8 wires total. I don't see how. Cause to splice in the alone is more then 8 and I know there will be more. So, did you also get the dash harness from your donor vehicle? To me there seems to be a lot more splicing then you let on... Thanks
May 24, 2009 | 08:05 AM
#32
Thread Starter
Contributing Member
Joined: Apr 2008
Posts: 654
Likes: 1
From: Colorado Springs, Colorado
Okay, I could see that. It's just I'm looking and the EWD and starting to label the wires and figuring out what goes where and there was more then 8 that need to be spliced. I just wanted to be sure that I'm not screwing this up. Thanks
May 24, 2009 | 11:22 AM
#33
Thread Starter
Contributing Member
Joined: Apr 2008
Posts: 654
Likes: 1
From: Colorado Springs, Colorado
Okay so I was looking through all my downloaded EWDs and didn't see anything on the diagram for the IH1 and IH2 connectors. They are under the PS kick panel. I have to splice those into the engine harness. Does anyone have that diagram or a picture of theres spliced. I understand they are different from the different years. I have a 93 4Runner 4x4 and the engine is 2001 Tacoma 4x4. Using the TIS diagram the wires are as follows. If you know where they go that would be great. X=NOTHING THERE
IH1
My connector
1-W-B_____Ground for the T-Case Switch
2-X
3-V_____Check engine light To ECU
4-X
5-G-W_____Stop light switch to ECU
6-L_____To FP in check connector
7-L-B_____ECU and Transmission ECU to A/C amplifier
8-B-R _____Goes to check connector for rear ABS
9-Y-B______From the crusie control ECU to the check connector
10-B-G_____Constant power for the ECU
11-X
12-W-G_____Ground for the ECU
13-X
14-B-R_____Power for the ignition coil
15-X
16-W-R _____Switched power for ECU
17-X
18-X
19-X
20-G-L_____Speed sesor to ECU
21-X
22-B-W____Starter to starter relay
23-G-Y_____Circuit open relay to air flow meter
24-X
IH2 My Connector
1-X
2-G-W_____Transfer oil pressure switch
3- X
4- X
5-L_____EFI main relay to A/C idle up VSV
6-B-R_____A/C amplifier to engine ECU
7-R-W_____To the transmission still working on what exactly
8-B-BR_____To the transmission still working on what exactly
9-X
10-G-Y_____ADD indicator switch to 4wd light in combo meter
11-Y-L_____Oil pressure sender
12-X
13-G-L_____Vehicle speed sensor
14-Y-G_____Water temp sender to temp gauge
15-B-W_____Engine ECUto A/C amplifier, A/C magnetic clutch
16-X
17-X
18-X
19-G-BR_____4wd. light, Trans. Vehicle speed sensor
20-B_____Ignitor to tach, A/C amplifier
I have these on my diagram and not on the harness.
G-O, V-G, R-G, and B-O
TIS Diagram for the IH2 connector (White Connector)
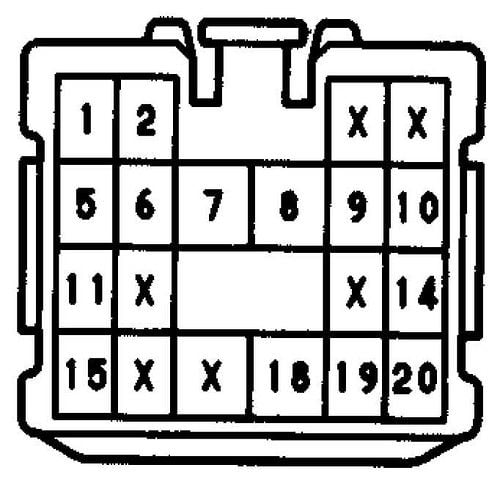
This is the connectors for the 4Runner, does anyone one what wires they hook up to on the Tacoma harness? Thanks
IH1
My connector
1-W-B_____Ground for the T-Case Switch
2-X
3-V_____Check engine light To ECU
4-X
5-G-W_____Stop light switch to ECU
6-L_____To FP in check connector
7-L-B_____ECU and Transmission ECU to A/C amplifier
8-B-R _____Goes to check connector for rear ABS
9-Y-B______From the crusie control ECU to the check connector
10-B-G_____Constant power for the ECU
11-X
12-W-G_____Ground for the ECU
13-X
14-B-R_____Power for the ignition coil
15-X
16-W-R _____Switched power for ECU
17-X
18-X
19-X
20-G-L_____Speed sesor to ECU
21-X
22-B-W____Starter to starter relay
23-G-Y_____Circuit open relay to air flow meter
24-X
IH2 My Connector
1-X
2-G-W_____Transfer oil pressure switch
3- X
4- X
5-L_____EFI main relay to A/C idle up VSV
6-B-R_____A/C amplifier to engine ECU
7-R-W_____To the transmission still working on what exactly
8-B-BR_____To the transmission still working on what exactly
9-X
10-G-Y_____ADD indicator switch to 4wd light in combo meter
11-Y-L_____Oil pressure sender
12-X
13-G-L_____Vehicle speed sensor
14-Y-G_____Water temp sender to temp gauge
15-B-W_____Engine ECUto A/C amplifier, A/C magnetic clutch
16-X
17-X
18-X
19-G-BR_____4wd. light, Trans. Vehicle speed sensor
20-B_____Ignitor to tach, A/C amplifier
I have these on my diagram and not on the harness.
G-O, V-G, R-G, and B-O
TIS Diagram for the IH2 connector (White Connector)
This is the connectors for the 4Runner, does anyone one what wires they hook up to on the Tacoma harness? Thanks
Last edited by yodathespian87; Jun 9, 2009 at 06:55 AM.
May 26, 2009 | 08:49 AM
#34
Thread Starter
Contributing Member
Joined: Apr 2008
Posts: 654
Likes: 1
From: Colorado Springs, Colorado
Ok so reading around found out Cad Man had an extra power steering line. So bought that from him, should have that some time this week. Figured if he has one made already it saves me from making one. The dealership wanted $417.47  for the hose and I would have to alter it! By the way does anyone have the 2001 Tacoma Engine harness to body harness pin out?
for the hose and I would have to alter it! By the way does anyone have the 2001 Tacoma Engine harness to body harness pin out?
May 27, 2009 | 05:08 AM
#35
Thread Starter
Contributing Member
Joined: Apr 2008
Posts: 654
Likes: 1
From: Colorado Springs, Colorado
Seeing as my diagram that I got off of TIS don't have the engine to body harness. I am making my own diagram. I have the Tacoma wires as follows. These are known as IK6 and IK2 right?
Small Connector- IK6
1. R-Y_____Vapor Pressure Sensor
2.G-B_____Vapor Pressure Sensor/VSV
3.W-B_____ADD actuator to GND
4.L-Y_____4wd ECU to ADD actuator
5.LG_____ADD actuator to 4wd ECU
6.R-B_____Trans control relay to ADD actuator
7.L-R_____4wd ECU to ADD actuator
8.X
9.X
10.X
11X
12.X
And then I have a wire on the diagram that isn't in my harness. R-W
Large Connector-IK2
1.B-R_____Igniter, Injectors to Ignition switch
2.R-B_____Back up switch, park /neutral position switch to ECU
3.G-B_____ADD acctuator to 4wd ECU
4.W-B_____4wd activation switch
5.X
6.G-BR
7.R-W_____4wd ECU to detection switch
8.G-Y_____Oil combination meter to oil pressure switch
9.BR_____combination meter to GND
10.Y-R_____Water temp. combination meter to water temp. sender
11.LG-B_____Tach/speedo. to igniter
12.BR_____Data link connector to OXS on the ECU
13.BR (Gray Spots)
14.P_____Vehicle Speed Sensor
15.B-R_____Park/ neutral position switch to Combination meter, backup switch
16.R-Y_____ABS actuator w/ECU to data connector
17.Y-B_____ABS actuator w/ECU to data connector
18.V
19.L_____Tach/speedo to speed sensor
20.W-R_____Data link connector, ECU, Power?
21.X
22.BR_____Data link connector to GND (Not 100% positive)
23. LG_____A/C Magnetic Clutch
24. X
25. GR_____4wd L4 detection switch, trasfer case
26. X
And then I have an extra wire from the diagram that says its a G-R, that is not on my harness.
Had some camera (SD card) problems but just got me a new card and pics will be up soon as I can.
Last edited by yodathespian87; Jun 9, 2009 at 05:54 AM.
May 27, 2009 | 08:14 PM
#36
Thread Starter
Contributing Member
Joined: Apr 2008
Posts: 654
Likes: 1
From: Colorado Springs, Colorado
Alright so tonight I bolted up the starter. Plugged it in. Bolted the fan on. Connected the fuel line to the body line. Bolted up the clutch line. Mounted the harness to the firewall.

Cut the brake boost hose and re routed it. Included the one way valve. Ground down the bracket a little so I could bolt it down. Now it doesn't move.

So the coolant plug on the side of the block does that get plugged or routed to the back? Anyone have any pictures of the coolant lines in the back? Kinda confusing, I have 3 lines off of the back of the block and 2 coming off the firewall.
Cut the brake boost hose and re routed it. Included the one way valve. Ground down the bracket a little so I could bolt it down. Now it doesn't move.
So the coolant plug on the side of the block does that get plugged or routed to the back? Anyone have any pictures of the coolant lines in the back? Kinda confusing, I have 3 lines off of the back of the block and 2 coming off the firewall.
Last edited by yodathespian87; May 28, 2009 at 06:42 AM.
May 28, 2009 | 06:44 AM
#38
Thread Starter
Contributing Member
Joined: Apr 2008
Posts: 654
Likes: 1
From: Colorado Springs, Colorado
By the way there is this site that lets you look at the diagrams. Much likeTIS but i thinks its more general. Doesn't hurt to take a look at.
2001-2004 Tacomahttp://www.ncttora.com/fsm/2003/index.html
The main page. http://www.ncttora.com/fsm/index.html
The more information you have the better.
2001-2004 Tacomahttp://www.ncttora.com/fsm/2003/index.html
The main page. http://www.ncttora.com/fsm/index.html
The more information you have the better.
Last edited by yodathespian87; Jun 12, 2009 at 04:46 AM.
May 28, 2009 | 02:45 PM
#39
Thread Starter
Contributing Member
Joined: Apr 2008
Posts: 654
Likes: 1
From: Colorado Springs, Colorado
Here are the photos of the coolant lines in the back of the engine.
There are 2 off of the block dead center, 1 behind the other. Then one off to the drivers side. More or less on the head. 1 small one off of the firewall and 2 big ones off of the fire wall. Here is pics I tried to get them as good as possible but still kind of difficult. I am hold the passenger side firewall hose and the one from by the head from the driver side.

Here is a top view. Looking down the 2 from the back are center
Like the first pic but with out my hand.

Kinda funny how coolant lines can confuse me on the swap.
There are 2 off of the block dead center, 1 behind the other. Then one off to the drivers side. More or less on the head. 1 small one off of the firewall and 2 big ones off of the fire wall. Here is pics I tried to get them as good as possible but still kind of difficult. I am hold the passenger side firewall hose and the one from by the head from the driver side.
Here is a top view. Looking down the 2 from the back are center
Like the first pic but with out my hand.
Kinda funny how coolant lines can confuse me on the swap.
Last edited by yodathespian87; May 28, 2009 at 02:47 PM.
May 29, 2009 | 11:11 AM
#40

Registered User
Joined: Apr 2007
Posts: 1,580
Likes: 1
From: Park City, UT
Dunno exactly if this will help ya, it's the best pics I have of the heater core routing:


Can't really see it that well, but I also had to cut up the hard metal pieces that were part of the 3.0 setup so I could hook up my rear heater. I'll look and see if I can find better pics, I thought for some reason I had some.
Can't really see it that well, but I also had to cut up the hard metal pieces that were part of the 3.0 setup so I could hook up my rear heater. I'll look and see if I can find better pics, I thought for some reason I had some.


