
1989 4runner 3.4 swap
 Nov 20, 2013 | 04:02 PM
#1

Thread Starter
Registered User
Joined: Feb 2013
Posts: 224
Likes: 0
1989 4runner 3.4 swap
What's up everyone. Due to lay off for the winter,
I've decided to do another swap then sell her, experiment with it and see how much profit I can get. Love my 88, couldn't be happier with the swap. Took me quite a while last time, but hopefully I'm still fresh on it, So here goes.
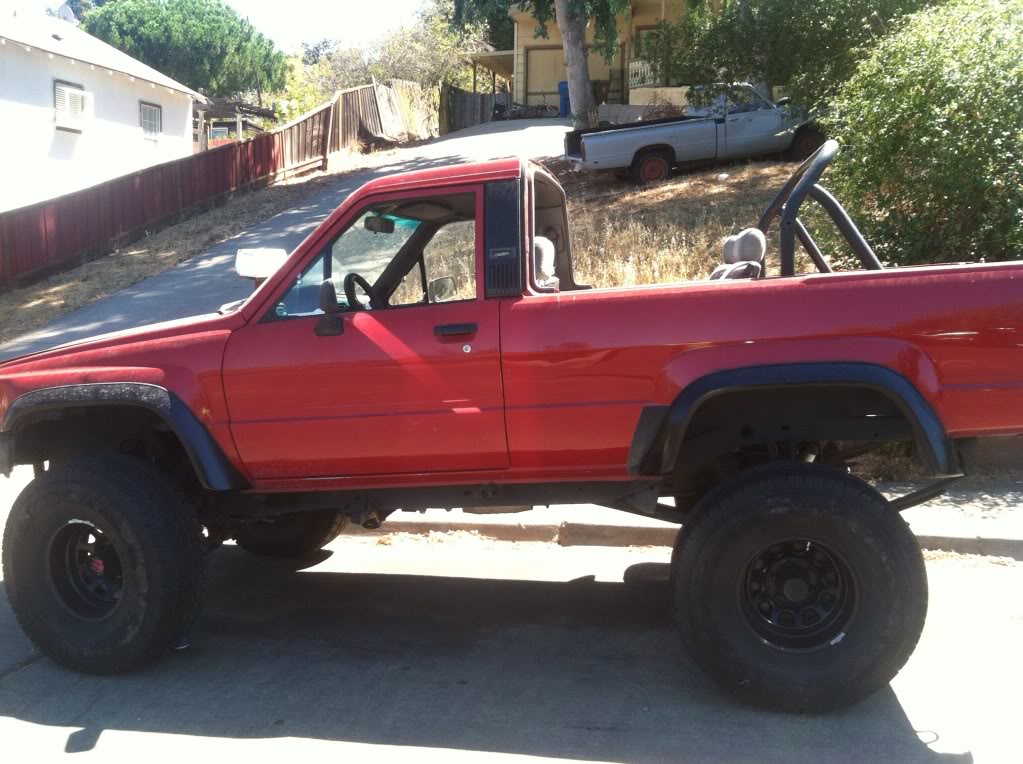
1989 Toyota 4runner 3vz 4x4 M/T 5.29 gears on 35's. Got it for $540 bad 3.0 valves/head gasket and for some reason the body harness under the dash were all bucked up like someone just started cutting everything. After three days of soldering, there she is got the 3.0 running. Yanked her right after :-P. Had one problem with my fuel level guage I couldn't get it working even tracing all the wires I got pissed off and gave up, put the dash back together. Anyways
Donor engine- (Rebuilt) 2001 Toyota taco prerunner 5vzfe
Harness/ECU 96 toyota taco 4x4 m/t
Got my 3.slow out and picked up the donor. Nice having a rebuild, mine was used I'm a little jealous but looks better when selling I guess.
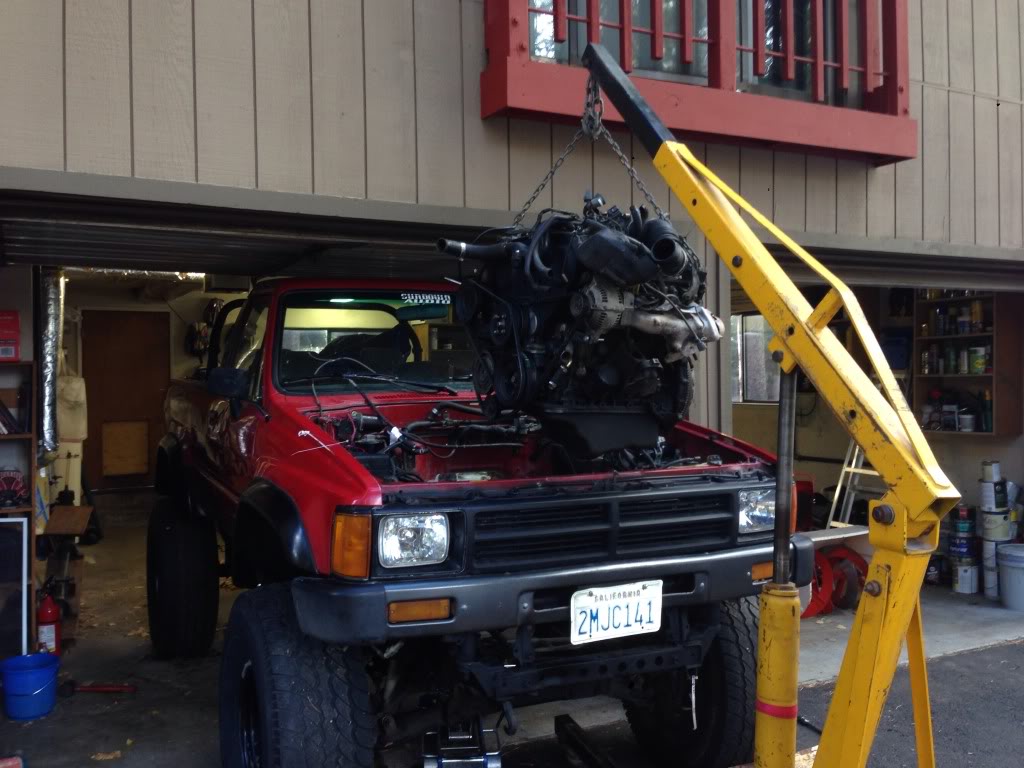
I got my crossover sent to toyonlyswaps so gonna be waiting on that one, as well as my conversion harness from ORS. While I wait I got a new clutch coming and as you can see in the pic . The front is lower than rear >.< yea body lift up front. Add a leaf in back. Sits on 35's. So while I wait I've got new cv axles coming along with ball joint spacers, diff drop, sway bar drop and extended/new shocks. Hopefully that'll level her out cause that's just enbarressing having the reward higher. If not I'll pull a leaf or attempt should I say. I have a relay or possibly my COR mounted on my firewall for some reason. Two wires go to my body hardness and one was spliced to my 3.0 engine harness, I had to chop it, after following it to a plug for the 3.0 ECU I'm a little nervous about it. I don't know what it's for. Ill post some pics of it when I look up what relay it is. Talk to ya'll soon.
I've decided to do another swap then sell her, experiment with it and see how much profit I can get. Love my 88, couldn't be happier with the swap. Took me quite a while last time, but hopefully I'm still fresh on it, So here goes.
1989 Toyota 4runner 3vz 4x4 M/T 5.29 gears on 35's. Got it for $540 bad 3.0 valves/head gasket and for some reason the body harness under the dash were all bucked up like someone just started cutting everything. After three days of soldering, there she is got the 3.0 running. Yanked her right after :-P. Had one problem with my fuel level guage I couldn't get it working even tracing all the wires I got pissed off and gave up, put the dash back together. Anyways
Donor engine- (Rebuilt) 2001 Toyota taco prerunner 5vzfe
Harness/ECU 96 toyota taco 4x4 m/t
Got my 3.slow out and picked up the donor. Nice having a rebuild, mine was used I'm a little jealous but looks better when selling I guess.
I got my crossover sent to toyonlyswaps so gonna be waiting on that one, as well as my conversion harness from ORS. While I wait I got a new clutch coming and as you can see in the pic . The front is lower than rear >.< yea body lift up front. Add a leaf in back. Sits on 35's. So while I wait I've got new cv axles coming along with ball joint spacers, diff drop, sway bar drop and extended/new shocks. Hopefully that'll level her out cause that's just enbarressing having the reward higher. If not I'll pull a leaf or attempt should I say. I have a relay or possibly my COR mounted on my firewall for some reason. Two wires go to my body hardness and one was spliced to my 3.0 engine harness, I had to chop it, after following it to a plug for the 3.0 ECU I'm a little nervous about it. I don't know what it's for. Ill post some pics of it when I look up what relay it is. Talk to ya'll soon.
 Keep very good track of your time and expenses .
Nov 21, 2013 | 09:57 AM
Keep very good track of your time and expenses .
Nov 21, 2013 | 09:57 AM
#5
Thread Starter
Registered User
Joined: Feb 2013
Posts: 224
Likes: 0
Ya I've been writing down gas $ I spend on my receipts and hours spent on the truck per day though just so I know for future reference how much money and time I can do it at. Really don't have much time into yet (not including that wiring mess) and haven't really thought of a hourly rate id be going off of. A lot cheaper than any other shop that's for sure. I pulled the engine in 6 hours. More of a flat rate. Hoping to make $3-4,000 profit when she's done but as I said just experimenting with it. Front driver seat is beat up and I don't have a top for it yet :-/ saving my bakini top for my runner. And yea good find. He asked $1200 but when I got there and saw that crappy body lift (that he thought was suspension) I low balled him and got a pretty good steal. Just waiting on parts, ill post a pic of that relay today and see what I can come up with. Hopefully it's nothing ill struggle with to bad.
Nov 21, 2013 | 10:55 AM
#6
Thread Starter
Registered User
Joined: Feb 2013
Posts: 224
Likes: 0
Alright here's some pics of this relay. I was wrong as to where it routes. Maybe a Hotwire for a fuel pump?? I tried matching this part number online. No luck. Ill call the auto part store next.
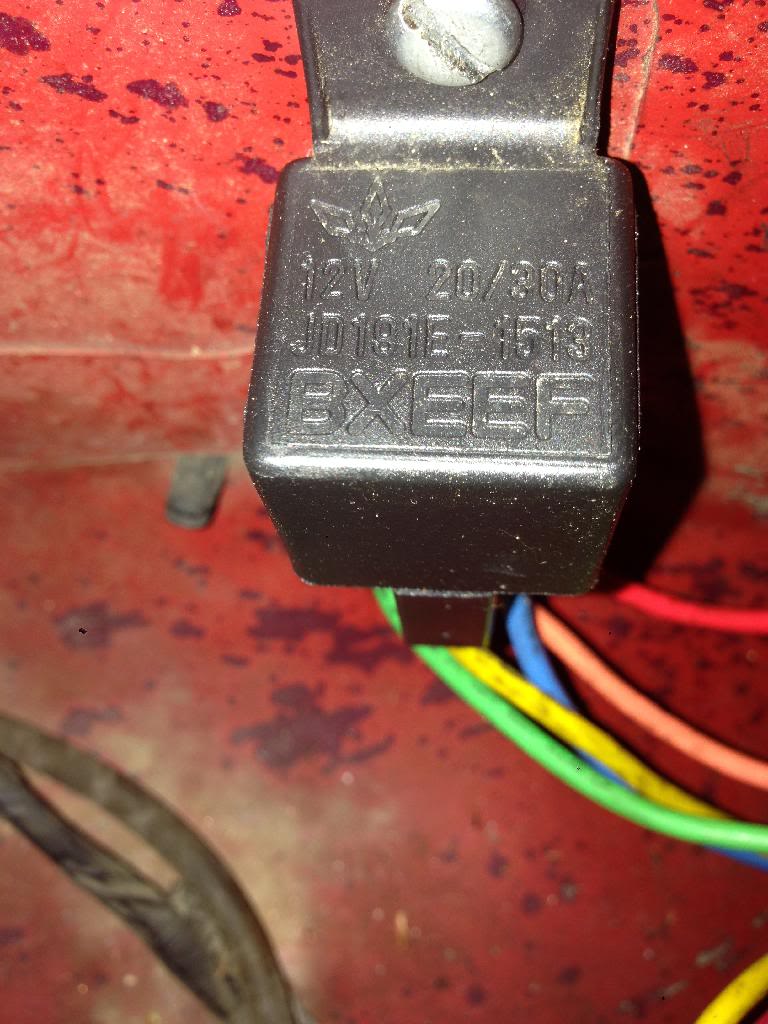
Red wire goes to my Body Harness,
Green is grounded to my Wiper motor,
Yellow is a to my starter(starter trigger wire?)
Blue is to my 3.0 engine harness, spliced into another wire, that eventually follows to a 3.0 ECU Plug.
And the orange wire is just Capped.
Any thoughts?


Red wire goes to my Body Harness,
Green is grounded to my Wiper motor,
Yellow is a to my starter(starter trigger wire?)
Blue is to my 3.0 engine harness, spliced into another wire, that eventually follows to a 3.0 ECU Plug.
And the orange wire is just Capped.
Any thoughts?
Last edited by Moto260; Nov 21, 2013 at 11:59 AM.
Nov 21, 2013 | 12:56 PM
#7
Thread Starter
Registered User
Joined: Feb 2013
Posts: 224
Likes: 0
It's very hard to trace where that red wire leads to, looked like body harness but the guy I bought it from did have a remote car alarm wired in so possibly that and he did have extra speakers and a system hooked up in the back.
Trending Topics
Nov 23, 2013 | 06:45 PM
#8
Thread Starter
Registered User
Joined: Feb 2013
Posts: 224
Likes: 0
Got my shocks today along with driveaxles, and ball joint spacers w/ sway bar and diff drop kit. Though they forgot to send me the instructions for the b/j spacer kit, it seems pretty basic just looking at em. I think I'll have more trouble figuring out the order to put all these on. I think ill go ball joint spacers, shocks, then sway bar drop, diff drop, and the axles in that order. Hopefully it works out good that way Hoping to knock em out Monday. Post some pics when they're done :-)
Nov 24, 2013 | 12:58 PM
#9
Registered User
Joined: Jul 2007
Posts: 301
Likes: 0
From: guam
I can't tell from the pics
What is opposite from Green? Is it Blue?
If it's Blue then Blue is the "switch". Probably hooked up as a turn key switch
Where is yellow hooked up? To the starter with the battery cable or at the trigger input? If yellow is on the battery cable, that is your 12v power source.
Opposite of this wire(yellow) looks like it is Red that goes to the body harness. If so follow that line and it should take you to what you're looking for.
If orange is in the middle (87a) that's usually nothing UNLESS the PO wanted it on at all times.
Hope that helps. I just finished wiring my front Rock lights yesterday so everything is sill very fresh with how a relay works.
Nov 24, 2013 | 04:13 PM
#10
Thread Starter
Registered User
Joined: Feb 2013
Posts: 224
Likes: 0
I can't tell from the pics
What is opposite from Green? Is it Blue?
If it's Blue then Blue is the "switch". Probably hooked up as a turn key switch
Where is yellow hooked up? To the starter with the battery cable or at the trigger input? If yellow is on the battery cable, that is your 12v power source.
Opposite of this wire(yellow) looks like it is Red that goes to the body harness. If so follow that line and it should take you to what you're looking for.
If orange is in the middle (87a) that's usually nothing UNLESS the PO wanted it on at all times.
Hope that helps. I just finished wiring my front Rock lights yesterday so everything is sill very fresh with how a relay works.
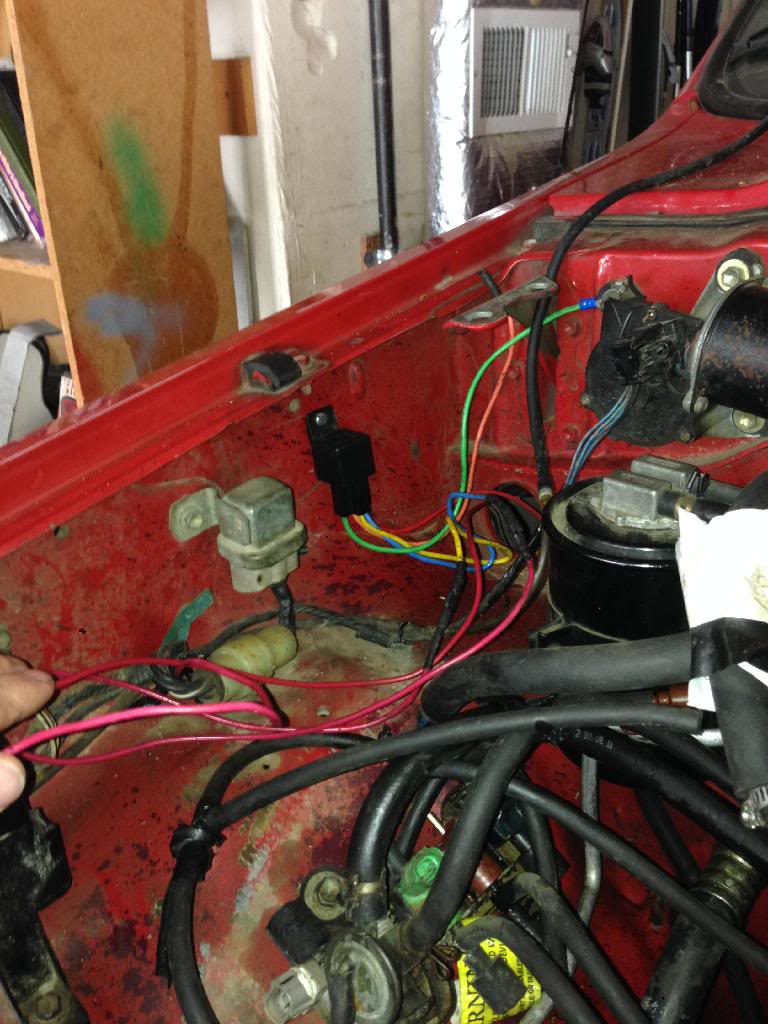
Thanks for the reply. I appreciate the help on this. I'll have to get a closer look at it tomorrow while I'm working on the suspension. Here's another pic of it if this helps. http://i1296.photobucket.com/albums/ag12/Wbotto/49010FAE-351C-442D-97ED-ADC53B642C23_zps99zcdbcp.jpg
Ill trace that red wire better tomorrow.
Yellow is not to same spot as battery. It's posing as my trigger wire. (Weird). And all the others as you said should be correct. U were right on haha. And blue is whats really confusing me. Spliced into my engine harness like that. :-/
Ill trace the red and let u know what I come up with. Thanks again.
 Nov 25, 2013 | 04:46 PM
#12
Thread Starter
Registered User
Joined: Feb 2013
Posts: 224
Likes: 0
Well this is what I came to following the red wire.
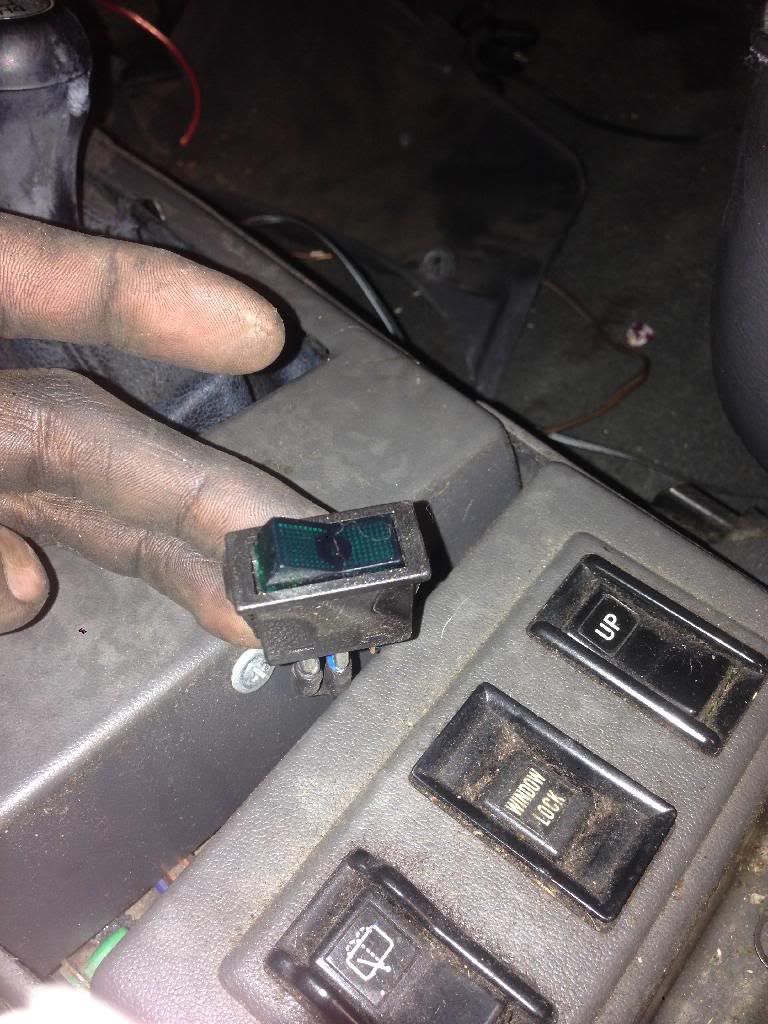
This little switch (which I have no idea what it's for) was under the plastics between my shifter and center console. Took some screws out picked it up and there she was. So that's my red wire. the other wire on it is also red and follows back out of my firewall to my positive battery terminal. I remember after the wiring mess I dealt with my truck wouldn't start without that red wire connected to my pos terminal. Hmm.

This little switch (which I have no idea what it's for) was under the plastics between my shifter and center console. Took some screws out picked it up and there she was. So that's my red wire. the other wire on it is also red and follows back out of my firewall to my positive battery terminal. I remember after the wiring mess I dealt with my truck wouldn't start without that red wire connected to my pos terminal. Hmm.
Nov 25, 2013 | 04:52 PM
#13
Thread Starter
Registered User
Joined: Feb 2013
Posts: 224
Likes: 0
As for suspension components today... Very upsetting day from the start and un-eventful. First off b/j spacers well. U don't want full droop on suspension so spacer or socket between upper control arm and bump stop right. Well this trucks bump stops are cut off or broken off. So I had no way to keep that from full droop. Pulled it all apart disconnected ball joint from upper arm. Couldn't get it out. After prying on it with a pry bar and nail puller it slipped out and I hit myself under my eye with the nail puller. 1/8 of an inch up I would have lost an eye. Lucky I am. Drrppp. Got a nice shiner out of it haha. Hopefully tomorrow I can figure out how to get this control arm higher up. :-/
Nov 26, 2013 | 10:08 AM
#15
Thread Starter
Registered User
Joined: Feb 2013
Posts: 224
Likes: 0
(Blue) I believe it was. Or maybe I could just disassemble the whole thing and my truck would run?
Nov 26, 2013 | 05:58 PM
#16
Registered User
Joined: Apr 2012
Posts: 32
Likes: 1
From: Winnemucca NV
Torsion bars
Put the 4runner on jack stands and take the tension off your torsion bars. This will allow you to freely move the a arms and suspension. There is a lot of downward force in the front end.
Nov 26, 2013 | 06:04 PM
#17
Registered User
Joined: Apr 2012
Posts: 32
Likes: 1
From: Winnemucca NV
Torsion bars
Put the 4runner on jack stands and take the tension off your torsion bars. This will allow you to freely move the a arms and suspension. There is a lot of downward force in the front end.
Sorry about the double post don't know how that happened,
Sorry about the double post don't know how that happened,
Last edited by auassay; Nov 26, 2013 at 06:05 PM.
Nov 26, 2013 | 06:50 PM
#18
Thread Starter
Registered User
Joined: Feb 2013
Posts: 224
Likes: 0
You're awesome thanks, ill try that. Today I tried hopking a strap to the upper control arm and cranking it up to pick the arm up. It lifted the whole truck. (So upsetting) Set it back down and tried without. No luck at all. The stupid broken cv axle binded up and now I can't swivel it anymore. Should have done cv axle first. :-P. I thought that an upper control arm should move like a lower. I'm no suspension expert. Thanks for the advice. I'll give that a go tomorrow and let u know how it goes.
Nov 26, 2013 | 10:21 PM
#19
Registered User
Joined: Jul 2007
Posts: 301
Likes: 0
From: guam
As for suspension components today... Very upsetting day from the start and un-eventful. First off b/j spacers well. U don't want full droop on suspension so spacer or socket between upper control arm and bump stop right. Well this trucks bump stops are cut off or broken off. So I had no way to keep that from full droop. Pulled it all apart disconnected ball joint from upper arm. Couldn't get it out. After prying on it with a pry bar and nail puller it slipped out and I hit myself under my eye with the nail puller. 1/8 of an inch up I would have lost an eye. Lucky I am. Drrppp. Got a nice shiner out of it haha. Hopefully tomorrow I can figure out how to get this control arm higher up. :-/
Nov 27, 2013 | 09:59 AM
#20
Registered User

Joined: Jan 2009
Posts: 1,908
Likes: 5
From: Fresno, Ca.
I doubt that is a theft deterrent unless the person wiring it was a total moron. If it was, the red and orange would be connected the the wires to be interrupted whether that be the fuel pump feed, the starter, etc. that way when the switch was flipped, the circuit would toggle between open and closed.
You say some of those wires connect to the body harness. There are dozens of wires in the body harness......which ones, and what colors, and where?
The one that goes to the starter.......the big wire or the little one on the starter?
This really could be anything.......an aftermarket light, horn, compressor, manual backup lights, or rack of amps.
Without more detailed info, everyone is guessing.


