
aa1911's HID retrofit/conversion in 93 4Runner
 Mar 21, 2011 | 12:08 PM
#1
Thread Starter
Registered User
iTrader: (1)
Joined: Sep 2009
Posts: 1,286
Likes: 3
From: Western Washington
aa1911's HID retrofit/conversion in 93 4Runner
Ok, let's try this again, started this in the staging area for tech writeups, can't get back to it now, oops. sorry guys.... (mods)
Anyway, lots of pics to come, please no replies until I get thru all this....
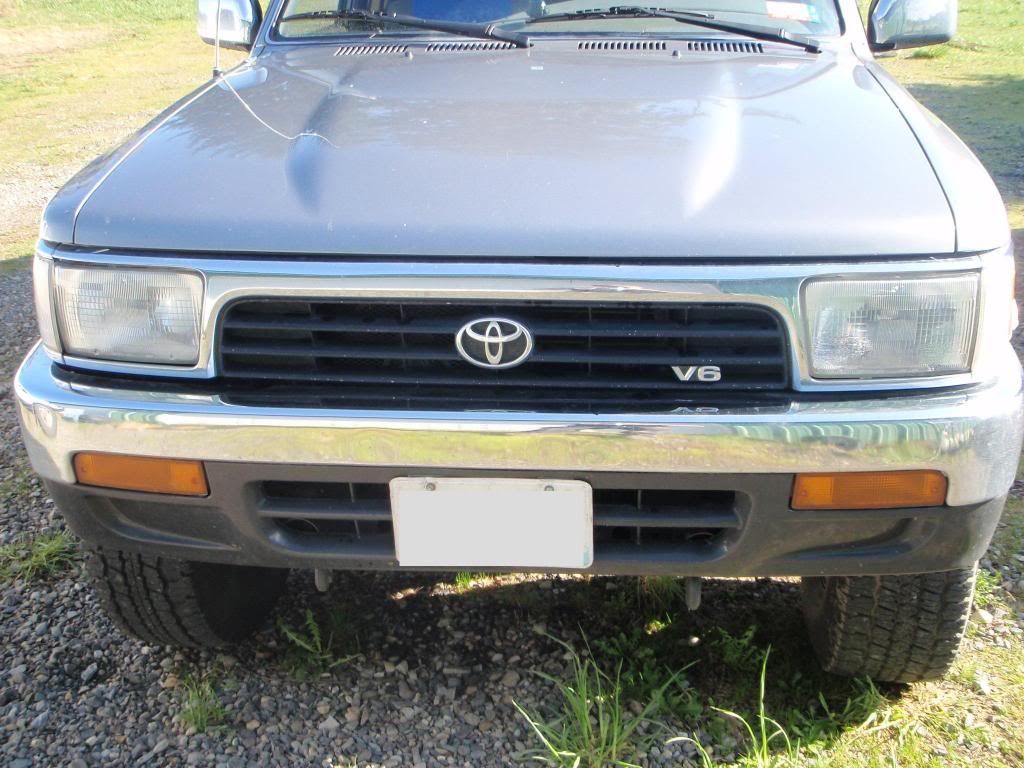
The vehicle: 1993 4Runner SR5 4x4 5speed 3vze
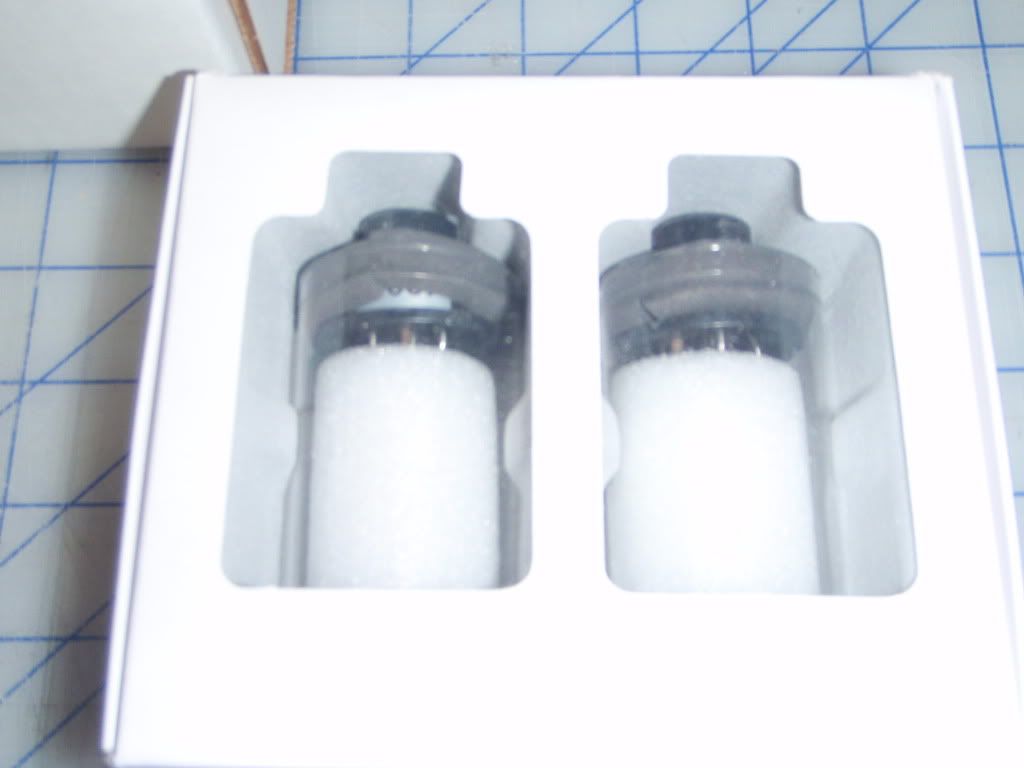
The HID kit: entire kit from TheRetrofitSource (TRS) using FX-R projectors, Mirimoto 5Five's (50 watt) bi-Xenon bulbs and ballasts.
First off, if anyone wants to do this HID conversion, please do yourself a HUGE favor and buy from TRS, top notch quality and support, way beyond most other vendors.
First things first, lets run down the list of supplies and tools needed to tackle this:
Here's the things off of TRS's writeup that I used:
Recommended Tools & Materials:
Philips Screwdriver
2-3 Flat Blade Screwdrivers (ones you don�t mind if they get caked with glue)
Dremel Rotary Tool
Fast-setting epoxy in caulk tube format (we used "Sika Fast Setting Anchoring Adhesive")
Caulk gun
Spray can air duster
soft cloth (for cleaning off dust/fingerprints)
Oven or heat gun
Work gloves (Mechanix )
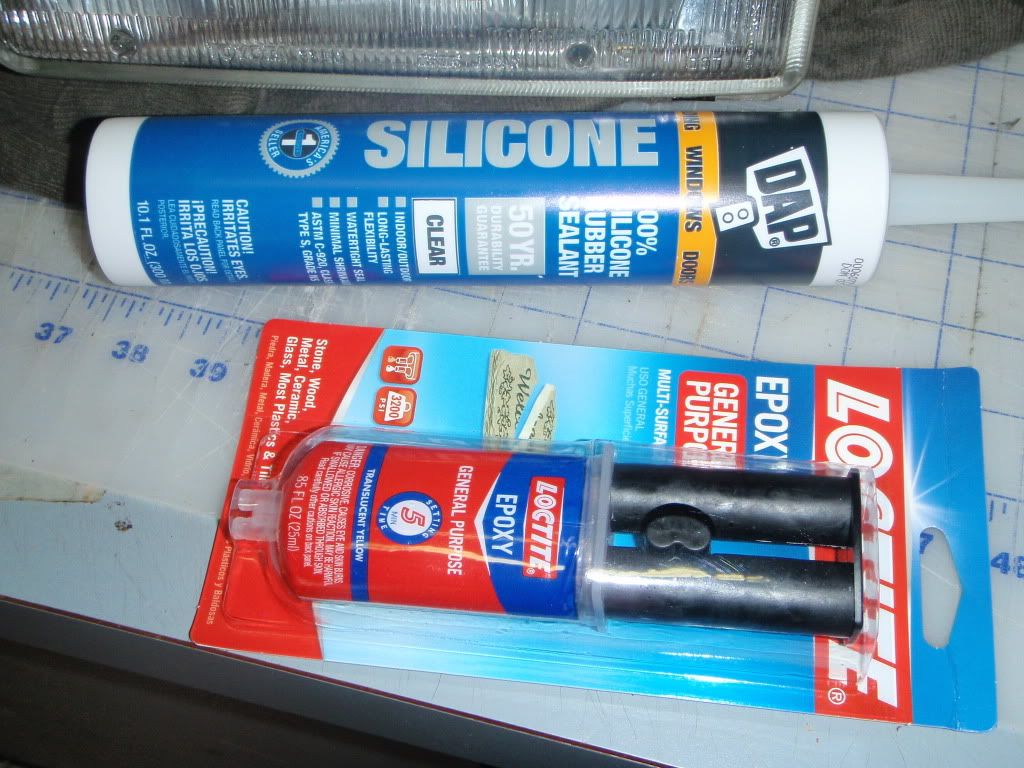
I also added: Silicone 50yr sealant in caulk tube format, regular 5 minute epoxy
Big difference with my build was that I did not use very much epoxy but did a mechanical mounting technique with just a small bit of epoxy to help; I plan on switching over (re-doing this whole deal) with some aftermarket clear housings down the road so didn't want to cake my expensive projectors in just yet permanently...
OK, heres a pic of the parts laid out:

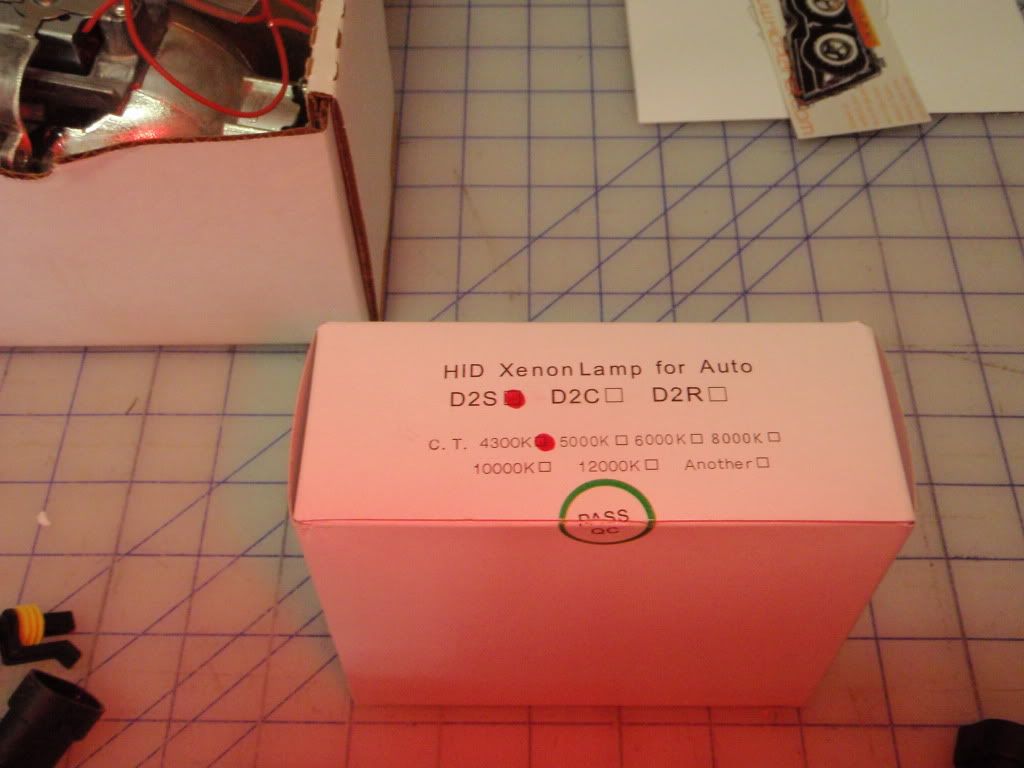
the bulbs: 50w 4300k mirimoto's
more coming, standby.....
Anyway, lots of pics to come, please no replies until I get thru all this....
The vehicle: 1993 4Runner SR5 4x4 5speed 3vze
The HID kit: entire kit from TheRetrofitSource (TRS) using FX-R projectors, Mirimoto 5Five's (50 watt) bi-Xenon bulbs and ballasts.
First off, if anyone wants to do this HID conversion, please do yourself a HUGE favor and buy from TRS, top notch quality and support, way beyond most other vendors.
First things first, lets run down the list of supplies and tools needed to tackle this:
Here's the things off of TRS's writeup that I used:
Recommended Tools & Materials:
Philips Screwdriver
2-3 Flat Blade Screwdrivers (ones you don�t mind if they get caked with glue)
Dremel Rotary Tool
Fast-setting epoxy in caulk tube format (we used "Sika Fast Setting Anchoring Adhesive")
Caulk gun
Spray can air duster
soft cloth (for cleaning off dust/fingerprints)
Oven or heat gun
Work gloves (Mechanix )
I also added: Silicone 50yr sealant in caulk tube format, regular 5 minute epoxy
Big difference with my build was that I did not use very much epoxy but did a mechanical mounting technique with just a small bit of epoxy to help; I plan on switching over (re-doing this whole deal) with some aftermarket clear housings down the road so didn't want to cake my expensive projectors in just yet permanently...
OK, heres a pic of the parts laid out:
the bulbs: 50w 4300k mirimoto's
more coming, standby.....
Mar 21, 2011 | 12:15 PM
#2
Thread Starter
Registered User
iTrader: (1)
Joined: Sep 2009
Posts: 1,286
Likes: 3
From: Western Washington
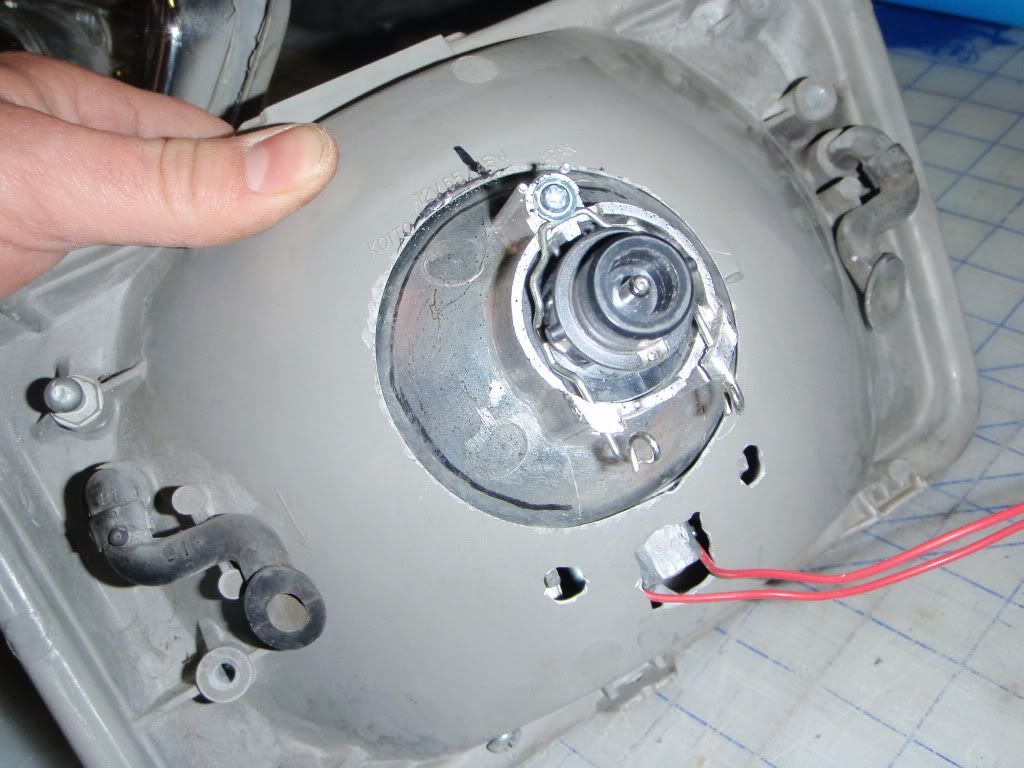
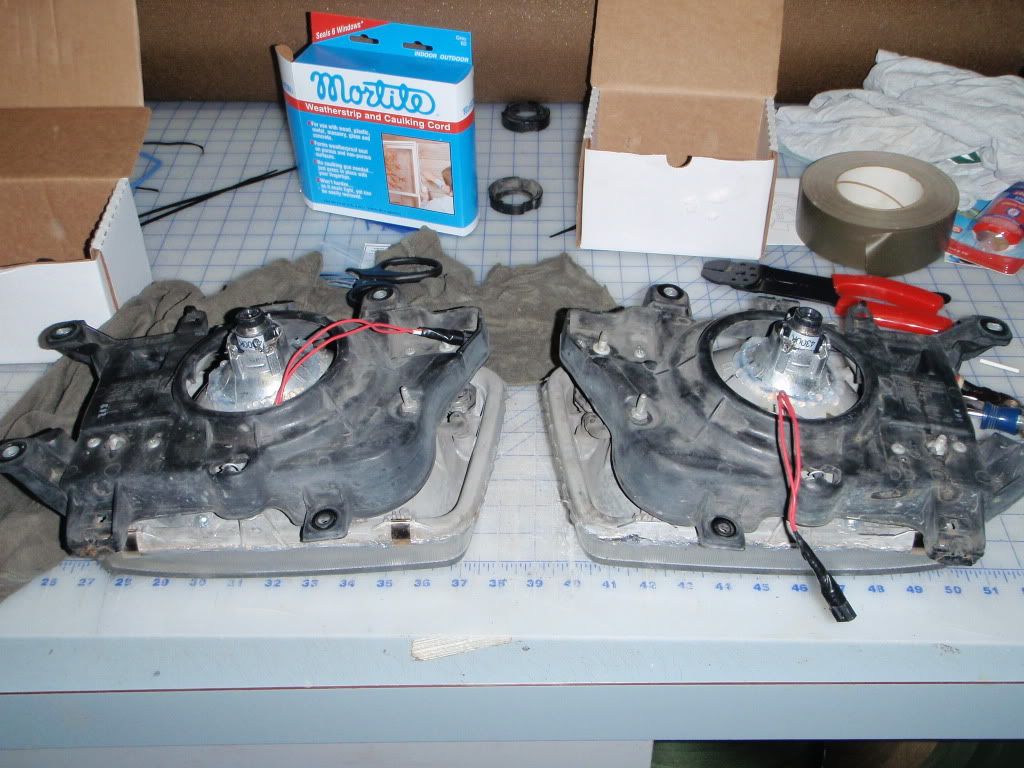
Here's the stock headlights in the vehicle, crappy crappy crappy halogens, horrible light output, very dangerous at night, no joke!
I've been getting condensation inside the driver's side housing for about 6 months now....

and everything removed: need to start with the side marker housings, then the center plastic portion, then the headlights themselves...
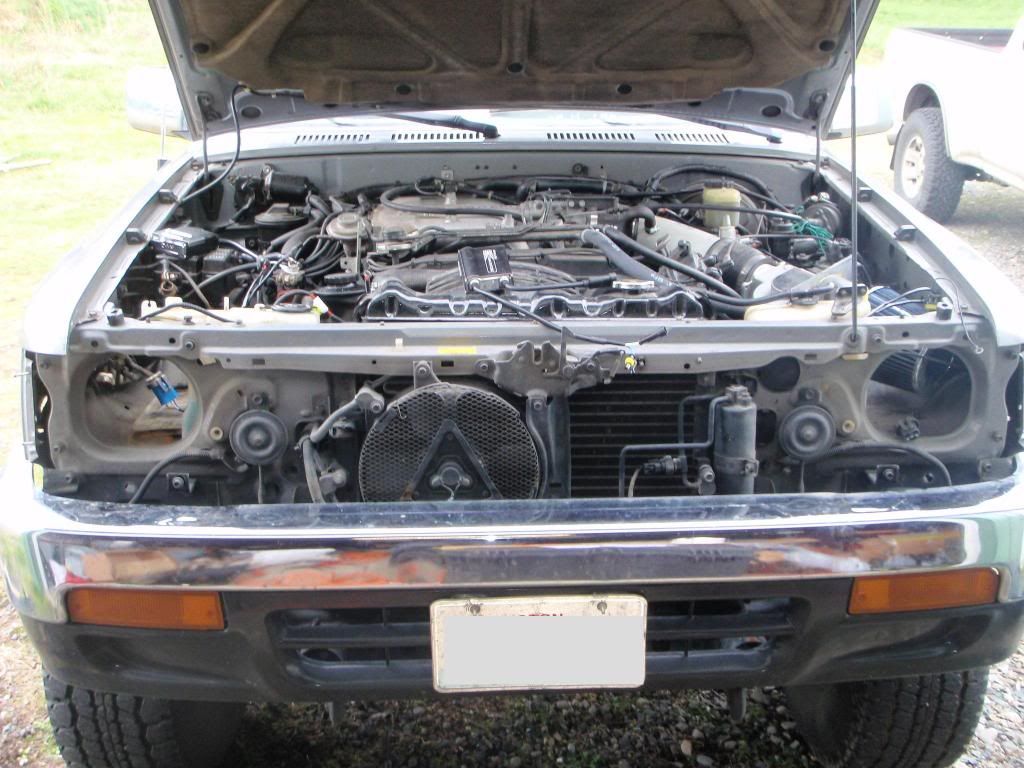
while I was in there, noticed this little gem waiting for me, no telling how long this fan has not been working, rrrr.... one of the wires to the electric fan is completely corroded thru, had to strip/solder the ends back together and cover them....
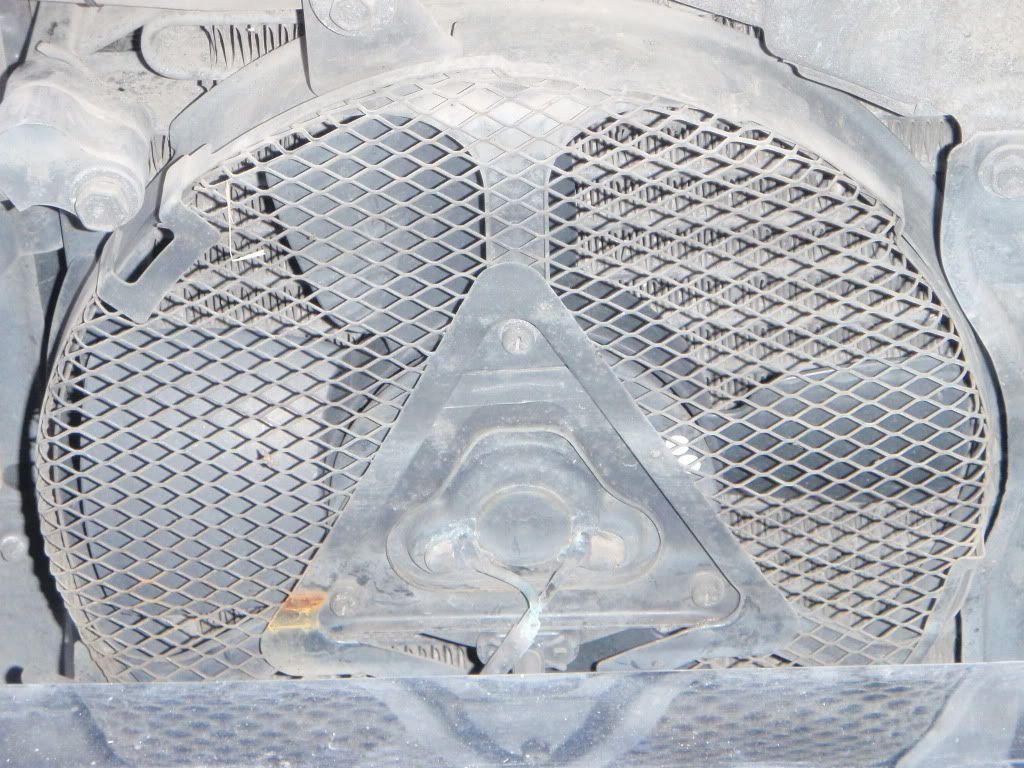
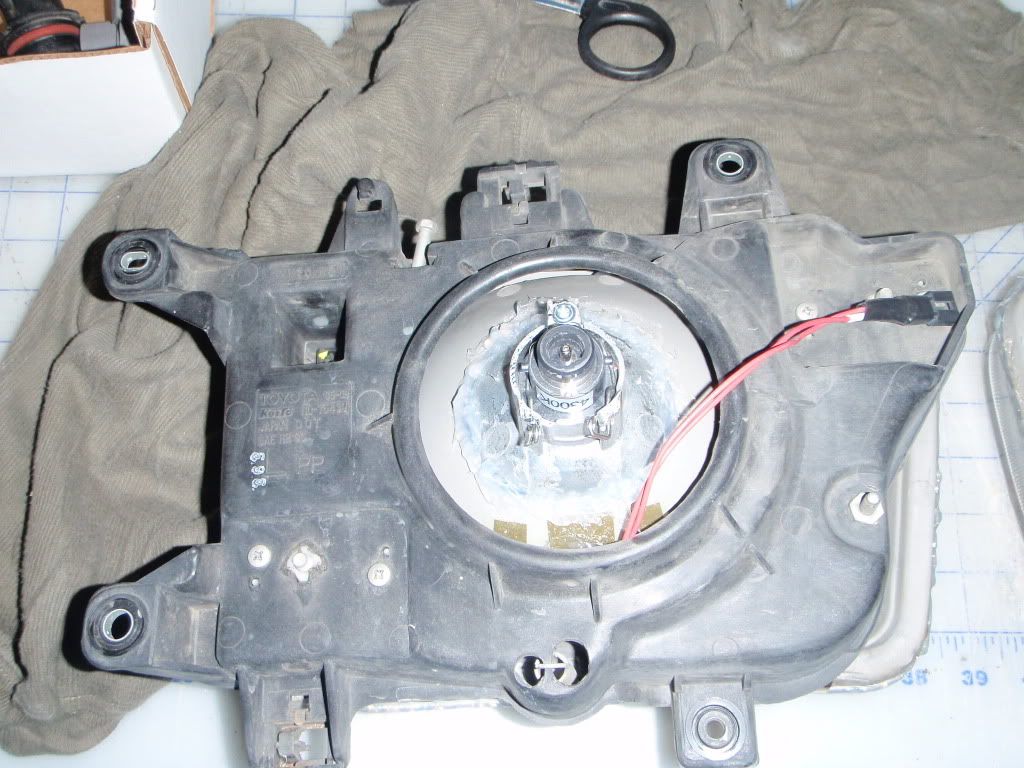
closer:

I've been getting condensation inside the driver's side housing for about 6 months now....
and everything removed: need to start with the side marker housings, then the center plastic portion, then the headlights themselves...
while I was in there, noticed this little gem waiting for me, no telling how long this fan has not been working, rrrr.... one of the wires to the electric fan is completely corroded thru, had to strip/solder the ends back together and cover them....
closer:
Mar 21, 2011 | 12:30 PM
#3
Thread Starter
Registered User
iTrader: (1)
Joined: Sep 2009
Posts: 1,286
Likes: 3
From: Western Washington
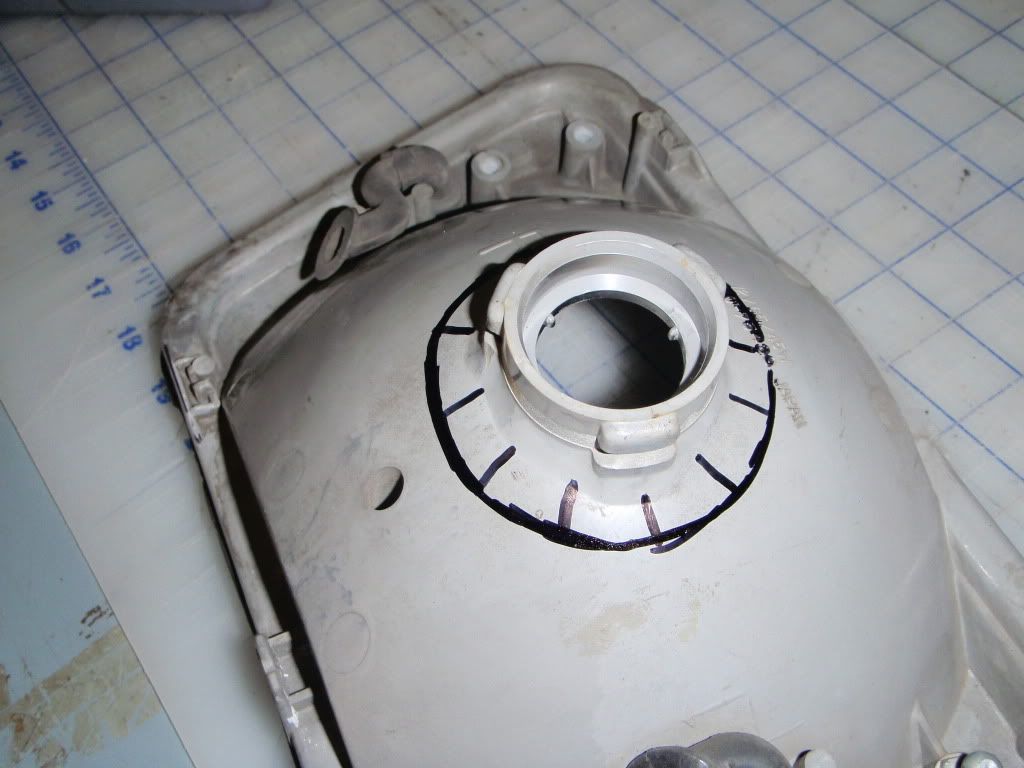
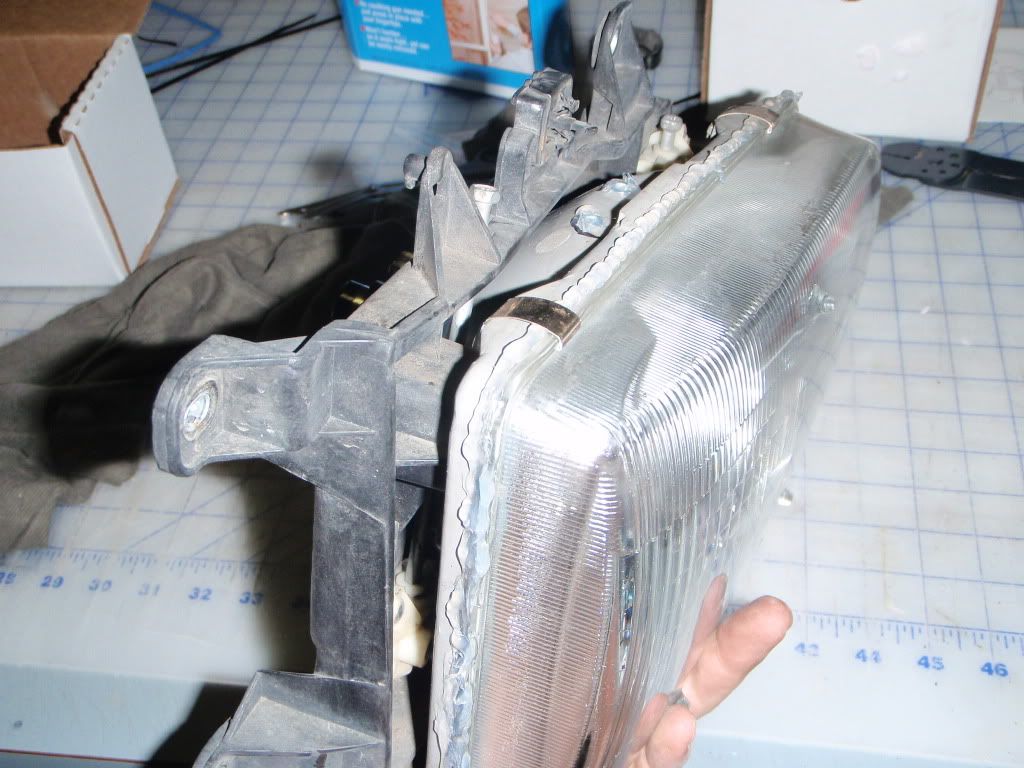
OK, so following TRS's instructions (a PDF download off of HID planet forums), I started by aiming the OEM halogens in the housing and marking it after baking the housings in the oven to separate the glass lense and reflector/housing. I did one light at a time in the oven set to 250' F for 7 minutes, this softens the sealant so you can separate the housings.... this is a VERY important step!
(Make sure your lights are aimed correctly before you remove them from the vehicle!)
I did it at about 18' and used a marker on a big chunk of cardboard. Basically you clamp the housing down and mark it's exact orientation on a fixed object like a work bench and you will have to run power to it from your rig (make sure to reference your plug, i.e. what is ground (low beam) and what is power (positive terminal). we have switched ground, make sure to pay attention to that if you do any of your own wiring!!
when aiming, use the low beams.... then time to chop!
First housing marked ready for the cut:
some fitting, cutting, fitting, cutting, grunting, fitting.....
still not done, but close to what I cut away total:
here's about how they ended up as far as cutting...
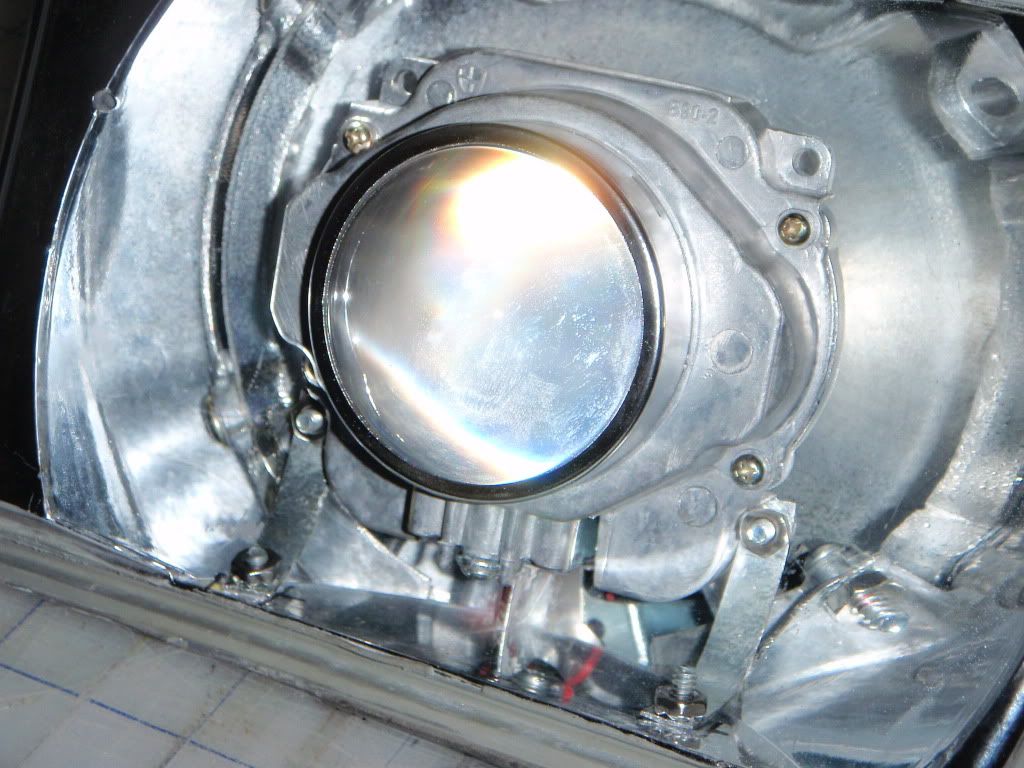
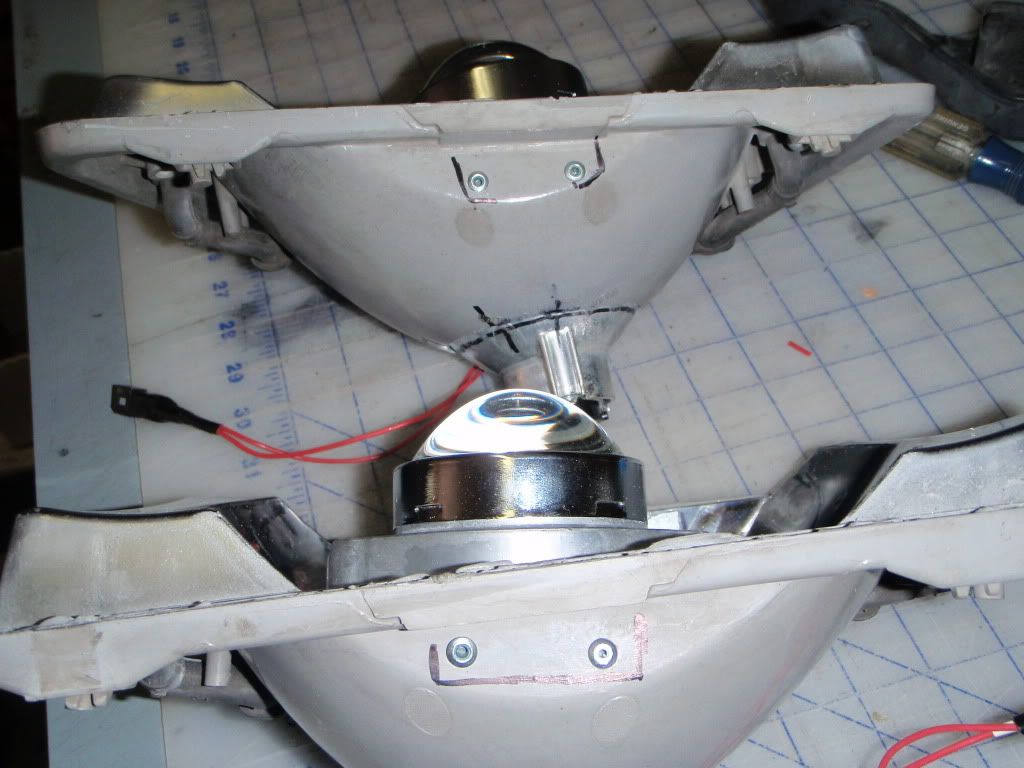
I won't lie, this was the biggest PITA !!!!!! the projectors are almost too big for these housings without setting them waaaaay back. I was worried about clearance in the back after install, the battery on the passenger side and my ISR mod on the Driver side. I had to walk away and come back the next day to finish this, the projector lenses were a little too close to the glass for my liking. They ended up being about 1/4" off the glass.
here's a shot of one of the projectors:
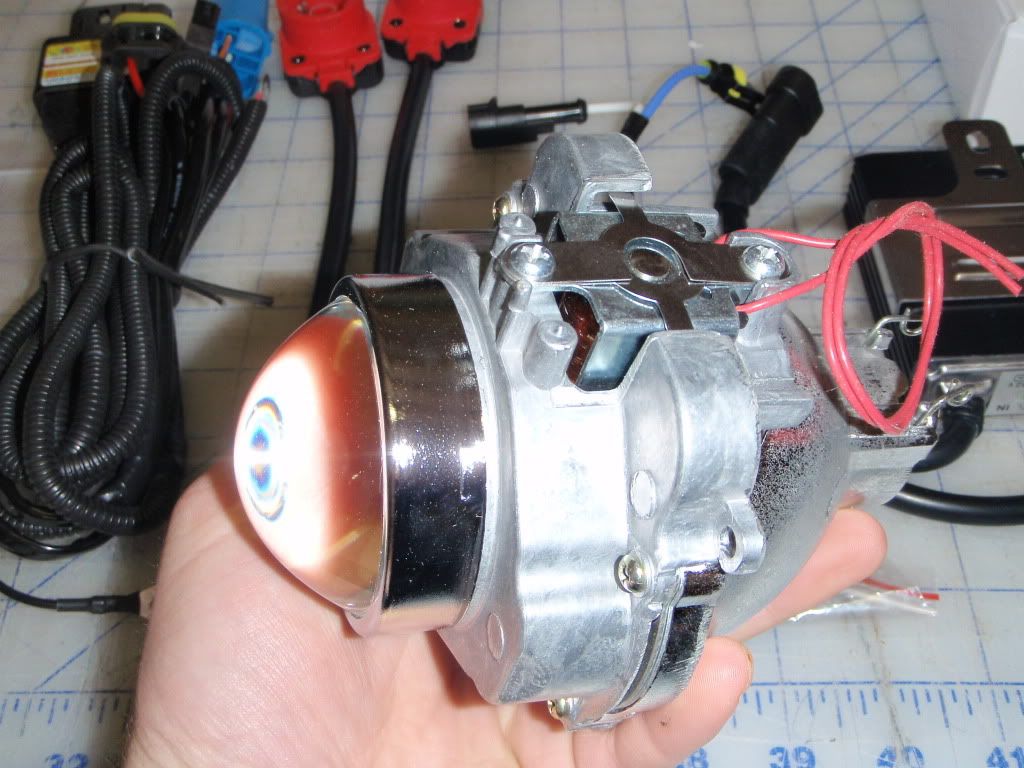
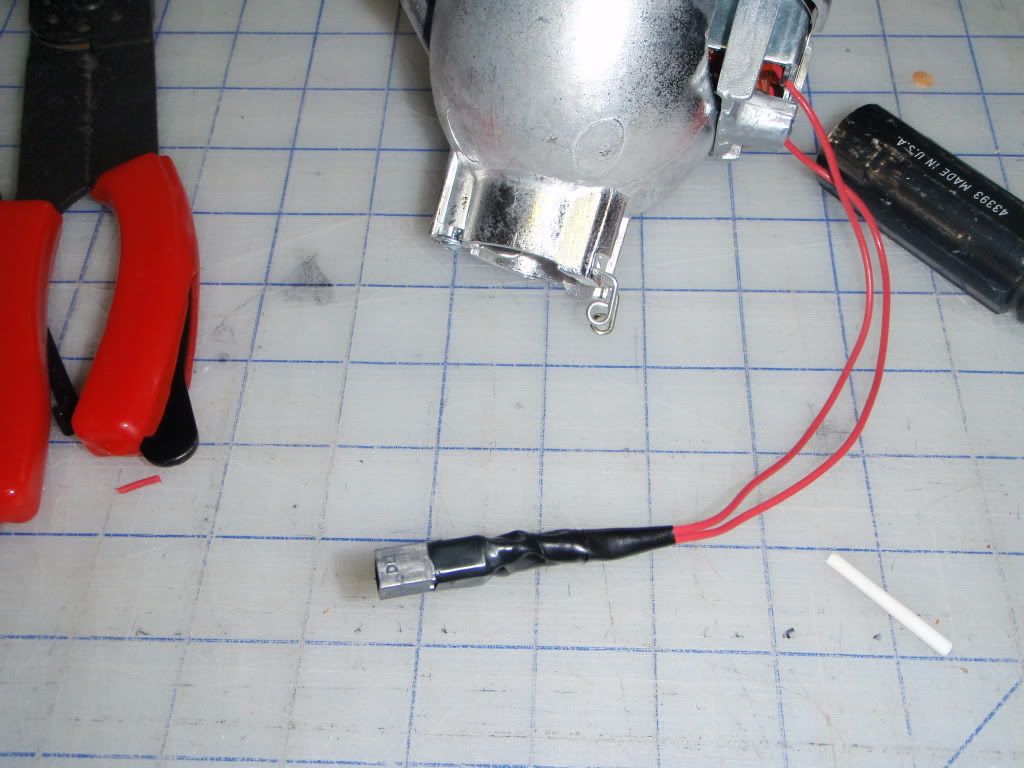
while grumbling and trying to decide how much housing to remove, I wired up the projectors (two small wires for the solenoid that switches hi/lo beam) the kit comes with a nice plug and connector to fit to the harness, this is the ONLY wiring you will have to do!
(Make sure your lights are aimed correctly before you remove them from the vehicle!)
I did it at about 18' and used a marker on a big chunk of cardboard. Basically you clamp the housing down and mark it's exact orientation on a fixed object like a work bench and you will have to run power to it from your rig (make sure to reference your plug, i.e. what is ground (low beam) and what is power (positive terminal). we have switched ground, make sure to pay attention to that if you do any of your own wiring!!
when aiming, use the low beams.... then time to chop!
First housing marked ready for the cut:
some fitting, cutting, fitting, cutting, grunting, fitting.....
still not done, but close to what I cut away total:
here's about how they ended up as far as cutting...
I won't lie, this was the biggest PITA !!!!!! the projectors are almost too big for these housings without setting them waaaaay back. I was worried about clearance in the back after install, the battery on the passenger side and my ISR mod on the Driver side. I had to walk away and come back the next day to finish this, the projector lenses were a little too close to the glass for my liking. They ended up being about 1/4" off the glass.
here's a shot of one of the projectors:
while grumbling and trying to decide how much housing to remove, I wired up the projectors (two small wires for the solenoid that switches hi/lo beam) the kit comes with a nice plug and connector to fit to the harness, this is the ONLY wiring you will have to do!
Mar 21, 2011 | 12:40 PM
#4
Thread Starter
Registered User
iTrader: (1)
Joined: Sep 2009
Posts: 1,286
Likes: 3
From: Western Washington
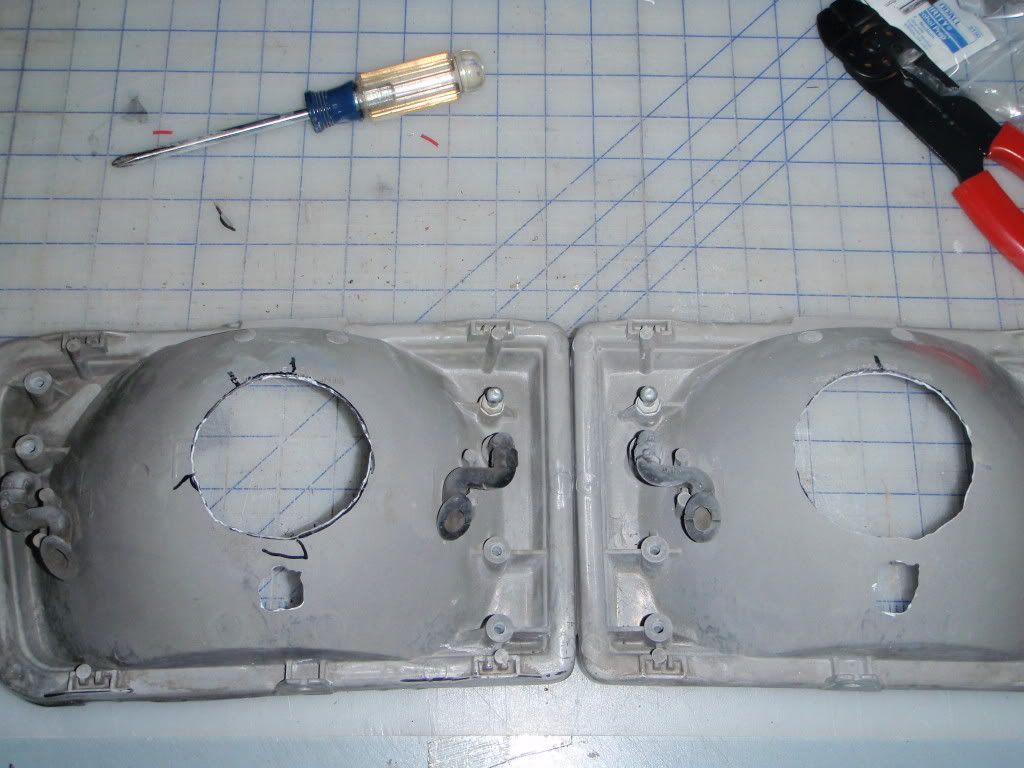
there's the main hole for the projector that I cut, the other 3 small holes below were for the bottom portion where the solenoid is, you will need to cut the lowest middle hole but do not cut the other two holes like I did, not necessary at all in the end.... you may have to file down the nubs on the projector itself just a wee bit but they will fit!
I covered the holes with duct tape and then used epoxy to rebuild it/solidify it, made a nice repair.
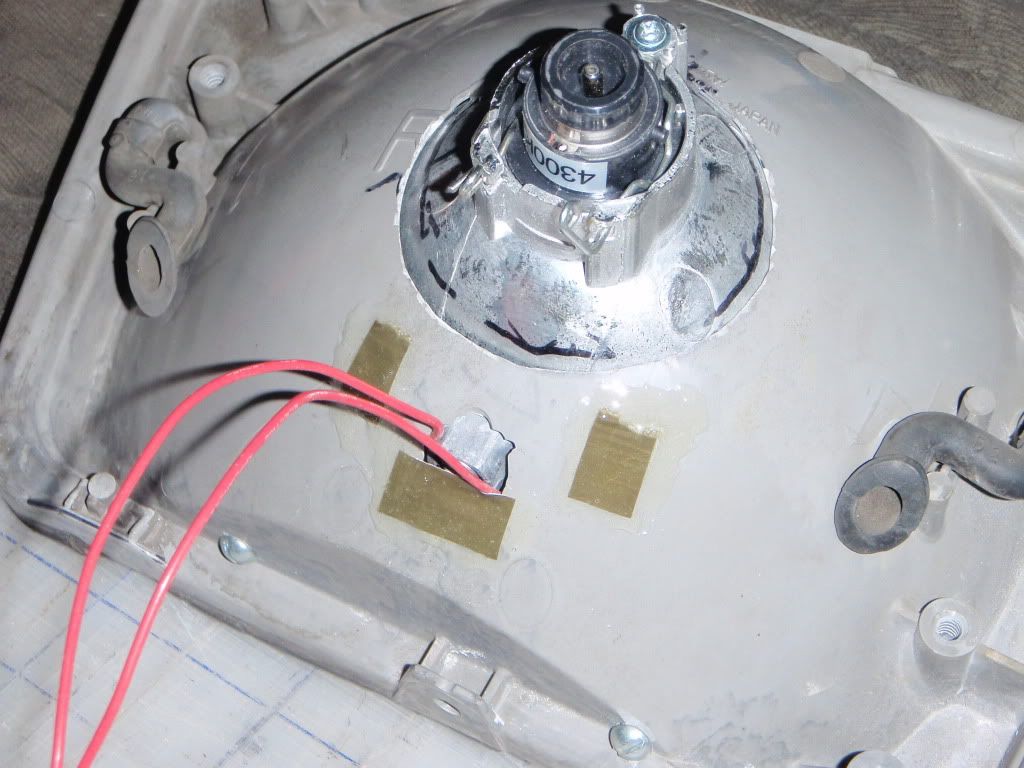
another shot before the tape/epoxy fit showing what I ended up cutting away:
now time to secure 'em in place... my other dilema... I want to convert over to clear housings/lenses at some point (the pattern on the OEM glass lense distorts/diminishes the HID's capability a little bit) so didn't want to just epoxy them in place. Sooooo.... I decided to pull out some scrap metal and a hacksaw/file and get to work fabbing up some brackets....
For those more interested in hardware vs. epoxy, check out the 'JnC method' on HID planet forums, I didn't follow his idea but it's worth a look for sure.
Here's what I came up with that wound up working very well, two 3/16" wide strips of construction bracket secured with short 10 x 24 machine screws...
I covered the holes with duct tape and then used epoxy to rebuild it/solidify it, made a nice repair.
another shot before the tape/epoxy fit showing what I ended up cutting away:
now time to secure 'em in place... my other dilema... I want to convert over to clear housings/lenses at some point (the pattern on the OEM glass lense distorts/diminishes the HID's capability a little bit) so didn't want to just epoxy them in place. Sooooo.... I decided to pull out some scrap metal and a hacksaw/file and get to work fabbing up some brackets....
For those more interested in hardware vs. epoxy, check out the 'JnC method' on HID planet forums, I didn't follow his idea but it's worth a look for sure.
Here's what I came up with that wound up working very well, two 3/16" wide strips of construction bracket secured with short 10 x 24 machine screws...
Mar 21, 2011 | 12:50 PM
#5
Thread Starter
Registered User
iTrader: (1)
Joined: Sep 2009
Posts: 1,286
Likes: 3
From: Western Washington
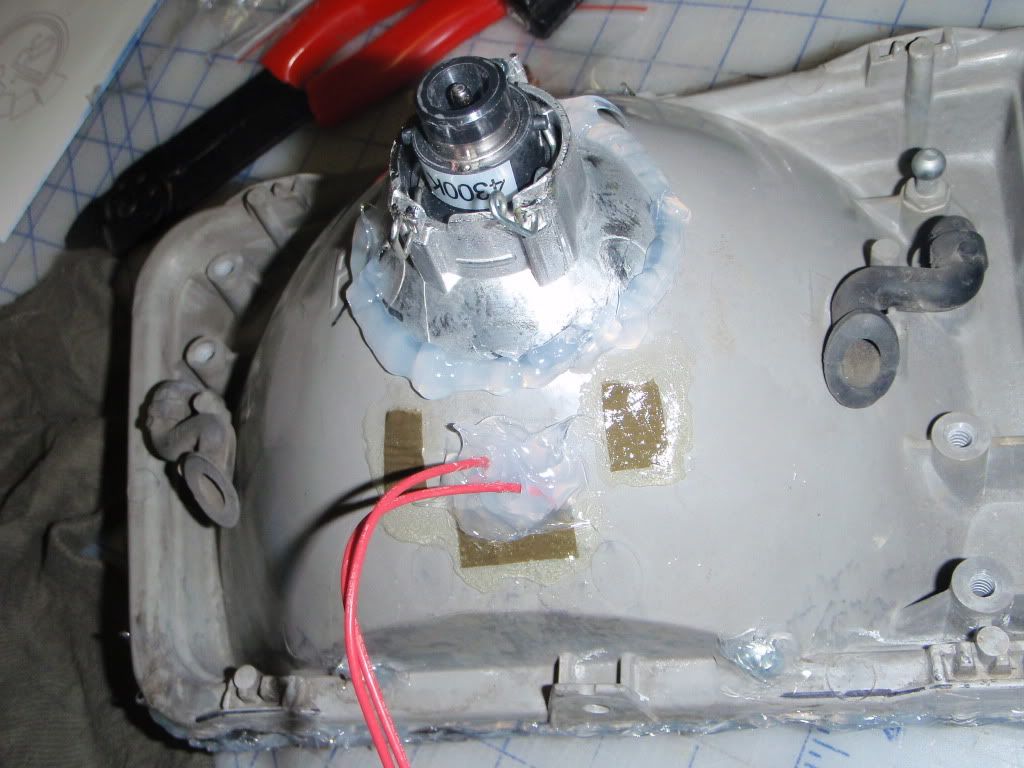
still needed something to secure the top to keep them from 'tipping' forward and hitting the glass lense....
used some more construction bracket/brace and made an 'L' shape piece and secured it with rivets at the top of the housing. the bracket doesn't actually attach but rather just secures the projector.
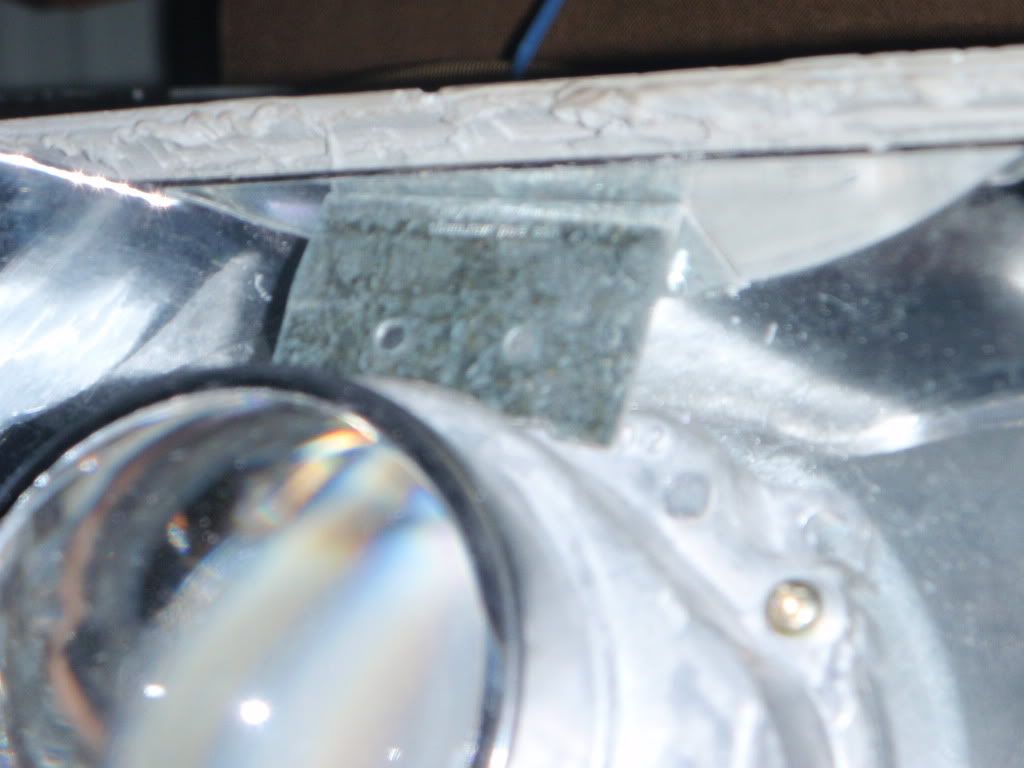
yeah, I took that barcode sticker off, hahahaha
OK, here we are, mounted and aimed at the right spot (pretty close anyway...)
I then flipped them over and applied some 5 minute epoxy along about a 3" strip on the top of the back side where the projector/housing met to make it more solid but still easily removable with a small bit of grinding if needed later. also helps to verify the beam is still where it's supposed to be BEFORE gluing it all in place...
I then popped them back in the oven minus the bulbs and baked 'em again for 7 minutes at 250' F and re-installed the retaining clips. Good idea to use spring clamps here also... If you need to add more sealant, butyl rubber is what goes in there, couldn't find any so I just made sure it was all as even as I could get it and then sealed the outside with some silicone.
Also sealed the entire back of the housings where there were any holes/ space including the screw heads/rivets from the mounting hardware.
used some more construction bracket/brace and made an 'L' shape piece and secured it with rivets at the top of the housing. the bracket doesn't actually attach but rather just secures the projector.
yeah, I took that barcode sticker off, hahahaha
OK, here we are, mounted and aimed at the right spot (pretty close anyway...)
I then flipped them over and applied some 5 minute epoxy along about a 3" strip on the top of the back side where the projector/housing met to make it more solid but still easily removable with a small bit of grinding if needed later. also helps to verify the beam is still where it's supposed to be BEFORE gluing it all in place...
I then popped them back in the oven minus the bulbs and baked 'em again for 7 minutes at 250' F and re-installed the retaining clips. Good idea to use spring clamps here also... If you need to add more sealant, butyl rubber is what goes in there, couldn't find any so I just made sure it was all as even as I could get it and then sealed the outside with some silicone.
Also sealed the entire back of the housings where there were any holes/ space including the screw heads/rivets from the mounting hardware.
Mar 21, 2011 | 12:58 PM
#6
Thread Starter
Registered User
iTrader: (1)
Joined: Sep 2009
Posts: 1,286
Likes: 3
From: Western Washington
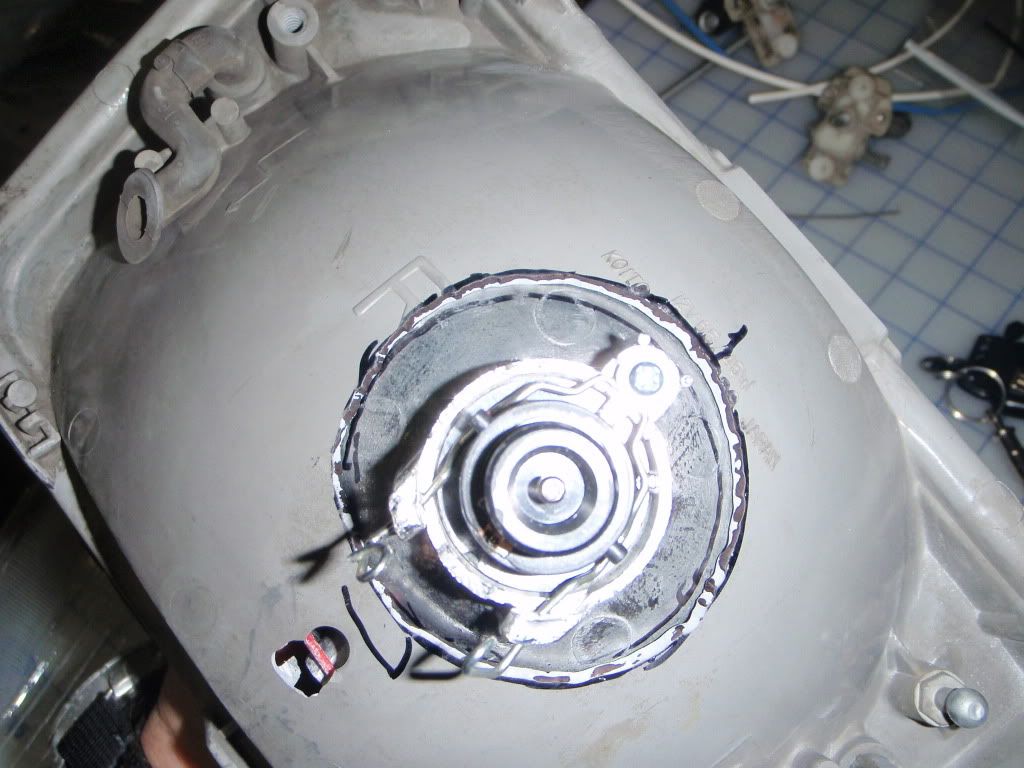
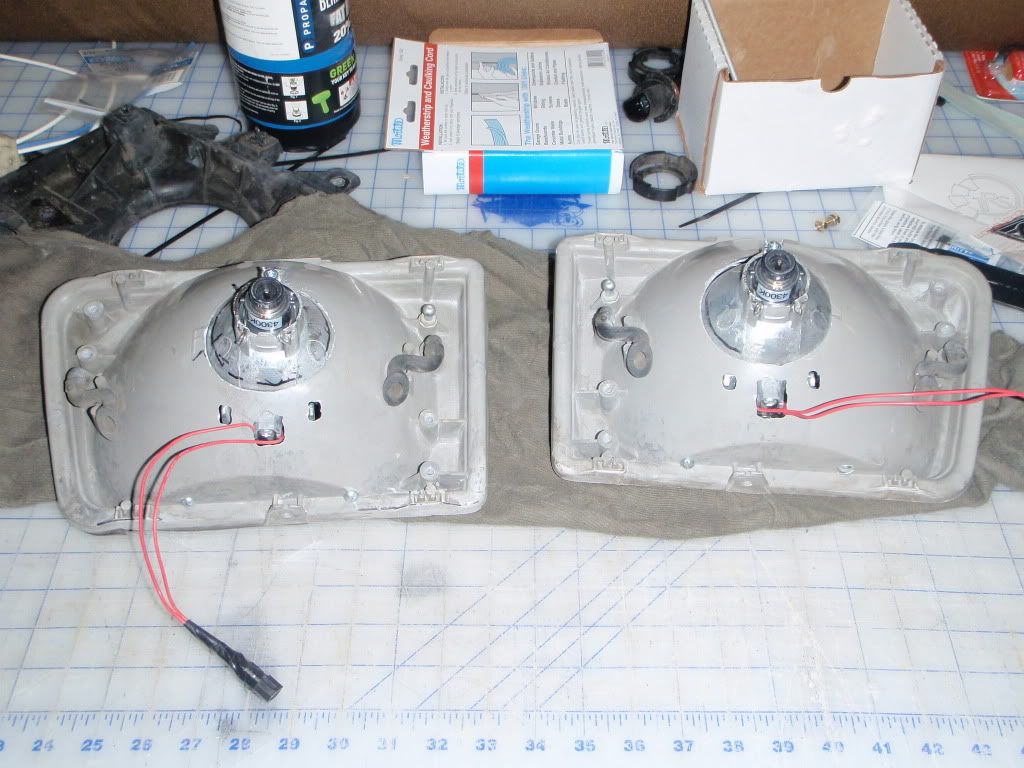
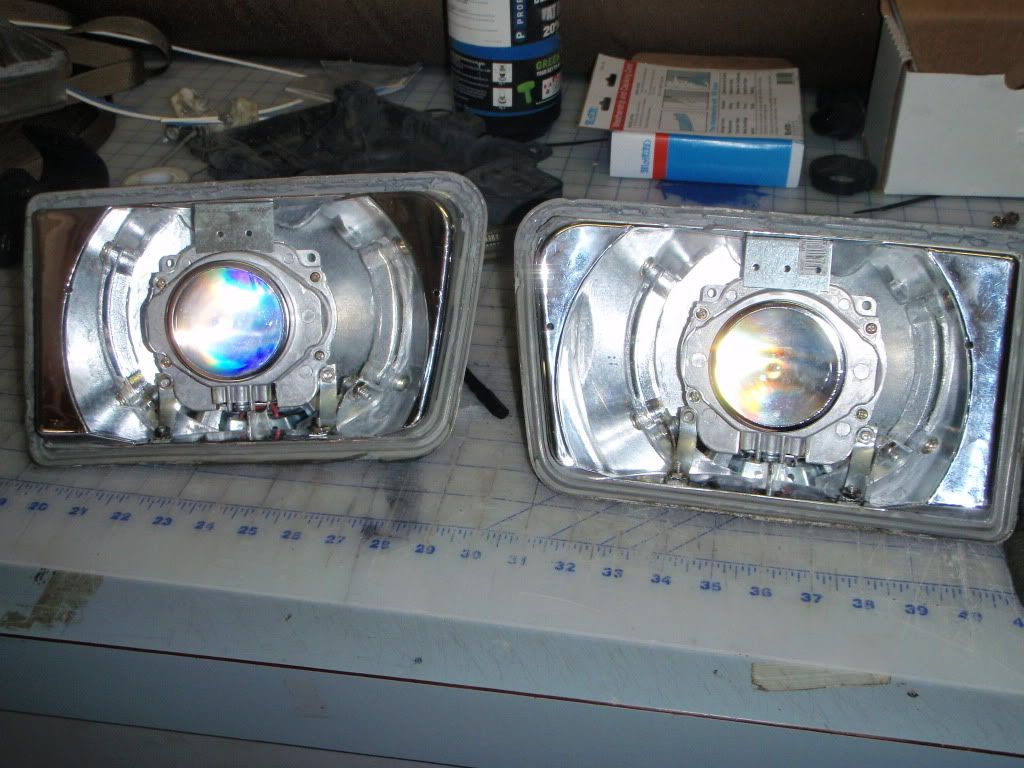
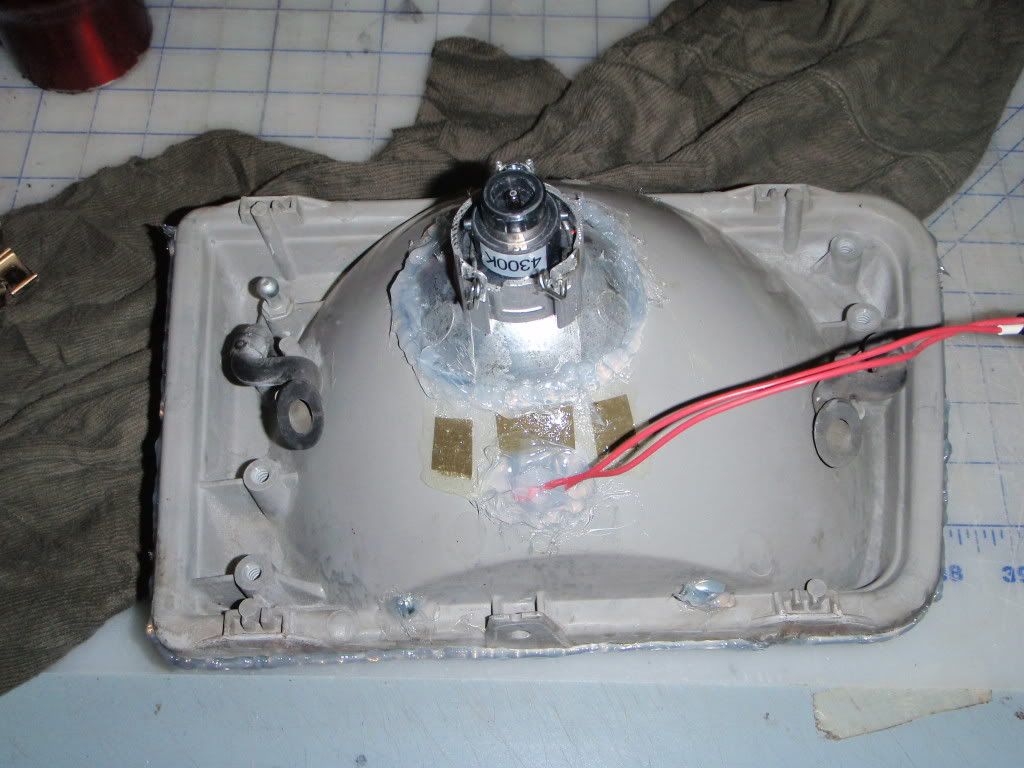
a pic of the top of the housing with the rivets holding the upper brackets;
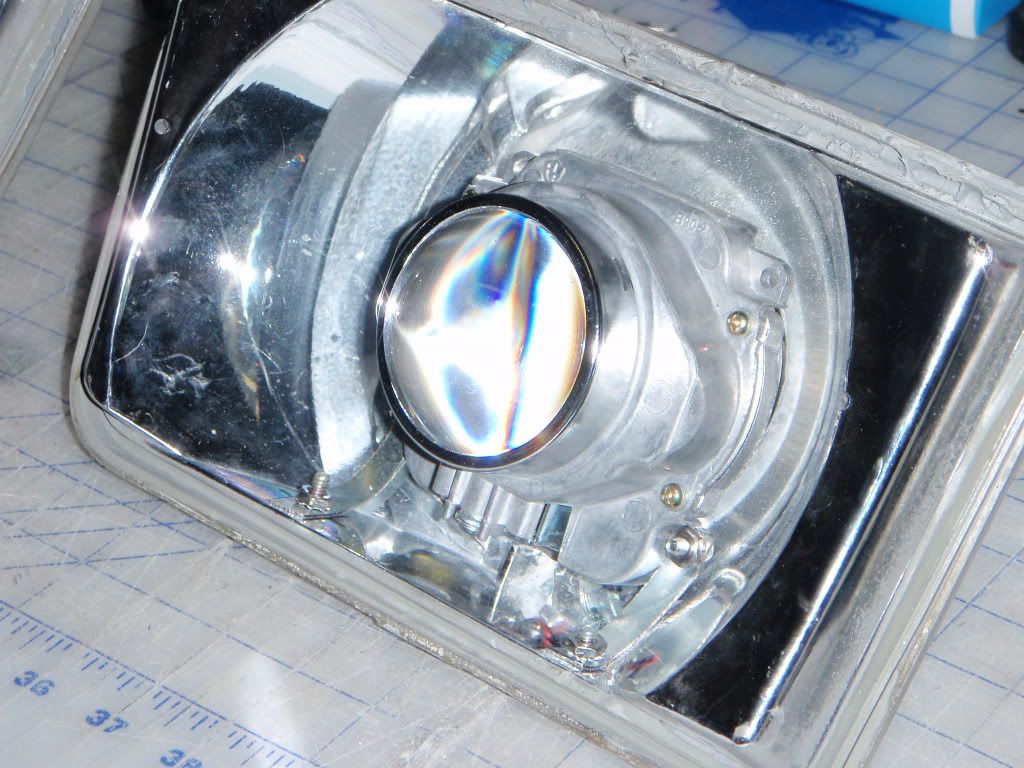
a shot with the lense baked back on:
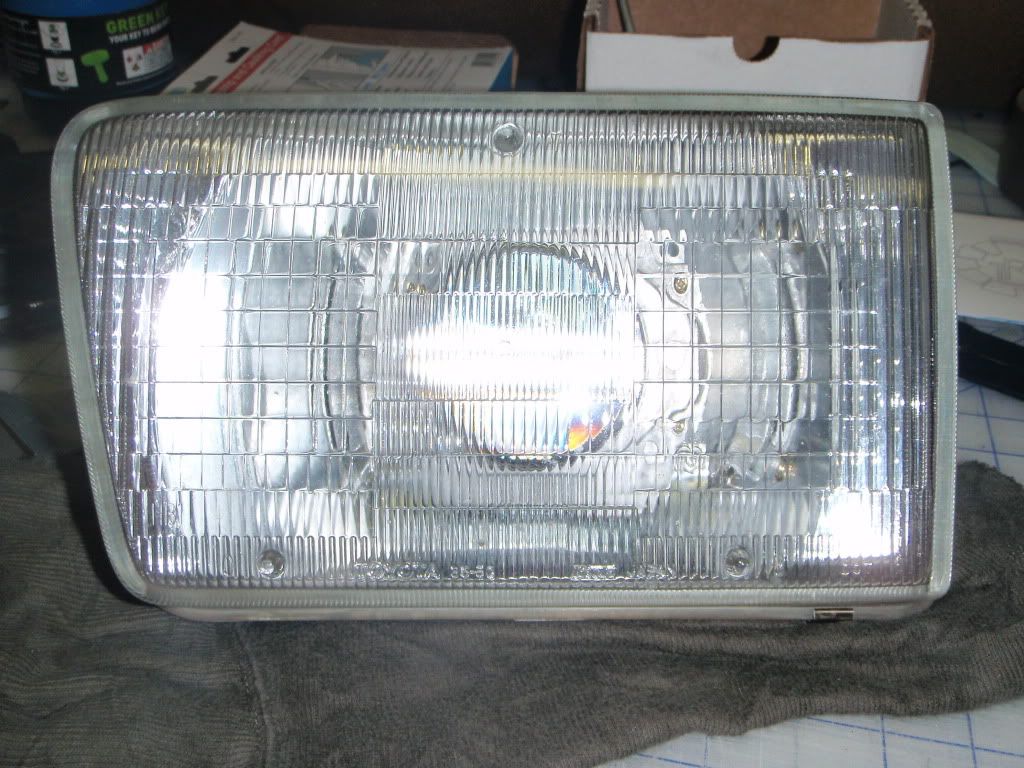
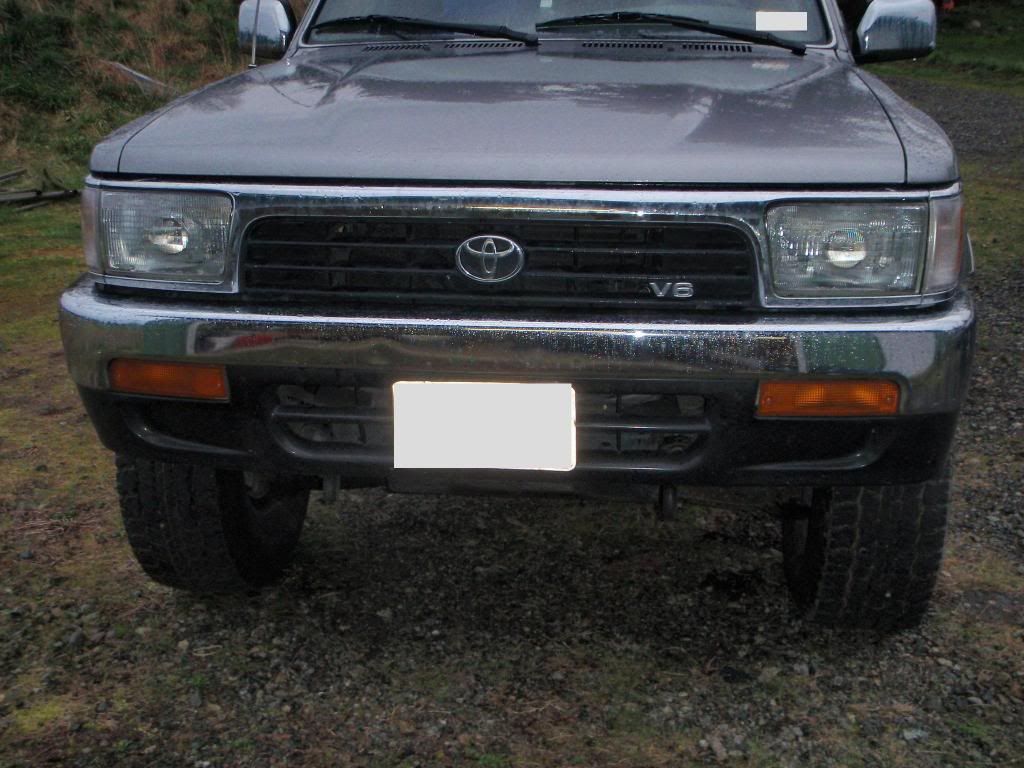
I considered painting the inside reflector bowl black but didn't bother and it doesn't look half bad. If I had clear housing it would look not so great but this works perfect for me.
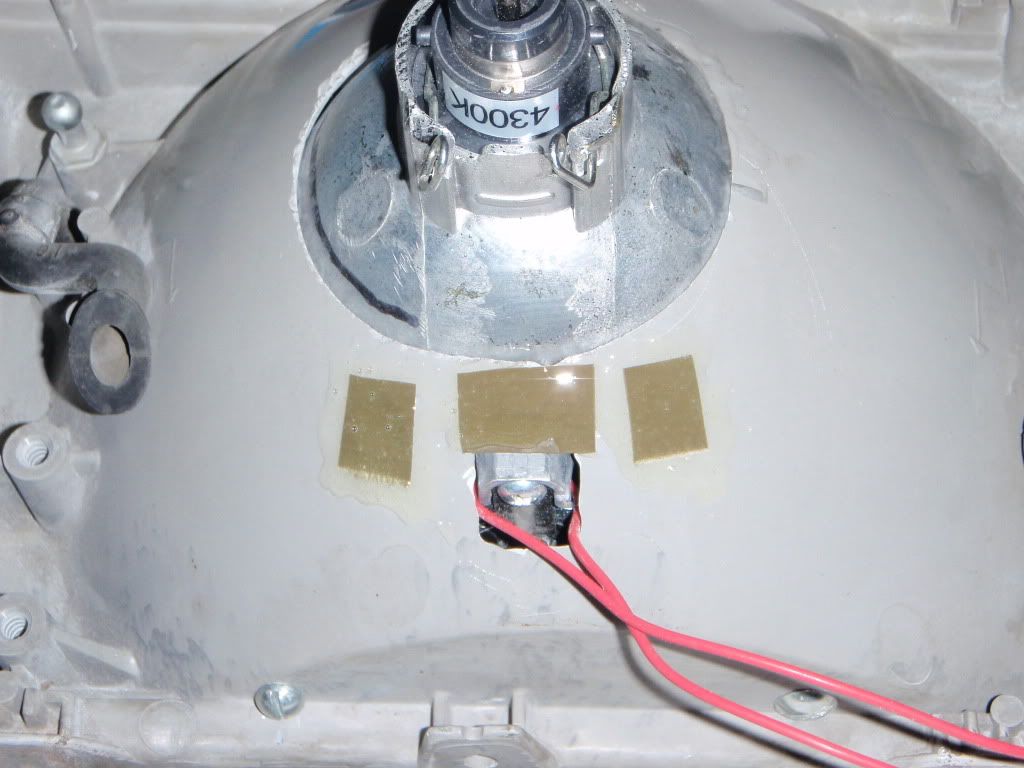
put the mounting/adjustment hardware back on the housing, running the solenoid wires out the center:
another shot:
now time to start wiring the vehicle....
a shot with the lense baked back on:
I considered painting the inside reflector bowl black but didn't bother and it doesn't look half bad. If I had clear housing it would look not so great but this works perfect for me.
put the mounting/adjustment hardware back on the housing, running the solenoid wires out the center:
another shot:
now time to start wiring the vehicle....
Mar 21, 2011 | 01:25 PM
#7
Thread Starter
Registered User
iTrader: (1)
Joined: Sep 2009
Posts: 1,286
Likes: 3
From: Western Washington
also, a side note, if you lose your aim/marks or forget altogether, you can still get close by using the housing; most headlight housings have the 'center' alignment marked on it, on these it has some oval dots on the top and bottom, bisect them and aim the projector right down the middle. just a thought....
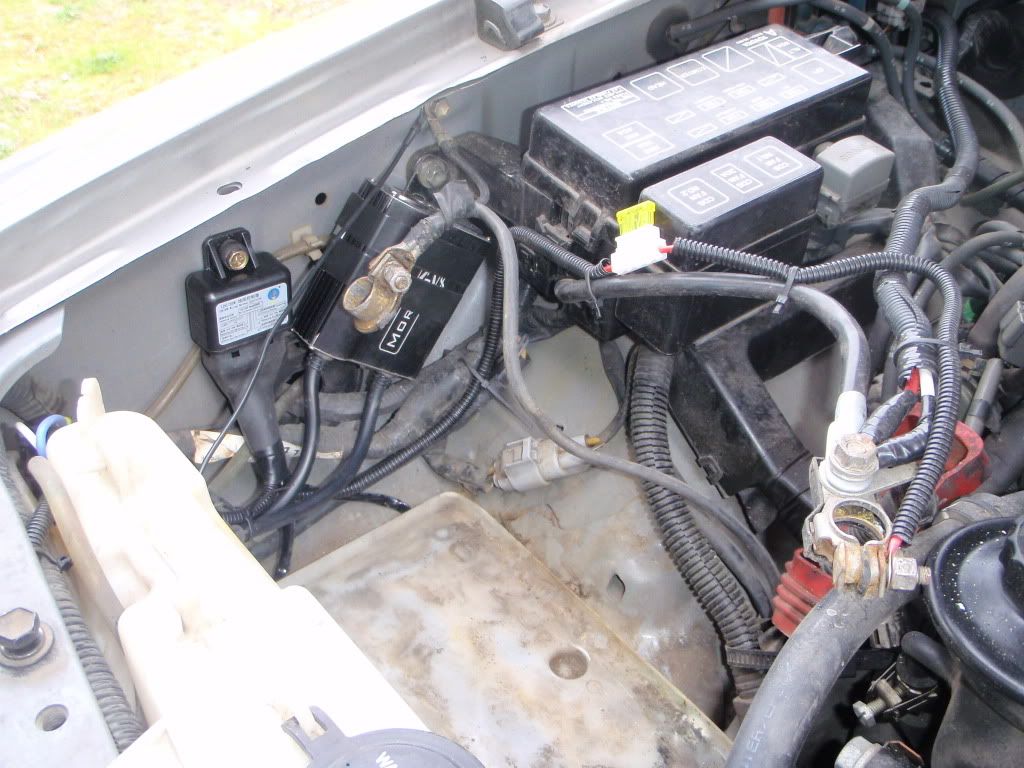
OK, so wiring was by far the easiest part of this project thanks to TRS's awesome harness; completely idiot proof, trust me. The ballasts and relays come with mounting bolts and what'dya know, they were exactly the same size/pitch as some threaded holes I found inside my engine bay!! huge step forward there.... I mounted the ballasts on the side, pass side next to the battery (on the fuse box bolt) along with the relays, then the driver side in the same exact spot next to my intake/filter.
Passenger side:
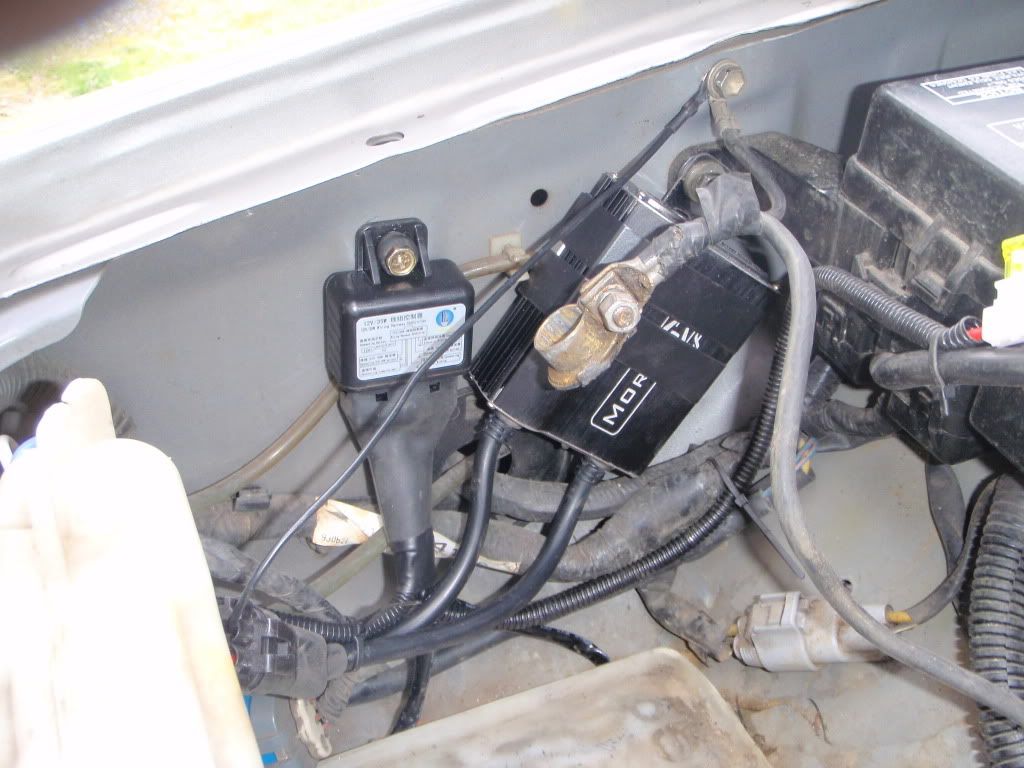
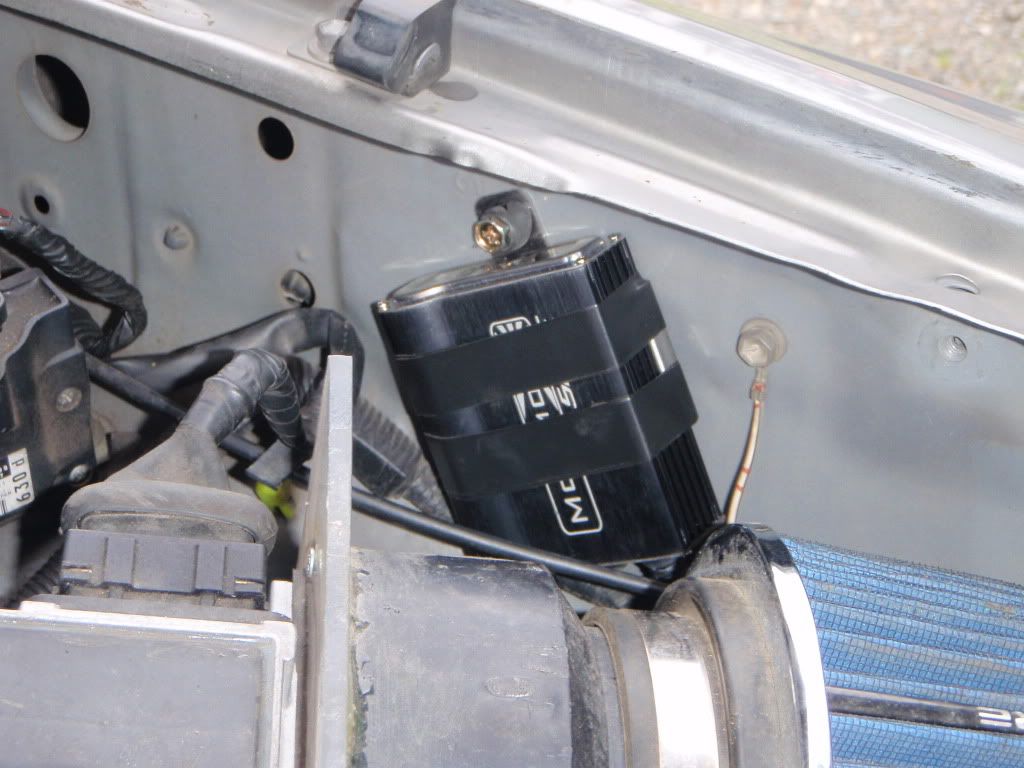
and driver side ballast:
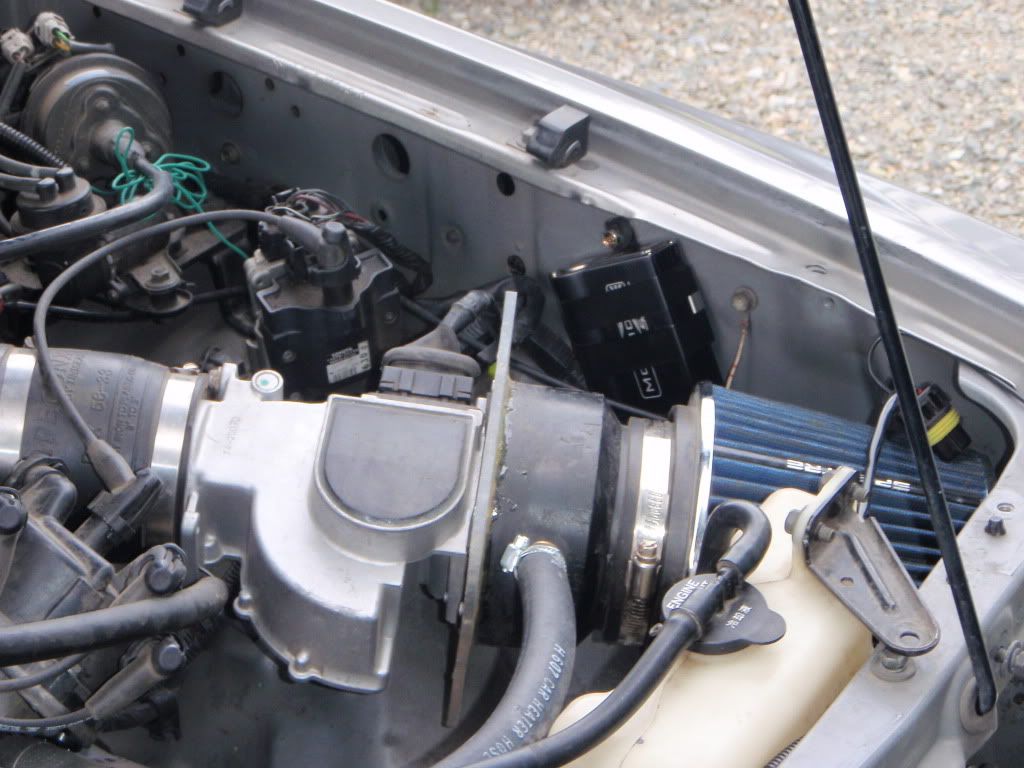
a bit closer:
here's the bolts that came with the kit, I used some fuel line hose to make a washer, also used a tiny bit of loctite to keep the bolts from loosening. I used two wraps of electrical tape on the ballasts to help secure/protect them
Anyway, ran the crossover wire to the driver side (I put the main harness near the battery on the pass side) under the existing wire loom in front of the radiator, secured it with zipties. Again, this kit is idiot proof, took all of like 10 minutes to install! I used the passenger side OE plug (9004 connector) to run the harness/relays btw.... The driver side plug I filled with white lithium grease to protect from corrosion while I decide what to do with it....
Everything plugged in and buttoned up, I put the battery back in and fired her up! Worked great from the start, no wiring issues at all minus the hi-beam indicator does not light up now, haven't checked yet but pretty sure it's because there's no juice at the driver side plug, only the passenger side. Not an issue though for now....
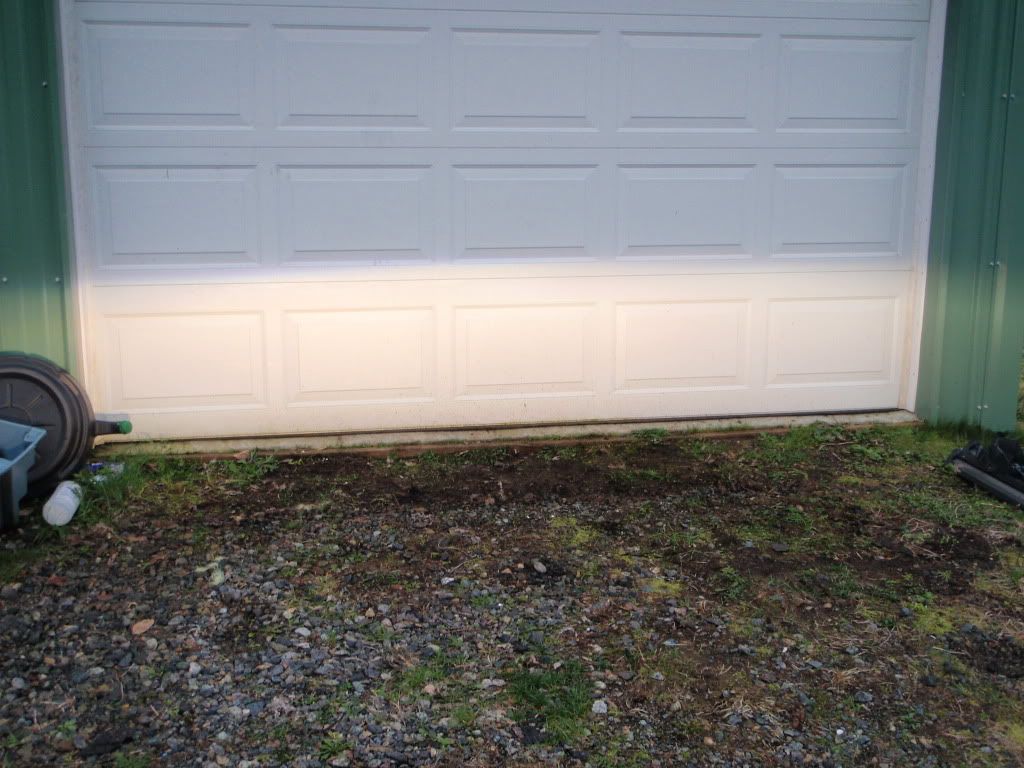
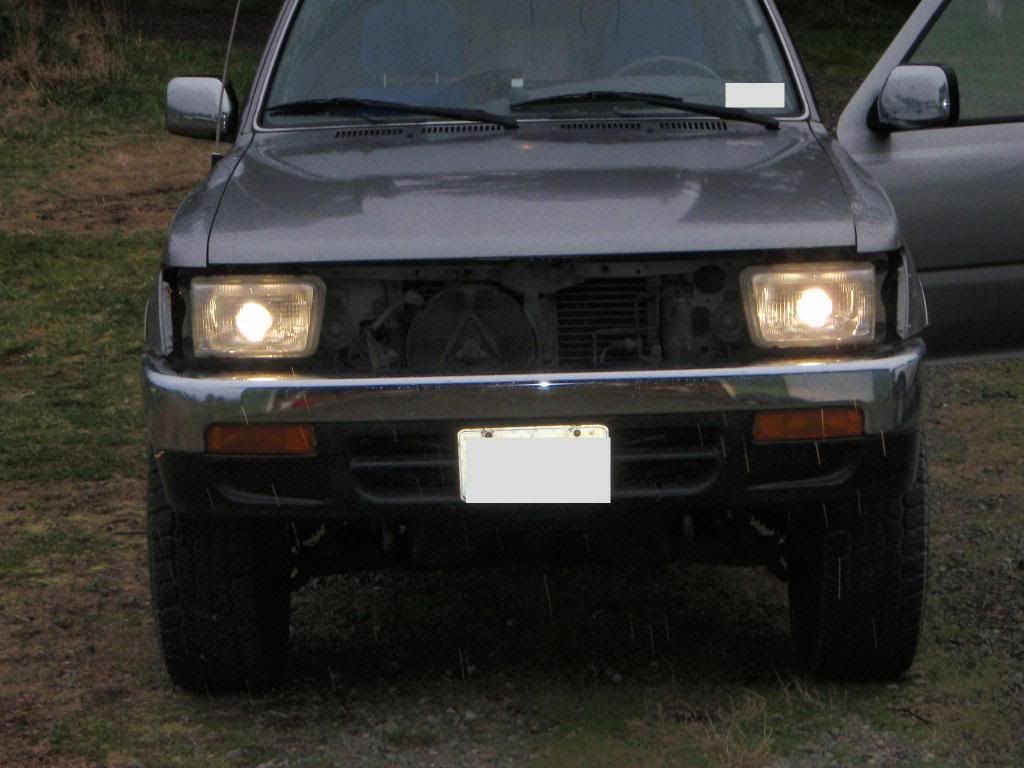
Anyway, did some rough aiming at the garage door, and was pleasantly surprised at how good the cutoff remained and how close the aim was in general; I was expecting the patterned glass lense to distort these much more then they do. Both solenoids firing, you can hear them click from Hi to Lo beam if the window is open... also, start up intitially takes a couple seconds but they go full bright pretty quick.
low beams
looking from just above the cutoff:
and right in the beam:
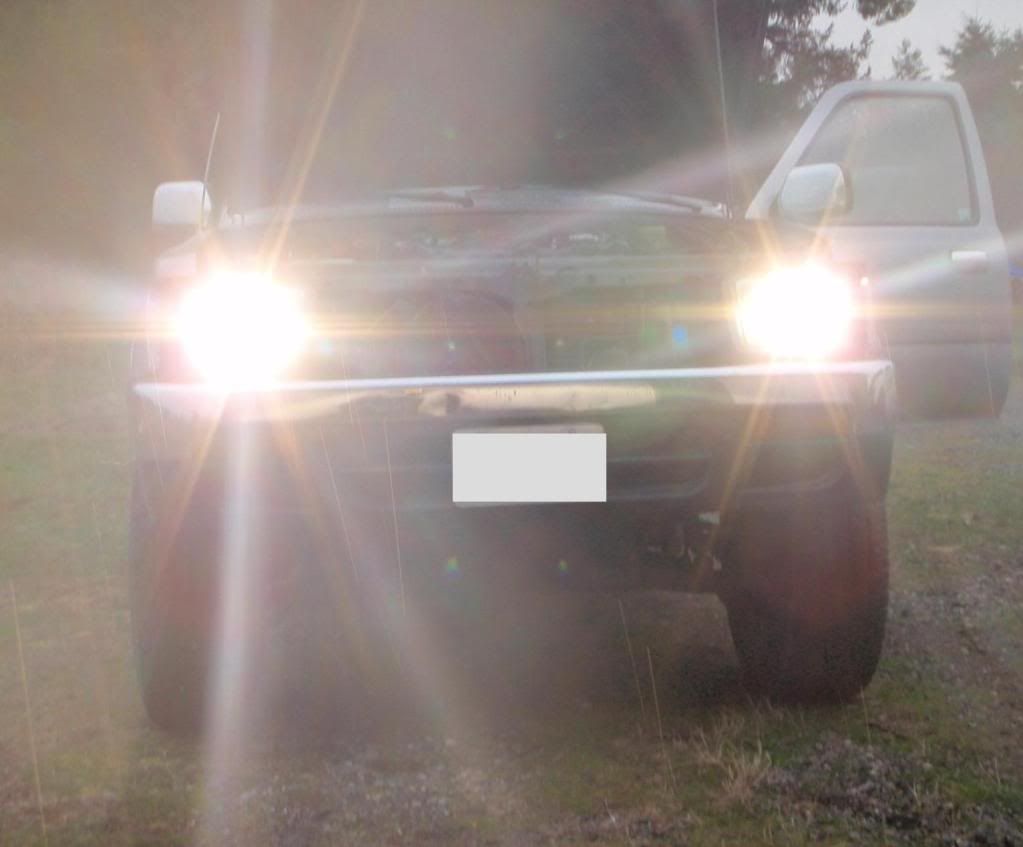
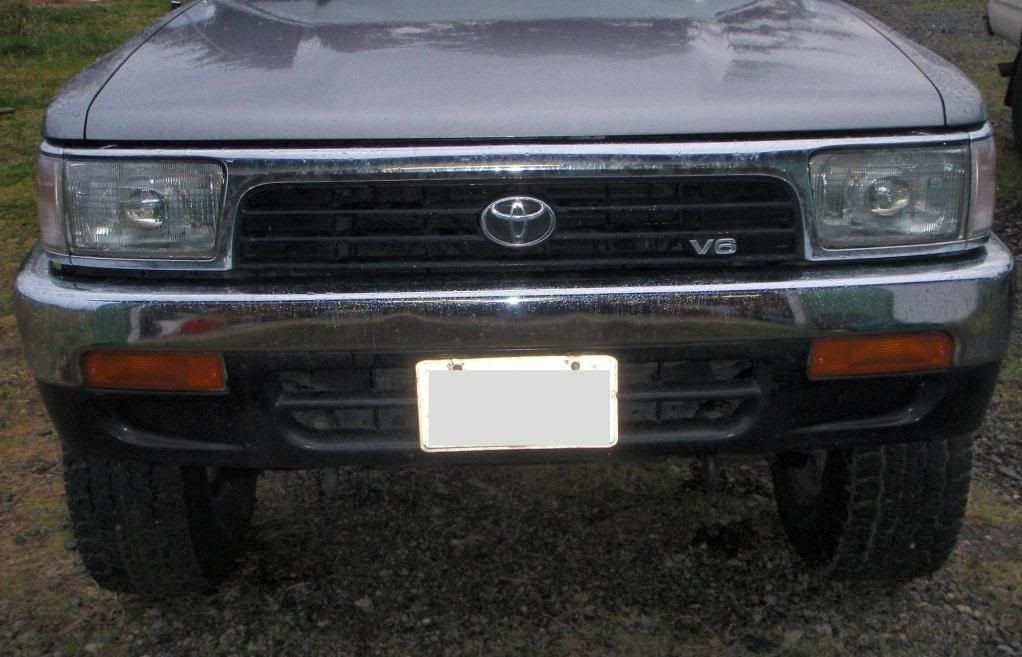
and a shot of the finish look, not too bad I don't think:
Took some night photos after a short test drive but didn't turn out all that great. The lights are GREAAAAT!! they're aimed just a tad low right now but pretty dang close I must say. I passed about 25 cars at full dark and nobody flashed me, I can see the sides of the road clear as daylight for about 75 meters deep out to almost 90' each way as I drive. Very impressed, very clear white light but not too white; it was raining when I did the test drive (and no streetlights where I live) and crystal clear daylight in front of me!!
Overall, very satisfied with this project so far, I probably forgot one or two things in this writeup but will add any other info I can to this.
The only somewhat difficult part of this is deciding how much housing to cut and how to mount it, other than that, this retrofit is very simple with TRS's kit. My next one will be much smoother for sure!
Fire away with any comments/questions, and anyone interested in doing this that hasn't yet, make sure to spend some time on HID planet forums...
and as always, thanks YT!!!!
OK, so wiring was by far the easiest part of this project thanks to TRS's awesome harness; completely idiot proof, trust me. The ballasts and relays come with mounting bolts and what'dya know, they were exactly the same size/pitch as some threaded holes I found inside my engine bay!! huge step forward there.... I mounted the ballasts on the side, pass side next to the battery (on the fuse box bolt) along with the relays, then the driver side in the same exact spot next to my intake/filter.
Passenger side:
and driver side ballast:
a bit closer:
here's the bolts that came with the kit, I used some fuel line hose to make a washer, also used a tiny bit of loctite to keep the bolts from loosening. I used two wraps of electrical tape on the ballasts to help secure/protect them
Anyway, ran the crossover wire to the driver side (I put the main harness near the battery on the pass side) under the existing wire loom in front of the radiator, secured it with zipties. Again, this kit is idiot proof, took all of like 10 minutes to install! I used the passenger side OE plug (9004 connector) to run the harness/relays btw.... The driver side plug I filled with white lithium grease to protect from corrosion while I decide what to do with it....
Everything plugged in and buttoned up, I put the battery back in and fired her up! Worked great from the start, no wiring issues at all minus the hi-beam indicator does not light up now, haven't checked yet but pretty sure it's because there's no juice at the driver side plug, only the passenger side. Not an issue though for now....
Anyway, did some rough aiming at the garage door, and was pleasantly surprised at how good the cutoff remained and how close the aim was in general; I was expecting the patterned glass lense to distort these much more then they do. Both solenoids firing, you can hear them click from Hi to Lo beam if the window is open... also, start up intitially takes a couple seconds but they go full bright pretty quick.
low beams
looking from just above the cutoff:
and right in the beam:
and a shot of the finish look, not too bad I don't think:
Took some night photos after a short test drive but didn't turn out all that great. The lights are GREAAAAT!! they're aimed just a tad low right now but pretty dang close I must say. I passed about 25 cars at full dark and nobody flashed me, I can see the sides of the road clear as daylight for about 75 meters deep out to almost 90' each way as I drive. Very impressed, very clear white light but not too white; it was raining when I did the test drive (and no streetlights where I live) and crystal clear daylight in front of me!!
Overall, very satisfied with this project so far, I probably forgot one or two things in this writeup but will add any other info I can to this.
The only somewhat difficult part of this is deciding how much housing to cut and how to mount it, other than that, this retrofit is very simple with TRS's kit. My next one will be much smoother for sure!
Fire away with any comments/questions, and anyone interested in doing this that hasn't yet, make sure to spend some time on HID planet forums...
and as always, thanks YT!!!!
Trending Topics
Mar 21, 2011 | 01:36 PM
#8
Thread Starter
Registered User
iTrader: (1)
Joined: Sep 2009
Posts: 1,286
Likes: 3
From: Western Washington
mmmm, money, almost forgot...
HID kit: $290, Slicone/epoxy, less than $10... maybe a couple dollars in screws, tape and zipties, I would ring in the grand total at around $325 at the most....
I did not purchase the shrouds btw, one was room (they would probably fit fine) but two was extra dollars, they're basically for looks.... the kit with shrouds is $315 FYI.
Mar 21, 2011 | 01:40 PM
#10
Thread Starter
Registered User
iTrader: (1)
Joined: Sep 2009
Posts: 1,286
Likes: 3
From: Western Washington
yes but that's a bad idea, stock reflectors will not work well with HID bulbs, the light will be scattered all over and blind other drivers...
gotta use projectors or just stay with halogens
gotta use projectors or just stay with halogens
Mar 21, 2011 | 01:52 PM
#11
Mar 21, 2011 | 02:24 PM
#12
Registered User
Joined: Mar 2010
Posts: 706
Likes: 2
From: charlotte nc and beaufort sc
Nice writeup. I've been thinking about getting a set of projector lenses for mine, with the hella housings the washout isn't too bad. but I do feel bad for the people in front of me.
Mar 21, 2011 | 03:14 PM
#13
Registered User
Joined: Dec 2010
Posts: 1,295
Likes: 1
From: tacoma wa
the hid kit and the h4 bulb set up im running does not have a bad wash out and the cut off is good too. i got a set of housings off ebay they where clear housings and the bulbs where 6000k and looks good... link to the ones i did the link for the h4 housings in my link dont work but here are the ones i got.
https://www.yotatech.com/forums/f116...d-hids-227953/
http://cgi.ebay.com/ebaymotors/86-91...Q5fAccessories
https://www.yotatech.com/forums/f116...d-hids-227953/
http://cgi.ebay.com/ebaymotors/86-91...Q5fAccessories
Mar 21, 2011 | 04:34 PM
#14
Registered User
Joined: Jun 2007
Posts: 442
Likes: 1
From: Salt Lake City, UT
Nice job man! Prices have definitely come down since I first did my retro 3 years ago... You'll also notice a big difference once you get those housings with clear lenses. I'm actually quite surprised that you have that good of a cutoff without clear headlight lenses. Anyway, way to do it the right way!
Mar 21, 2011 | 05:52 PM
#15
Thread Starter
Registered User
iTrader: (1)
Joined: Sep 2009
Posts: 1,286
Likes: 3
From: Western Washington
Nice job man! Prices have definitely come down since I first did my retro 3 years ago... You'll also notice a big difference once you get those housings with clear lenses. I'm actually quite surprised that you have that good of a cutoff without clear headlight lenses. Anyway, way to do it the right way!
The only clear lenses I found so far were on eBay autopal, can't remember how much they ran; not very much though. I figured it would be a good idea to start here and then I will be able to do a much more professional look/build with some different housings now that I got the gist of it...
my cutoff right now is better than I thought, the line only has about an inch or two of fuzz at 25'... if you guys had witnessed my OEM bulbs firsthand you would have died laughing at how ridiculously weak they were (or died in a head on collision with me at night.... hahaha)
one more thing I want to add about TRS is that once you make an initial purchase like this, shipping is FREE dollars from now on!!! pretty impressive there, never seen that one.... they will get more of my $$$ here before too long when I save enough to do my 2000 taco....
If anyone has any links to some good clear housings for the 2nd gen runners post 'em up!
Thanks fellas...
Mar 21, 2011 | 05:58 PM
#16
Thread Starter
Registered User
iTrader: (1)
Joined: Sep 2009
Posts: 1,286
Likes: 3
From: Western Washington
oh, and one thing to mention on this write-up is the clearance of the bulbs or housings in the engine bay, was pretty sure I would have to relocate the battery back a bit and my intake would have to be rebuilt/shortened/moved but with as far forward as I mounted the projectors, I actually had a tiny bit more room, plenty to fit without moving anything.
I also plan on switching the wiring harness around when I do my 3.4 swap and securing everything a little bit tidier but pretty decent enough for the time being...
I also plan on switching the wiring harness around when I do my 3.4 swap and securing everything a little bit tidier but pretty decent enough for the time being...
Mar 23, 2011 | 03:09 PM
#17

Registered User
Joined: Dec 2006
Posts: 912
Likes: 9
From: Hudson Valley, NY
You should find someone with a vacuum table to make you new clear outer plastic/acrylic lenses, then just make a black shroud/coverplate for the projector. The output will be even sharper as there would be no fluting like on the stock lens.
Glad you did the right thing with a proper retrofit. It came out well, and I'm sure the output is stunning.
:high five:
Glad you did the right thing with a proper retrofit. It came out well, and I'm sure the output is stunning.
:high five:
Mar 24, 2011 | 08:26 AM
#18
Thread Starter
Registered User
iTrader: (1)
Joined: Sep 2009
Posts: 1,286
Likes: 3
From: Western Washington
that actually sounds like it might be cheaper than trying to find some 'aftermarket' clear headlight lenses and housings; will have to find someone local who wants to do it.....
here's a good forum for anyone interested in this stuff: http://www.tk560.com/phpBB2/viewforum.php?f=1
beware though, it looks like a bunch of weirdo gamers/ LARPERs on there making plastic 'armor' for some dungeons and dragons crap.... hahaha....
anyway, thanks again Shaeff for the wise advice on doing a proper retrofit! I would strongly recommend others take heed as well... Light output even with the OEM lenses is amazing and I'm not blinding other drivers at all, well worth the time and $$$
Mar 24, 2011 | 12:30 PM
#19
Registered User
Joined: Jun 2007
Posts: 442
Likes: 1
From: Salt Lake City, UT
It's really interesting... I have NEVER heard anyone that has done a proper retrofit say it wasn't worth it, they always are very satisfied with the results.
However, with the people who just drop in a cheap HID kit it's a very different story, both from them and everyone else they are blinding!!!
However, with the people who just drop in a cheap HID kit it's a very different story, both from them and everyone else they are blinding!!!
Mar 24, 2011 | 01:19 PM
#20
Registered User
Joined: Dec 2006
Posts: 912
Likes: 9
From: Hudson Valley, NY
that actually sounds like it might be cheaper than trying to find some 'aftermarket' clear headlight lenses and housings; will have to find someone local who wants to do it.....
here's a good forum for anyone interested in this stuff: http://www.tk560.com/phpBB2/viewforum.php?f=1
beware though, it looks like a bunch of weirdo gamers/ LARPERs on there making plastic 'armor' for some dungeons and dragons crap.... hahaha....
anyway, thanks again Shaeff for the wise advice on doing a proper retrofit! I would strongly recommend others take heed as well... Light output even with the OEM lenses is amazing and I'm not blinding other drivers at all, well worth the time and $$$
here's a good forum for anyone interested in this stuff: http://www.tk560.com/phpBB2/viewforum.php?f=1
beware though, it looks like a bunch of weirdo gamers/ LARPERs on there making plastic 'armor' for some dungeons and dragons crap.... hahaha....
anyway, thanks again Shaeff for the wise advice on doing a proper retrofit! I would strongly recommend others take heed as well... Light output even with the OEM lenses is amazing and I'm not blinding other drivers at all, well worth the time and $$$
Then have them vacuum form you an outer lens to protect the entire assembly like stock. You'll be the coolest kid on the block. If you're already the coolest kid on the block, then I'm sure every new parent will name their first born child after you.

Edit: here's a decent video I found quick of a vacuum table working: http://www.youtube.com/watch?v=t2uGPe0aZgU
Last edited by shaeff; Mar 24, 2011 at 01:20 PM.


