
Fusable Link Replacement
 Jan 24, 2011 | 01:39 PM
#1


Fusable Link Replacement
This is one of those "hardly ever happens to these trucks" thread. If you have it happen and don't realize the issue, it can drive you buggers!
First indicaiton will be NO POWER to ANYTHING! You check the obvious and still nothing. I would then recommend checking your "fusable link". This will be identified in the FSM as the "Main" fuse. coming from the battery to your engine main fuse box. In this case it is nothing more then a specialty wire designed to save your truck from a short circuit which can very likely result in an engine fire.

Here is a step by step replacement of your "Main" or fusible link.
 NOTE:
NOTE:
Disclaimer: As with all repairs and modifications, this write up is for educational purposes only. Any use or application of this procedure is done so at the risk of the installer/owner. The author and YotaTech are not responsible for any repairs or modifications done to any vehicle using these or any other related procedures contained in this write up. Descriptions and photographs are the sole property and copyright of the author and may not be copied or distributed without written consent. Links to this article may be allowed but are protected by all US and foreign copyrights. Use of specific products is not an endosrsement of these products or company by the author or Yotatech. Any photographs or images of such items or products remain the copyrighted property of the copyright holder.
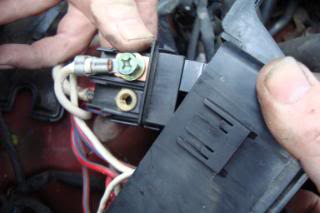
This is the fusible link

I can not stress this point enough, you MUST use the designed fusible link for your 4runner. If you use other then designed fusible link, you can start a fire. These are not just pieces of insulated wire, they are specifically designed to MELT at a predetermined current loading. They are also covered in a special type of insulation designed to work with these wires. They help to contain the melting wire without igniting from the heat generated from the melting of this designed wire. If you use normal wiring of the same gauge (which is smaller the the connecting wire on either end of the fusible link) an overload will cause the wire to melt but at a temperature higher then the fusible link which can result in damage to the components of our trucks as well as the high probability of an engine fire. DO NOT cut corners on this wire. It is the same thing as replacing one of the normal fuses in our fuse panels with a higher rated fuse, you will fry something and in this case is could very well be your truck!
First item to do is to remove the battery.
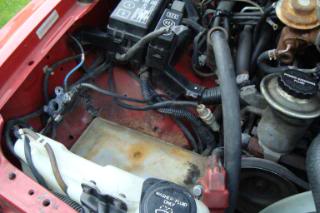
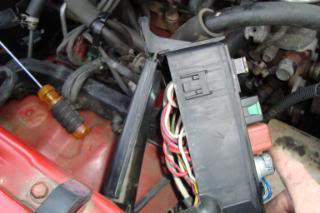
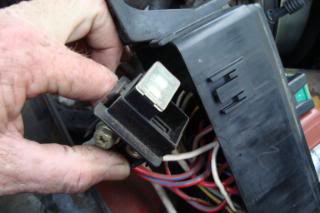
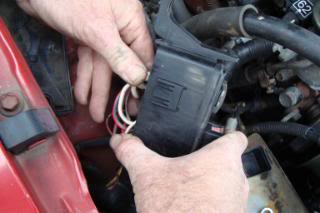
If you have not previously done so, remove the fuse panel cover. Then remove two 10 mm screws securing the fuse panel to the right fender well.
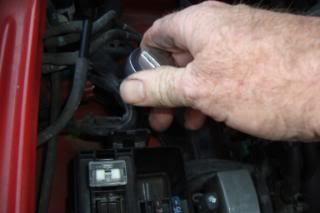
Pull the fuse panel free of the fender. The forward mount also has a small locating tab so be gentle when you try to pull it free.
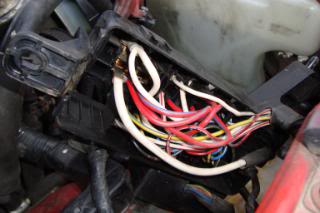
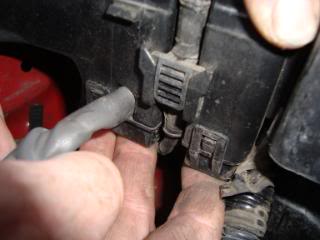
You will note two small clips on the front base of the fuse panel. These are the lockdowns for the lower cover. Using a small flat blade screw driver, gently lift these up while at the same time moving the bottom cover downward. Once both clips have been removed the bottom cover will be free from the front side. The rear of the cover is hooked over the bottom latch at the rear of the panel
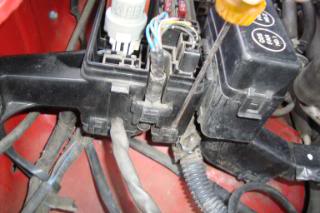
Swing the cover clear and unlatch it from the back location. This may be difficult due to the wire bundles near the rear of the fuse panel.
Remove the bottom cover exposing the underside of the panel.
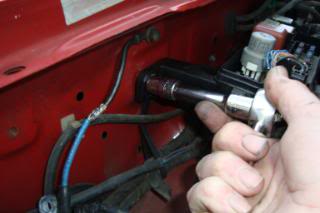
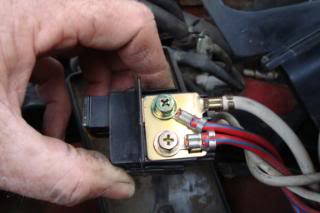
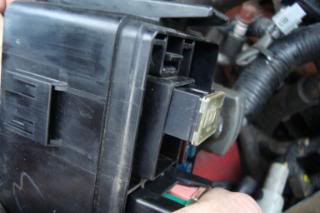
Removal of the fusible link wire from the 80 amp fuse requires removal of the fuse. This fuse is held in place by a locking block. near the rear of the mounting location you will note what looks like a clip.
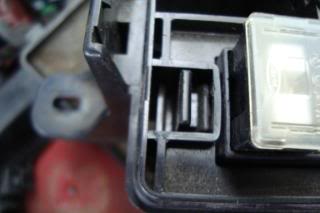
Push the clip towards the edge of the panel while pushing the 80 amp fuse downward.

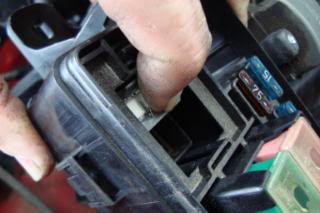
Fully pull the assembly from the bottom of the panel.
One side will have two small phillips/hex screws. This is the pair of screws that hold the fusible link to the fuse and are 8 mm. I recommend using either a wrench or socket to loosen and removal of those screws. If you are only replacing the fusible link then skip the next step as removal of the single 10 mm screw is not necessary.
If you are going to replace the 80 amp fuse then remove the single 10 mm screw on the opposite side in the same fashion.
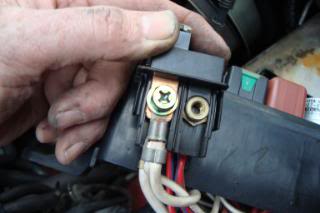
The fusible link is now removable from the system. Attach the new fusible link in the correct location on the fuse with the other two red wires using the 8mm screws removed previously.
If you replaced the 80 amp fuse, finish up the replacement by installing the other white wires on the opposite side and secure. Insert the assembly into the same location from the bottom of the fuse panel.
Continue pushing from the bottom until it is fully seated. You should hear a slight audible 'click'.

Position the fusible link wire under the panel towards the front cutout. Fit it into the cutout and then attach the bottom cover and snap into place. This will secure the fusible link in the panel.
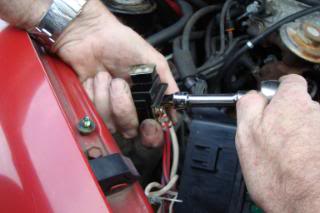
Remount the fuse panel with the two 10 mm screws, attach the loop end of the fusible link to the POSITIVE (+) terminal battery cable and secure it firmly to the connector.
Reinstall the battery ensuring that the NEGATIVE (-) terminal post is closest to the right side fender, the POSITIVE (+) terminal post is towards the engine. Connect the negative terminal first and hand tighten. Attach the positive terminal and hand tighten. You have now completed your fusible link installation.

First indicaiton will be NO POWER to ANYTHING! You check the obvious and still nothing. I would then recommend checking your "fusable link". This will be identified in the FSM as the "Main" fuse. coming from the battery to your engine main fuse box. In this case it is nothing more then a specialty wire designed to save your truck from a short circuit which can very likely result in an engine fire.
Here is a step by step replacement of your "Main" or fusible link.
NOTE: Disclaimer: As with all repairs and modifications, this write up is for educational purposes only. Any use or application of this procedure is done so at the risk of the installer/owner. The author and YotaTech are not responsible for any repairs or modifications done to any vehicle using these or any other related procedures contained in this write up. Descriptions and photographs are the sole property and copyright of the author and may not be copied or distributed without written consent. Links to this article may be allowed but are protected by all US and foreign copyrights. Use of specific products is not an endosrsement of these products or company by the author or Yotatech. Any photographs or images of such items or products remain the copyrighted property of the copyright holder.
This is the fusible link
I can not stress this point enough, you MUST use the designed fusible link for your 4runner. If you use other then designed fusible link, you can start a fire. These are not just pieces of insulated wire, they are specifically designed to MELT at a predetermined current loading. They are also covered in a special type of insulation designed to work with these wires. They help to contain the melting wire without igniting from the heat generated from the melting of this designed wire. If you use normal wiring of the same gauge (which is smaller the the connecting wire on either end of the fusible link) an overload will cause the wire to melt but at a temperature higher then the fusible link which can result in damage to the components of our trucks as well as the high probability of an engine fire. DO NOT cut corners on this wire. It is the same thing as replacing one of the normal fuses in our fuse panels with a higher rated fuse, you will fry something and in this case is could very well be your truck!First item to do is to remove the battery.
If you have not previously done so, remove the fuse panel cover. Then remove two 10 mm screws securing the fuse panel to the right fender well.
Pull the fuse panel free of the fender. The forward mount also has a small locating tab so be gentle when you try to pull it free.
You will note two small clips on the front base of the fuse panel. These are the lockdowns for the lower cover. Using a small flat blade screw driver, gently lift these up while at the same time moving the bottom cover downward. Once both clips have been removed the bottom cover will be free from the front side. The rear of the cover is hooked over the bottom latch at the rear of the panel
Swing the cover clear and unlatch it from the back location. This may be difficult due to the wire bundles near the rear of the fuse panel.
Remove the bottom cover exposing the underside of the panel.
Removal of the fusible link wire from the 80 amp fuse requires removal of the fuse. This fuse is held in place by a locking block. near the rear of the mounting location you will note what looks like a clip.
Push the clip towards the edge of the panel while pushing the 80 amp fuse downward.
Fully pull the assembly from the bottom of the panel.
One side will have two small phillips/hex screws. This is the pair of screws that hold the fusible link to the fuse and are 8 mm. I recommend using either a wrench or socket to loosen and removal of those screws. If you are only replacing the fusible link then skip the next step as removal of the single 10 mm screw is not necessary.
If you are going to replace the 80 amp fuse then remove the single 10 mm screw on the opposite side in the same fashion.
The fusible link is now removable from the system. Attach the new fusible link in the correct location on the fuse with the other two red wires using the 8mm screws removed previously.
If you replaced the 80 amp fuse, finish up the replacement by installing the other white wires on the opposite side and secure. Insert the assembly into the same location from the bottom of the fuse panel.
Continue pushing from the bottom until it is fully seated. You should hear a slight audible 'click'.
Position the fusible link wire under the panel towards the front cutout. Fit it into the cutout and then attach the bottom cover and snap into place. This will secure the fusible link in the panel.
Remount the fuse panel with the two 10 mm screws, attach the loop end of the fusible link to the POSITIVE (+) terminal battery cable and secure it firmly to the connector.
Reinstall the battery ensuring that the NEGATIVE (-) terminal post is closest to the right side fender, the POSITIVE (+) terminal post is towards the engine. Connect the negative terminal first and hand tighten. Attach the positive terminal and hand tighten. You have now completed your fusible link installation.

Thread
Thread Starter
Forum
Replies
Last Post
sandyota
84-85 Trucks & 4Runners
18
Feb 4, 2021 11:16 AM
TURBOrunnerNM
86-95 Trucks & 4Runners
4
Jul 22, 2015 11:01 AM


