

PSA: Don't skip the 1/2 mm adjustment step when doing your drum brakes!
 Feb 13, 2018 | 12:53 AM
#1

Thread Starter
Registered User
Joined: Oct 2017
Posts: 49
Likes: 0
PSA: Don't skip the 1/2 mm adjustment step when doing your drum brakes!
After replacing the front (OE Akebono AK PA533 EE) pads last week and flushing the DOT 3 brake fluid with 20 ounces of DOT4 ATE SuperBlue, this weekend, at about 180K miles, I replaced the rear brake shoes, which were the original Nisshinbo (NBK LN508 FF) shoes for this vehicle.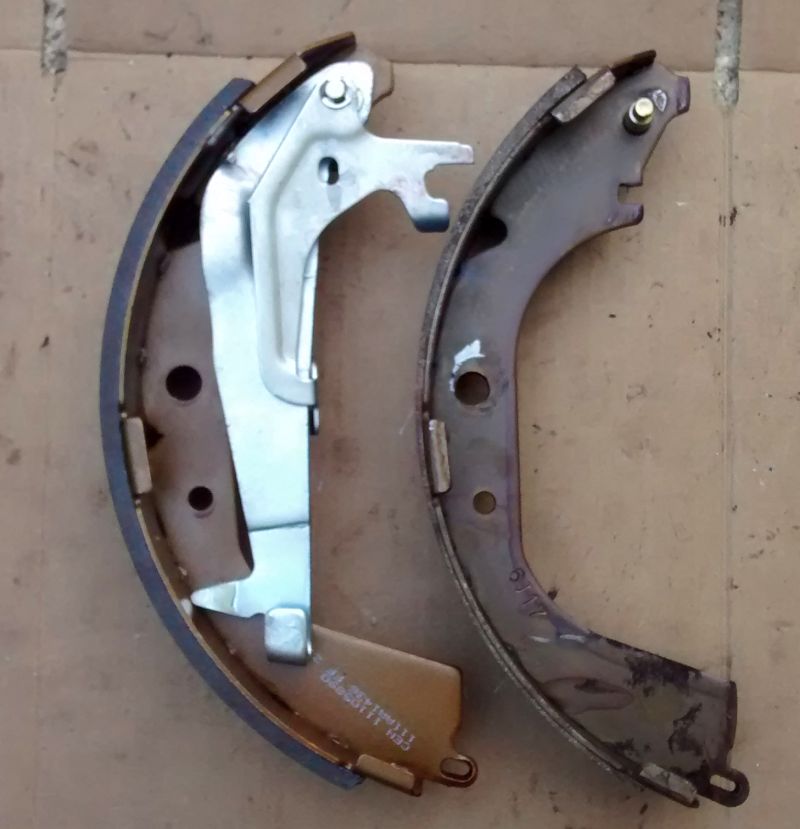
The unfortunate result was an odd jerking vibration starting at about 50 mph to 60 mph, where that vibration was independent of whether I was braking at the time, or what gear (or neutral) the transmission was in, and independent of load (uphill or downhill).
First attempt:
1. Replaced the original factory brake shoes and tested at 50 to 60 mph where noticeable vibration occurred that wasn't there before the brake job.
2. This noticeable vibration was unrelated to braking events or to coasting downhill in neutral and was unrelated to road conditions.
3. All four wheels were previously balanced and originally put back in their original position after the initial repair as were the drums.
4. All six lug nuts on each wheel were torqued to 84 foot pounds using the classic star pattern. A thin coating of old (partially congealed) never-seize was applied to the rear hub to drum mating surface.
5. The main deviation from factory protocol was the common practice of adjusting the star wheel to the shortest position so that the drums go on easily and then lifting up on the emergency brake handle about a hundred times to adjust the parking brake to 7 clicks.
6. After an 18-mile test-drive loop, start to finish, to get to the highway and then to the first exit and back where half was highway and half were local roads, both drums "sizzled" a wet fingertip, perhaps the driver side drum more so than the passenger side drum.
7. The brake shoes had a gray pasty appearance, almost of leaking oil but no oil leaked on the brake shoes.
Here is what fixed the problem:
A. I rotated the tires front to back but they were balanced before so I don't see how that mattered afterward.
B. I very carefully torqued the six nuts on each wheel to 84 foot pounds, in a star pattern, with plenty of banging on the wheel assembly to jostle the seating position, although they were previously torqued to 84 foot pounds so I don't see how that mattered afterward.
C. I visually inspected the u-joints, wiggling them by hand, but I did not feel more than about a half millimeter or so of movement, but I don't know how much they're supposed to move - but they didn't change anyway.
D. The drums were harder to get off then originally so I fashioned a tool to push the star-nut lock-plate back so that I could release brake tension in order to remove the drums and visually inspect the front and rear brakes, where no visual anomaly was seen, and wiped some of the never seize off, but it was a very thin layer anyway.
E. The only procedure I did very differently on this second attempt was that I explicitly followed the factory protocol for adjusting the brake shoes just prior to the drum replacement which was to mic the drum and mic the shoes and set the star adjustment to 1/2 mm (20 thousandths of an inch) smaller than the drum diameter.
F. I also left the parking brake adjustment loose at about 8 or 9 clicks instead of the 7 to 8 clicks (it still held the car on a hill but not as firm as did the first adjustment if the car was previously moving).
Here is the result:
Something in that second procedure above "solved" the vibration problem.
The job is done but I would like to learn more about changing brake shoes.
Do you have any idea what specifically had caused the vibration?
[I'm thinking it may have been the shoes were "floating" and "catching" at speed???]
- CENTRIC 111.05890 shoes + the included parts kit of two "C" clips, AMECA edge code 111AA 1436 FF 23N16 which means 111AA formula, 1436 factory, F cold and F hot friction, 23rd week of 2016, N type material (low copper)
- CENTRIC 105.04360 pads + the included P117.44034 complete hardware kit, AMECA edge code 15AA2256 FE 41A16 which means 15AA formula, 2256 factory, F cold and E hot friction, 41st week of 2016, A type material (high copper)
The unfortunate result was an odd jerking vibration starting at about 50 mph to 60 mph, where that vibration was independent of whether I was braking at the time, or what gear (or neutral) the transmission was in, and independent of load (uphill or downhill).
First attempt:
1. Replaced the original factory brake shoes and tested at 50 to 60 mph where noticeable vibration occurred that wasn't there before the brake job.
2. This noticeable vibration was unrelated to braking events or to coasting downhill in neutral and was unrelated to road conditions.
3. All four wheels were previously balanced and originally put back in their original position after the initial repair as were the drums.
4. All six lug nuts on each wheel were torqued to 84 foot pounds using the classic star pattern. A thin coating of old (partially congealed) never-seize was applied to the rear hub to drum mating surface.
5. The main deviation from factory protocol was the common practice of adjusting the star wheel to the shortest position so that the drums go on easily and then lifting up on the emergency brake handle about a hundred times to adjust the parking brake to 7 clicks.
6. After an 18-mile test-drive loop, start to finish, to get to the highway and then to the first exit and back where half was highway and half were local roads, both drums "sizzled" a wet fingertip, perhaps the driver side drum more so than the passenger side drum.
7. The brake shoes had a gray pasty appearance, almost of leaking oil but no oil leaked on the brake shoes.
Here is what fixed the problem:
A. I rotated the tires front to back but they were balanced before so I don't see how that mattered afterward.
B. I very carefully torqued the six nuts on each wheel to 84 foot pounds, in a star pattern, with plenty of banging on the wheel assembly to jostle the seating position, although they were previously torqued to 84 foot pounds so I don't see how that mattered afterward.
C. I visually inspected the u-joints, wiggling them by hand, but I did not feel more than about a half millimeter or so of movement, but I don't know how much they're supposed to move - but they didn't change anyway.
D. The drums were harder to get off then originally so I fashioned a tool to push the star-nut lock-plate back so that I could release brake tension in order to remove the drums and visually inspect the front and rear brakes, where no visual anomaly was seen, and wiped some of the never seize off, but it was a very thin layer anyway.
E. The only procedure I did very differently on this second attempt was that I explicitly followed the factory protocol for adjusting the brake shoes just prior to the drum replacement which was to mic the drum and mic the shoes and set the star adjustment to 1/2 mm (20 thousandths of an inch) smaller than the drum diameter.
F. I also left the parking brake adjustment loose at about 8 or 9 clicks instead of the 7 to 8 clicks (it still held the car on a hill but not as firm as did the first adjustment if the car was previously moving).
Here is the result:
Something in that second procedure above "solved" the vibration problem.
The job is done but I would like to learn more about changing brake shoes.
Do you have any idea what specifically had caused the vibration?
[I'm thinking it may have been the shoes were "floating" and "catching" at speed???]
Last edited by SodiumFlouride; Feb 16, 2018 at 01:29 PM.
Feb 13, 2018 | 07:03 AM
#2
Registered User


Joined: Apr 2016
Posts: 1,583
Likes: 291
From: Alaska
I believe you may have over adjusted the rear brakes the first time, it can be done using the parking brake method. I get my best results with a loose adjustment on the parking brake and manually adjusting the star wheel while rotating the drum back and for the until the brake has a noticeable drag then releasing the adjuster lever and backing the star wheel off about 1/2 to a full turn. then adjust the parking brake to 7 or 8 clicks or so without pulling super hard. (this is where the over adjusting can happen). I do this because I have never seen a spec for pulling the parking brake at XX pounds pull to 8 clicks, everyone has a different idea of how hard to pull. After feeling the vibration the best tell all test you could have done was to jack up the rear and try to rotate the tires by hand to see if the brakes were dragging. Another issue that could pop up is if your parking brake cable is not fully releasing and causing the rear brakes to drag after every time you use it. So if everything is fine and then you try the parking brake and have a drag afterward check your cables.
Feb 13, 2018 | 09:18 AM
#3
Thread Starter
Registered User
Joined: Oct 2017
Posts: 49
Likes: 0
Even so, I have to agree with you that I simply adjusted them wrong, but when I think about how the brakes work, I get confused since BOTH the parking brake lever and the turn screw do the SAME THING, don't they?
My confusion is if both do the same thing, then why wouldn't either method work?
I get my best results with a loose adjustment on the parking brake and manually adjusting the star wheel while rotating the drum back and for the until the brake has a noticeable drag then releasing the adjuster lever and backing the star wheel off about 1/2 to a full turn. then adjust the parking brake to 7 or 8 clicks or so without pulling super hard. (this is where the over adjusting can happen).
The problem, for me, is that I don't know what the right feel is.
So I had thought that leaving the star adjuster bolt in the shortest position, and adjusting the shoes to the drum only with the parking brake lever would give me a better feel.
Based on what you told me, that was the wrong approach to adjusting the brakes - where I believe you - but I just want to understand why it didn't work.
I now know the method I used doesn't work but I don't yet understand why it didn't work.
Why doesn't leaving the star adjuster set turned all the way inward so that the fat new shoes are all the way in, and then just adjusting with just the parking brake lever NOT work?
Feb 13, 2018 | 12:24 PM
#4
Registered User
iTrader: (1)
Joined: Apr 2009
Posts: 13,381
Likes: 100
From: I live in New Tripoli Pa out in the woods
I don`t have a inside or outside Micrometer that big
Can`t see spending the money on tools used a few times a month.
What did you pay for your Mics?? What brand??
Can`t see spending the money on tools used a few times a month.
What did you pay for your Mics?? What brand??
Feb 13, 2018 | 02:37 PM
#5
Registered User
Joined: Apr 2016
Posts: 1,583
Likes: 291
From: Alaska
first off your rear brakes may not adjust evenly if you use the parking brake, one might make a few more turns than the other, second one side or the other may not release completely due to a cable hanging up or a bellcrank frozen (on some models) it just isn't a reliable or effective method, you need to adjust the star wheel through the slot in the backing plate while the drum is in place until you can't turn the drum by hand, then back it off until you can. It'll take 1/10 the time of cycling the e-brake and it works.
Feb 13, 2018 | 10:48 PM
#6

Have to agree with Wyoming, damn that is a sexy bit of kit!
The ebrake adjustment specification is X clicks, sorry no number off hand but around 8 sounds right. This is all about taking the slack out of the cable. It doesn't have a ft/lb number because it's a limit, eg it doesn't matter how hard you pull it at that point it shouldn't go farther unless you are a "one ton gorilla" at which point you are stretching the cable.
The specification of the brake shoe to drum clearance (at rest) is in the manual. X to Y mm. This is what you set with the "star" wheel.
These are a self energized style drum, essentially this means once the leading edge touches the drum it forces the brake material against the hub regardless of any input, hence the specification of minimum clearance between pad and drum.
There is also a maximum spec. At which point the parking brake or foot brake become less effective.
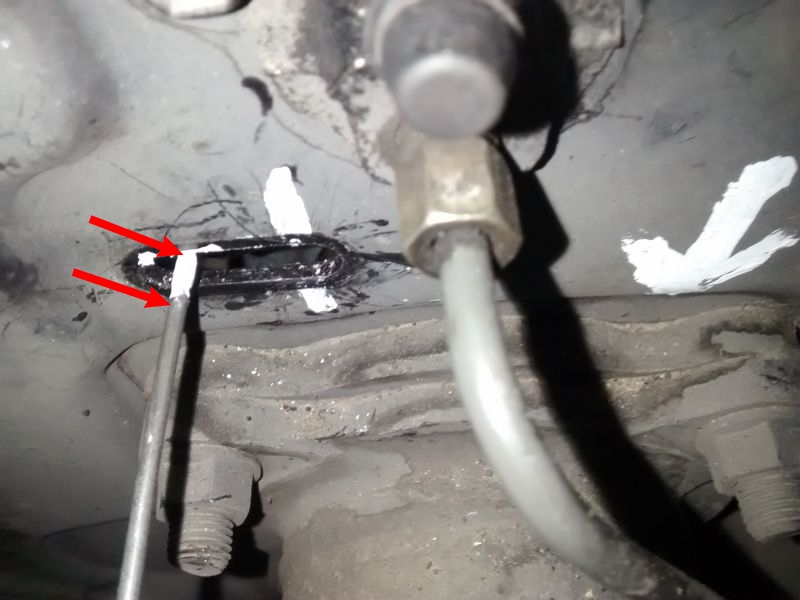
So the title of the thread is very accurate. Pull the inspection port open and follow the FSM. It is your friend!
... Bottom line. Pulled the inspection port open and make sure your have a gap, per the manual. Lube and manipulate the parking brake levers.
PS my bell crank was bent due to lift blocks and its a pita to straighten. Due to the blocks I can't rely on my parking brake and have to load the transmission pin. Bad juju.
The ebrake adjustment specification is X clicks, sorry no number off hand but around 8 sounds right. This is all about taking the slack out of the cable. It doesn't have a ft/lb number because it's a limit, eg it doesn't matter how hard you pull it at that point it shouldn't go farther unless you are a "one ton gorilla" at which point you are stretching the cable.
The specification of the brake shoe to drum clearance (at rest) is in the manual. X to Y mm. This is what you set with the "star" wheel.
These are a self energized style drum, essentially this means once the leading edge touches the drum it forces the brake material against the hub regardless of any input, hence the specification of minimum clearance between pad and drum.
There is also a maximum spec. At which point the parking brake or foot brake become less effective.
So the title of the thread is very accurate. Pull the inspection port open and follow the FSM. It is your friend!
... Bottom line. Pulled the inspection port open and make sure your have a gap, per the manual. Lube and manipulate the parking brake levers.
PS my bell crank was bent due to lift blocks and its a pita to straighten. Due to the blocks I can't rely on my parking brake and have to load the transmission pin. Bad juju.
Feb 14, 2018 | 04:44 PM
#7

Registered User
Joined: May 2011
Posts: 1,058
Likes: 18
From: Northern AZ
I believe you may have over adjusted the rear brakes the first time, it can be done using the parking brake method. I get my best results with a loose adjustment on the parking brake and manually adjusting the star wheel while rotating the drum back and for the until the brake has a noticeable drag then releasing the adjuster lever and backing the star wheel off about 1/2 to a full turn. then adjust the parking brake to 7 or 8 clicks or so without pulling super hard. (this is where the over adjusting can happen). I do this because I have never seen a spec for pulling the parking brake at XX pounds pull to 8 clicks, everyone has a different idea of how hard to pull. After feeling the vibration the best tell all test you could have done was to jack up the rear and try to rotate the tires by hand to see if the brakes were dragging. Another issue that could pop up is if your parking brake cable is not fully releasing and causing the rear brakes to drag after every time you use it. So if everything is fine and then you try the parking brake and have a drag afterward check your cables.

What AK describes is how it is done.
Trending Topics
Feb 15, 2018 | 02:36 AM
#8
Registered User
iTrader: (1)
Joined: Apr 2009
Posts: 13,381
Likes: 100
From: I live in New Tripoli Pa out in the woods
It must be nice the cheapest I could find outside and inside micrometers that size was over a $1000.00
Any more doing rear brakes bell cranks and brackets are removed cleaned or replaced New drums all new hardware .
If the adjusters don`t clean up to be free and smooth they are also replaced.
Drum on I adjust to they drum won`t move then back off.
A trick I learned I always close the adjuster all the way when installing the return spring makes it so much easier
Feb 16, 2018 | 01:44 PM
#9
Thread Starter
Registered User
Joined: Oct 2017
Posts: 49
Likes: 0
Simple primitive measuring tools are a basic component of my tool kit so I've had the full set of mics and calipers from one inch to at least a foot for years.
They never go out of style!
I don't think I use them that often, but, I do use them a few times a year, and not just on vehicles.
On cars, I always wonder when someone asks "when do you replace rotors", for example, where the answer is the same for drums, which is you measure them and if they fail the minimum specs, that's when.
I bought the mic and caliper set so long ago that I had to look at the brand so I pulled out one of the wooden boxes they came in to snap this picture for you.

It's from Nippon Sokutei, NSK Japan, but I don't remember what I paid for them since it was so long ago.
Personally, I think they have paid for themselves already anyway, so they're essentially free, like almost all tools are, when you consider that you can measure things like rotors and drums so that you don't have to throw them out if they're within spec, and, they allow you to save on labor costs, where just one brake job generally costs more in labor than all the tools required to do the job right.
They never go out of style!
I don't think I use them that often, but, I do use them a few times a year, and not just on vehicles.
On cars, I always wonder when someone asks "when do you replace rotors", for example, where the answer is the same for drums, which is you measure them and if they fail the minimum specs, that's when.
I bought the mic and caliper set so long ago that I had to look at the brand so I pulled out one of the wooden boxes they came in to snap this picture for you.
It's from Nippon Sokutei, NSK Japan, but I don't remember what I paid for them since it was so long ago.
Personally, I think they have paid for themselves already anyway, so they're essentially free, like almost all tools are, when you consider that you can measure things like rotors and drums so that you don't have to throw them out if they're within spec, and, they allow you to save on labor costs, where just one brake job generally costs more in labor than all the tools required to do the job right.
Last edited by SodiumFlouride; Feb 16, 2018 at 01:48 PM.
Feb 16, 2018 | 02:56 PM
#10
Thread Starter
Registered User
Joined: Oct 2017
Posts: 49
Likes: 0

Drum brakes aren't as simple when working in concert with the star adjuster and the parking brake cable as I had thought they were.
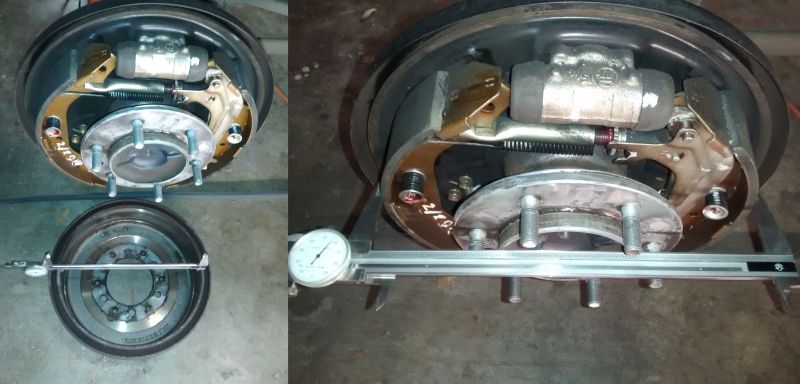
- With the drum off, measure the drum diameter and adjust the shoes to be 1/2 mm (20 thousandths of an inch) smaller.
- Putting the drum on and off repeatedly, adjust the shoes until the drum starts to drag slightly when putting it on
- With the drum on, adjust the star adjuster from the rear until the drums starts to drag, and then back it off a little bit
 Feb 16, 2018 | 06:07 PM
#11
Thread Starter
Registered User
Joined: Oct 2017
Posts: 49
Likes: 0
I'm still not sure why but I do know from the results that this was a big mistake.
That must happen if either the shoes are worn too much or the drum is worn too much, or both.
While I clean and lube, and while I have nothing against cleaning and lubing, the fact is that, after 20 years, the brakes were filled with dust and bone dry - and still working just fine - so I think cleaning & lubing is overrated.
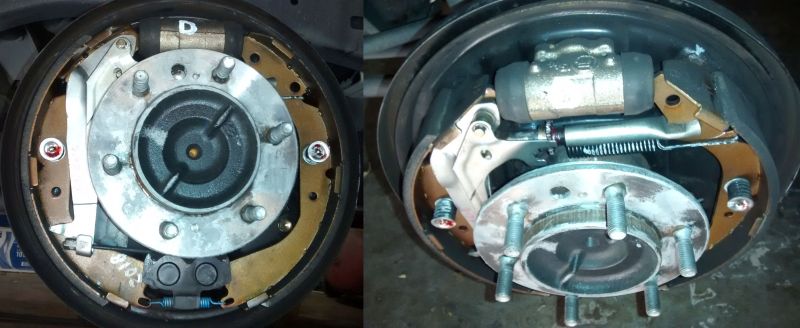
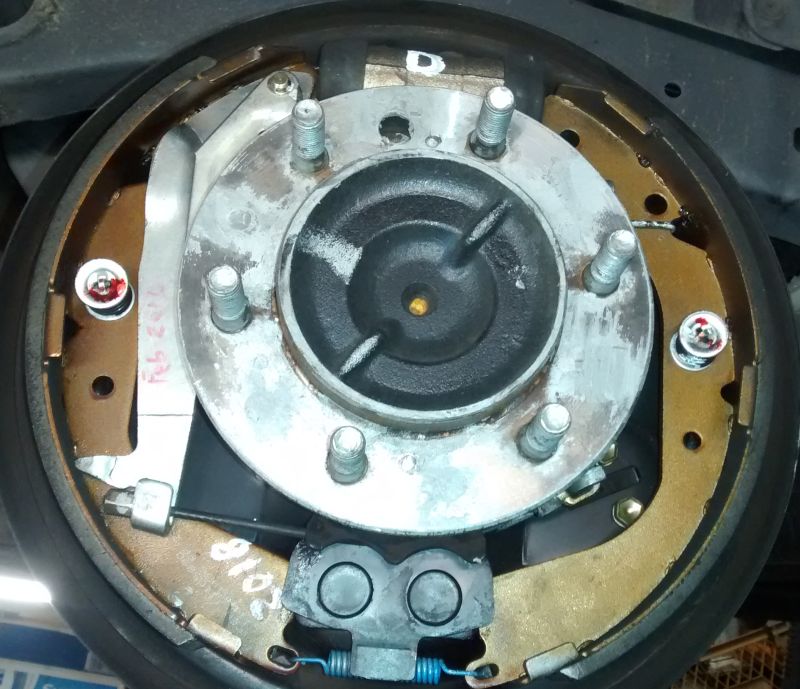
For the record, took apart all the parts and cleaned them with brake cleaner.

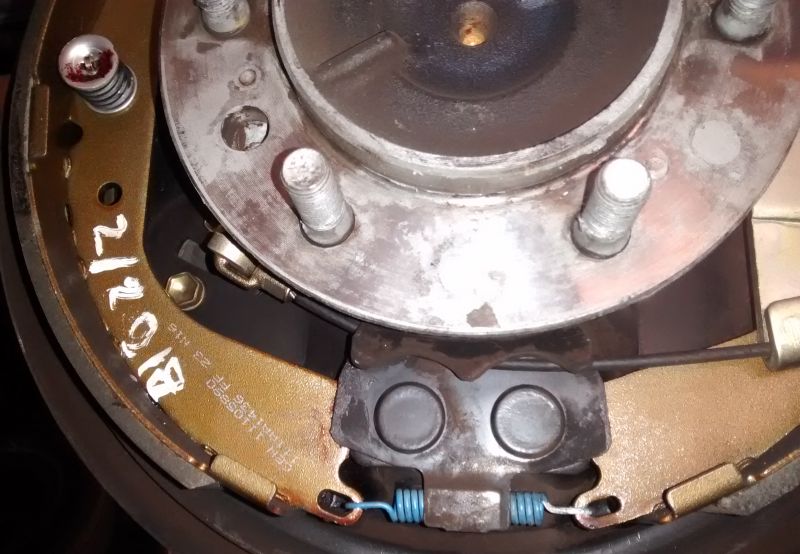
I lubed all the both ends of the slave cylinder posts:

And I lubed all 10 backing plate rub surfaces:

There are two surfaces to lube that are only seen from the 5 o'clock and 7 o'clock position.

And I lubed all pivoting and spinning surfaces.

Even so, I have zero faith that this cleaning and lubing accomplishes anything useful in the long run, since these brakes will be dirty and bone dry in just a short period of time.
 Feb 16, 2018 | 06:19 PM
#12
Thread Starter
Registered User
Joined: Oct 2017
Posts: 49
Likes: 0
In fact, in that first attempt, I didn't adjust the star nut at all, so, the ONLY adjustment was the parking brake.
Somehow, that caused the shoes to float, which caused them to catch at speed, which caused the car to "shudder".
Lesson learned.
There seem to be three methods of adjusting the initial position of the shoes.

1. With the drum off the vehicle, measure the drum and twist the star adjuster to 1/2 mm smaller diameter than the drum.
2. With the drum off, adjust the star nut until the drum just grabs, and then back it a click or two.
3. Put the drum on the vehicle and spin the axle and adjust the star nut until the drum just starts to grab & then back it off a click or two
The problem with the first method is you need calipers.
The problem with the second two methods is you need to know how the drum should feel.
The problem with the third method is that you won't realize how inconvenient adjusting that star nut is from inside the wheel well until you've done it yourself.
Feb 16, 2018 | 08:35 PM
#13
Registered User
Joined: Apr 2016
Posts: 1,583
Likes: 291
From: Alaska
I guess you just need practice then, quit over-thinking everything, your parking brake is adjusted with a cable length adjuster after your drums are properly adjusted. actuating the parking brake causes the adjuster lever to rise and fall turning the star wheel.
Feb 17, 2018 | 07:51 AM
#14

Nice thread with lots pictures! Glad you fixed it, but most of us simply do not have tools like yours.
My method is much more crude but has worked for years on many different makes and models is to: Put the drum on over the brake shoes halfway and wobble it. Adjust to reduce wobble and it still slips over without much effort. Then bolt the wheel up with the drum on. Now by hand click the adjuster and spin the wheel slowly by hand until it just touches and you can hear a slight contact and smidge of drag. Thats it, drive it like you stole it and adjust again in a week after the drums and shoes have become "friendly".
I find that if the brake pedal starts getting low, adjust again, you may find quite a bit of wear, but its just the circles of the shoes and drums coming together.
The parking brake, stays in its "home position" and never fails to hold the truck when pulled.
Feb 17, 2018 | 04:28 PM
#15
Thread Starter
Registered User
Joined: Oct 2017
Posts: 49
Likes: 0
I think I still have a lot to learn because every time I look, I find things that I forgot to think about when I first did the brake shoe replacement job, particularly in the ADJUSTMENT procedures.
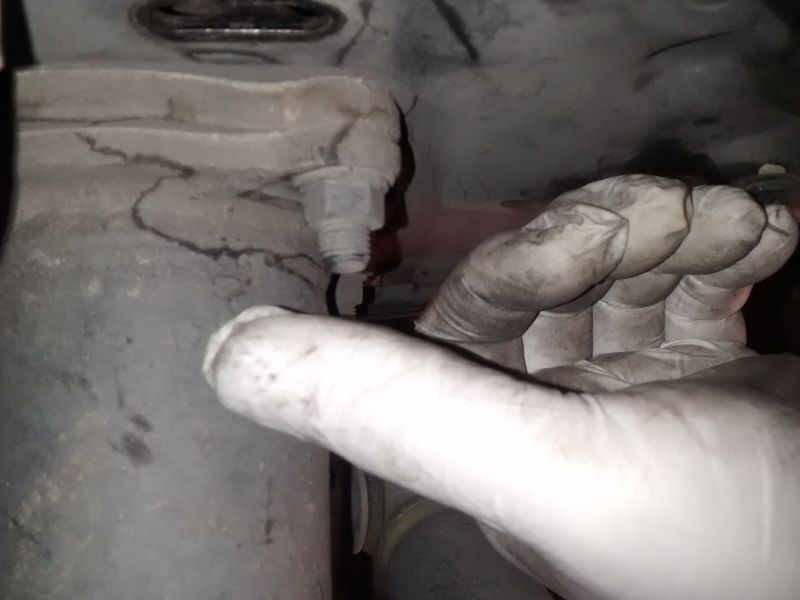
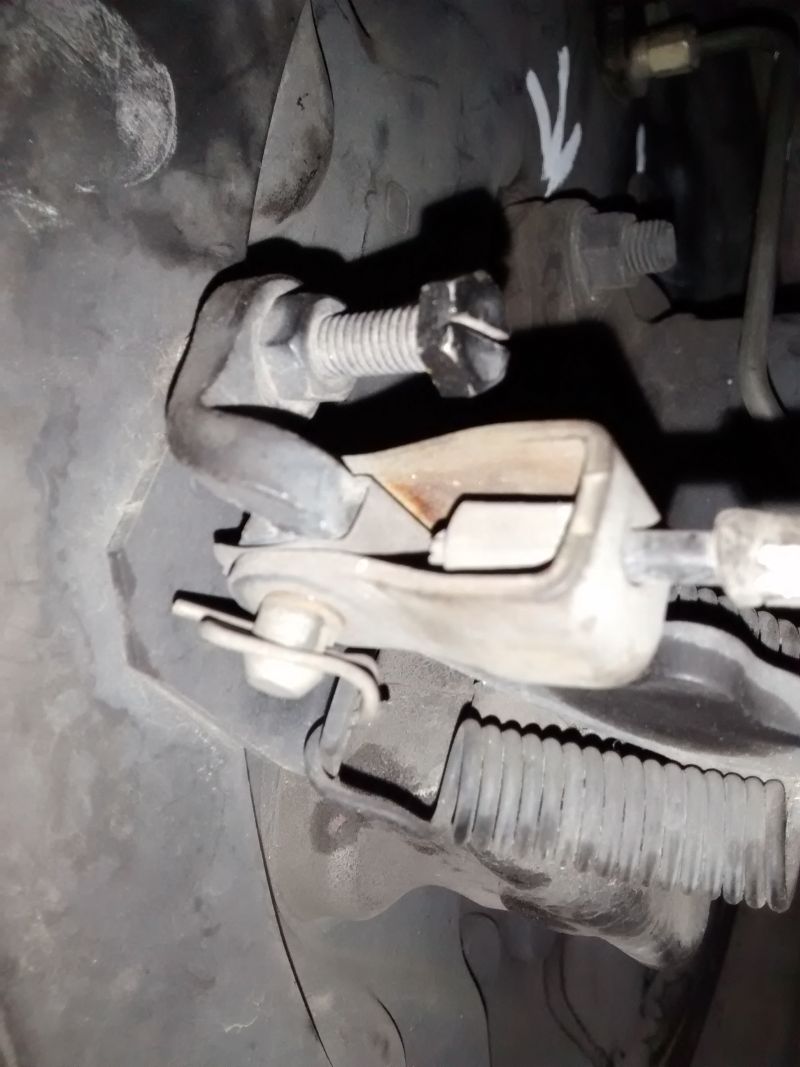
One question I still have is what to do about the bellcrank adjustment bolt (which I never touched - and still haven't touched).
Today I returned the wheels back to the original position that I had moved them from last week when I thought it might have been an imbalance (but I had meticulously static balanced them all myself, so I didn't think it was an unbalanced wheel).

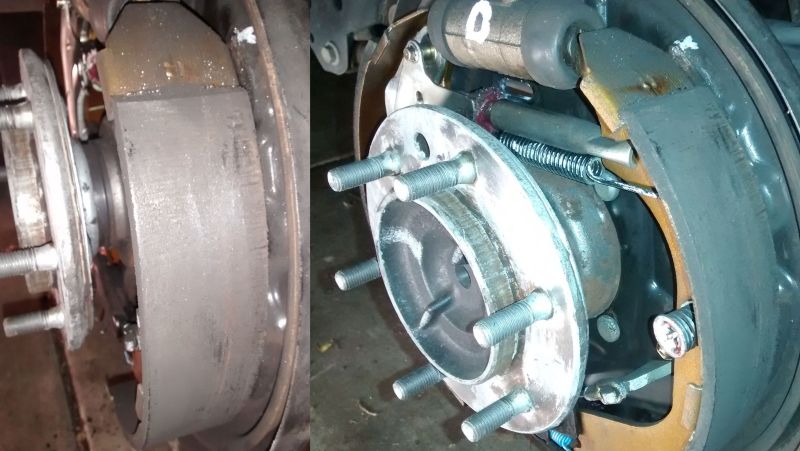
When the 4Runner was on all four jack stands, I noticed that the bellcrank adjustment bolt on the driver side was in the air.

Then I noticed the same with the passenger side bellcrank bolt not being even close to touching the backing plate.

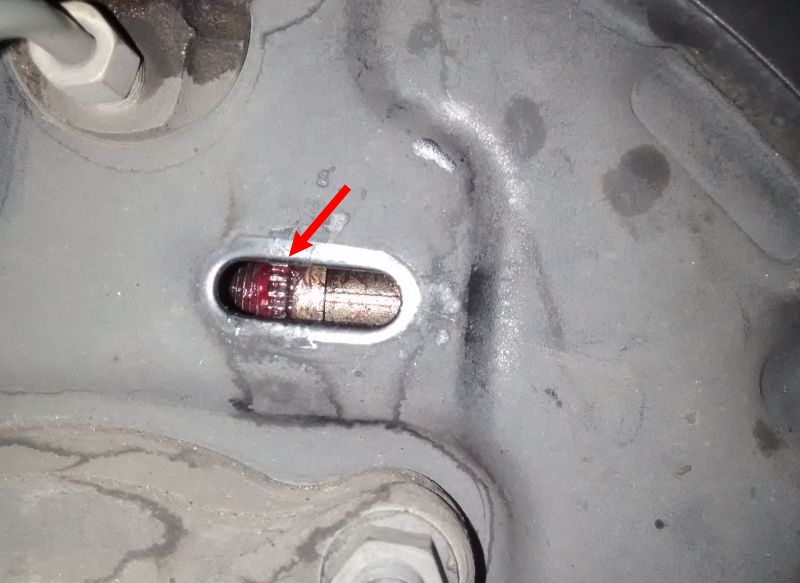
I hadn't touched that bellcrank adjustment bolt so I snapped a picture of the bolt when the 4Runner was back on its own four feet, where both seem to be touching the backing plate now.

Can someone tell me what the significance and purpose of this external bellcrank adjustment bolt position is?
Today I returned the wheels back to the original position that I had moved them from last week when I thought it might have been an imbalance (but I had meticulously static balanced them all myself, so I didn't think it was an unbalanced wheel).
When the 4Runner was on all four jack stands, I noticed that the bellcrank adjustment bolt on the driver side was in the air.
Then I noticed the same with the passenger side bellcrank bolt not being even close to touching the backing plate.
I hadn't touched that bellcrank adjustment bolt so I snapped a picture of the bolt when the 4Runner was back on its own four feet, where both seem to be touching the backing plate now.
Can someone tell me what the significance and purpose of this external bellcrank adjustment bolt position is?
Feb 17, 2018 | 04:56 PM
#16
Thread Starter
Registered User
Joined: Oct 2017
Posts: 49
Likes: 0

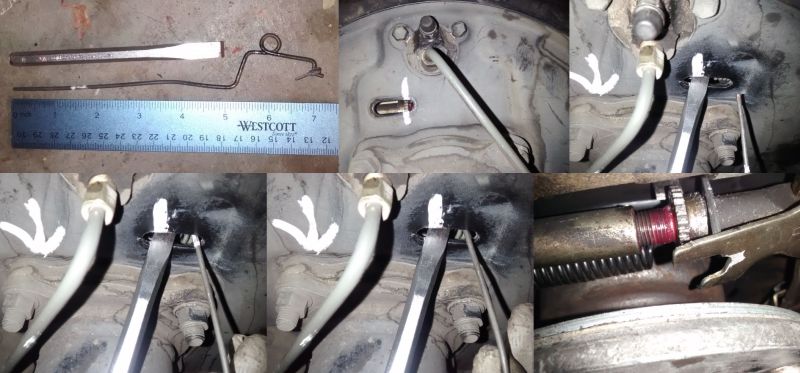
a. I found the brake spring pliers were the hardest to use because the sharp point would dig into the pad and with a piece of wood, it would slip off the rounded brake shoe.
b. I found the large pan of the concave clip tool was the easiest to use.
c. The two 2-inch-long 8x1.25 metric bolts were perfect for pulling the drums off.
d. The battery hold-down bolt was my first attempt at the star-adjuster lock-plate pushout tool, but it was too fat to fit well above the bolt to push the locking plate away.
e. Instead, I made the 8-inch wire, where I filed & painted the section where it hits the star-adjuster-lock-plate at 1-7/16th inch and then the plate is fully unlocked at 1-13/16.
f. The green S-shaped tool is for hanging the front calipers on the shock coils.
g. The disc-brake spreader tool is for spreading the piston cups in the front calipers.
My method is much more crude but has worked for years on many different makes and models is to: Put the drum on over the brake shoes halfway and wobble it. Adjust to reduce wobble and it still slips over without much effort. Then bolt the wheel up with the drum on. Now by hand click the adjuster and spin the wheel slowly by hand until it just touches and you can hear a slight contact and smidge of drag. Thats it, drive it like you stole it and adjust again in a week after the drums and shoes have become "friendly".
One trick I used to figure out which direction to turn the star adjuster once the drums were already on was to paint that down arrow on each backing plate.
You turn the star adjuster downward on each wheel to bring the shoes IN and you do the opposite to bring the shoes OUT.

Another way to remember that on the right side of the car is to "hitchhike" with the right hand thumb pointing backward where your fingers curl in the direction the star nut needs to go to bring the shoes IN.
Since the left-hand side (driver side) star adjuster bolt is reverse threaded, you do the same with the left hand to figure out which way the star adjuster turns to adjust the shoes inward.

Thread
Thread Starter
Forum
Replies
Last Post


