
SR5 Bucket swap - well she's done
 02-05-2006, 08:26 PM
#1
Registered User
Thread Starter
Join Date: Apr 2004
Location: Vancouver, British Columbia, Canada
Posts: 1,475
Likes: 0
Received 1 Like
on
1 Post
SR5 Bucket swap - well she's done
Well I got the buckets from an SR5 in my truck today. She's not a complete bolt. It took a few hours after a trip to the hardware store but it looks great!
Here is the skinny for replacing your front 60/40 bench sweats with SR5 buckets:
Passenger seat - complete bolt in, no problems what so ever. You will need to unbolt the female seat belt receiver/clicker and remove the centre seat belt of there and then rebolt it back in to it's existing location as you won't need the centre seat belt anymore.
Drivers seat - a little more complicated. I picked up one seat belt receiver complete with bolt from the passenger side on the SR5 truck (or you can get the drivers side, your call - you might want to get the drivers side as it has the wiring for the seat belt light in your dash, but I Think mine is either burnt out or not connected as I had my dash replaced when my truck was repaired after being stolen and I think they might have neglected to reconnect the seat belt wires). I unbolted the drivers side and centre seat belt receivers from their location which is just beside the back right bolt hole of the drivers 60 bench seat. The front left, and back left holes of the drivers seat line up properly with the SR5 buckets. The top right hole needs about a 1 inch offset to the left which I did with a bracket I made out of a piece of metal. The back right will go into the old seat belt hole but it is off about 1/4". What I did was take the old seat belt bolt and I un did the heat shield from the cat and then screwed it in upside down from underneath so it was sticking up into the cab. I then forced the 1/4" by a little "compromising (it's fine) and hammered down the back right hole of the bucket seat onto the male end and then screwed it down with a nut I bought from the local hardware store (I think it was a 7/16's fine thread nut).
Now the key with the front right part of the bucket for the offset. I bought a carriage bolt 3/8's in size and then I made a bracket with 2 holes. One to fit the carriage bolt and one to fit the stock bolt to go into the existing hole. You want a carriage bolt to scew in the bracket from in behind the seat hole and put the nut on it from the front (and then cut the excess end off the carriage bolt as you can't find short carriage bolts and you don't want it sticking out too far, then tighten the nut with a socket) so when you push the bracket up against the rest it doesn't get pushed out by the head of the bolt in behind which makes tightening down the stock bolt easier and more secure.
As for the drivers seat belt, take the receiver/clicker you got from the wrecker and you will need to drill a hole opposite the passenger seat and then put a nut from underneath. It is about 6 or so inches up from the drive shaft, there are no issues with working underneath here. This is where a buddy may come in handy but I just put a set of vice grips onto the nut from underneath and then drove the head of the bolt from in the cab with my socket. The vice grips wedged themselves up against the bottom of the cab and gave me something to push against while I drove the bolt into the nut. I used washers of course too.
All in all well worth the effort, just requries a few hand tools and some power tools and a little innovation on your part.
Last edited by CoedNaked; 02-05-2006 at 08:32 PM.
 02-05-2006, 08:48 PM
#2
Registered User
Thread Starter
Join Date: Apr 2004
Location: Vancouver, British Columbia, Canada
Posts: 1,475
Likes: 0
Received 1 Like
on
1 Post
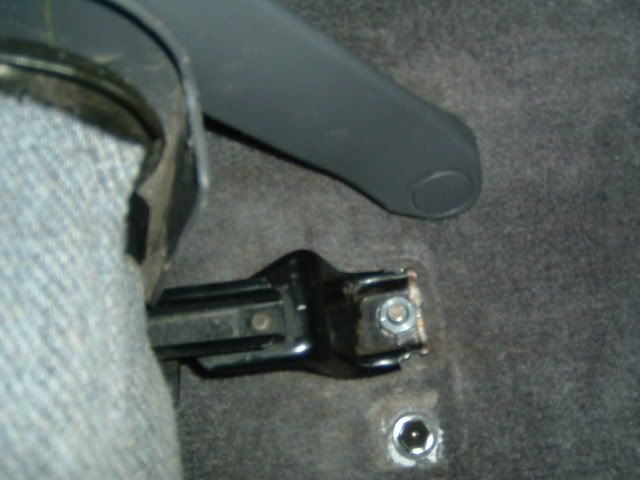
Here is a picture of the rear bolt. Note I plugged the original seat's hole with an old bolt. This is where I screwed the old seat belt bolt from underneath (removed the heat shield to do this) then forced the seat down onto it and used a nut to hold it down (as it was off 1/4" like I mentioned above). Also note the seat belt receiver/clicker I installed for the drivers side.
Here's a picture of the custom bracket I am did for the front right corner of the drivers side bucket seat.

Here's a picture of the custom bracket I am did for the front right corner of the drivers side bucket seat.
Last edited by CoedNaked; 02-05-2006 at 08:52 PM.
02-08-2006, 12:50 AM
#3
Registered User

Join Date: Aug 2005
Location: Jacksonville, FL
Posts: 38
Likes: 0
Received 0 Likes
on
0 Posts
I just did almost the same thing to mine. I have a 94 2WD Pickup. I got the seats from a 94 4 Runner. They bolted in with no problems at all. Except they didn't go back as far as the old 60/40 bench seat did. So I had to cut the adjusters off the 60/40 seats. And then cut the ones off the 4 Runners seats. I used bolts to put the 60/40 seat adjusters on my 4 Runners seats. When I bolted them back in I had the same problem with the drivers seat. Not lining up on the front right corner. But I just shot a drill screw in there to hold it in place. Now they go back as far as they did before. I still haven't found a seat belt to use on the drivers side.
04-20-2006, 07:44 PM
#4
Registered User
Thread Starter
Join Date: Apr 2004
Location: Vancouver, British Columbia, Canada
Posts: 1,475
Likes: 0
Received 1 Like
on
1 Post
Well I just completed the bucket seat swap in it's entirety just now with the addition of the console. Yes I forked up the $$$ for a new stock one from Toyota.
On my truck at least, unlike the seat swap which required a little fabrication as mentioned above to get the drivers seat in, the factory bolt holes for the console are in the deluxe model believe it or not. YOu just have to use a little pin to poke through the carpet to find them before prying the carpet open a little more. They are 8 1/8" 's forward of the passenger seat belt hole on the center "hump". The two front ones for the console are visable from undreneath the truck, the two rears, which are 7" back from the two front holes for the console, you can't view from underneath the truck, but if you do some probing through the carpet with the pin you will find them. Both sets of bolt holes are about 1 5/8" 's apart (measure the console holes, they're bang on with the mounting holes).
All in all I'm very happy with the way it turned out. Now I have a little more storage if needed.
04-21-2006, 04:21 PM
#6
Registered User
Thread Starter
Join Date: Apr 2004
Location: Vancouver, British Columbia, Canada
Posts: 1,475
Likes: 0
Received 1 Like
on
1 Post
I paid $100 each seat, for the 2 front buckets from a 92 SR5 pickup to go into my 93. The seats I got were in very good condition. Keep in mind that was $100 CDN though, from a local wrecker, and this wrecker isn't known for the best prices, but I was more concerned in finding good seats.

Thread
Thread Starter
Forum
Replies
Last Post
Flying91
86-95 Trucks & 4Runners (Build-Up Section)
45
04-11-2024 04:39 PM


