
And so the 22re rebuild begins
 07-04-2009, 12:14 AM
#21
Contributing Member
Thread Starter
OK guy's was suppot to pick up my block wednesday but my brother who is a Viet Nam Vet suffering from the effects of Agent Orange (lost his site about 8 months ago and has now been on dialysis for the last year and a half all from the agent orange poisoning) fell down a flight of stairs at his girlfriends house and broke two vertebrae vertically in his neck so I have been spending all my free time in the hospital with him it was at the point the doctors were asking if he had a no resuititon wish and if he had a living will in order so my block pick up has been put on hold till next week some time.
The good news is that a new doctor has checked him over and found that most of the dementia he has been suffering and his flash backs are all due to a mix of meds the last couple doctors that don't give a piss have been giving him and the new doc also a Viet Nam Vet said he is going to have a full as possible recovery but will have to wear a halo for the next 6 months or so and will be put in a first class physical therapy rehab center till he is able to function for himself again.
So today I played around for a few mins and have got this much done on my rebuild but should be getting more done soon as I get the block back.
IT'S A START
 07-04-2009, 07:57 AM
#22
Contributing Member
oh damn, that's gunna look good with all the contrasting parts!
can't wait to see her all together man!
i'm finally getting a since of progress with mine
hope your brother gets better man
can't wait to see her all together man!
i'm finally getting a since of progress with mine
hope your brother gets better man
Last edited by iamsuperbleeder; 07-04-2009 at 08:08 AM.
07-04-2009, 08:05 AM
#23
Registered User
Join Date: Dec 2006
Location: Boise, ID
Posts: 611
Likes: 0
Received 0 Likes
on
0 Posts
sorry to hear about your brother. your priorities are in the right place though. all our mechanixing gets put on the back burner for life. the progress looks good nonetheless.
07-13-2009, 10:17 PM
#24
Contributing Member
Thread Starter
Well today 7-13-09 was a good day I got my block from the shop my bro is doing so much better he is almost back to his mean nasty and abusive old self and yes that is a great thing.
So here is a list of what all was done at the shop
1. Clean , Check , and Magna flux the Block
2. R&R Freeze Plugs , Buff & Machine Surfaces
3. Deck Block-.010
4. Clean Magna Flux & Check Rods
5. Pean Rebush & Fit Rods
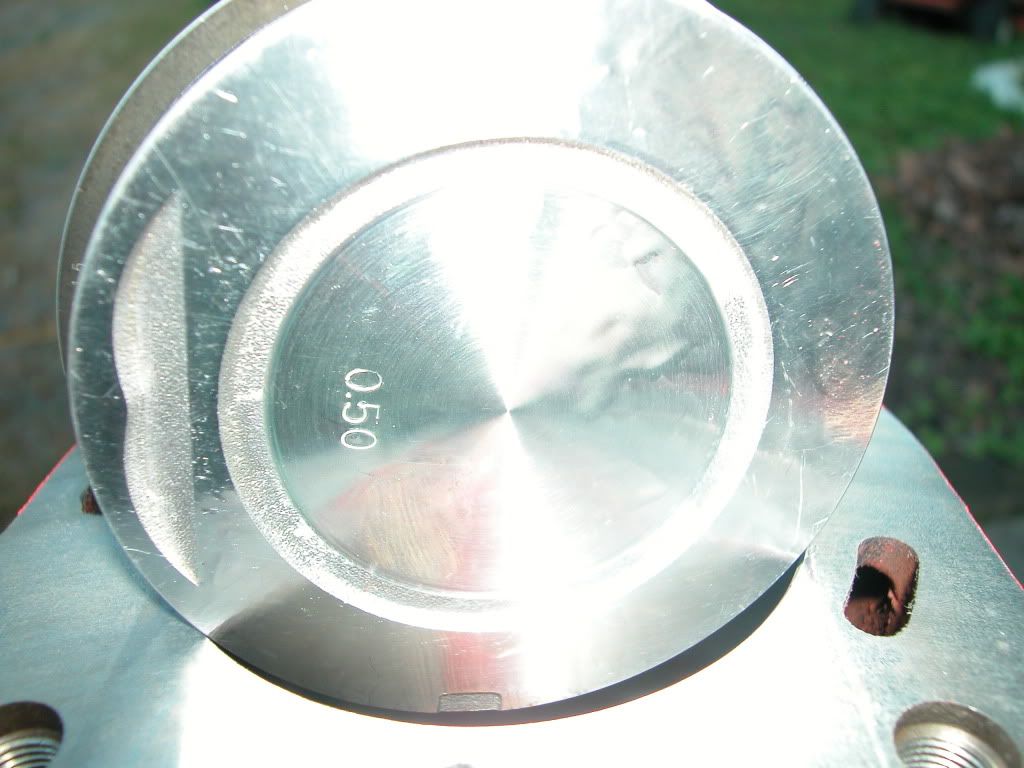
6. Rebore And Hone Cylinders .50mm
7. Retap 10 head bolt holes
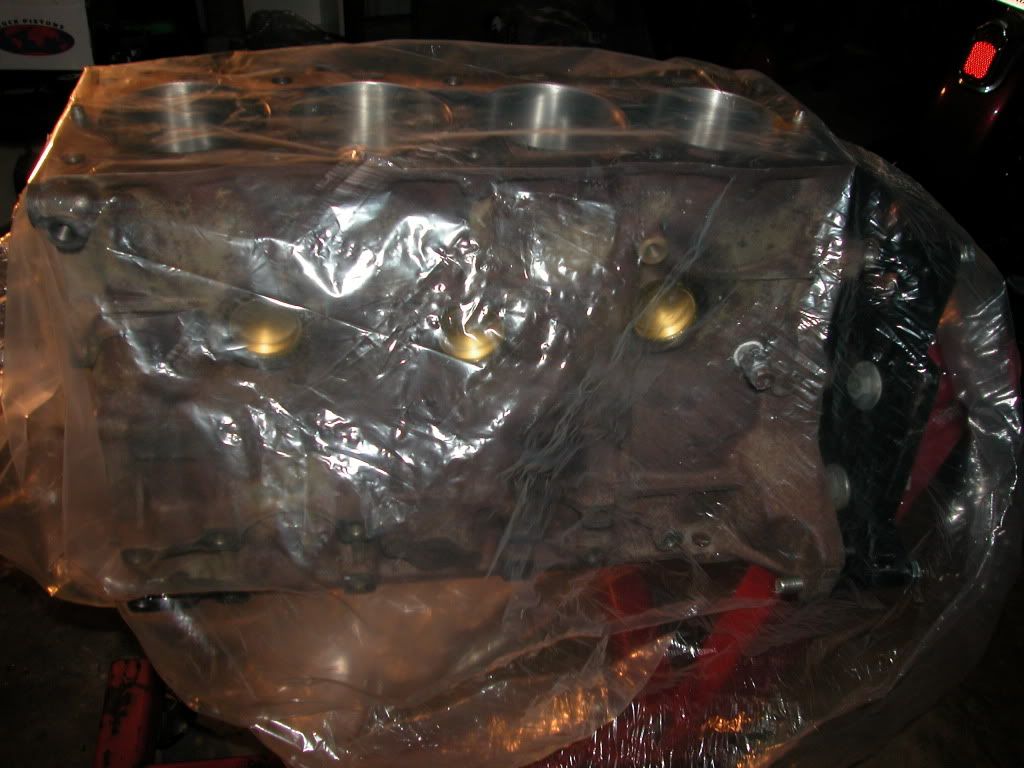
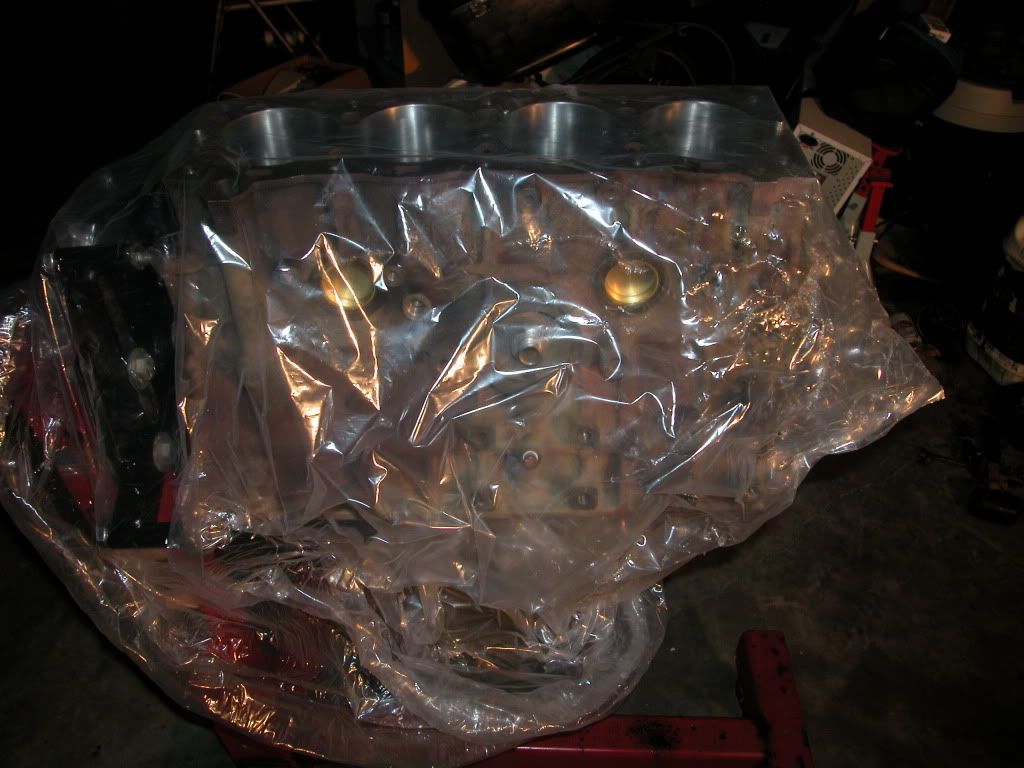
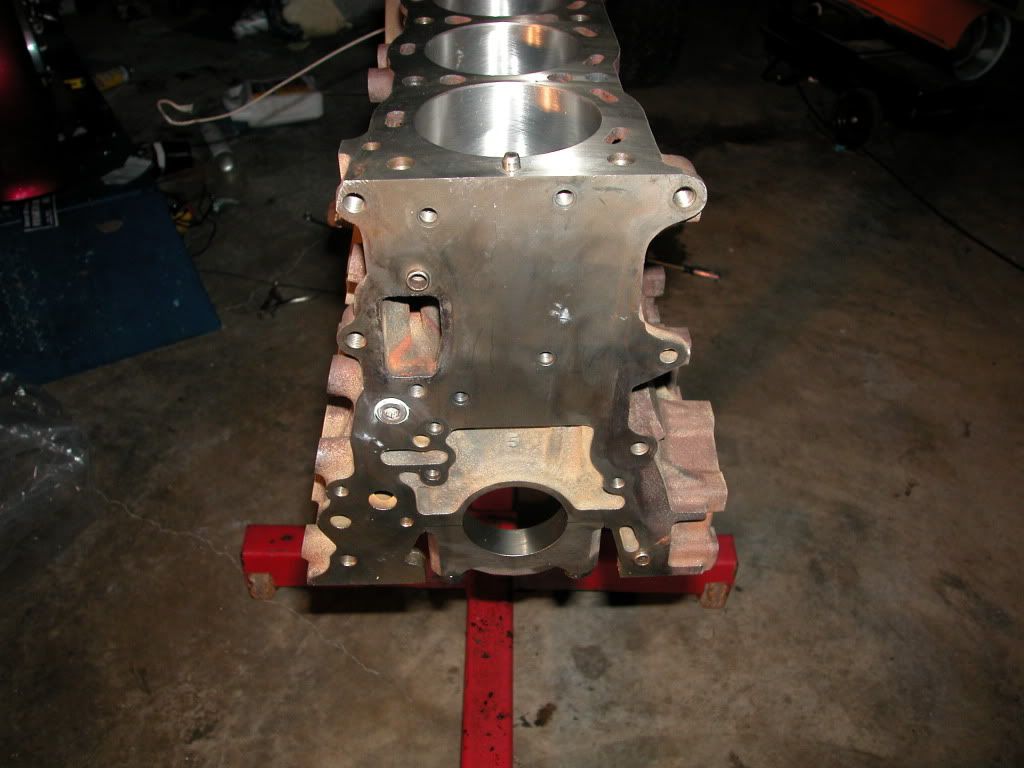
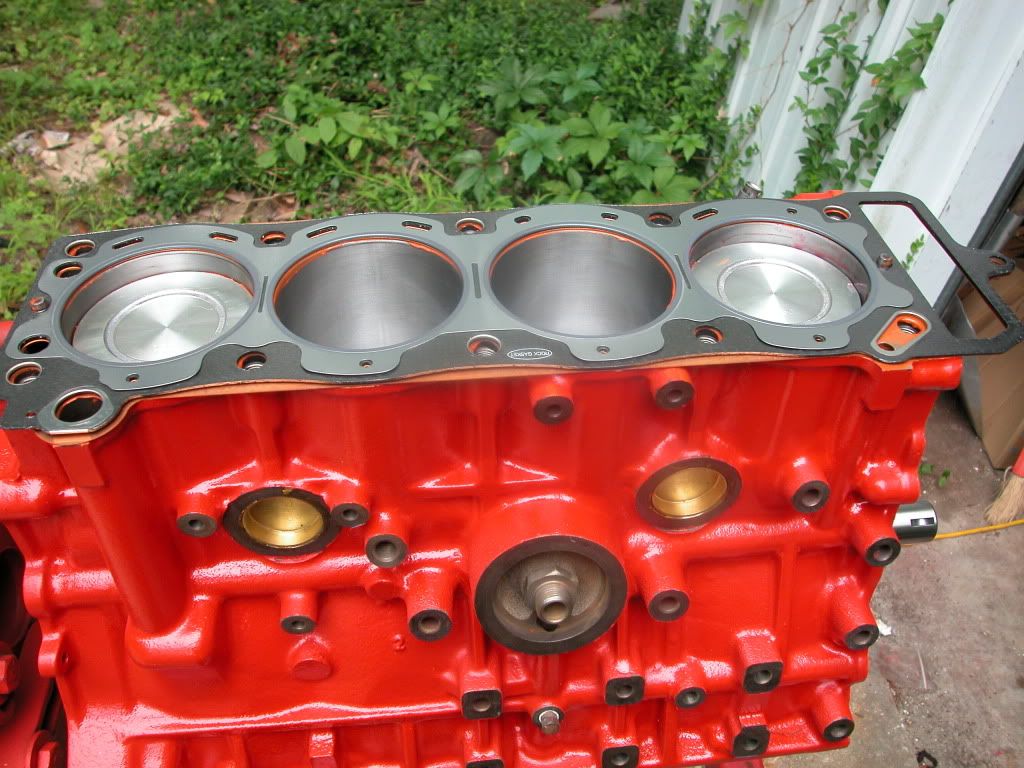
Here is the first look from the shop still in the plastic
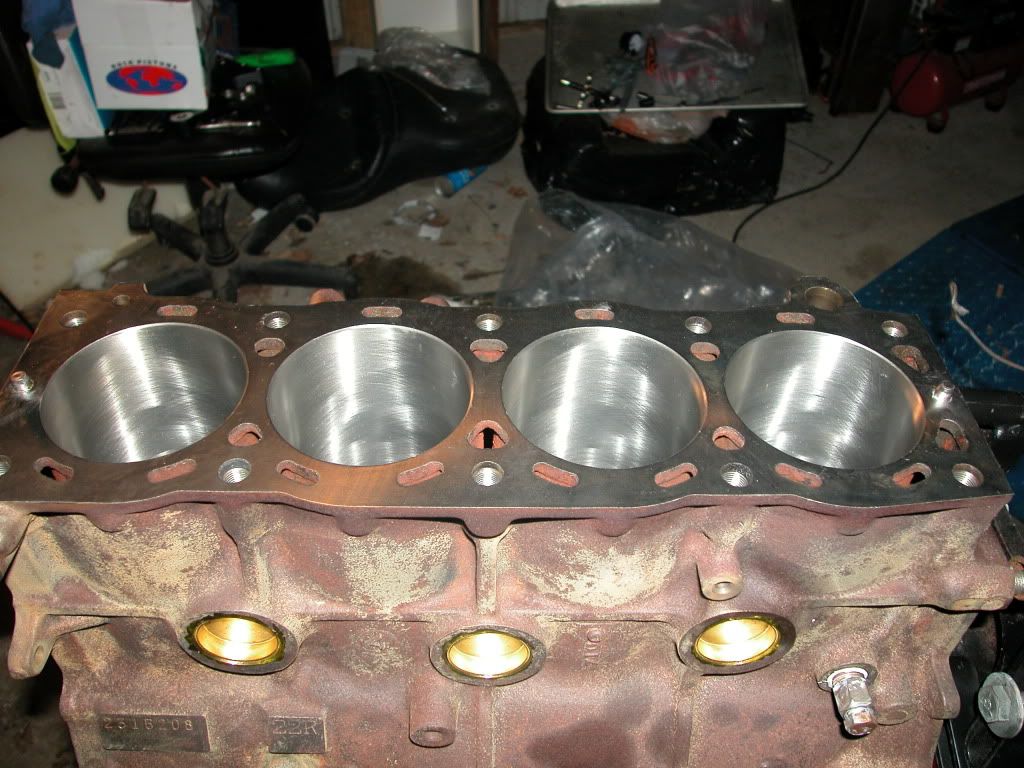
Here she is all nice and clean and out of her plastic wrapper
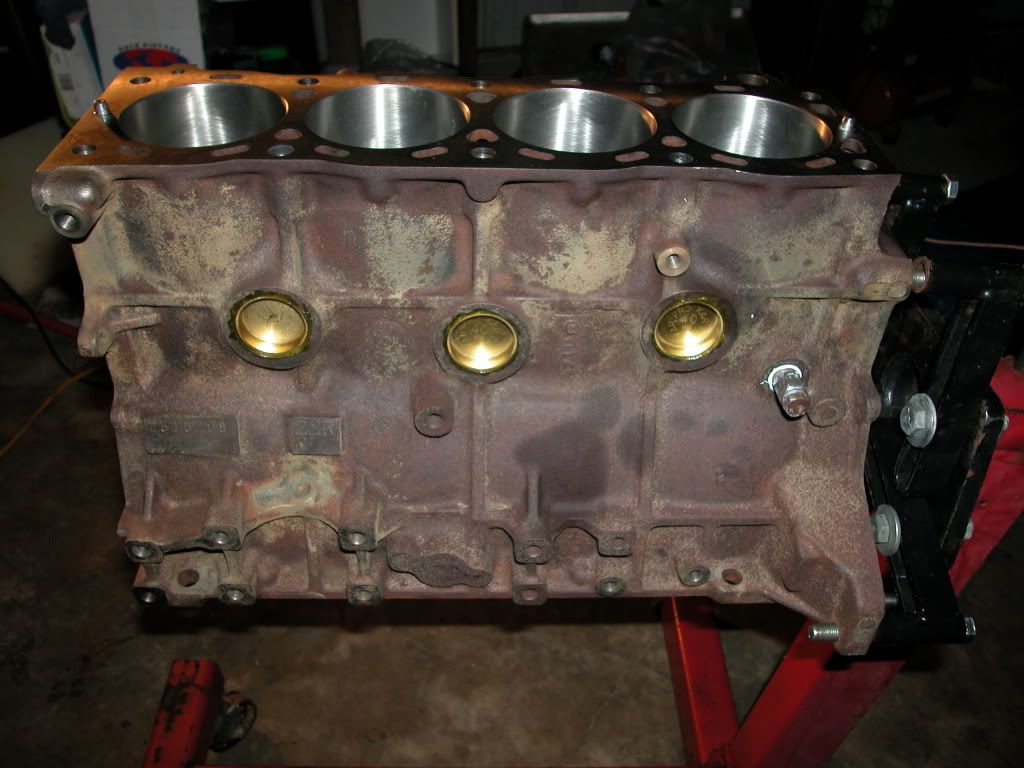

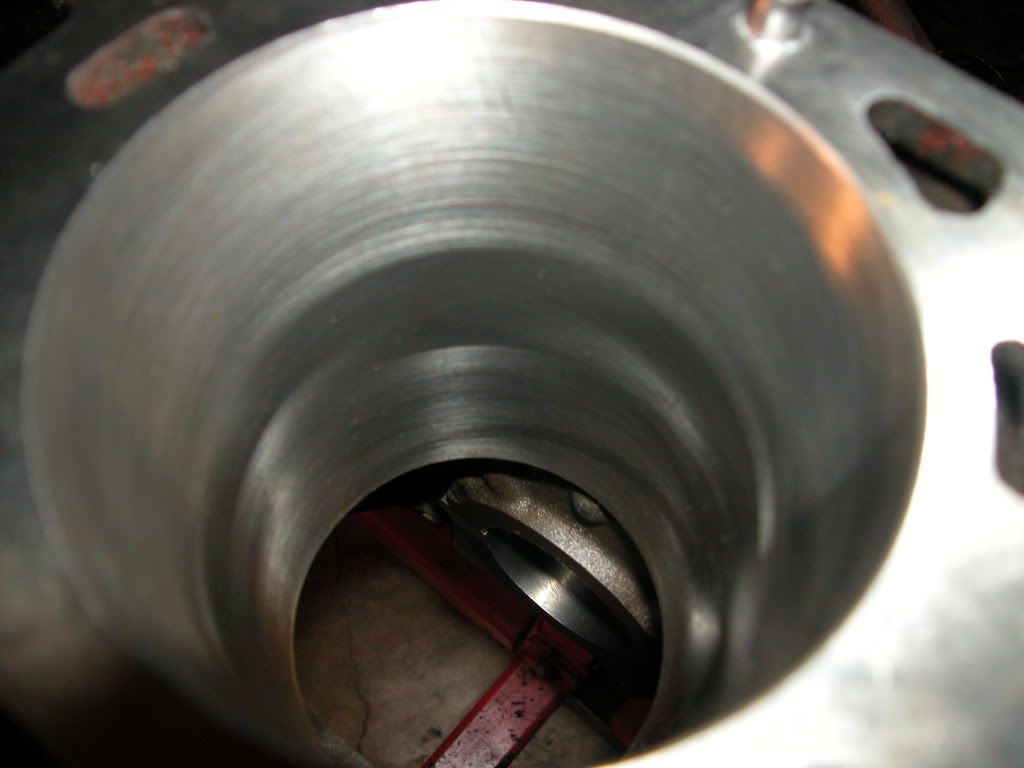
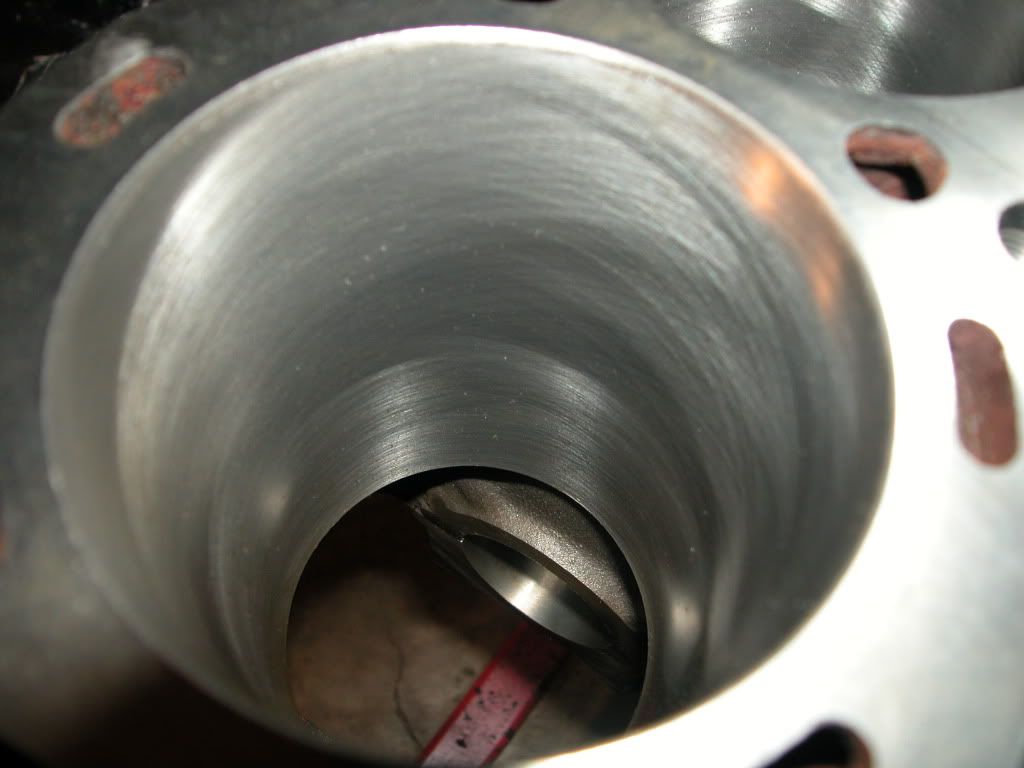
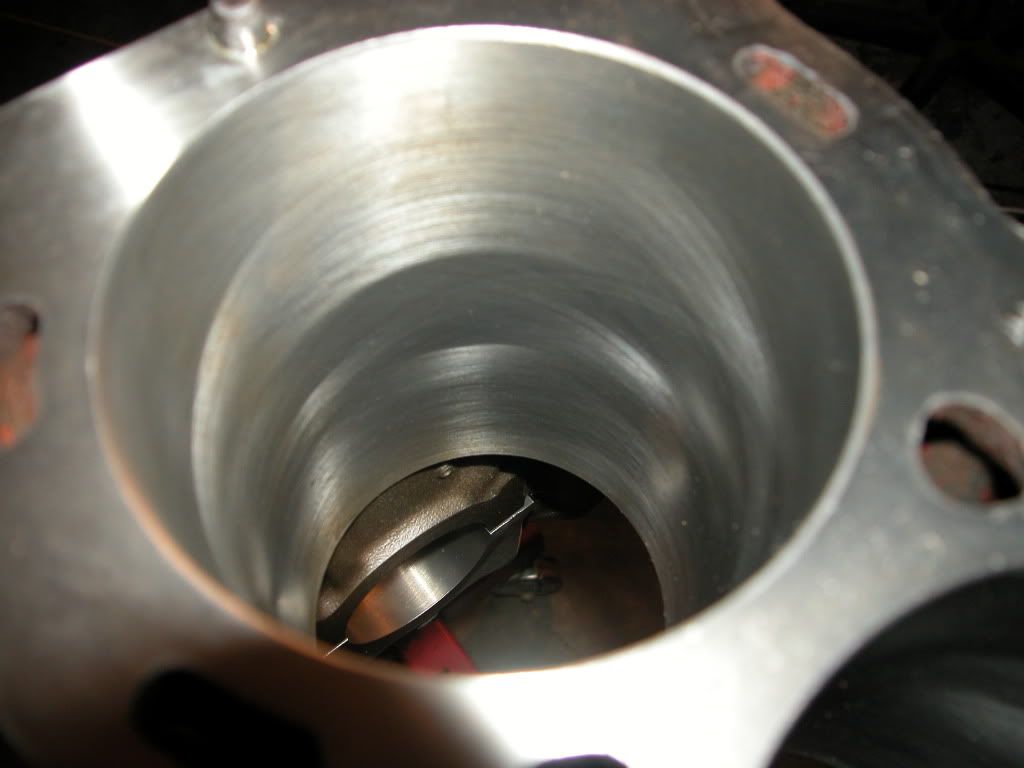
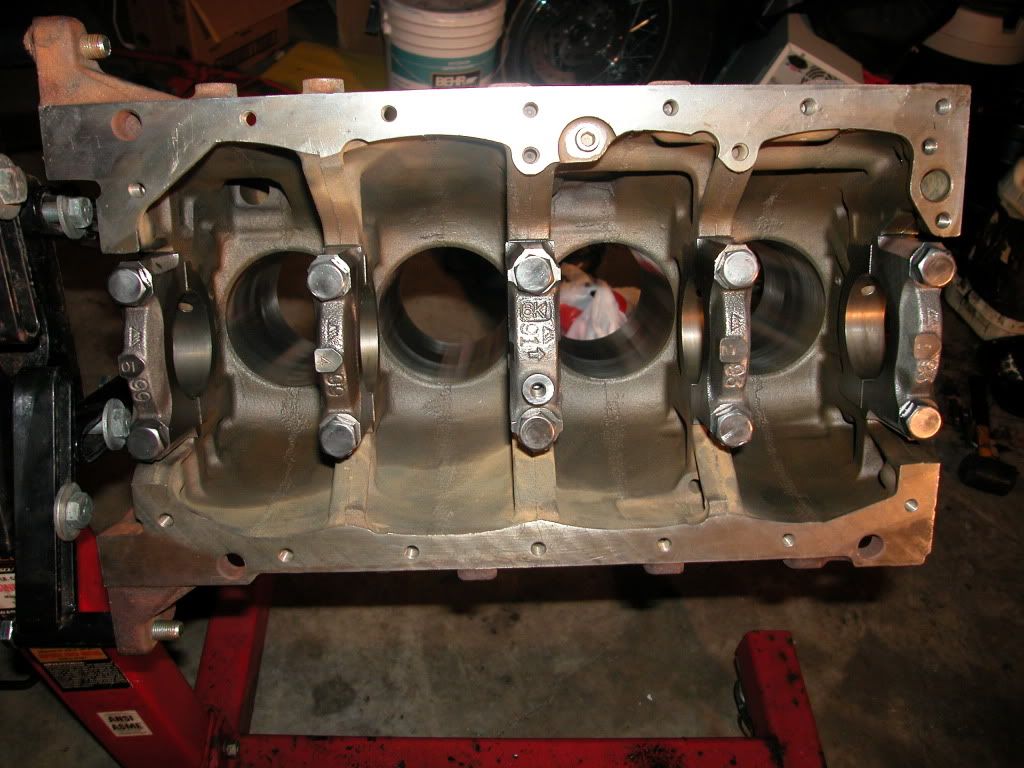
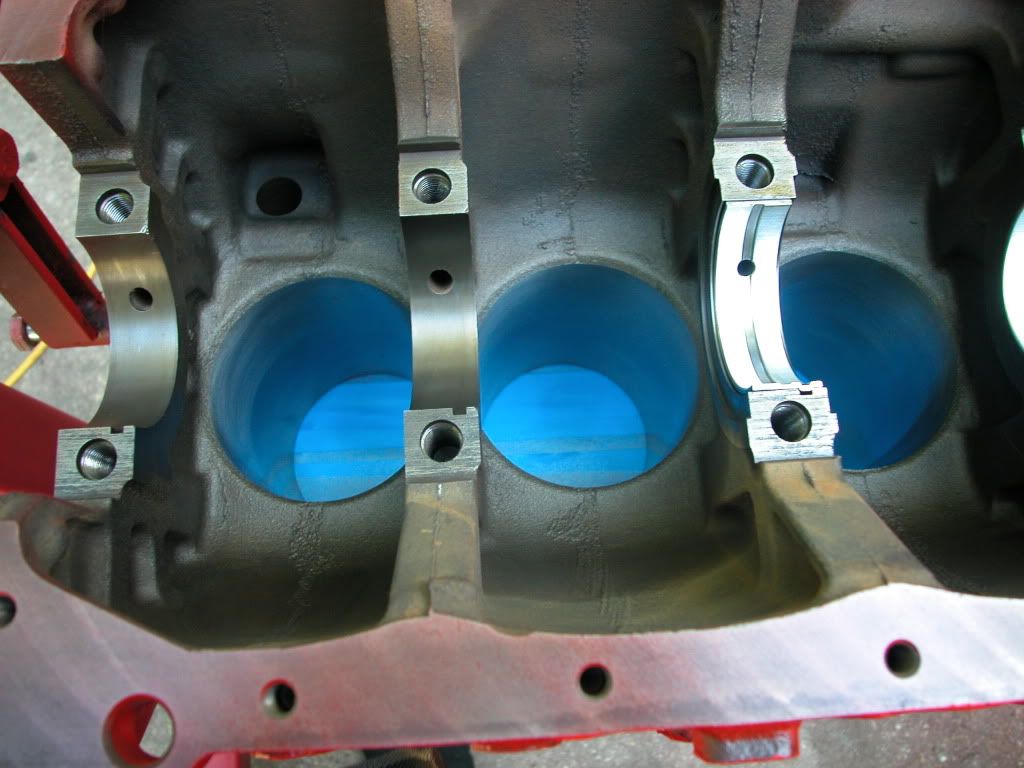
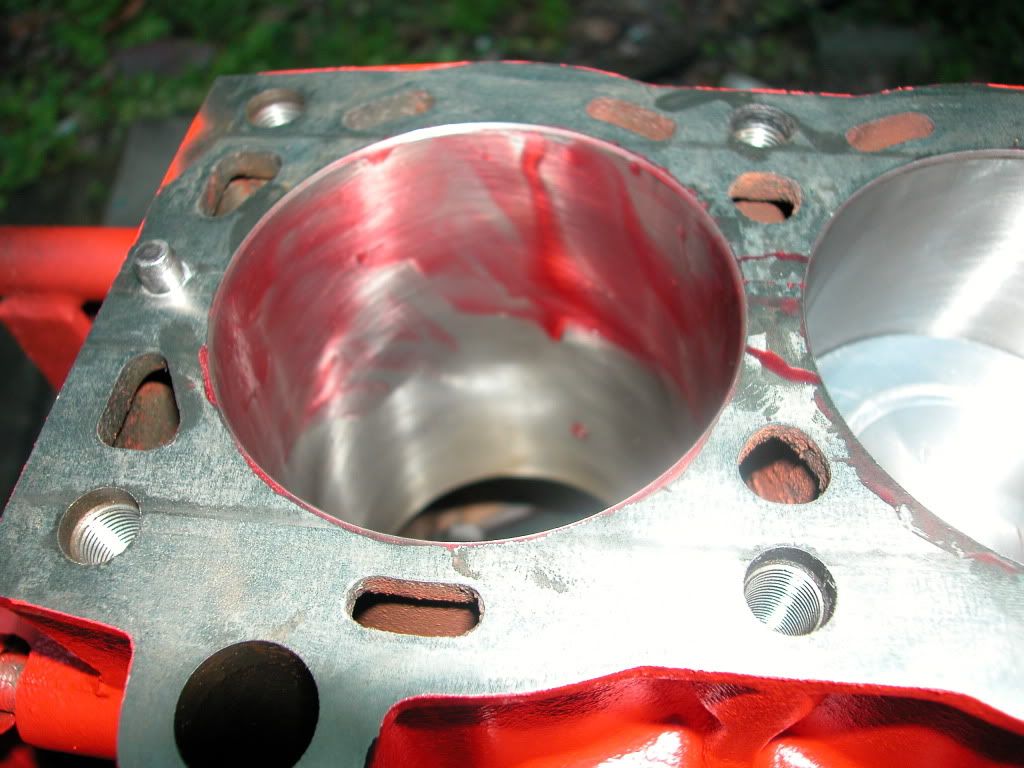
Look at how beautiful these cylinders are notice the exellent cross hatching
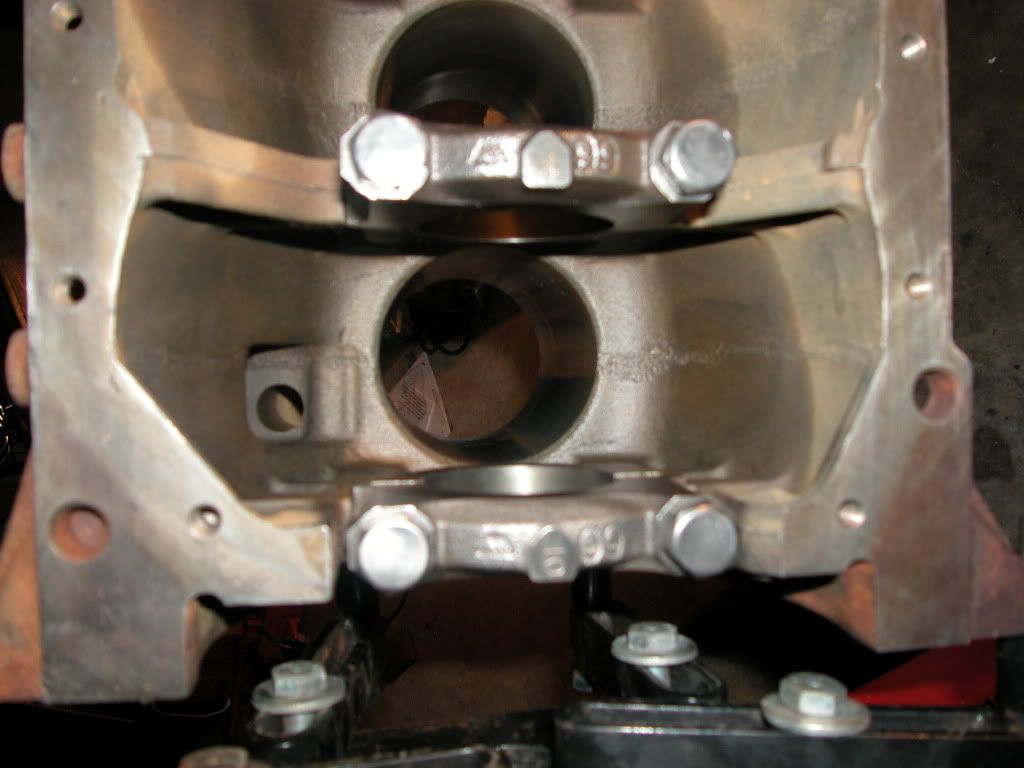
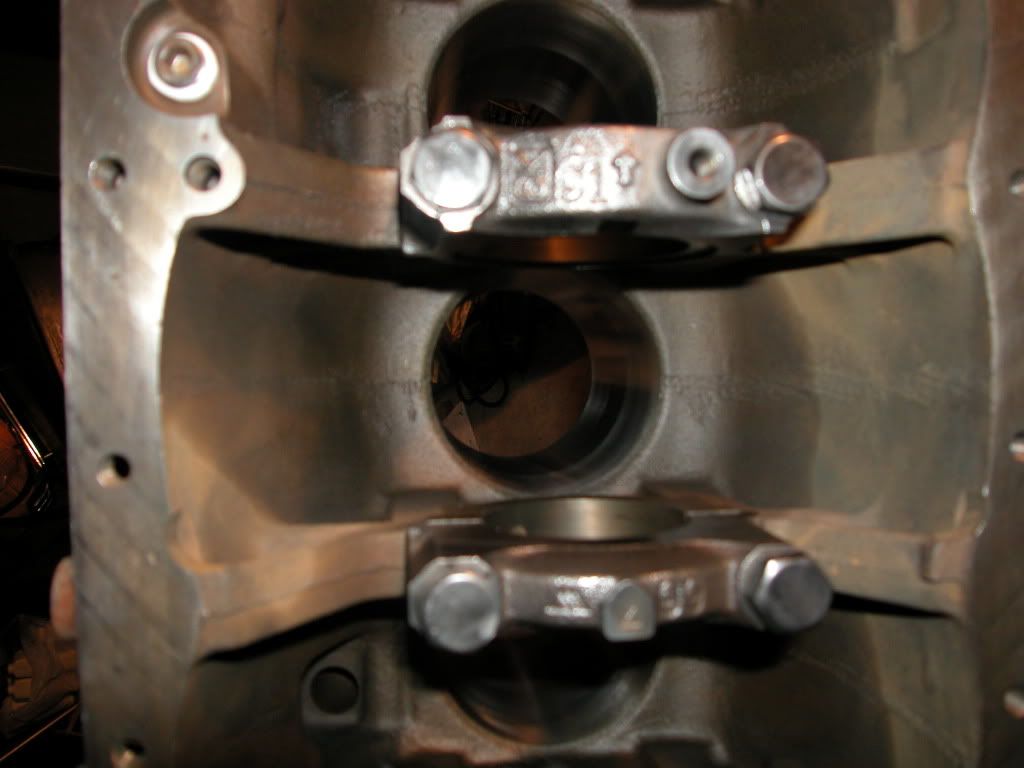
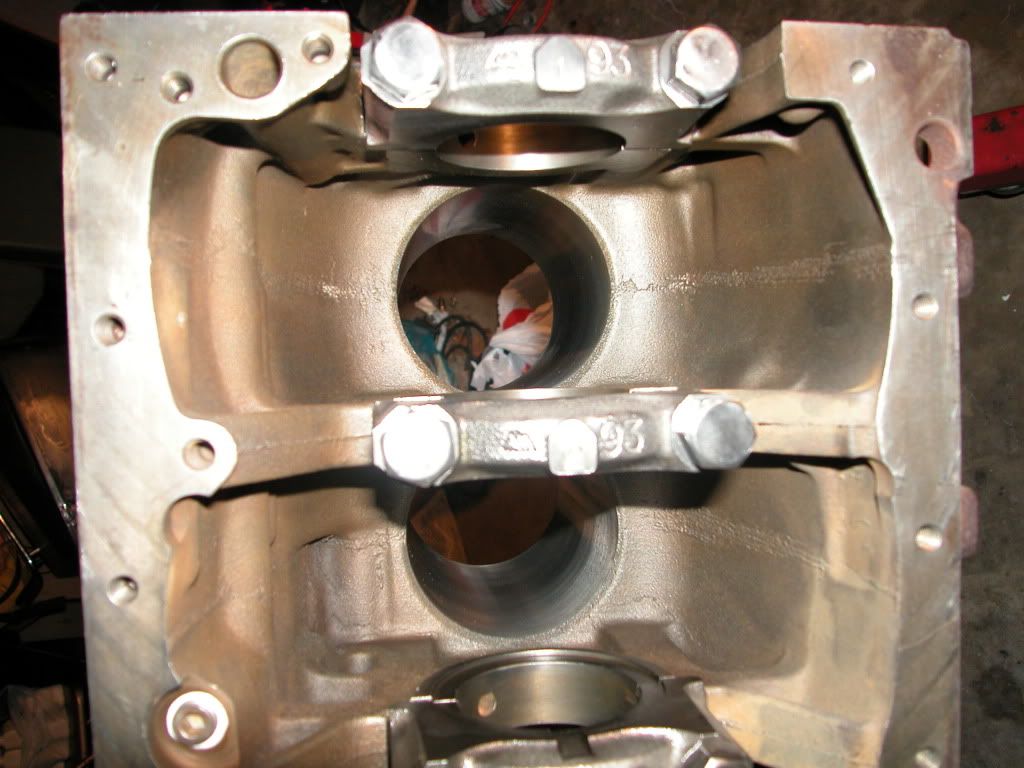
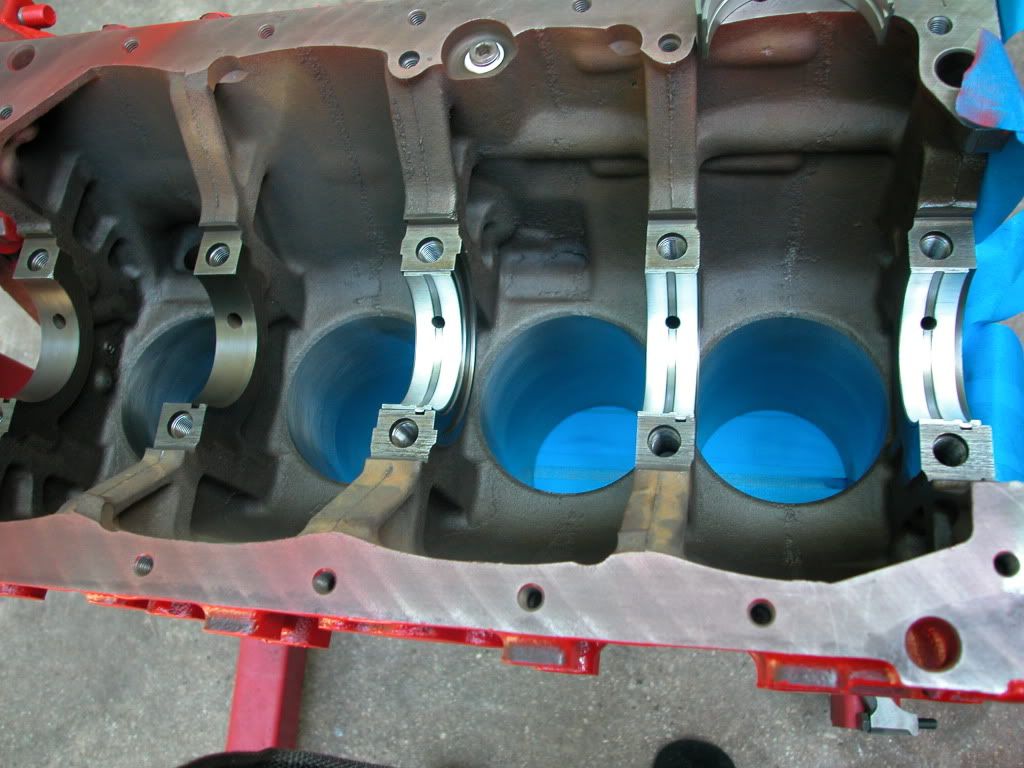
A little look from the bottom end
OK so now the fun begins taping
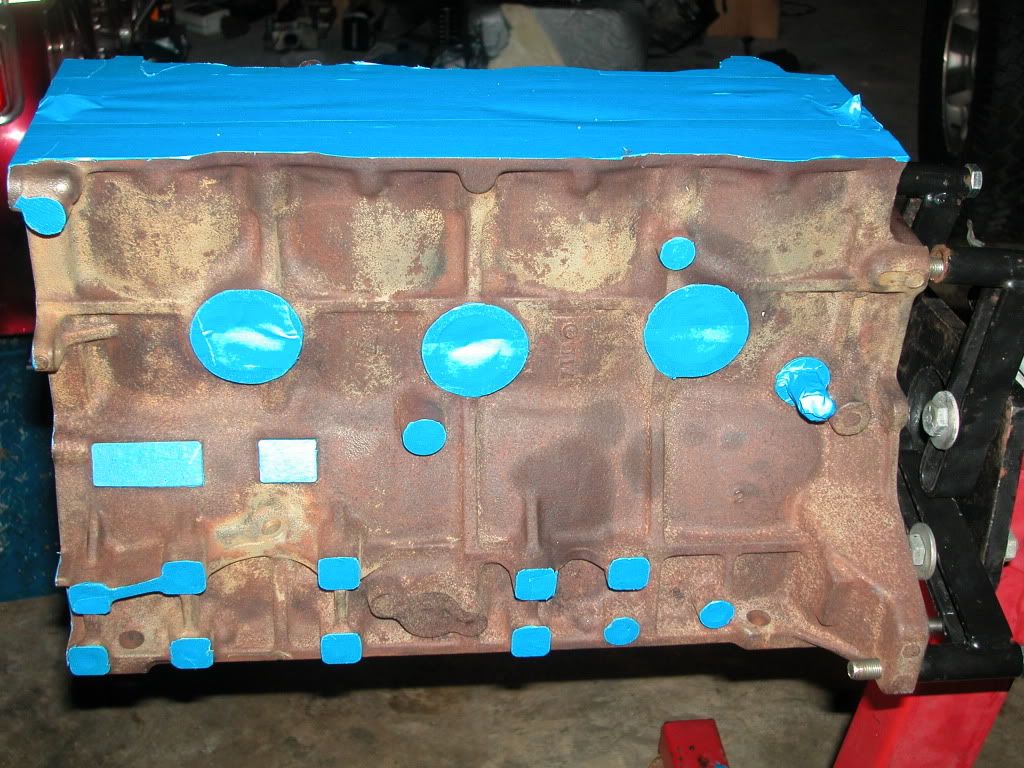

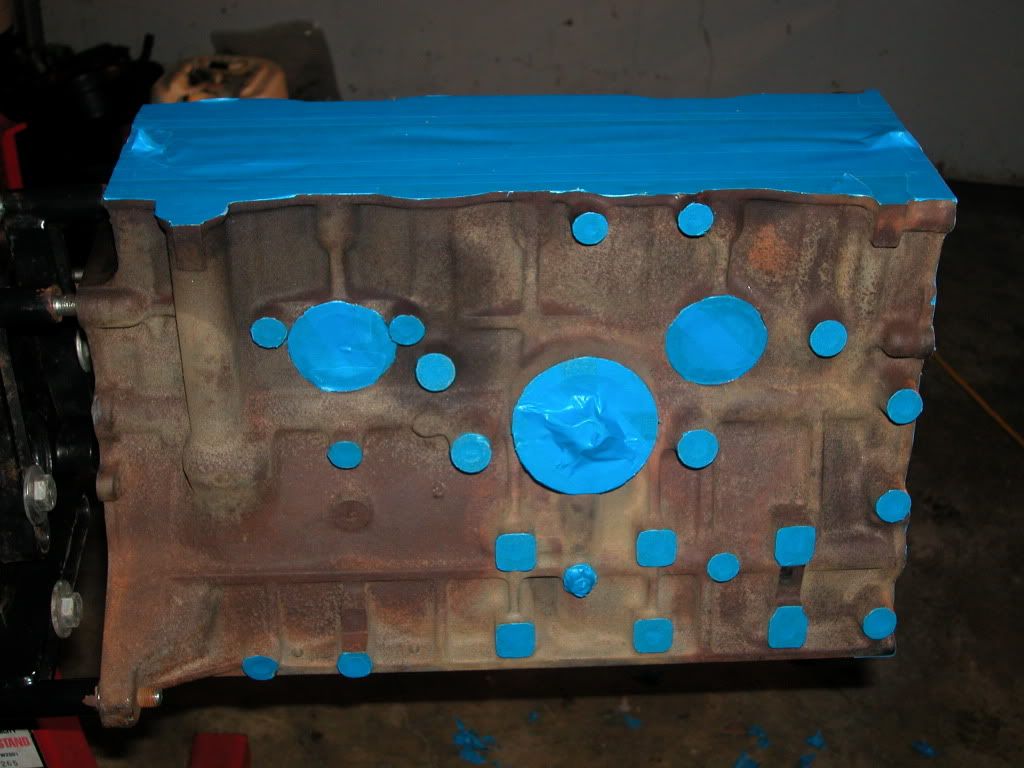
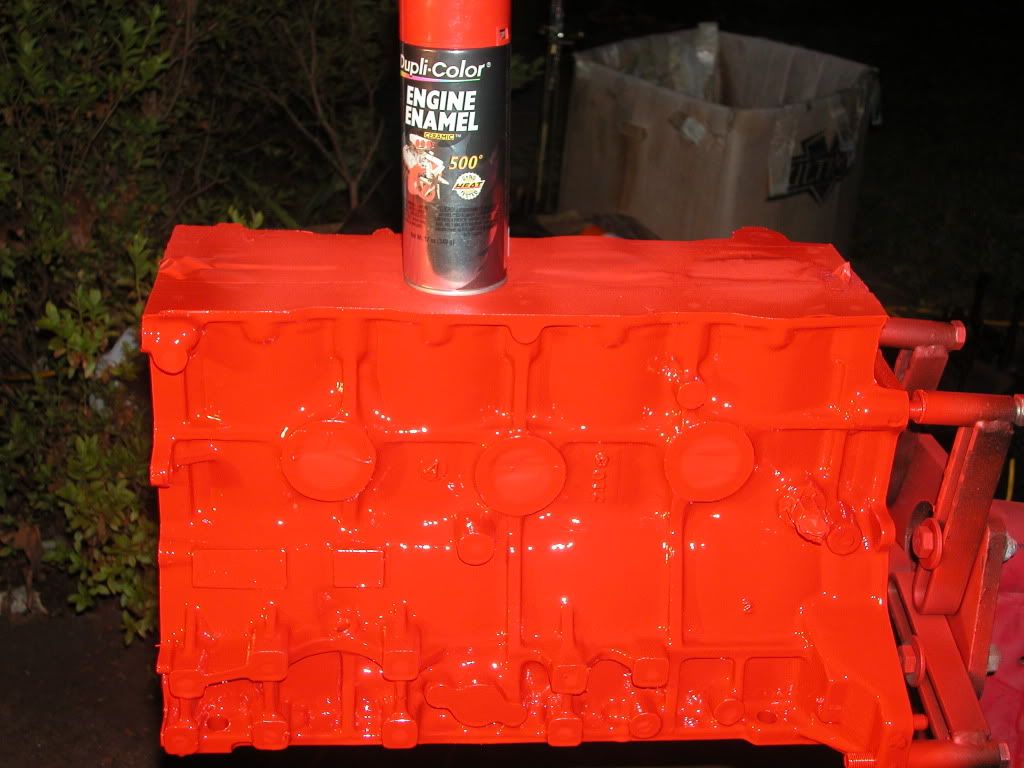
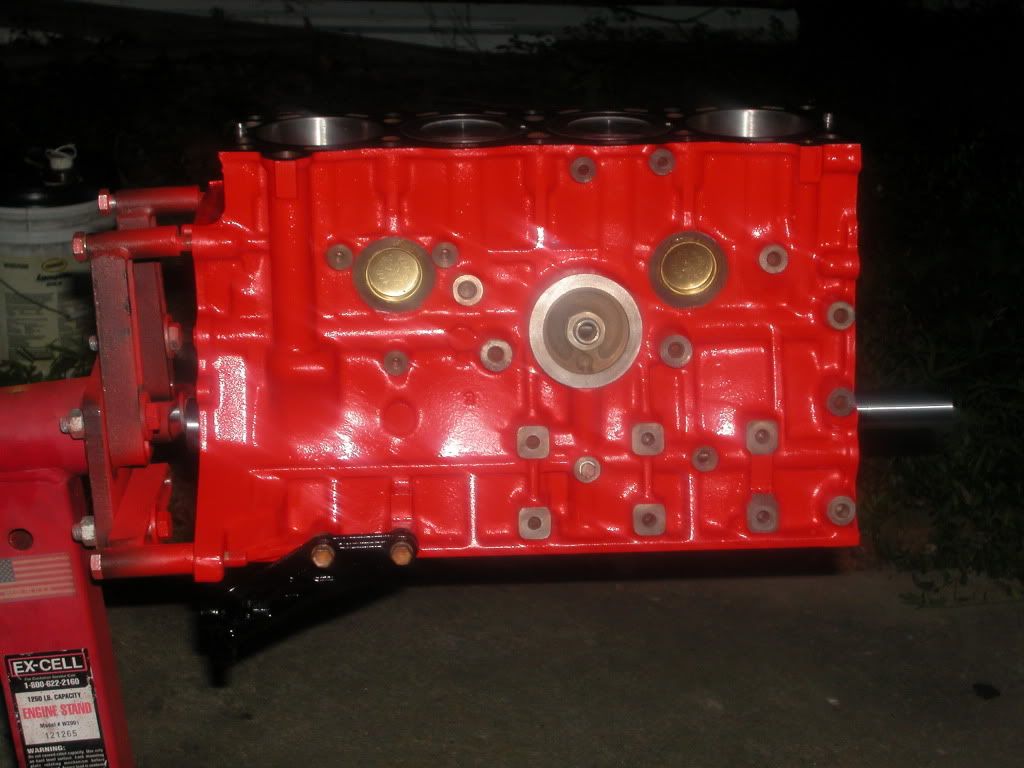
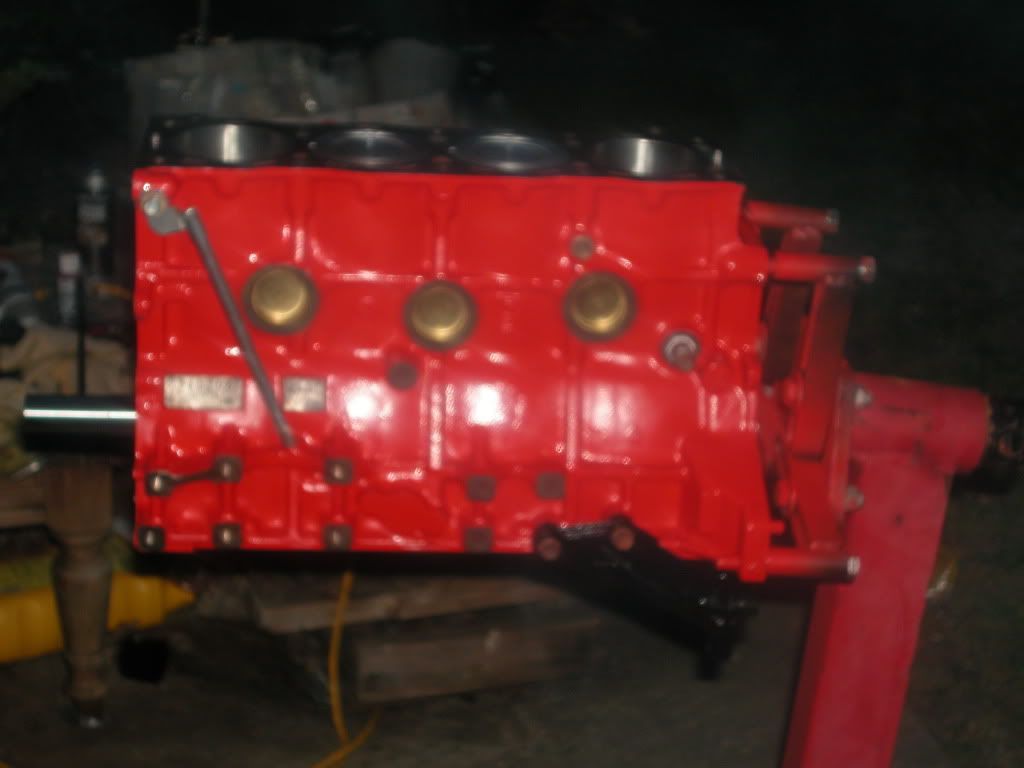
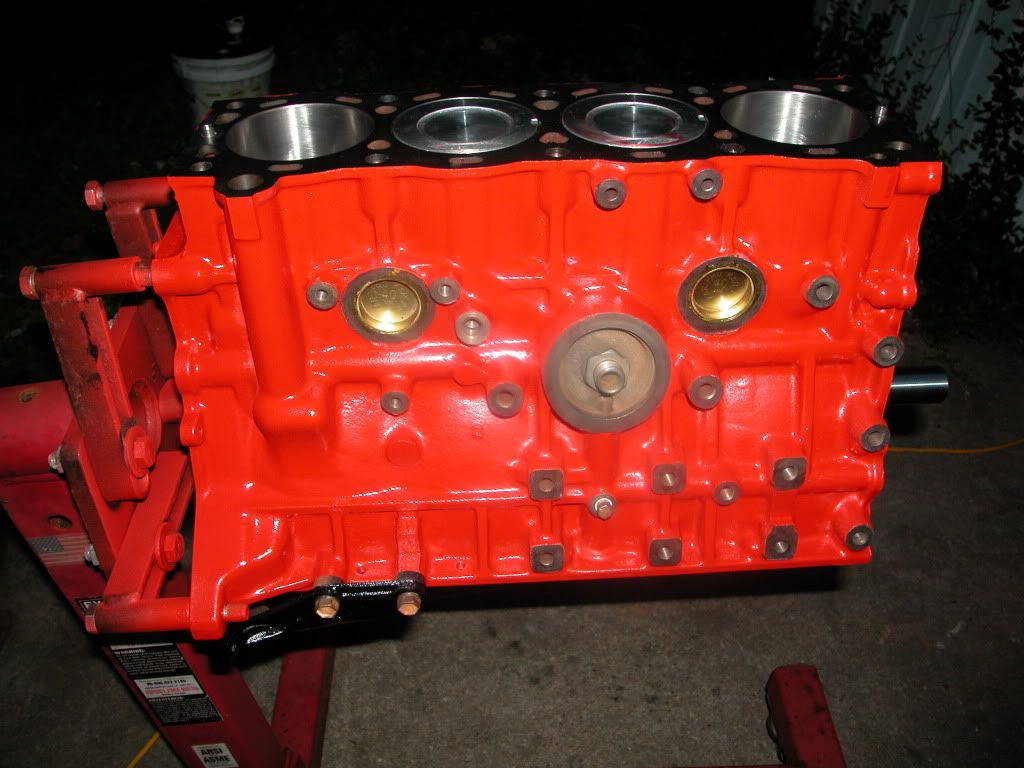
Now that the taping is done the real fun starts
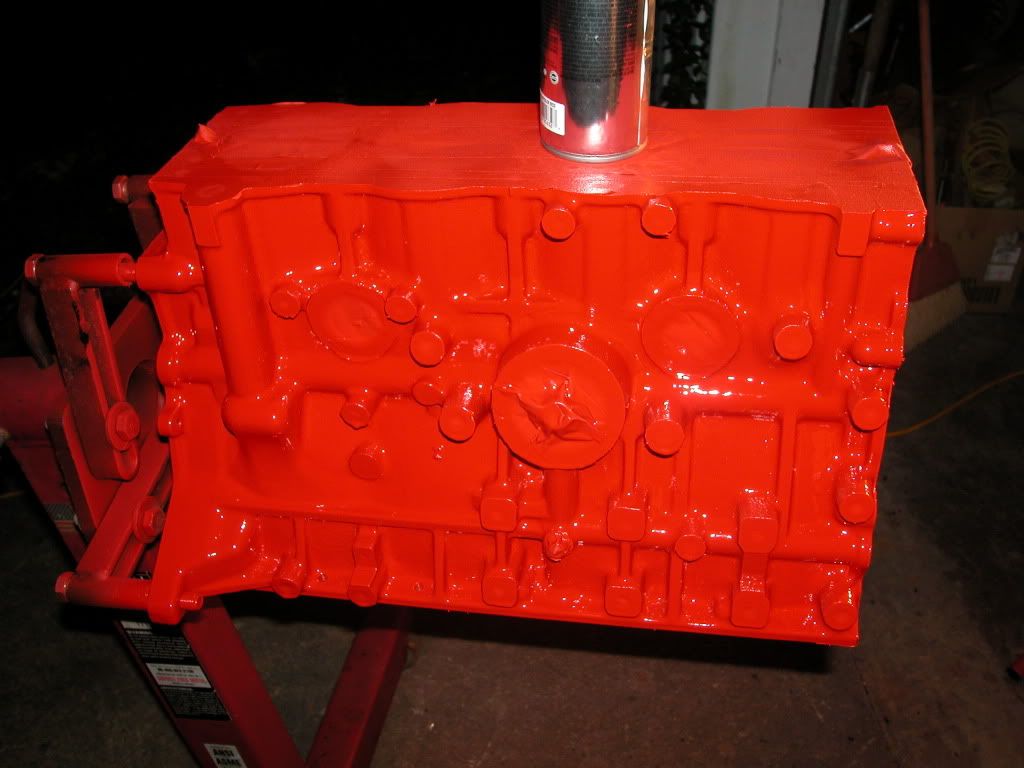
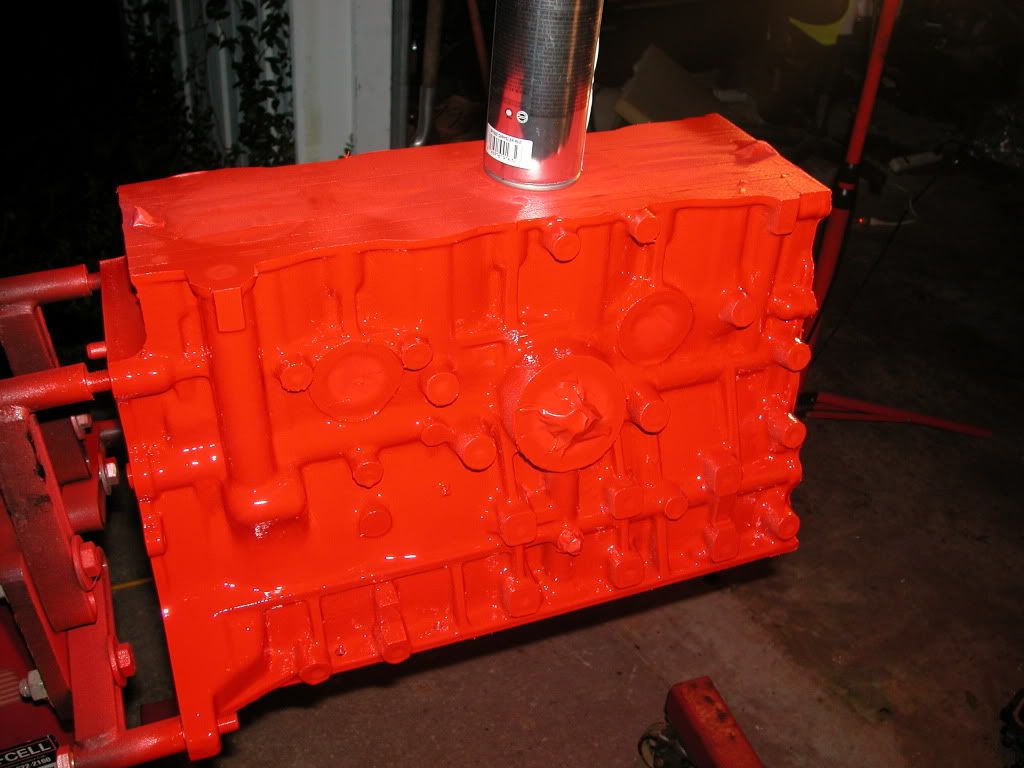
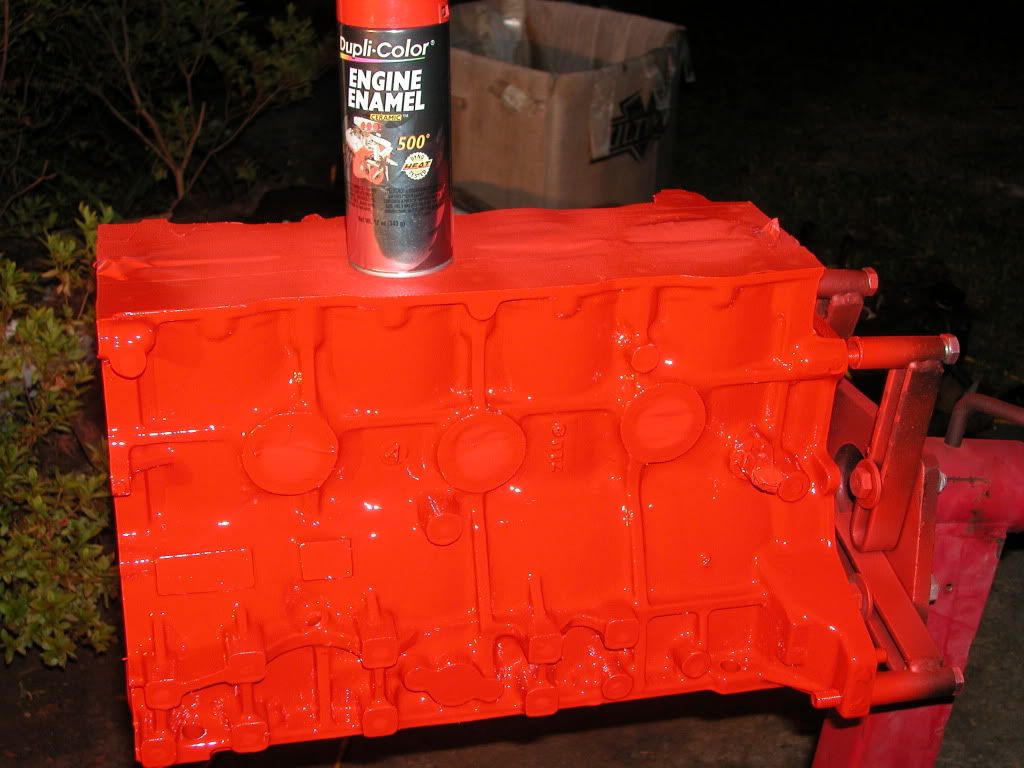
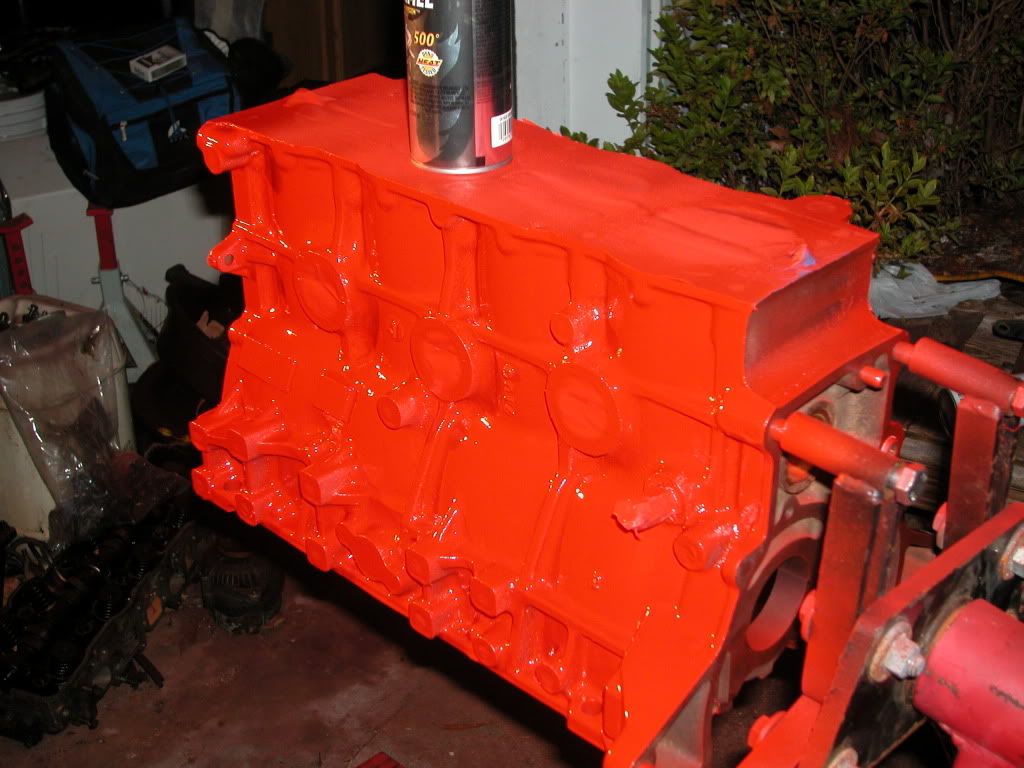
Chrysler Red Hi Heat
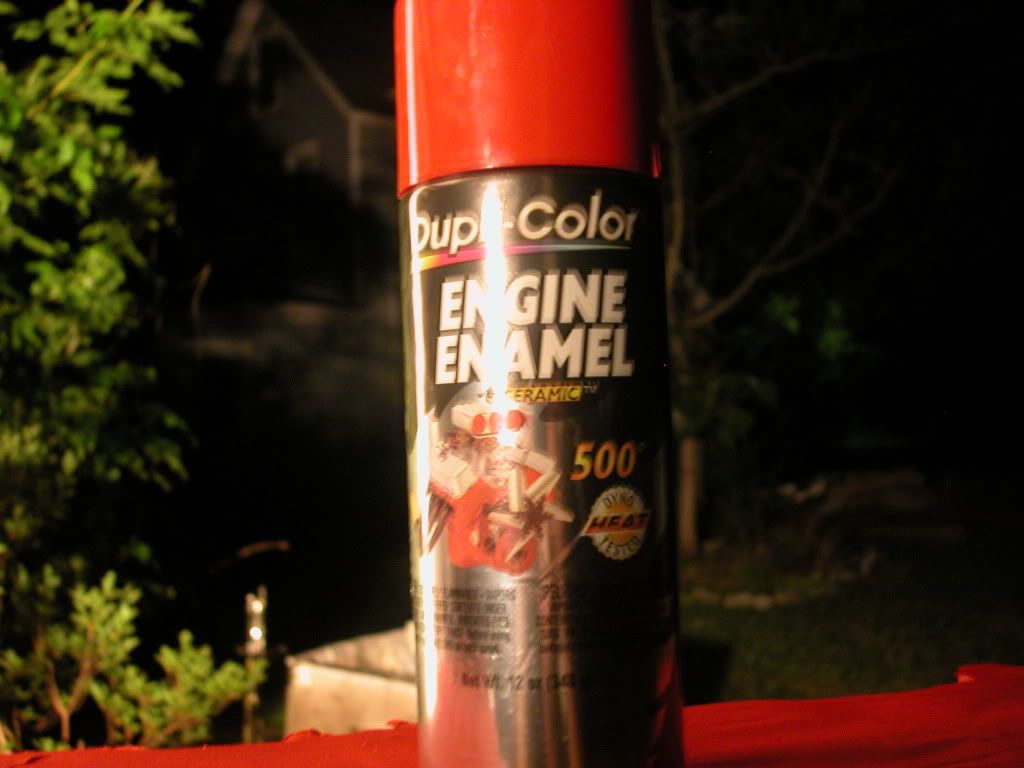
Vs.
And The Winner is

So here is a list of what all was done at the shop
1. Clean , Check , and Magna flux the Block
2. R&R Freeze Plugs , Buff & Machine Surfaces
3. Deck Block-.010
4. Clean Magna Flux & Check Rods
5. Pean Rebush & Fit Rods
6. Rebore And Hone Cylinders .50mm
7. Retap 10 head bolt holes
Here is the first look from the shop still in the plastic
Here she is all nice and clean and out of her plastic wrapper
Look at how beautiful these cylinders are notice the exellent cross hatching
A little look from the bottom end
OK so now the fun begins taping
Now that the taping is done the real fun starts
Chrysler Red Hi Heat
Vs.
And The Winner is
07-14-2009, 11:22 AM
#28
Registered User
i hate both YOU AND BLEEDER!!!!!!!! JEEZ!!! your motor and his both look AMAZING...LMAO...i should of done my paintin better..or well..painted more parts..and brighter colors..lol
 07-14-2009, 02:36 PM
#30
Contributing Member
Thread Starter
Well you cought me in the middle of installing the crank and rods I had a small delay I pulled the rod bearings out and they had dual holes so I had to make a phone call to ENGNBLDR and he assured me that all is well the bearings are universal with a few Toyota motors so I am going to go back out and try to finish up the short block.
So here's where I am at as of the phone call
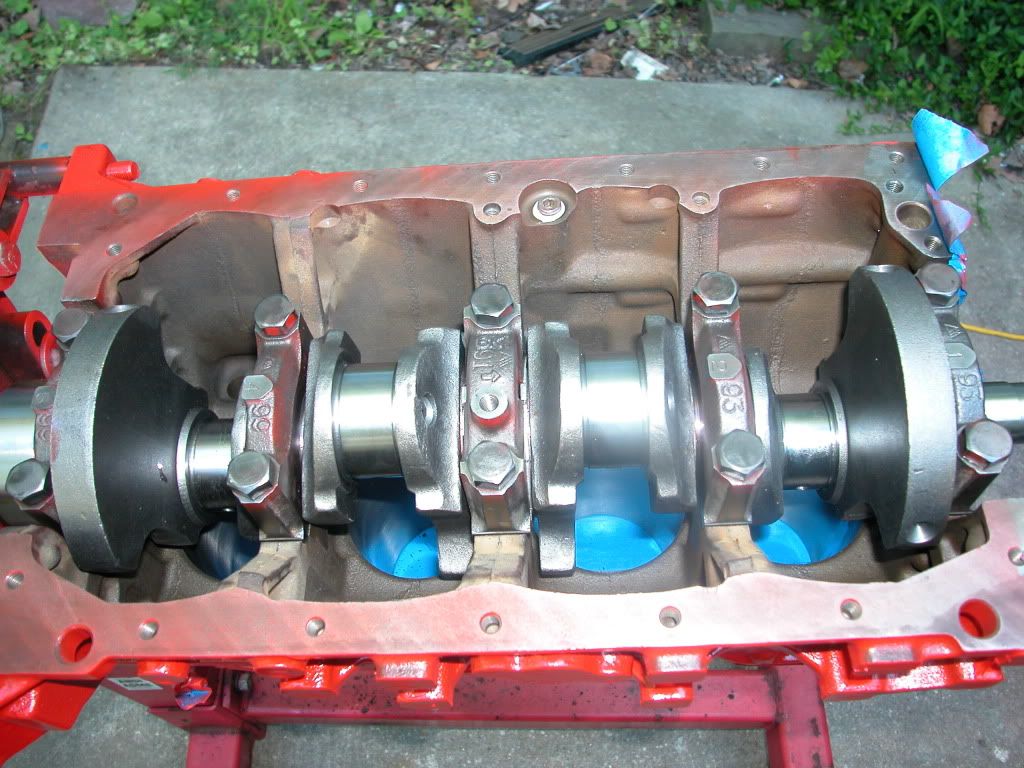
getting ready to drop the brand new crank in place
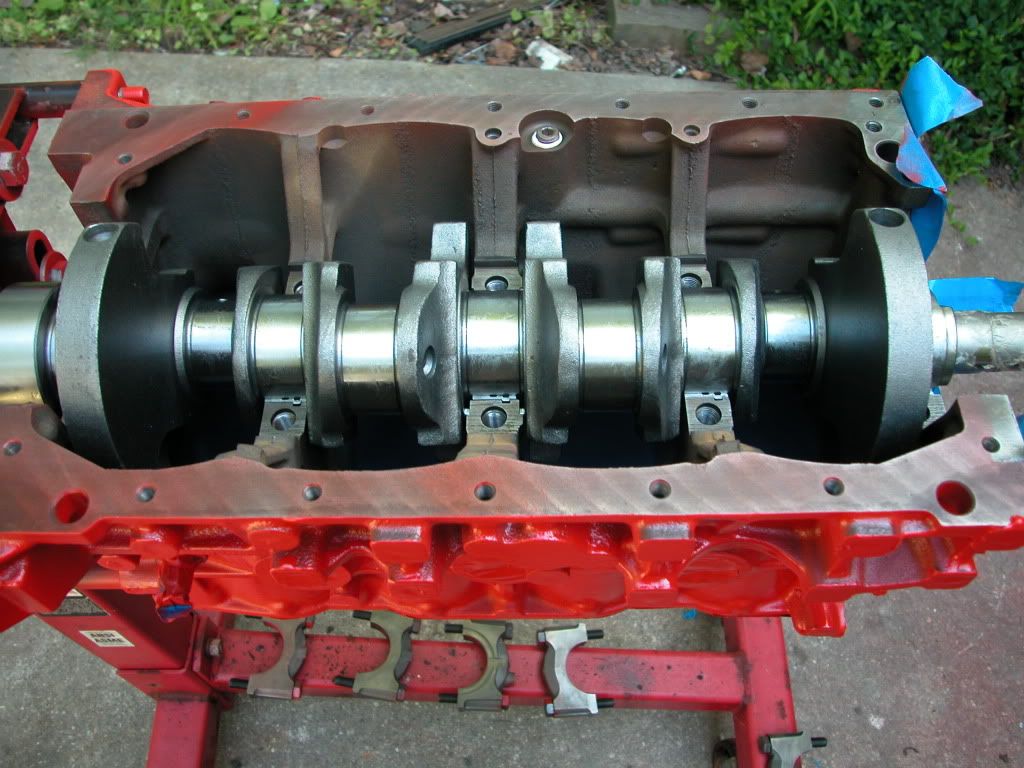
Crank in place
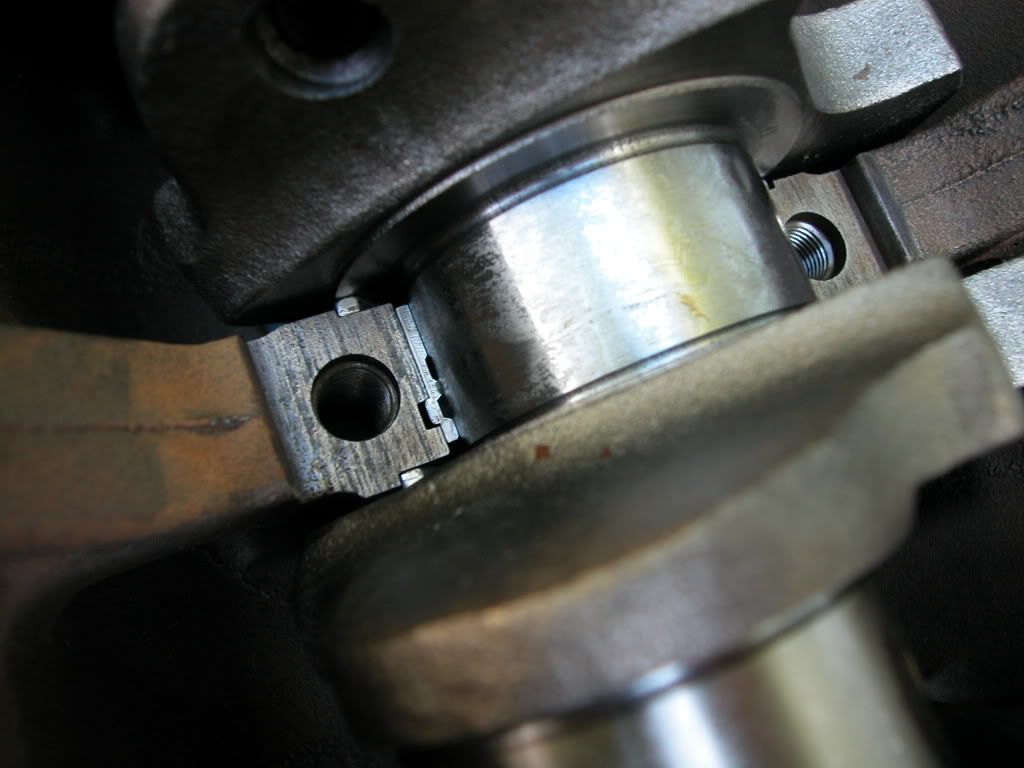

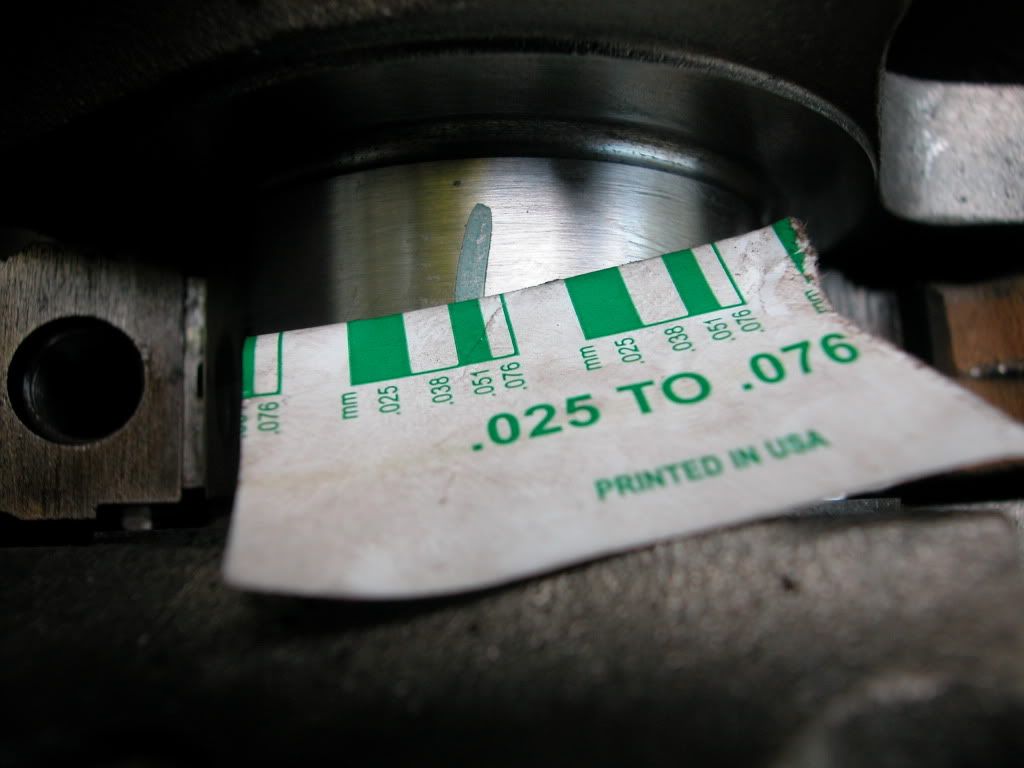
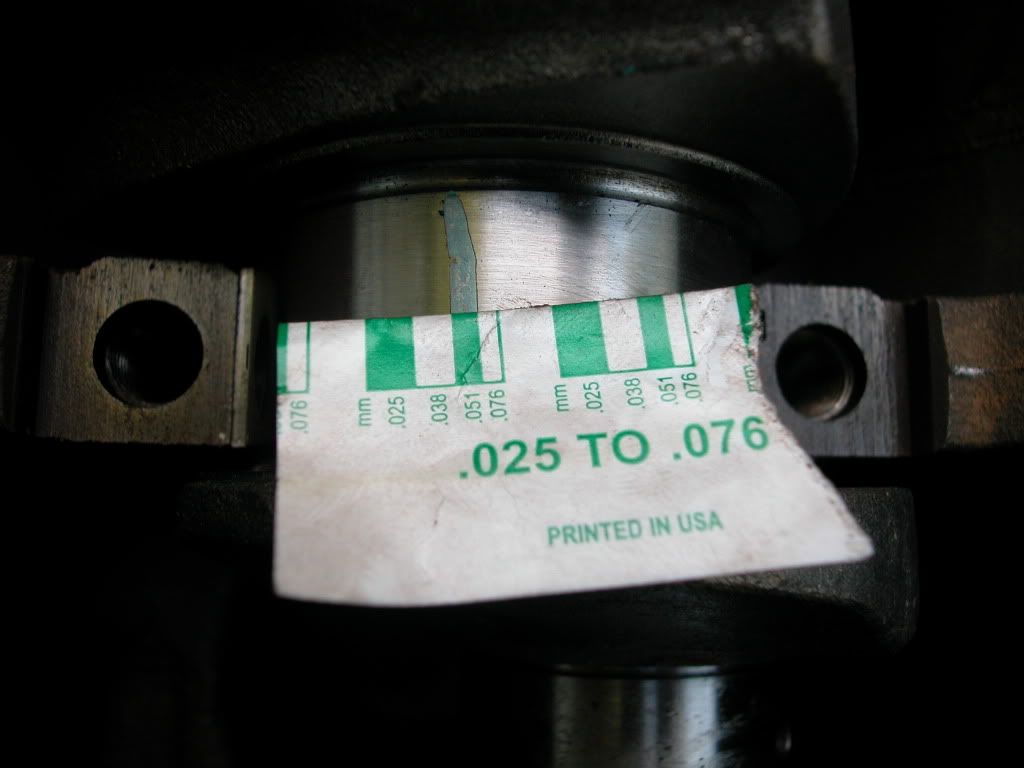
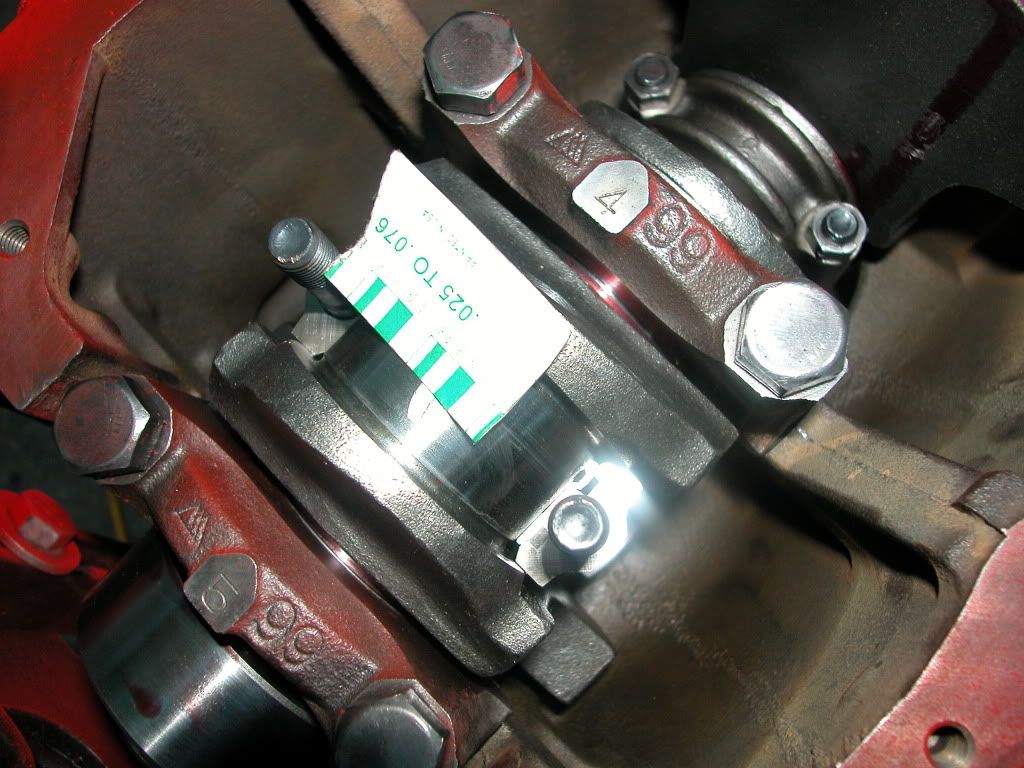
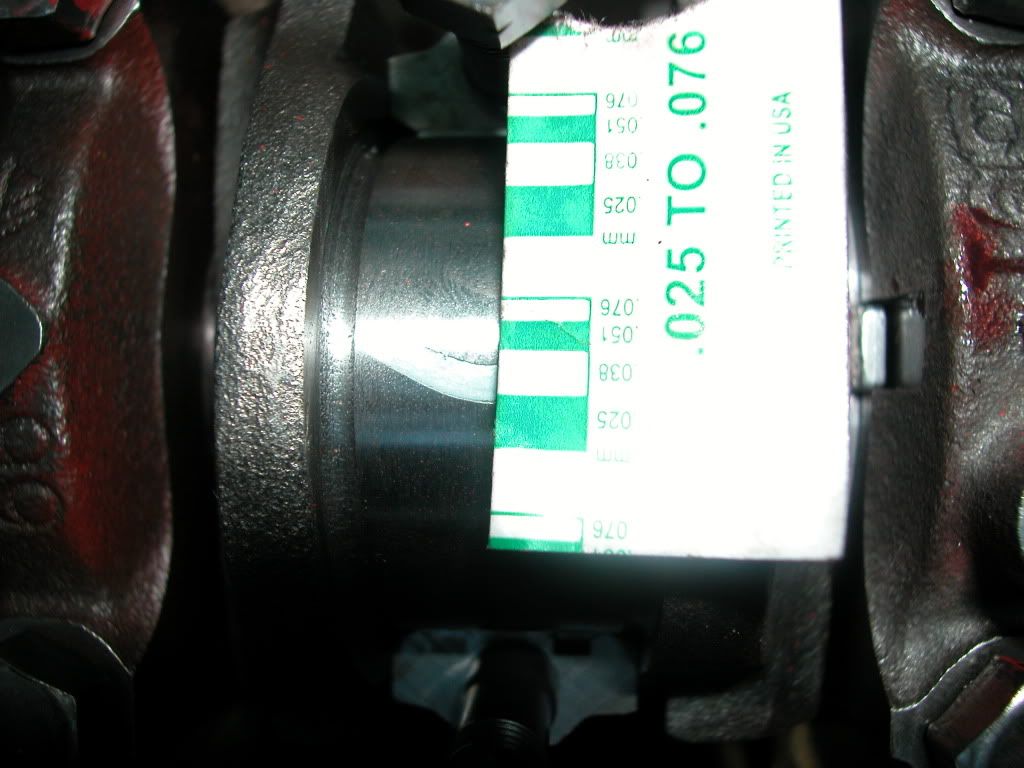
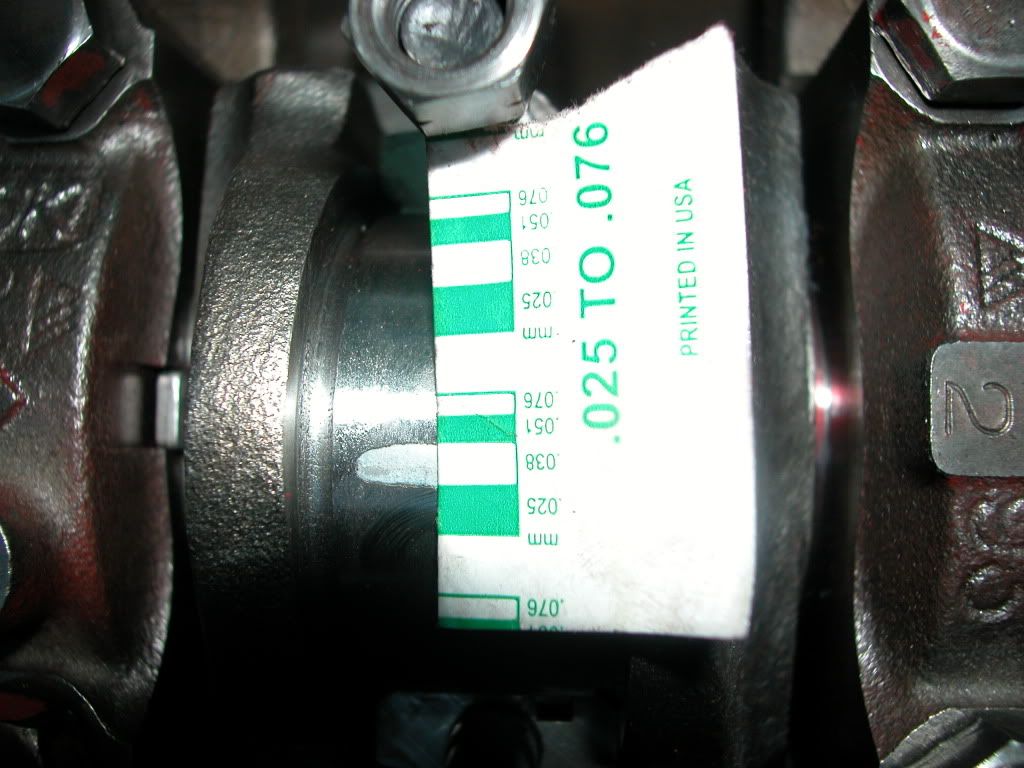
Even though the crank and bearings are brand new and the machine shop guy told me that plasti gaugeing was optionible I decide to go ahead and do the plasti gauge anyway and here are the pics to prove it.
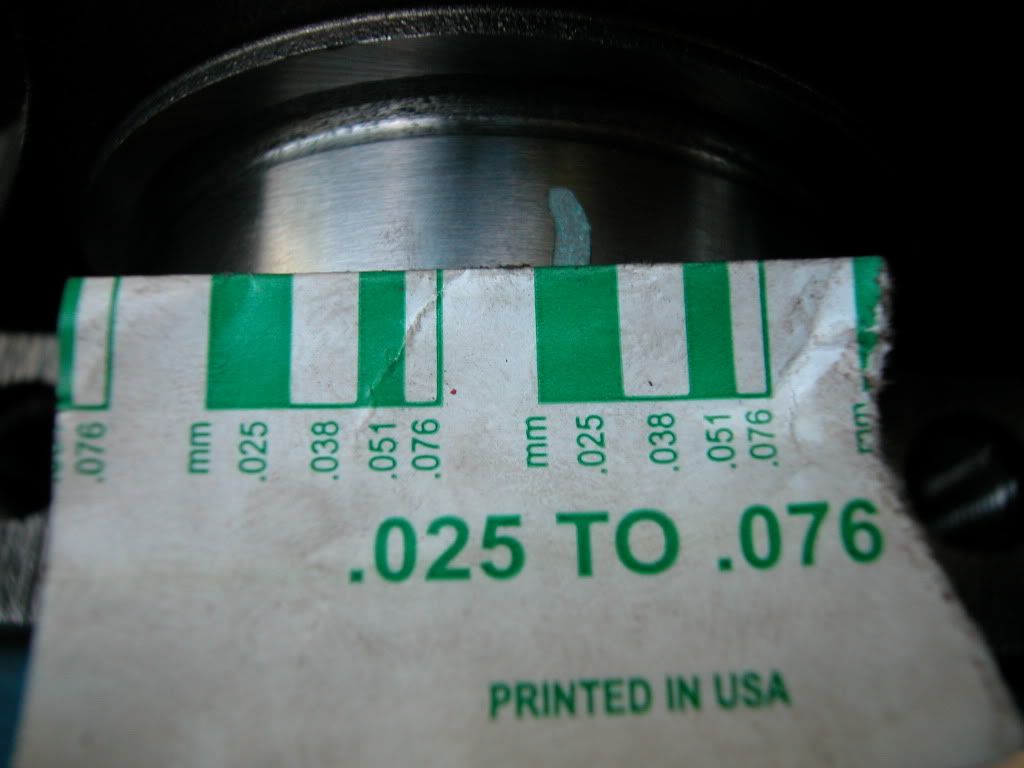
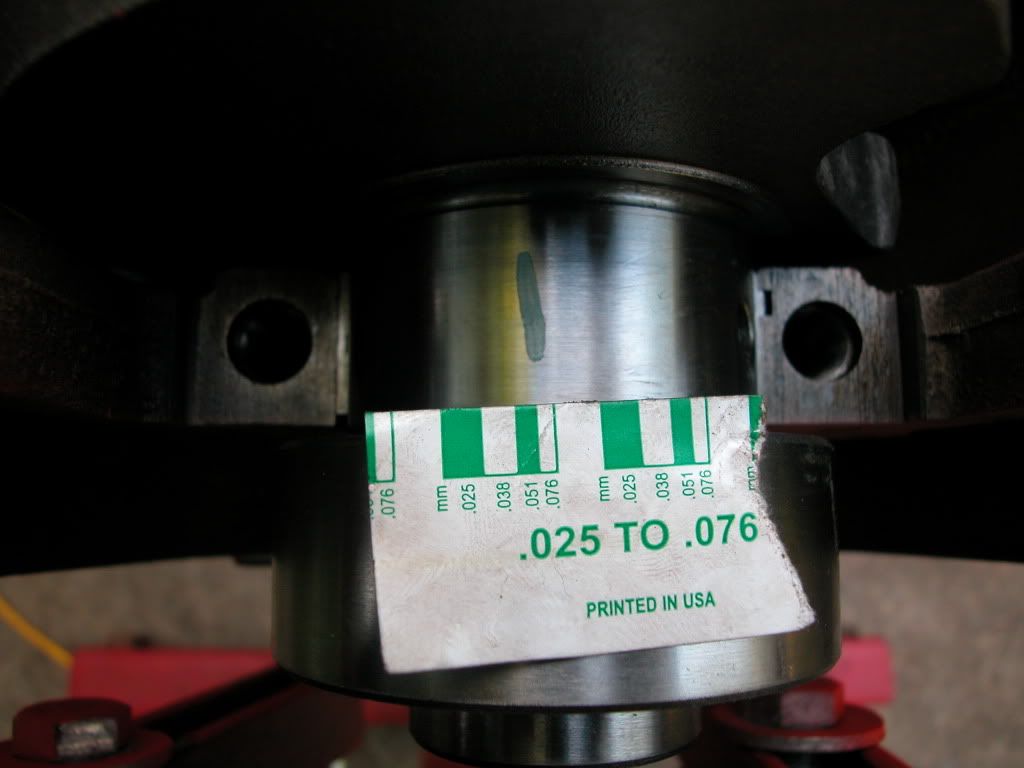
And Here She Is All Bolted In Place , I did 20 , 40 , 60 , And Final Torque Of 76 Lbs Each On The Crank Bolts
All Came Out Between .25 -And .51 which I Am Told Is Fine So Now That I am Sure The Rod Bearings Are correct It's Off To Finish Them Up And I Will Update As Soon As I Get Done With Them But I Have One Question First
After I get The Rods And Pistons Done Is There Any Reason I Should Not Do The Head?
I Have To Still Pull The Other Motor Out Of the Truck And I Will Be Using The Bolts From That Motor To Put Every Thing On On This Motor With The Exception Of The Brand New Head Bolts I Already Have I Understand That There Are A Couple Bolts To The Head That The Timing Cover And The Head Use In Common.
Any Help Please Let Me Know So I Know How Far I Can Go Today.l
So here's where I am at as of the phone call
getting ready to drop the brand new crank in place
Crank in place
Even though the crank and bearings are brand new and the machine shop guy told me that plasti gaugeing was optionible I decide to go ahead and do the plasti gauge anyway and here are the pics to prove it.
And Here She Is All Bolted In Place , I did 20 , 40 , 60 , And Final Torque Of 76 Lbs Each On The Crank Bolts
All Came Out Between .25 -And .51 which I Am Told Is Fine So Now That I am Sure The Rod Bearings Are correct It's Off To Finish Them Up And I Will Update As Soon As I Get Done With Them But I Have One Question First
After I get The Rods And Pistons Done Is There Any Reason I Should Not Do The Head?
I Have To Still Pull The Other Motor Out Of the Truck And I Will Be Using The Bolts From That Motor To Put Every Thing On On This Motor With The Exception Of The Brand New Head Bolts I Already Have I Understand That There Are A Couple Bolts To The Head That The Timing Cover And The Head Use In Common.
Any Help Please Let Me Know So I Know How Far I Can Go Today.l
07-14-2009, 02:48 PM
#31
Contributing Member
Thread Starter


OTE=hillbdeelux;511825242524]just did my 22r
 soo mfun fun to rebuild. its like playing with legosws it
hows it going man?
hone001.jpg[/IMG]
 [/QUOTE]
I was Thinking Of Going That Route At First But I Wanted To Be A Little Different Then Most Hence The Red , Silver And Black I Decided To Go With But Don't Get Me Wrong Yours Looks Just As Good Just Not As Bright
 07-14-2009, 05:45 PM
#32
Contributing Member
Thread Starter
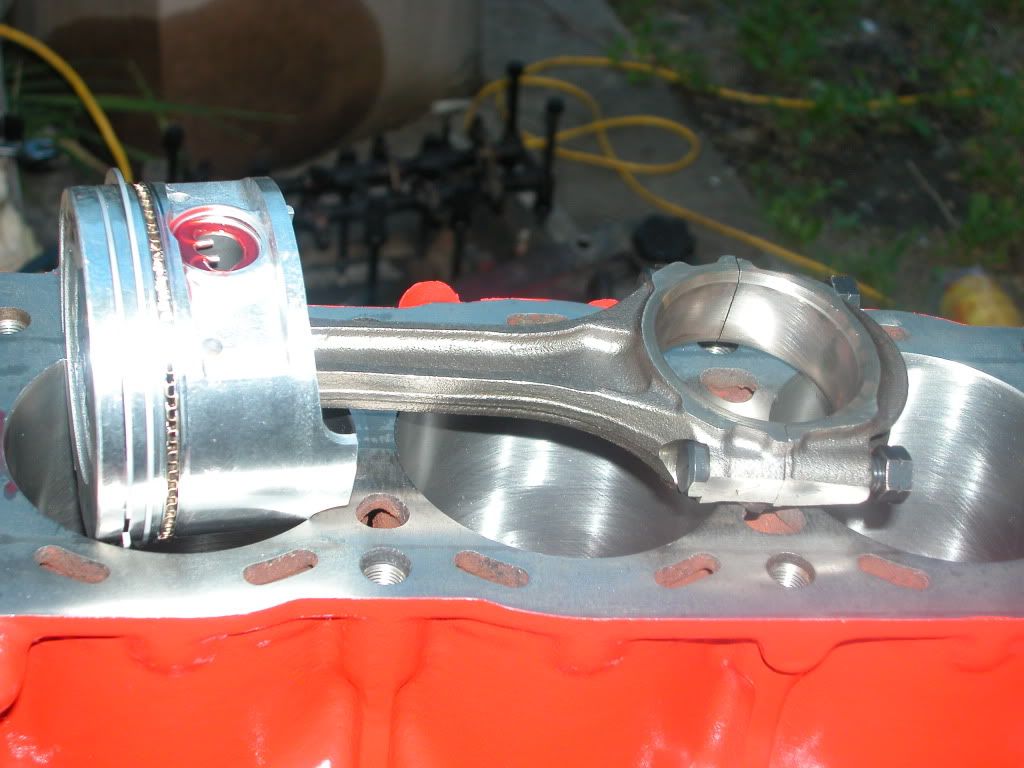
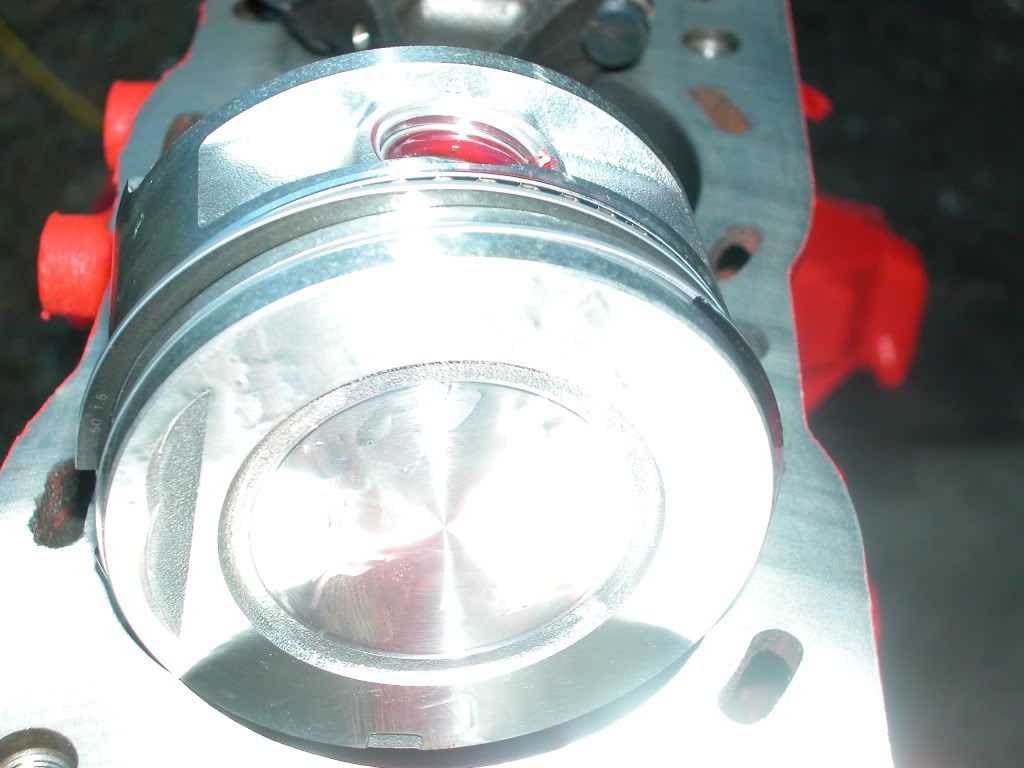
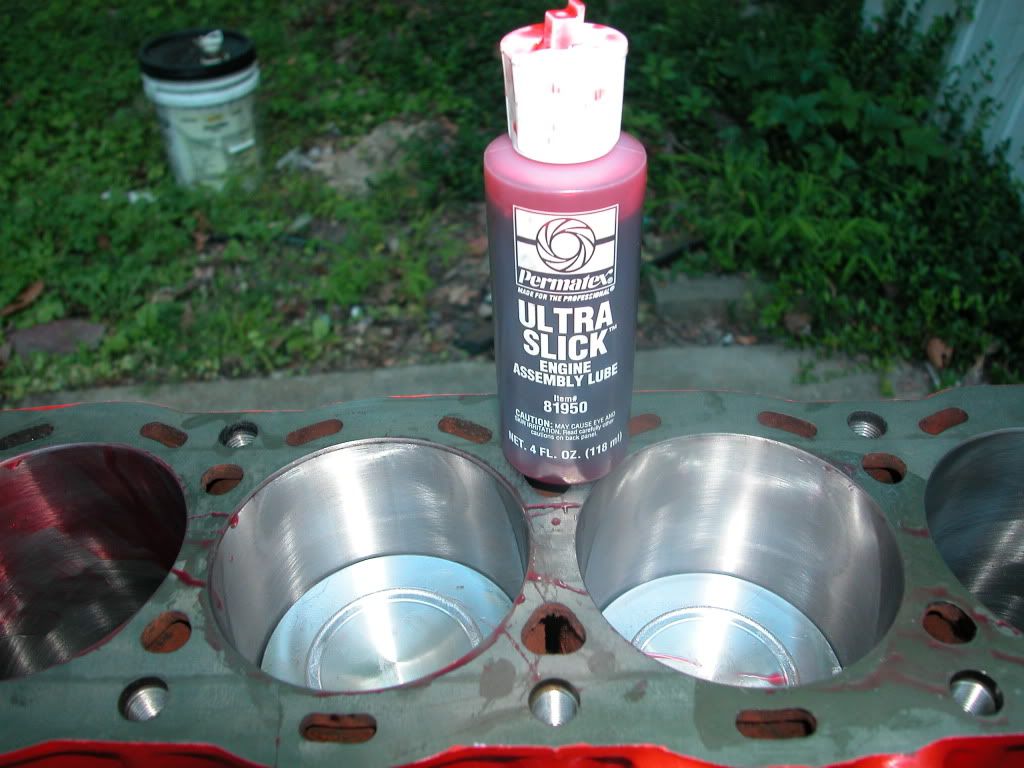
OK well on to the next step PISTON'S sure their not SEXY but as a major next step in the rebuild I thought I would share so here ther are in all their glory .20 over stock piston's and ring's.
Time to lube up the hole HEY GET YOUR MIND OUT OF THE GUTTER
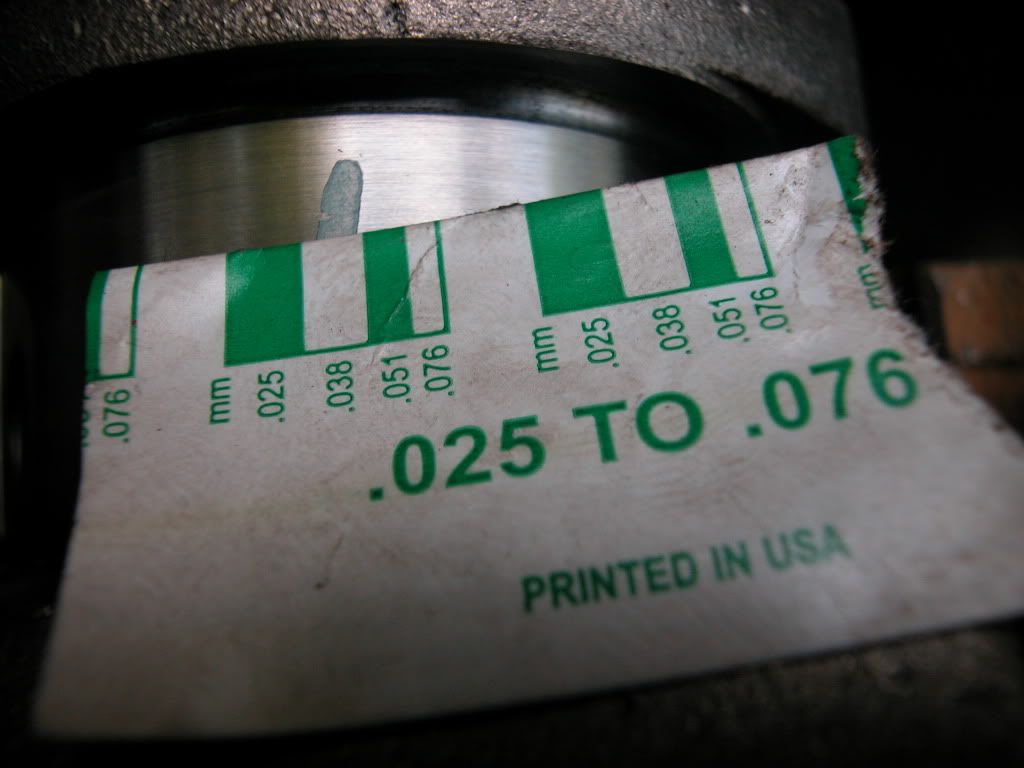
Yep it's PLASTI GAUGE TIME AGAIN this time on the connecting rod berarings again all turn out between .25 and .55 BUT just as everything is going perfect HUSTON WE HAVE A PROBLEM I set the number 1 piston into the ring compressor and BANG the middle ring snaps a small piece off F*** now what?
The logical answer is to call ENGNBLDR tell him about my delima and see if he has a ring I can buy so I can get this thing done. Like the man I figured he was and the main reason I bought my parts from him he steps up and say's I have one in the back I can send you so I say COOL HOW MUCH SHIPPED? He replies give me your piston size and address and it will it be in the mail tomorrow NO CHARGE and that my friends is how you get repete and referial business MOST LIKELY THE BEST DEAL I GOT ON THIS WHOLE REBUILD RIGHT THERE.
So after talking with ENGNBLDR it was back out to the garage to see what I was going to do now well here's the answer
TAKE THE TAPE OFF THE ENGINE
I was so STOKED I almost forgot about the broken ring so standing there looking at this thing I could not help but think to myself I WONDER WHAT IT'S GOING TO LOOK LIKE DONE SO
FRESH FROM THE SPY CAM AND A LITTLE CURIOSITY HERE YOU GO NEVER BEFORE SEEN BEHIND THE SCENE FOOTAGE
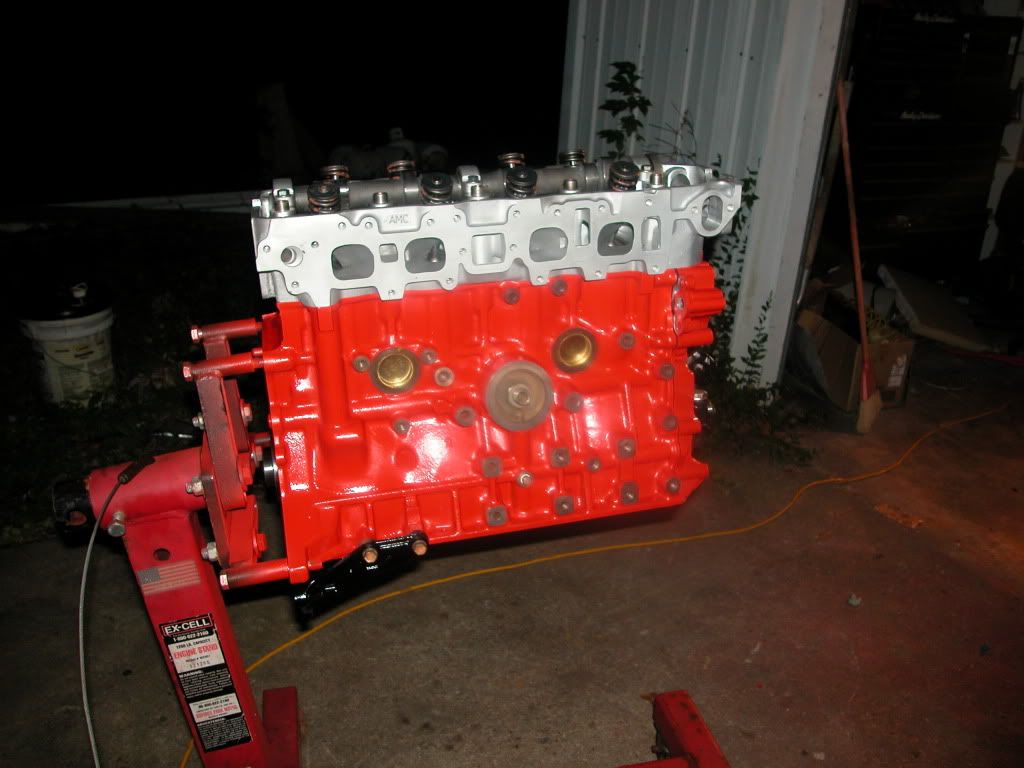
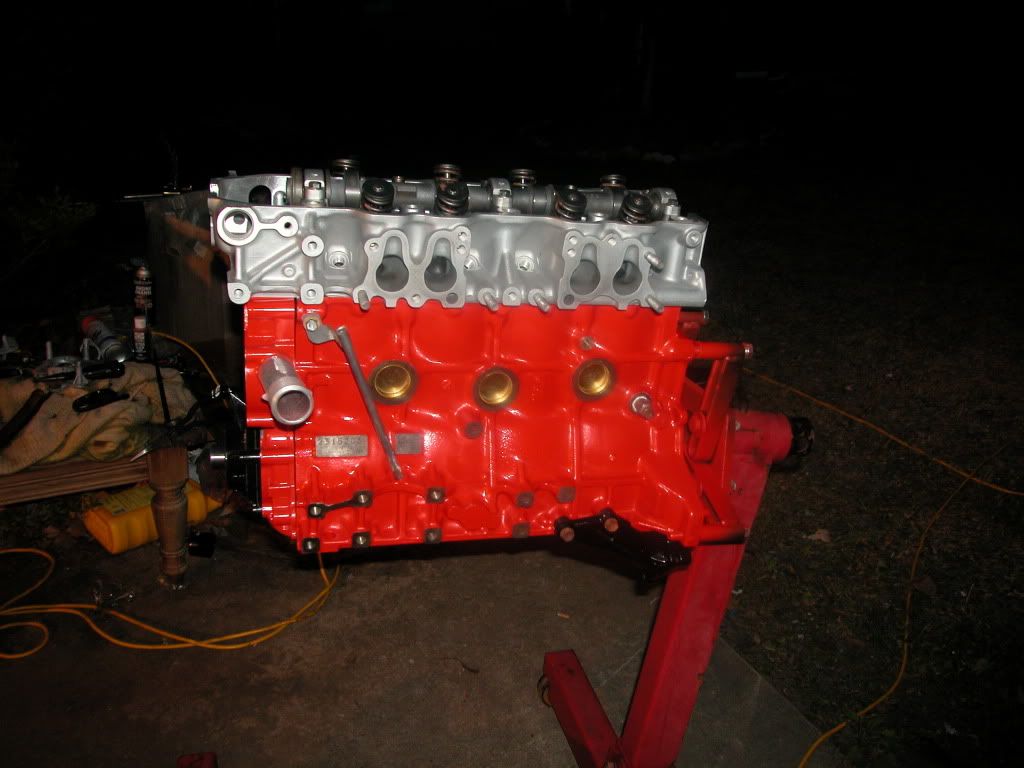

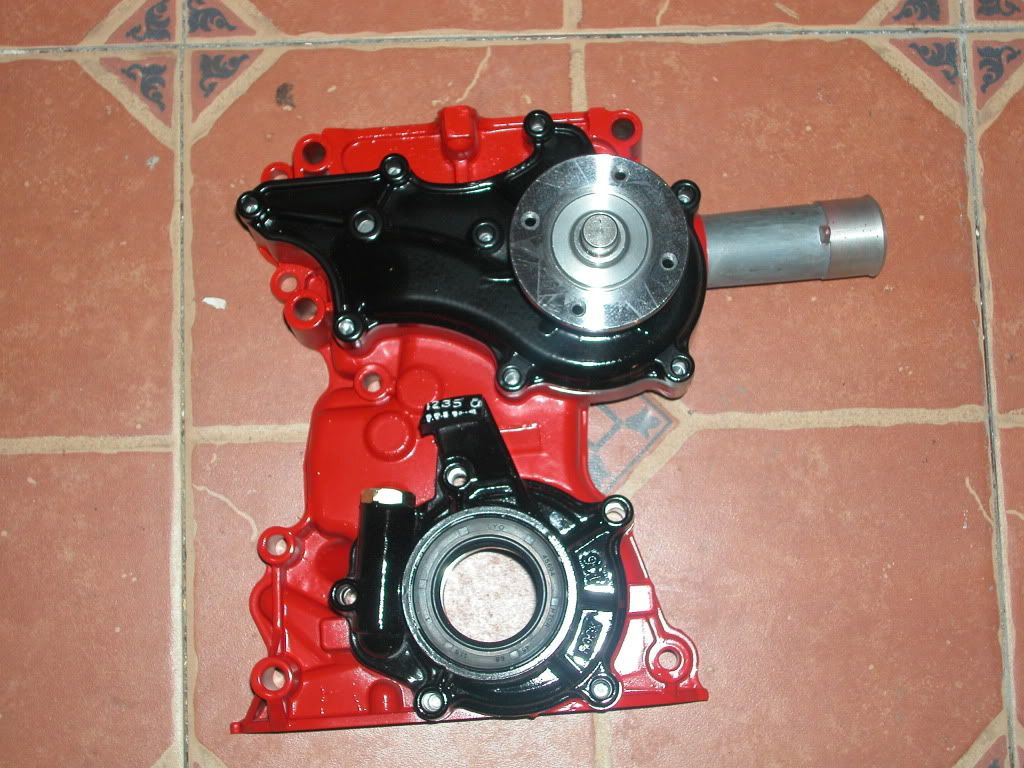
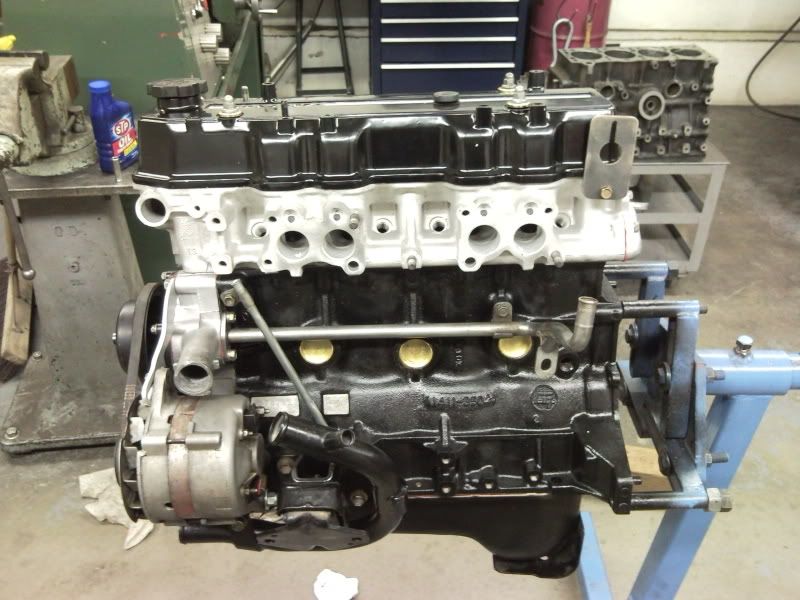
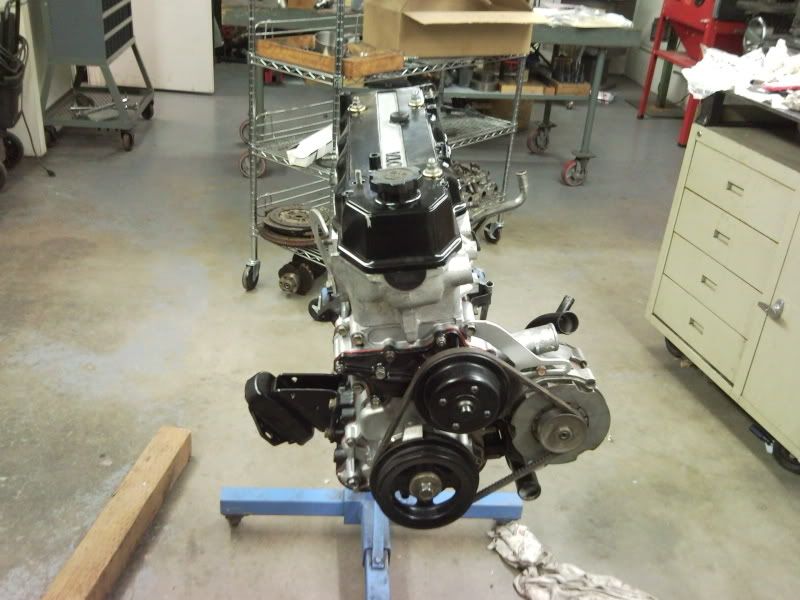
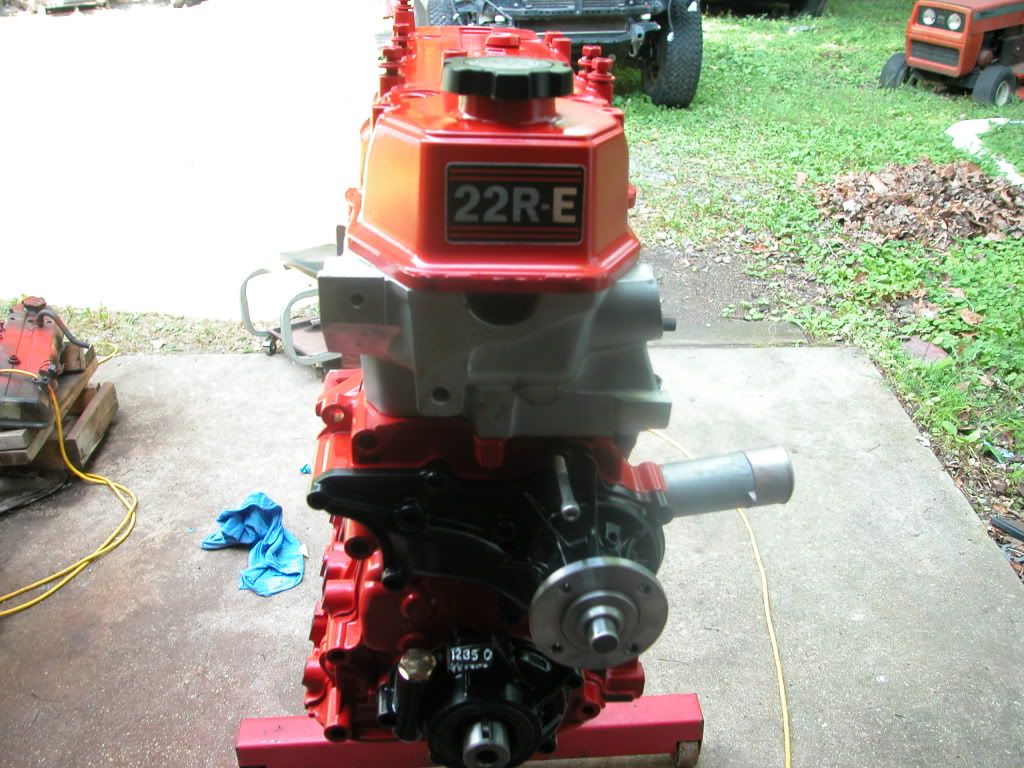
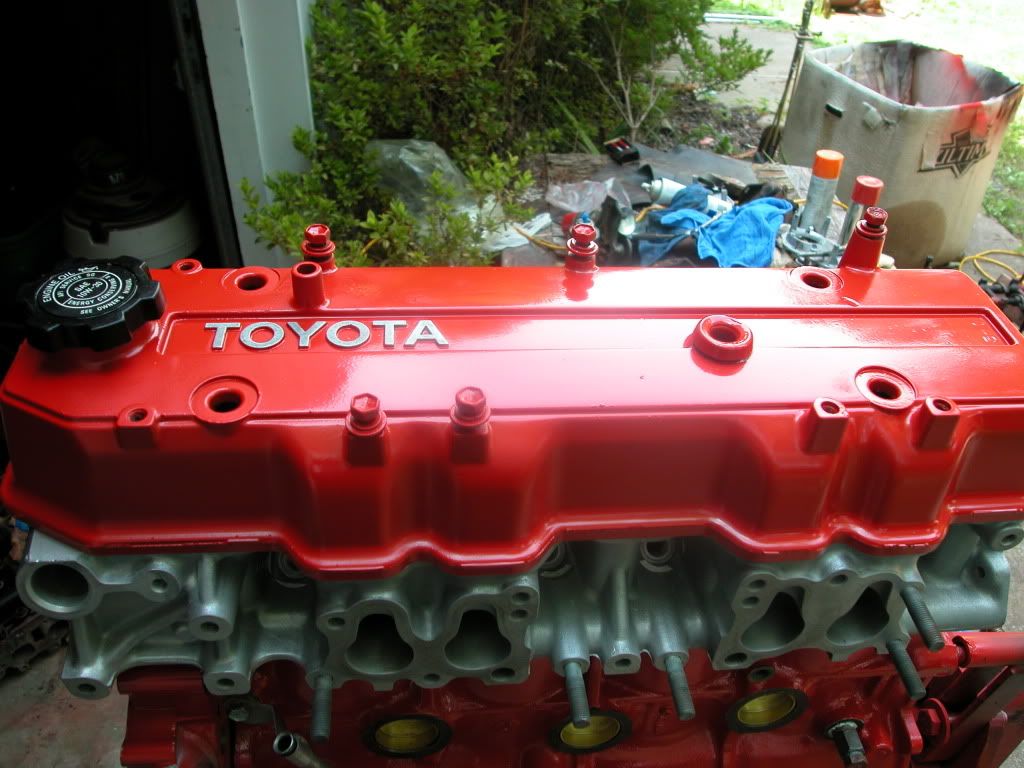
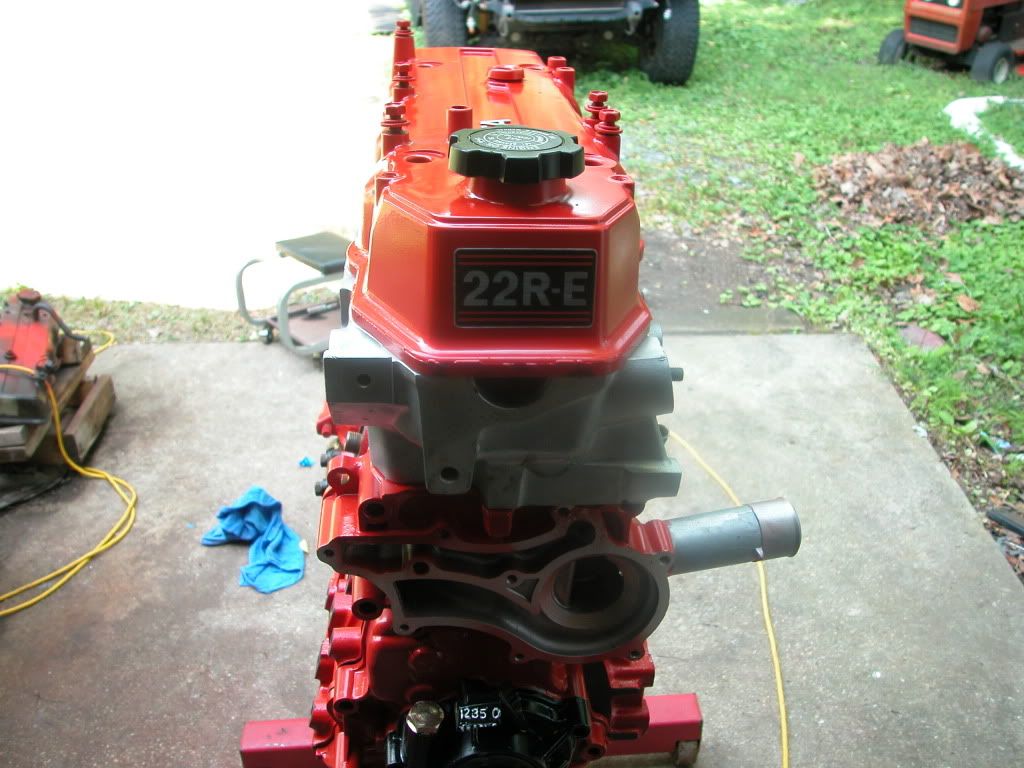
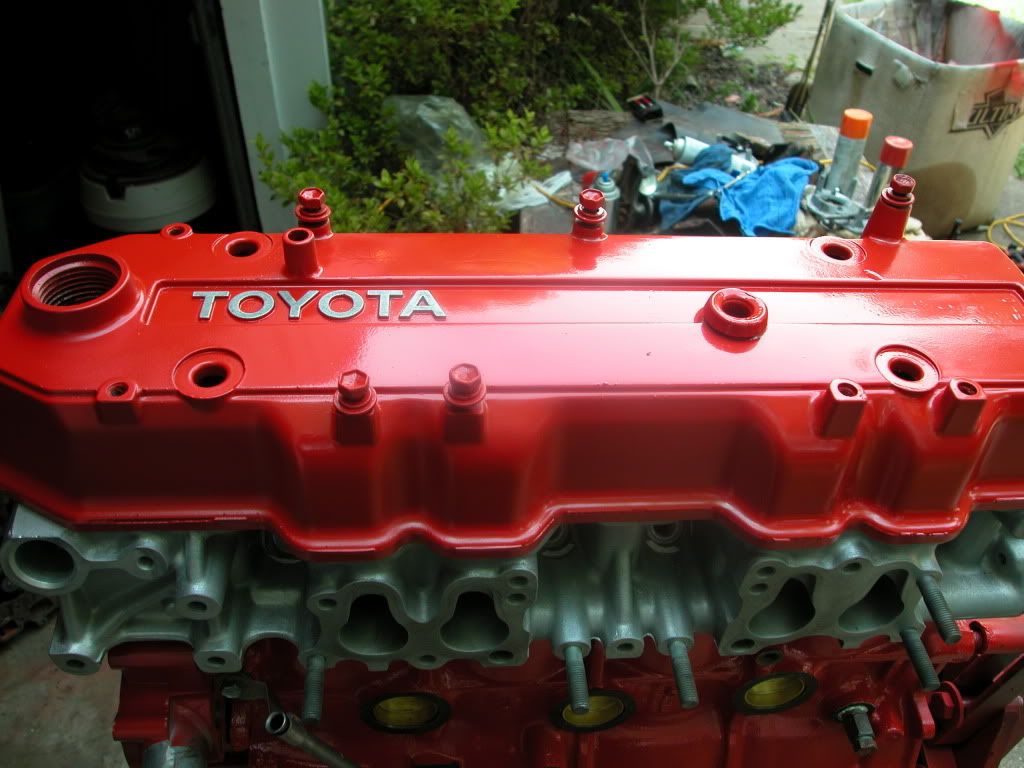
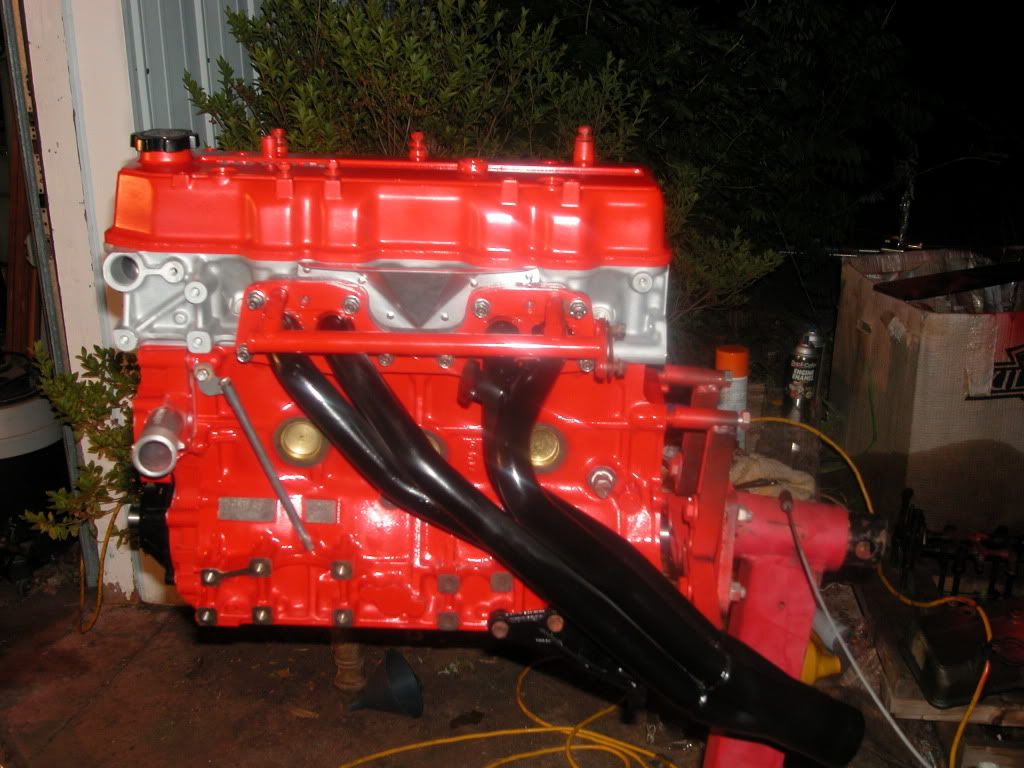
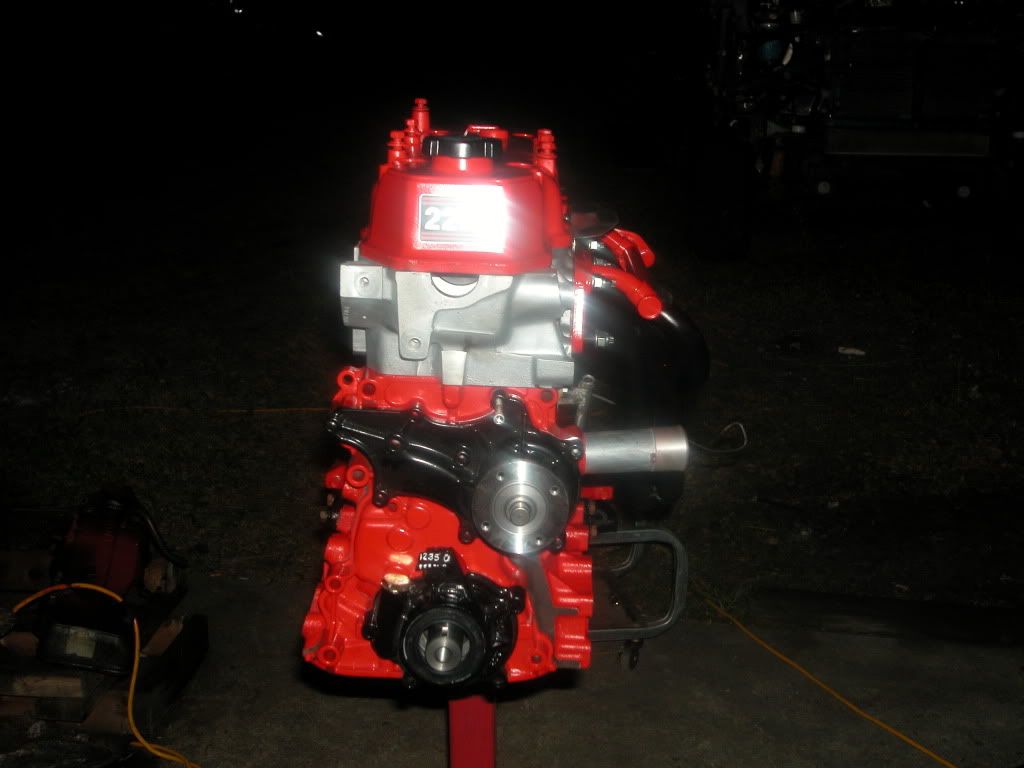
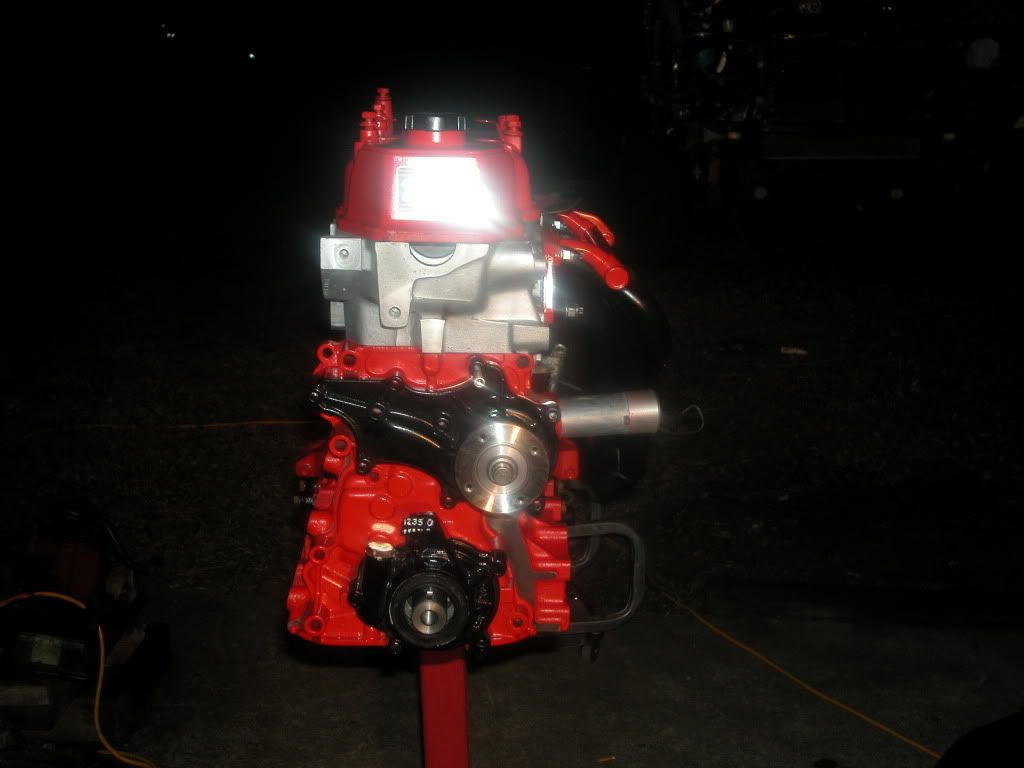
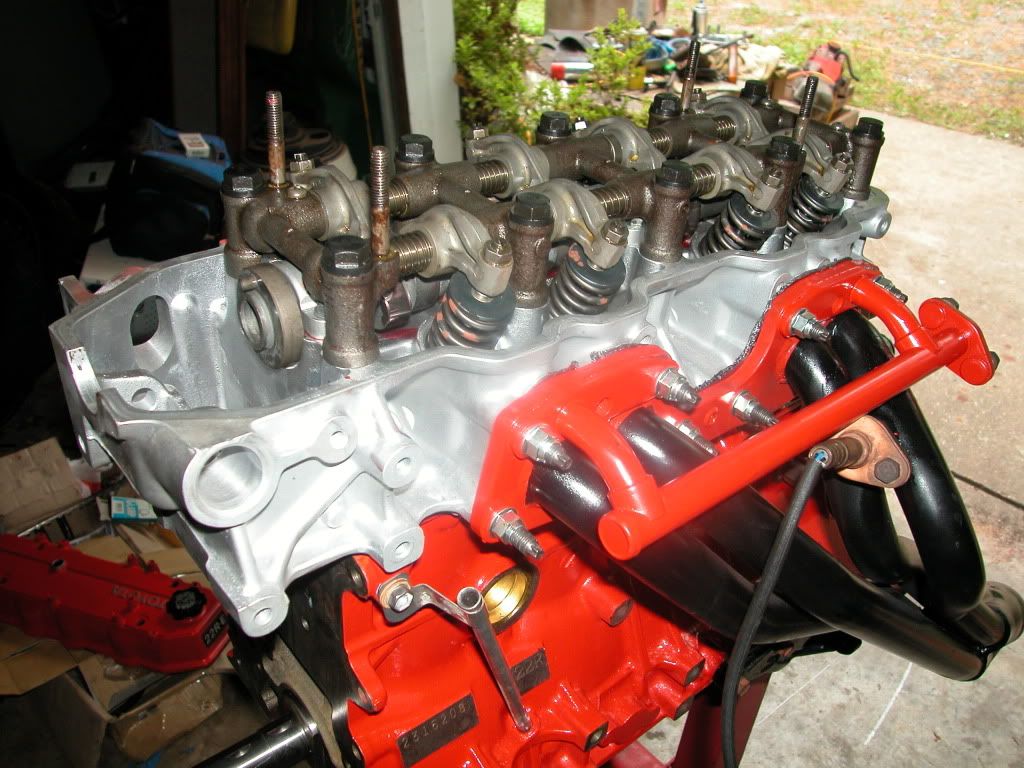
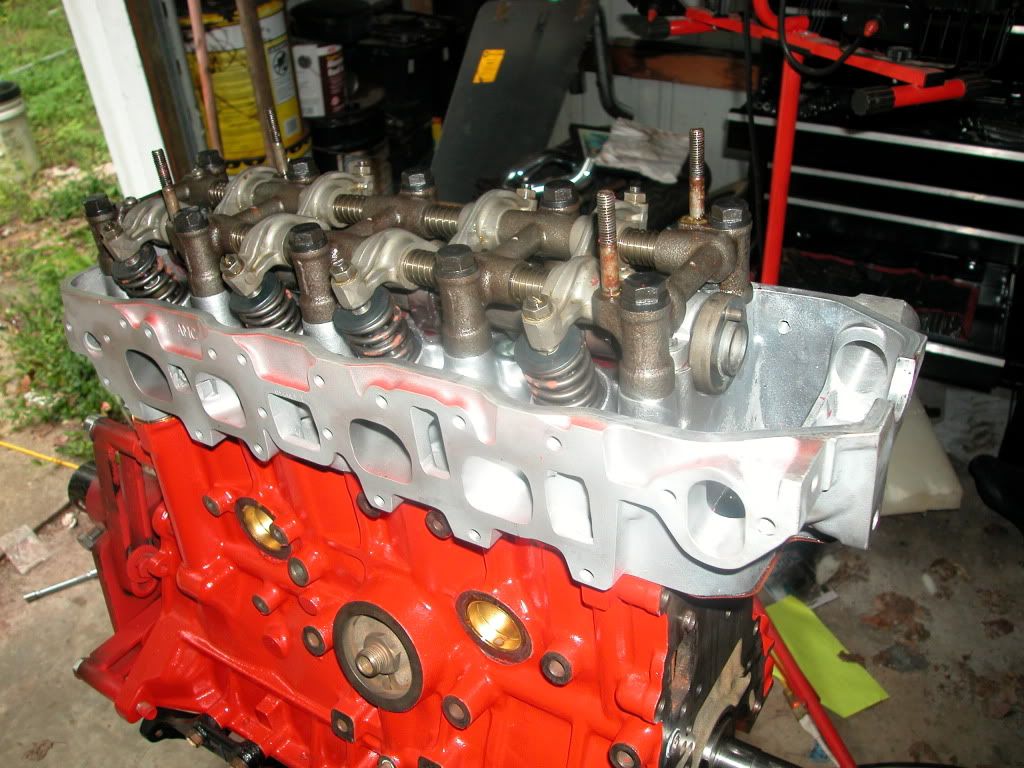
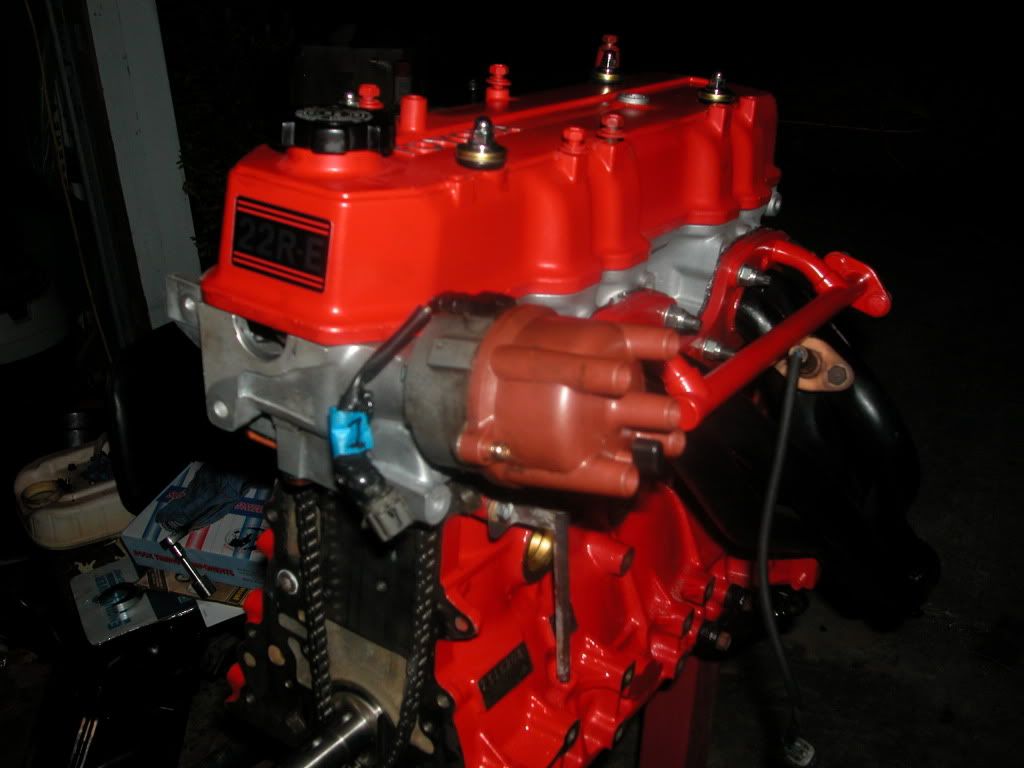
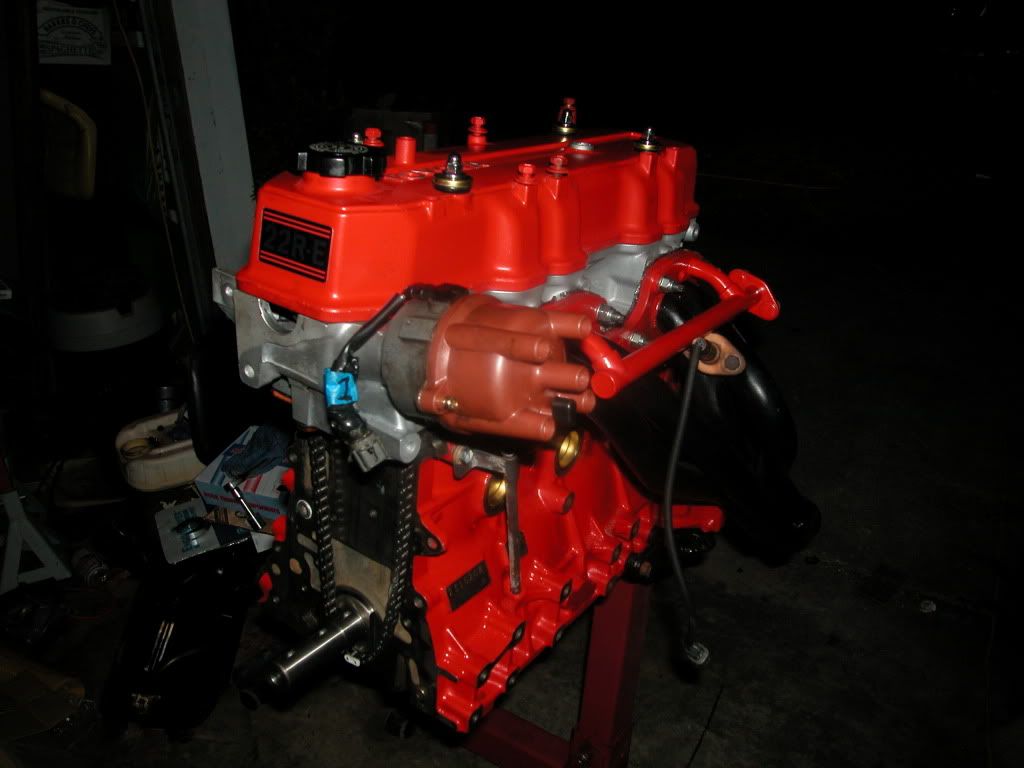
Although it's all just set up there and nothing is bolted down it still looks KILLER to me the L.C.Engineering head will stay SILVER when I get it off and painted the valve cover will be red with the TOYOTA letters silver the header will be black to balance the red out , all the intake will also be silver with all the lettering in red , Pulley's will be silver and considering doing the alternator black or silver but all the mounts will be black to help break up the red again.
Time to lube up the hole HEY GET YOUR MIND OUT OF THE GUTTER
Yep it's PLASTI GAUGE TIME AGAIN this time on the connecting rod berarings again all turn out between .25 and .55 BUT just as everything is going perfect HUSTON WE HAVE A PROBLEM I set the number 1 piston into the ring compressor and BANG the middle ring snaps a small piece off F*** now what?
The logical answer is to call ENGNBLDR tell him about my delima and see if he has a ring I can buy so I can get this thing done. Like the man I figured he was and the main reason I bought my parts from him he steps up and say's I have one in the back I can send you so I say COOL HOW MUCH SHIPPED? He replies give me your piston size and address and it will it be in the mail tomorrow NO CHARGE and that my friends is how you get repete and referial business MOST LIKELY THE BEST DEAL I GOT ON THIS WHOLE REBUILD RIGHT THERE.
So after talking with ENGNBLDR it was back out to the garage to see what I was going to do now well here's the answer
TAKE THE TAPE OFF THE ENGINE
I was so STOKED I almost forgot about the broken ring so standing there looking at this thing I could not help but think to myself I WONDER WHAT IT'S GOING TO LOOK LIKE DONE SO
FRESH FROM THE SPY CAM AND A LITTLE CURIOSITY HERE YOU GO NEVER BEFORE SEEN BEHIND THE SCENE FOOTAGE
Although it's all just set up there and nothing is bolted down it still looks KILLER to me the L.C.Engineering head will stay SILVER when I get it off and painted the valve cover will be red with the TOYOTA letters silver the header will be black to balance the red out , all the intake will also be silver with all the lettering in red , Pulley's will be silver and considering doing the alternator black or silver but all the mounts will be black to help break up the red again.
07-14-2009, 05:51 PM
#33
Contributing Member
looks really good man!
that's awesome how the guys at engnbldr hooked you up like that! they are good people
you are not unlike myself; you like to temporarily assymble, or mock up the parts, just to get a hint of what it's going to look like in the end
keep up the work man; I'm hoping to set mine down in the truck this weekend providing my clutch arrives
07-14-2009, 06:23 PM
#34
Contributing Member
Thread Starter
looks really good man!
that's awesome how the guys at engnbldr hooked you up like that! they are good people
you are not unlike myself; you like to temporarily assymble, or mock up the parts, just to get a hint of what it's going to look like in the end
keep up the work man; I'm hoping to set mine down in the truck this weekend providing my clutch arrives
I guess the next move is to pull the other motor and start stripping the parts off it and getting them all prettied up and mounted till the new ring comes in. I am going to buy the new clutch soon found a 1250 lb set up for $110 from a place in INDIANA but they say they need to know what size the clutch is that's in it even though I told them it was for a 93 they still want to make sure I get the correct one the first time.
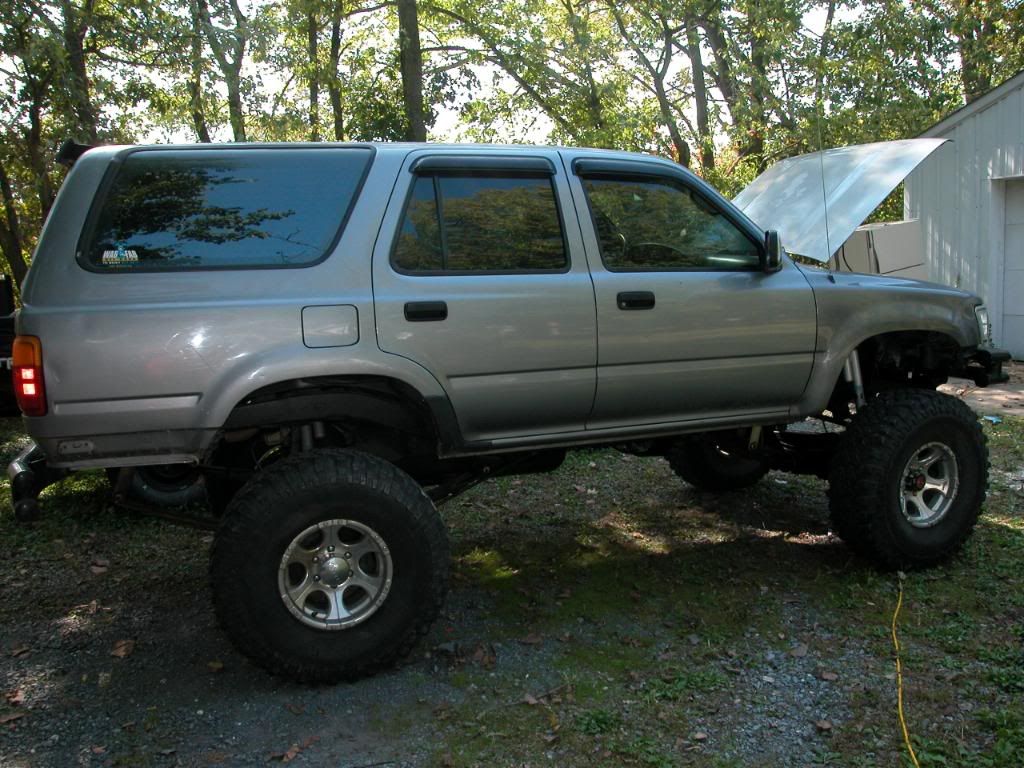
Good luck getting yours in the truck this weekend I know the feeling and I am still a way's away from that but I still feel the burning desire to get it done. I want to be ready to go to BIG DOG in Aug. even if I just go to watch or maybe do some small stuff till this motor is good and broke in I want so bad to try out the S.A.S. set up I can't even imgane what it's going to feel like with the rear set up like the front. Here's a picture of the truck this motor is going into.
 07-15-2009, 12:06 PM
#35
Contributing Member
Thread Starter
Well got a little bit more done today I know it's not much be the work into it time wise was a lot more then the pictures show.
Last edited by olharleyman; 07-15-2009 at 02:48 PM.
07-16-2009, 10:33 AM
#37
Contributing Member
Thread Starter
As for the sticker here is a link to the guy I got it from on E-BAY and it arrived in like 3 days from AZ. to MD. he say's it's OEM if it's not you would never know it very well worth the $6.99
http://cgi.ebay.com/ebaymotors/4RUNN...A1%7C72%3A1171
This link is still active and is for another one or two he is selling so just over look the Your PayPal payment has been sent. Thank you. and scroll down a little and you can buy it now for the same price $6.99 shipped to you door
07-16-2009, 07:17 PM
#38
Contributing Member
Thread Starter
Well here is a little more progress from today but for some reason the header just don't seem like I got it right so if anybody see's where I may have made a mistake please point it out so I can fix it before going on and having to redo the same thing three times lol 

07-17-2009, 10:51 PM
#39
Contributing Member
Thread Starter
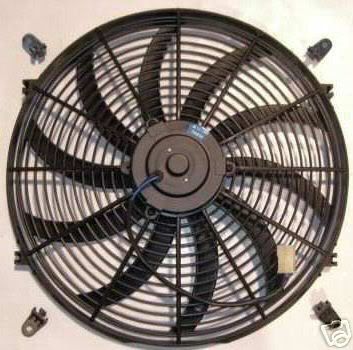
I ordered a couple new parts to help keep this new motor cool and keep a couple extra pony's where they belong and just maybe as the sells person say's get 1-3 extra MPG yea sure but will see anyway here's the break down of the fan kit
Procomp 16 Inch Electronic Thermo Cooling Fan
Great for Radiators, Oil Coolers, & Transmission Cooler, Condenser etc.
Part# PC-2054
* Procomps 12v High Performance Reversible Electrical Cooling Fans are idea for OEM or High Performance applications.
* Draws only 12.5 Amps!
* Configured as a puller from the factory, it mounts on the inside and pulls the air through the radiator.
* Blades and polarity of the wiring can be reversed and it becomes a pusher
* Universal fit for Cars, Trucks, Muscle Cars, Imports & Domestics, Hot Rods Street Rod, Show Car etc. Chevy Ford Pontiac Olds Chrysler...
* Includes mounting tabs.
* 2500 CFM Rating
Measurements:
* Thickness- 1 1/2" at edge, 3" at center
* Height- 16"
* Width- 17"
Mounting kit
16" Fan
And this to run it
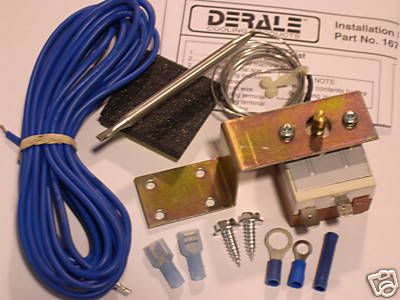
Derale Adjustable Dial Electric Fan Control Kit
Part# 16769
* Controller mounts on your car or truck
* Radiator in-hose probe temp sensor.
* Adjustable dial activates fan between 150-240F degrees.
* Turn-off is 10 degrees less than turn on.
* Works with any 12 volt fan.
* Maximum capacity is 25 amps.
* A/C override circuit included.
* Designed for single and dual fan setups.
* Kit includes switch, harness, probe, wire hardware, universal mounting bracket and installation booklet with diagram.
Procomp 16 Inch Electronic Thermo Cooling Fan
Great for Radiators, Oil Coolers, & Transmission Cooler, Condenser etc.
Part# PC-2054
* Procomps 12v High Performance Reversible Electrical Cooling Fans are idea for OEM or High Performance applications.
* Draws only 12.5 Amps!
* Configured as a puller from the factory, it mounts on the inside and pulls the air through the radiator.
* Blades and polarity of the wiring can be reversed and it becomes a pusher
* Universal fit for Cars, Trucks, Muscle Cars, Imports & Domestics, Hot Rods Street Rod, Show Car etc. Chevy Ford Pontiac Olds Chrysler...
* Includes mounting tabs.
* 2500 CFM Rating
Measurements:
* Thickness- 1 1/2" at edge, 3" at center
* Height- 16"
* Width- 17"
Mounting kit
16" Fan
And this to run it
Derale Adjustable Dial Electric Fan Control Kit
Part# 16769
* Controller mounts on your car or truck
* Radiator in-hose probe temp sensor.
* Adjustable dial activates fan between 150-240F degrees.
* Turn-off is 10 degrees less than turn on.
* Works with any 12 volt fan.
* Maximum capacity is 25 amps.
* A/C override circuit included.
* Designed for single and dual fan setups.
* Kit includes switch, harness, probe, wire hardware, universal mounting bracket and installation booklet with diagram.
Last edited by olharleyman; 07-17-2009 at 10:53 PM.
07-20-2009, 01:11 PM
#40
Contributing Member
Thread Starter
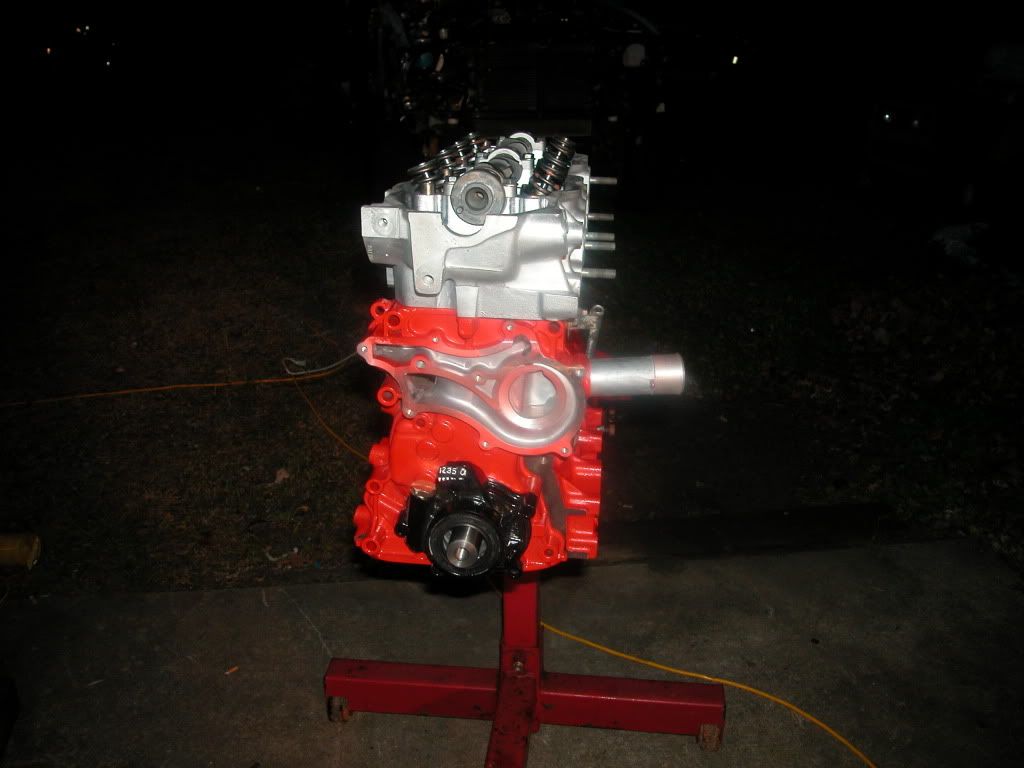
So today I got the replacement rings from ENGNBLDR GREAT GUY by the way anyway I installed the last piston and started on the rest of the top end. With the block being decked .010" I had to put on a head shim from the machine shop so I used some ultra copper rtv and laid down a small even bead to place the copper head shim on.

Then I put the copper head shim in place
Next was to put the head gasket in place
Then the head with brand new head bolts torqued 20 ,40, and then 62 ft.lbs and cut the metal shield out/off the header gasket for a better fit
I guess now it's time to pull the other motor and start scavenging parts off it to finish this motor up.
Last edited by olharleyman; 07-20-2009 at 04:51 PM.


