Rune's 3.0 rebuild thread

 08-24-2007, 11:59 AM
#42
Registered User
Join Date: Sep 2006
Location: Edmonton
Posts: 25
Likes: 0
Received 0 Likes
on
0 Posts
Before you drop the engine back in, install exhaust manifolds and that piece of pipe at the rear of the engine that connects them both together. It's easier to do it when the engine is out. I actually left them on the engine when I was lifting mine out.
Another thing is check/replace the clutch and components while you have the engine out. If it hasn't been done recently, I would just replace it - not too expensive, but will save you a lot of time when you are up to a new clutch. And if you had any tranny problems, that's a good time to pull it out too and sen't it to the shop or rebuild yourself if you have time. Tranny w/o t-case it so light that a baby can lift it (not quite but it's realy light).
Another thing is check/replace the clutch and components while you have the engine out. If it hasn't been done recently, I would just replace it - not too expensive, but will save you a lot of time when you are up to a new clutch. And if you had any tranny problems, that's a good time to pull it out too and sen't it to the shop or rebuild yourself if you have time. Tranny w/o t-case it so light that a baby can lift it
(not quite but it's realy light).
Last edited by shurup; 08-24-2007 at 12:00 PM.
08-24-2007, 12:07 PM
#43
Registered User
Join Date: Sep 2006
Location: Edmonton
Posts: 25
Likes: 0
Received 0 Likes
on
0 Posts
Just remembered one more thing. Replace the knock sensor wire, no matter how good it looks. I had to take mine engine apart again after I rebuilt it and started driving my truck again to replace that DAMN WIRE! :mad: Also I think I should have replaced the knock sensor too while I was there (twice). I think now that this sensor is giving me troubles. I have another tread running in this forum about the lack of power on higher RPMs.
08-24-2007, 12:54 PM
#44
Registered User
Join Date: Aug 2006
Location: Petersburg va.
Posts: 318
Likes: 0
Received 0 Likes
on
0 Posts
Heres a great thread just full of good info.
Jim https://www.yotatech.com/forums/f116...et-job-104934/
Jim https://www.yotatech.com/forums/f116...et-job-104934/
08-24-2007, 05:32 PM
#45
Registered User
Thread Starter
Join Date: Oct 2005
Location: Berkeley, CA
Posts: 587
Likes: 0
Received 0 Likes
on
0 Posts
Another thing is check/replace the clutch and components while you have the engine out. If it hasn't been done recently, I would just replace it - not too expensive, but will save you a lot of time when you are up to a new clutch. And if you had any tranny problems, that's a good time to pull it out too and sen't it to the shop or rebuild yourself if you have time. Tranny w/o t-case it so light that a baby can lift it (not quite but it's realy light).
(not quite but it's realy light). I am also definitely replacing the knock sensor wire and a bubch of other stuff as well. But first I need to figure out what I need to do to my crankshaft.

 08-28-2007, 10:22 PM
#48
Registered User
Thread Starter
Join Date: Oct 2005
Location: Berkeley, CA
Posts: 587
Likes: 0
Received 0 Likes
on
0 Posts
I'm pretty sure the connecting rod bearings/journals are not supposed to look like this. This is what they looked like when I got the connecting rod cap off.

And then they looked like this when I had them out.
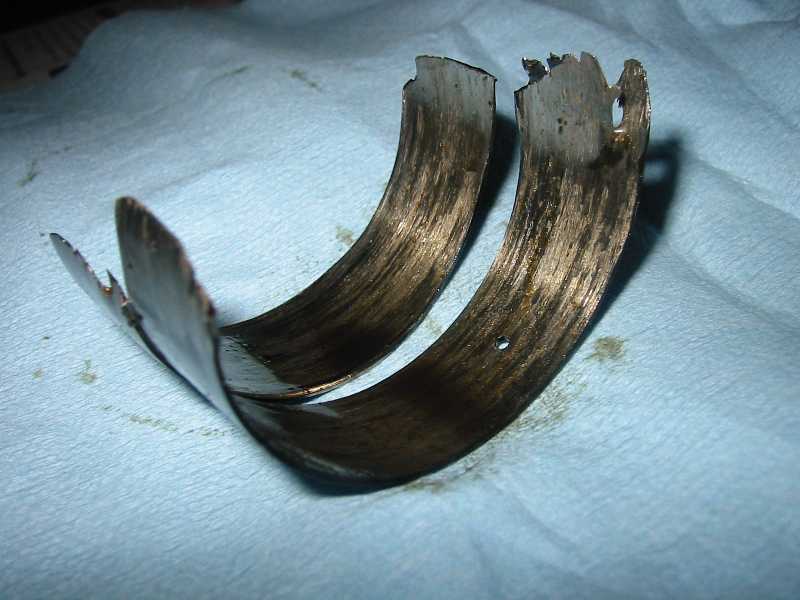
No wonder I heard a lot of strange noises in there.
This is what they looked like when I got the connecting rod cap off.And then they looked like this when I had them out.
No wonder I heard a lot of strange noises in there.
Last edited by runethechamp; 08-28-2007 at 10:24 PM.
 08-29-2007, 04:33 AM
#50

Watch for signs of piston slapping the cylinder head where the rod bearing spun. Happened to me and the head ended up being cracked internally due to the piston hammering. You will see signs of where the flat part of the piston has been hitting the cylinder head if it was happening. Also, the rod was beaten out of round at the crank end. You may want a shop to replace that one rod or at least resize the rod back to spec's due to the knocking even if the piston was not hitting the head.
Been there and don that......
My $0.02
Been there and don that......
My $0.02
08-29-2007, 06:05 AM
#52
Registered User
Thread Starter
Join Date: Oct 2005
Location: Berkeley, CA
Posts: 587
Likes: 0
Received 0 Likes
on
0 Posts
Watch for signs of piston slapping the cylinder head where the rod bearing spun. Happened to me and the head ended up being cracked internally due to the piston hammering. You will see signs of where the flat part of the piston has been hitting the cylinder head if it was happening. Also, the rod was beaten out of round at the crank end. You may want a shop to replace that one rod or at least resize the rod back to spec's due to the knocking even if the piston was not hitting the head.
Been there and don that......
My $0.02
Been there and don that......
My $0.02
Yeah Kat, I'm happy I tore it apart, and that I did it myself. I didn't really have a choice on whether to do it or not, and I was a little bit nervous I wouldn't find anything obvious, but here it is.
Bumpin, I'm at least getting a new rod. The old one is bent at the journal, I can't get the cap on again right now. I'll have the machine shop give me their opinion on the crank, but I might just try to pick up a new on in any case.
08-30-2007, 06:24 AM
#53
Registered User
Thread Starter
Join Date: Oct 2005
Location: Berkeley, CA
Posts: 587
Likes: 0
Received 0 Likes
on
0 Posts
Got the pistons and the crank out yesterday. Apart from the bearing and the corresponding rod and crank pin, everything looks pretty good.
Measured the crank/rod journal to 2.1558 inches (if I remember this correctly now), which I think is still within repairable specs. Just wonder what is cheaper, to fix this crank or get a good used one? Any advice?
Measured the crank/rod journal to 2.1558 inches (if I remember this correctly now), which I think is still within repairable specs. Just wonder what is cheaper, to fix this crank or get a good used one? Any advice?
Last edited by runethechamp; 08-30-2007 at 06:52 AM.
09-06-2007, 08:22 AM
#54
Registered User
Thread Starter
Join Date: Oct 2005
Location: Berkeley, CA
Posts: 587
Likes: 0
Received 0 Likes
on
0 Posts
Just a small update. Turned the block in to the machine shop on Tuesaday and I am hoping to get some answers and advice on what to do to it soon. The heads will go in on Saturday if everything goes as planned.
10-18-2007, 08:16 AM
#55
Registered User
Thread Starter
Join Date: Oct 2005
Location: Berkeley, CA
Posts: 587
Likes: 0
Received 0 Likes
on
0 Posts
It's been a while since last time I posted here I see  . I'm got a new rod and crank since there was too much damage on those to be reused. Got some new parts such as pistons and rings and bearings from somewhere I don't want to mention here right now since the service was impeccable, but my machine shop guy pretty much had steam coming out of his ears when he was telling me how bad the tolerances were on thoese parts. I'm considering coughing up the extra dough for original parts....
. I'm got a new rod and crank since there was too much damage on those to be reused. Got some new parts such as pistons and rings and bearings from somewhere I don't want to mention here right now since the service was impeccable, but my machine shop guy pretty much had steam coming out of his ears when he was telling me how bad the tolerances were on thoese parts. I'm considering coughing up the extra dough for original parts....
01-29-2008, 06:53 AM
#57
Registered User
Thread Starter
Join Date: Oct 2005
Location: Berkeley, CA
Posts: 587
Likes: 0
Received 0 Likes
on
0 Posts
It's kind of embarrassing how long this has taken me, but my family, a full time job and skiing on the weekends has left little time for a good push to get everything done. But now the engine is ready to be lifted in! I'll post some pictures later today.
For some kind of reason I was contemlating finishing the job without a new water pump, but then I realized that would be a hudge mistake, so I broke down and got the pump and both idler pulleys.
Edit: Any good advice for how to best line up the engine and the transmission when I lift it in?
For some kind of reason I was contemlating finishing the job without a new water pump, but then I realized that would be a hudge mistake, so I broke down and got the pump and both idler pulleys.
Edit: Any good advice for how to best line up the engine and the transmission when I lift it in?
Last edited by runethechamp; 01-29-2008 at 08:16 AM.
01-29-2008, 10:24 AM
#59
Contributing Member
Join Date: Apr 2006
Location: TENN Native Languishing in Virginia
Posts: 4,787
Likes: 0
Received 34 Likes
on
14 Posts
I assume you have an engine hoist? Do you have the the leveler attachment with it? It's pretty easy to line up with a leveler when you put it in. I did it by myself! Without the leveler, it would have taken at least one friend assisting...


