
Replacing 1989 22re Headgasket
 Nov 11, 2011 | 07:36 AM
#21

Thread Starter
Registered User
Joined: Jul 2011
Posts: 108
Likes: 0
From: Atlantic Canada
ohh I see what gottadog is talking about. Not sure if I have a gasket for that, might just set the head on a couple pieces of wood so I can keep the pipes on then, john4wd. I'll keep that in mind for the tensioner. I'm not sure about noises up front before the HG blew, I only bought the truck when it was already burning coolant. It seemed to run ok though, a decent sized exhaust leak close to the front made it hard to hear anything specific. Yeah I was cleaning yesterday, it looks much better already. I do have that haynes manual, #92075, I'm looking through the timing section now, this looks very helpful. We're going out in the rain soon to work on it, I'll keep you guys posted 
 Nov 11, 2011 | 08:21 AM
#24
Agreed!
The 22re is a fun motor to take apart. I've done the heads on the 6 motors I've owned a few times. It is really a great little motor. Currently mine is at the machinist. I can't wait for next week when I get my engnbldr kit and my rods, crank, head and block back. I really enjoy working on these trucks.
The 22re is a fun motor to take apart. I've done the heads on the 6 motors I've owned a few times. It is really a great little motor. Currently mine is at the machinist. I can't wait for next week when I get my engnbldr kit and my rods, crank, head and block back. I really enjoy working on these trucks.


 Nov 11, 2011 | 10:44 AM
#27

Registered User
Joined: Nov 2006
Posts: 730
Likes: 2
From: Indiana
I would remove the spark plugs to clean the threads and the electrode with the brass wire brush and check the gap, lightly clean don't go crazy on the white insulator under the exposed electrode, and before you reinstall put a small dab of anti-sieze on the bottom of the threads because as it's threaded in it spreads out everywhere.
Nov 11, 2011 | 11:33 AM
#29
Thread Starter
Registered User
Joined: Jul 2011
Posts: 108
Likes: 0
From: Atlantic Canada
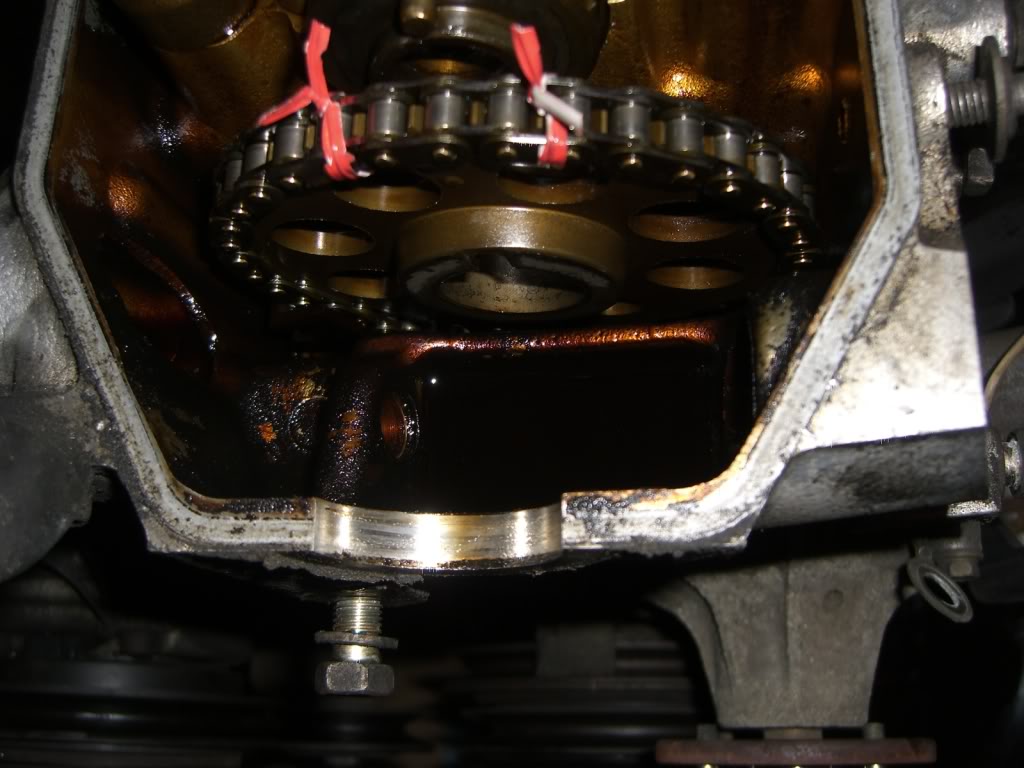
im looking at a number of guides online as well as the haynes, and your posts. The guides are saying to set TDC, remove cam sprocket bolt and dizzy gear thing. then the hidden timing cover bolt. then straight to removing head bolts, and prying head off. Do i need to remove the entire timing chain cover first? and timing chain? right now the chain is still on the sprocket, but the sprocket is sitting on top of the chain guides..
Nov 11, 2011 | 11:45 AM
#30
use twist-ties or zip-ties to keep the chain on the sprocket, and use a bunjee cord to keep it taught. that will keep timing correct so you won't have to take the timing cover off.
Last edited by irab88; Nov 11, 2011 at 11:53 AM.
Nov 11, 2011 | 11:59 AM
#31
Registered User
Joined: Nov 2006
Posts: 730
Likes: 2
From: Indiana
2x on irab88,
Put a zip tie through a hole in cam gear and attach a bungie or string to keep taught, slid gear off cam, if you have a friend helping you have him hold onto string while you lift head off and grab the gear once it come out the bottom of head then don't let the gear and chain have alot of slack, the timing cover does have tabs that surround the crank gear and the chain but they do break off easy, my old TC had one tab broke off and if your happen to have them broke off yours and if you leave alot of slack and don't keep it taught it might fall off then your crank gear timing will be off, so better to keep chain on gear zip tie it to each other so it won't move and keep it taught
Put a zip tie through a hole in cam gear and attach a bungie or string to keep taught, slid gear off cam, if you have a friend helping you have him hold onto string while you lift head off and grab the gear once it come out the bottom of head then don't let the gear and chain have alot of slack, the timing cover does have tabs that surround the crank gear and the chain but they do break off easy, my old TC had one tab broke off and if your happen to have them broke off yours and if you leave alot of slack and don't keep it taught it might fall off then your crank gear timing will be off, so better to keep chain on gear zip tie it to each other so it won't move and keep it taught
Last edited by john4wd; Nov 11, 2011 at 12:04 PM.
Nov 11, 2011 | 12:26 PM
#33
Registered User
Joined: Nov 2006
Posts: 730
Likes: 2
From: Indiana
I hope you do know about putting sealant on the little areas where TC cover meets the block on both sides before putting HG on, If you don't have Toyota FIPG sealant, I hear good things about Permatex black sealant, some say it's the same as the Toy OEM stuff.
Good Luck and have fun :}
Good Luck and have fun :}
Nov 11, 2011 | 12:42 PM
#34
don't forget the order!!! also, #8 in the order is tricky... either you get it out nicely or it's a pain in the arse. mine was the latter of the two.
i've been using the "ultra black" stuff with great results
I hope you do know about putting sealant on the little areas where TC cover meets the block on both sides before putting HG on, If you don't have Toyota FIPG sealant, I hear good things about Permatex black sealant, some say it's the same as the Toy OEM stuff.
Good Luck and have fun :}
Good Luck and have fun :}
Nov 11, 2011 | 01:18 PM
#35
Thread Starter
Registered User
Joined: Jul 2011
Posts: 108
Likes: 0
From: Atlantic Canada
yeah #8 was harder to turn out than the rest, haha. no i wasnt aware of that, ill take a look to see what i have for sealant, may take a trip to buy some sealant tomorrow, along with new spark plug wires, oil, and coolant.. iv removed head bolts, and have them sitting in the order they came out, i pry the entire rocker-arm assembly out now, correct? I thought it was time to pry the head off with the assembly on still, but apparently not
Nov 11, 2011 | 02:11 PM
#36
the rocker assembly is separate from the head, so it doesn't matter if you take it off now or after the head is off. also, don't pry the head off where the gasket touches. you risk scratching the surface and failing yet another hg. if you have all 11 bolts out (10 head, 1 "hidden"), then tap it a few times with a plastic/rubber hammer from the sides. then try lifting the head, tapping, lifting, etc until you get it. i'm sure you'll be fine
Nov 11, 2011 | 07:21 PM
#38
Thread Starter
Registered User
Joined: Jul 2011
Posts: 108
Likes: 0
From: Atlantic Canada
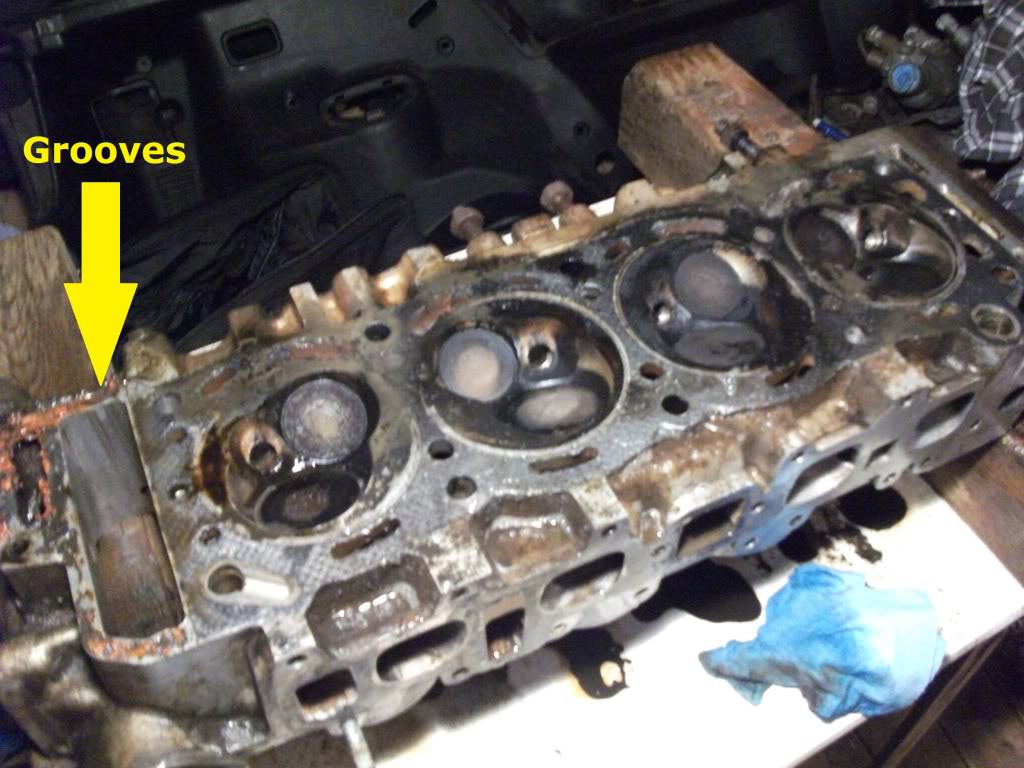
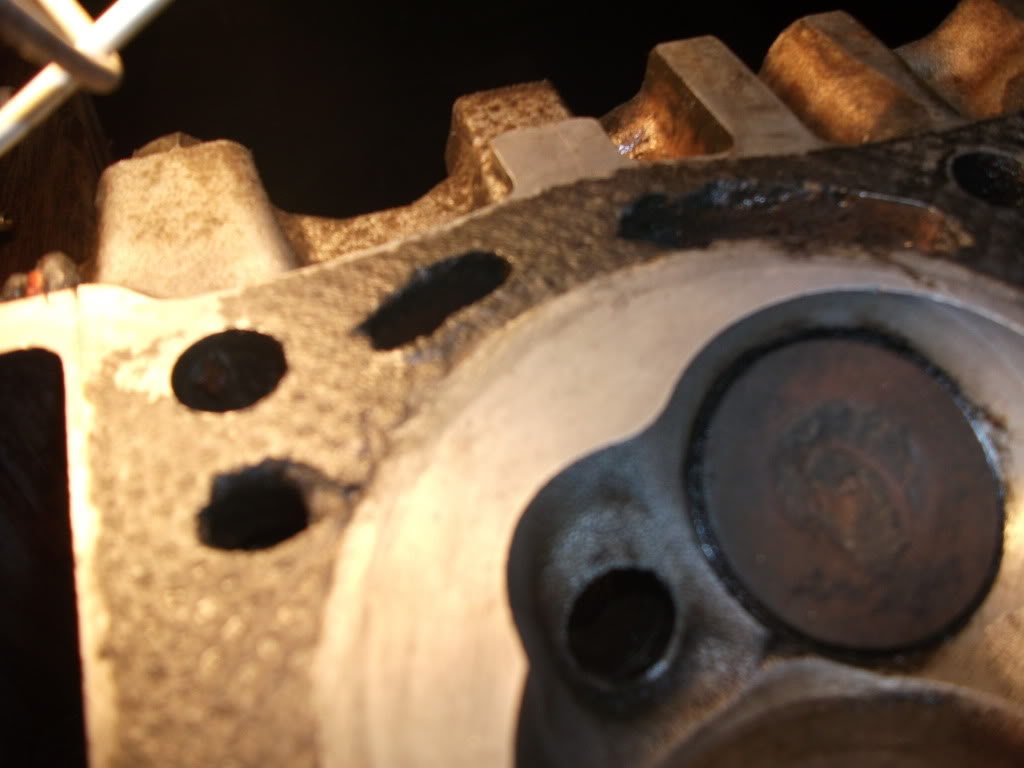
We're just getting inside now, have been cleaning the head for a while! I've taken some pictures for you guys. I also noticed marks in the head from a loose timing chain! but the guides are still fine, so i'm thinking it has been fixed before but only replaced with the regular guides.. right? lol. I've got a cloth covering the block for tonight, have to keep the hood open to keep the sprocket suspended.
Nov 11, 2011 | 07:54 PM
#39
Thread Starter
Registered User
Joined: Jul 2011
Posts: 108
Likes: 0
From: Atlantic Canada
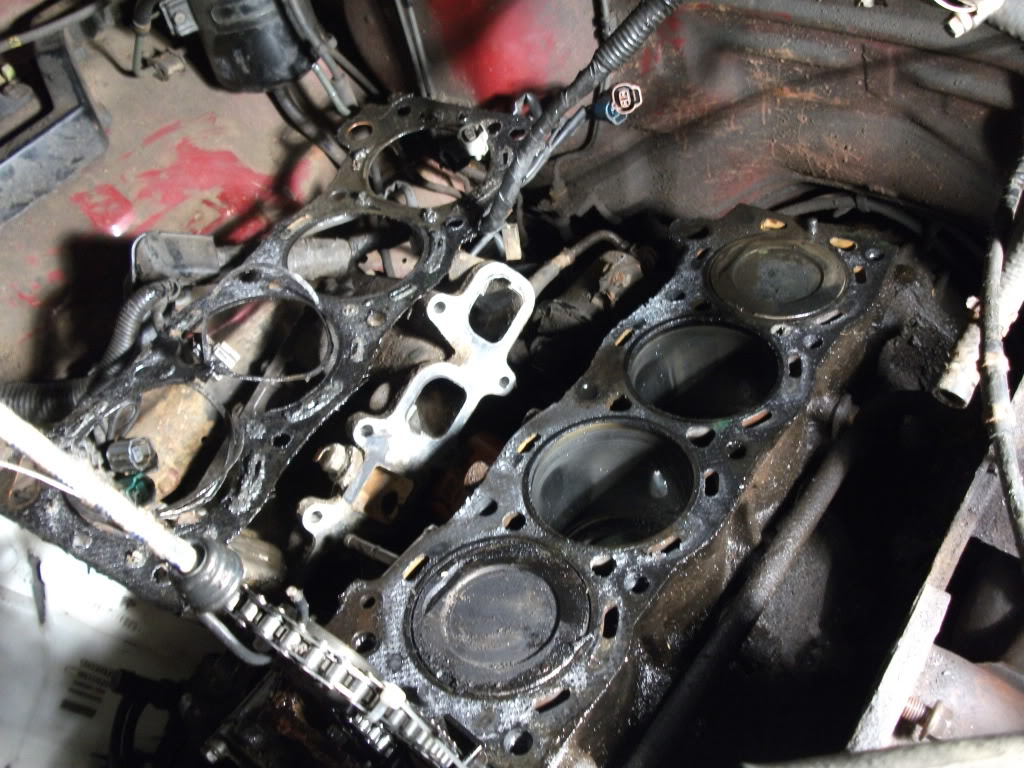
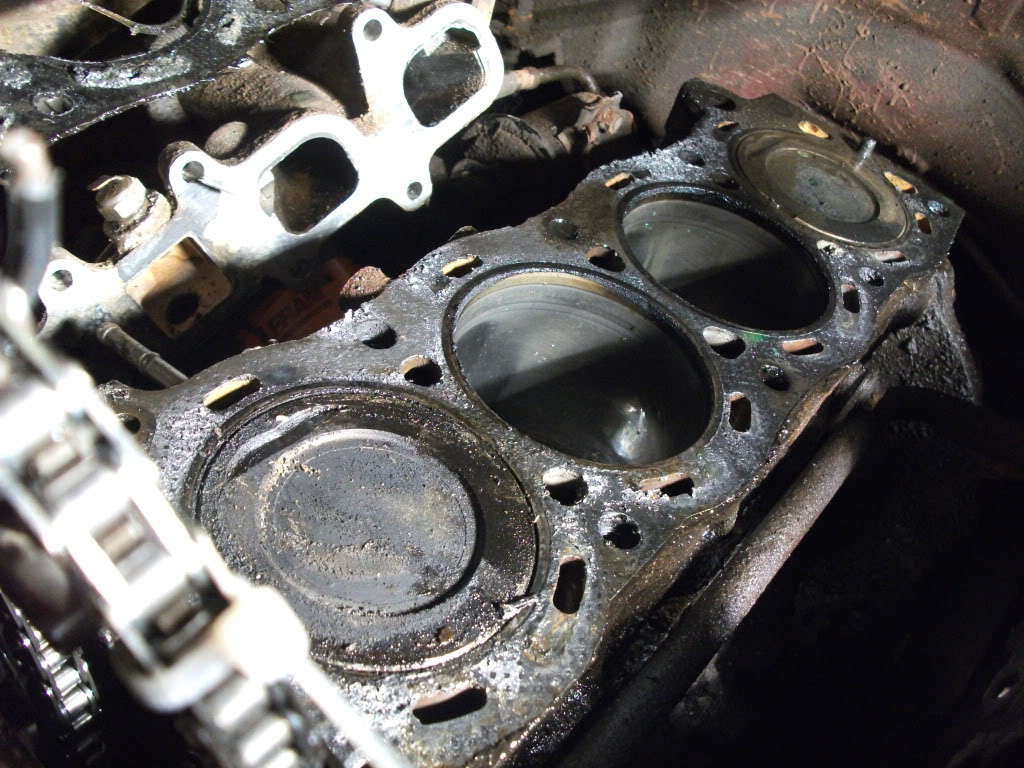
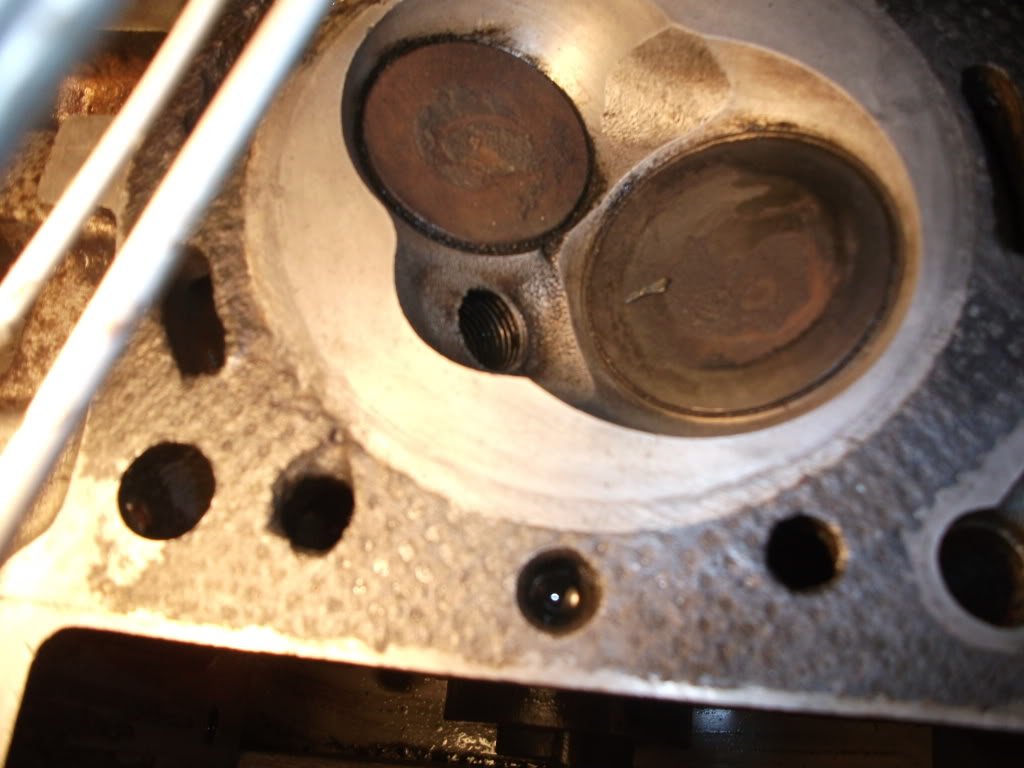
before cleaning..
after cleaning some.. seemed cleaner in person
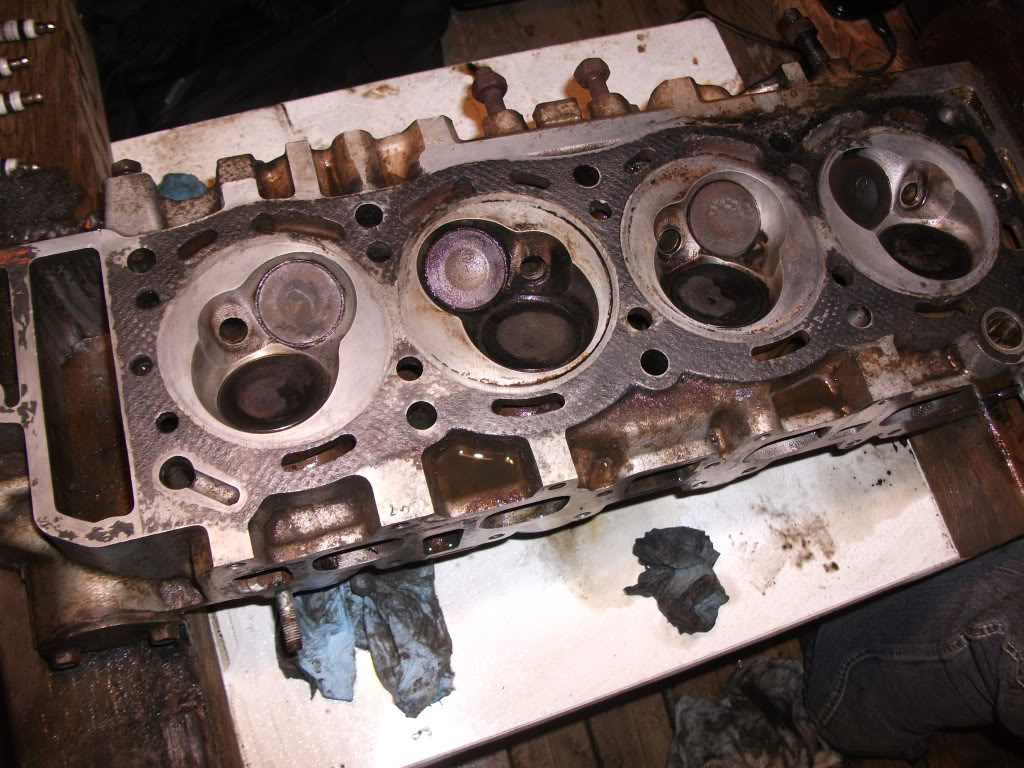
Theres a texture thats like wore into the surface, idk if thats normal, if I'm supposed to have the whole surface shiny metal like around the cylinders, or..
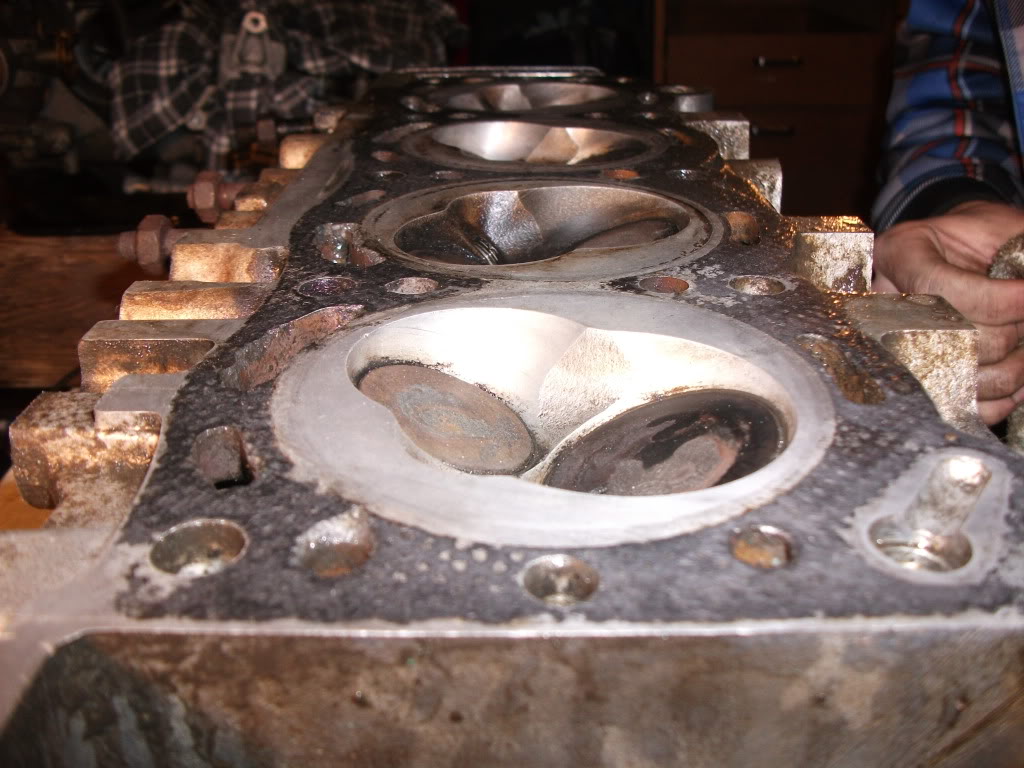
Because I really don't think I'll be able to get it off, I used a non scratch SOS pad on everything, and I don't think even any of that (remaining gasket?) is coming off..
Also seemed to be like chips missing, not sure if this is normal
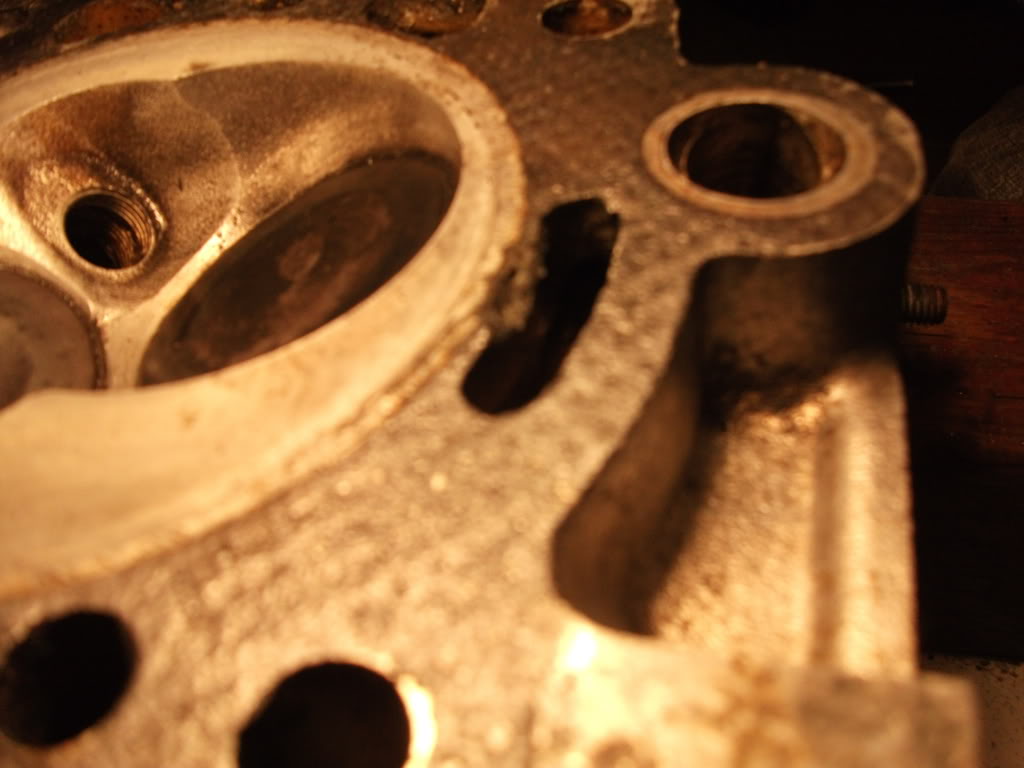

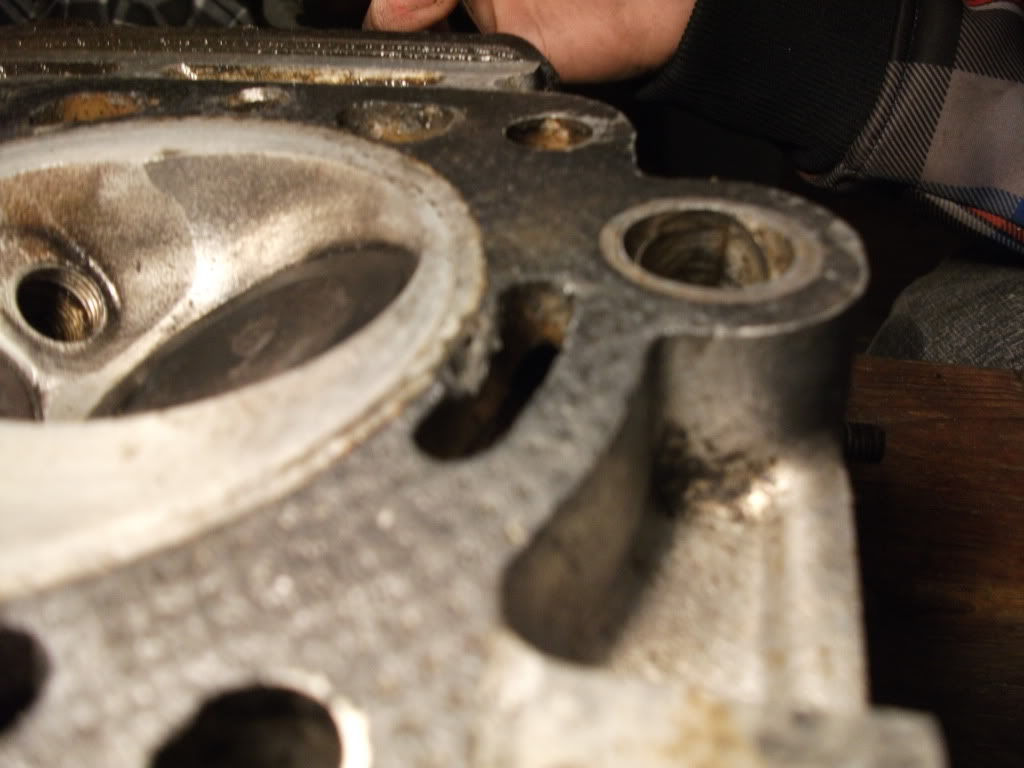
and another
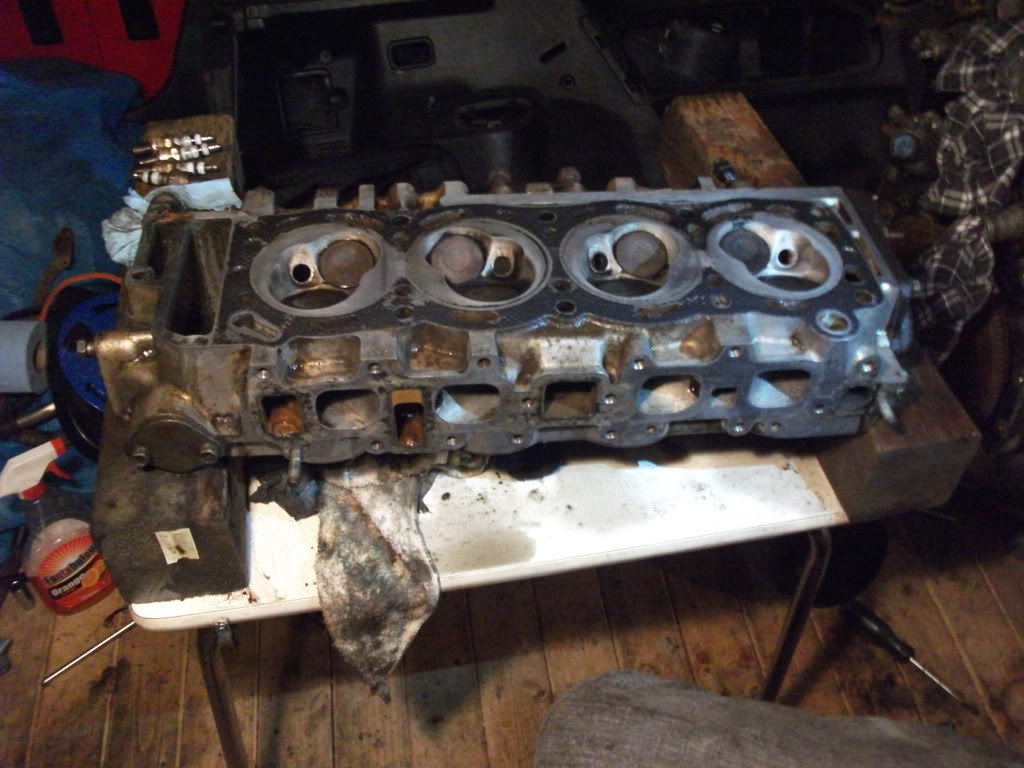
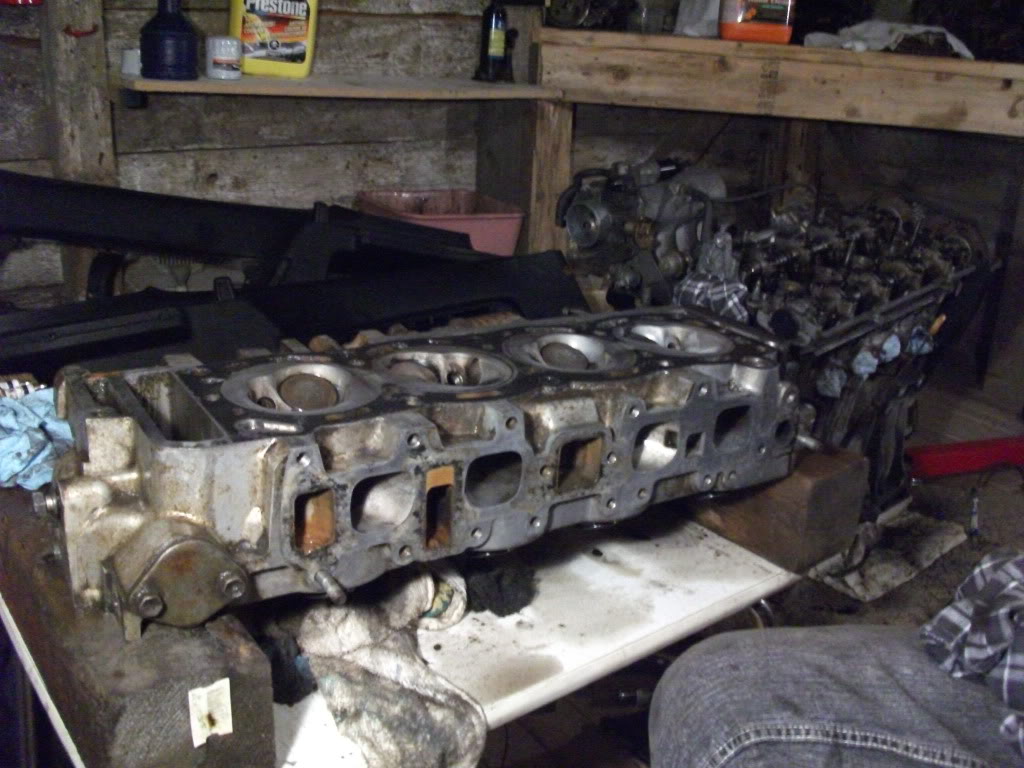
Might have to get the head re surfaced..? Would be nice to get it back together tomorrow while I have my cousin helping, will probably be tearing it back down in the spring anyway. But worst comes to worst I could get it re-done
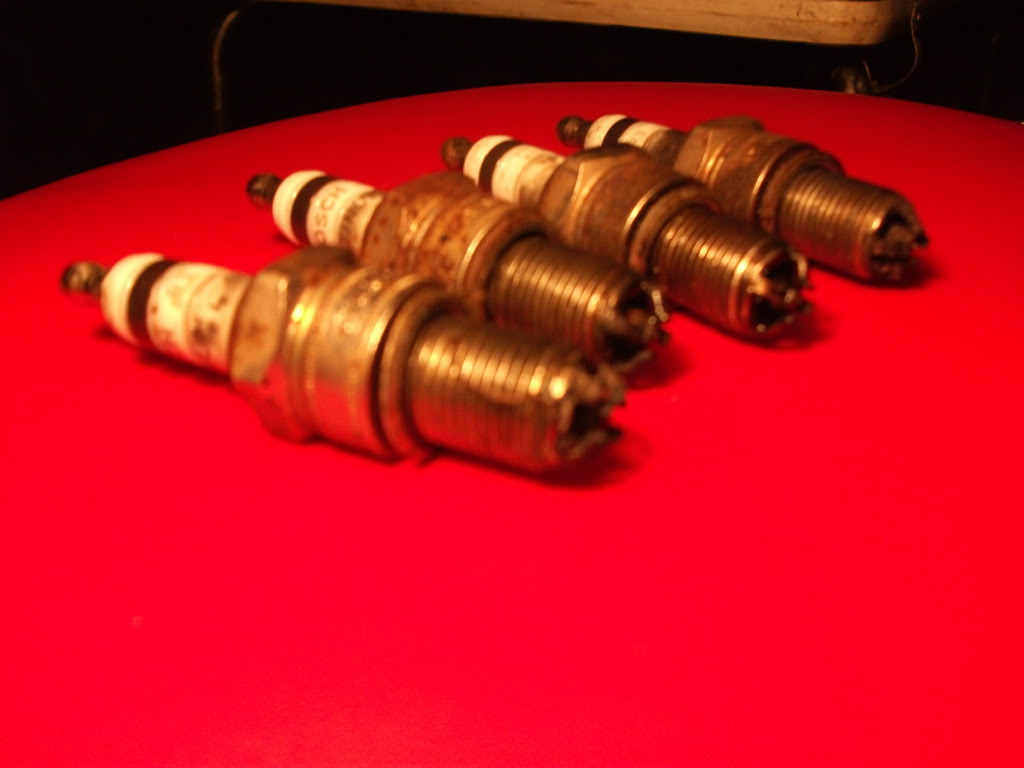
Also spark plugs don't seem too bad.. Thinking I'll replace them anyway though.
Last edited by 22r2tuff; Nov 11, 2011 at 08:02 PM.
Nov 11, 2011 | 08:22 PM
#40
Registered User
Joined: Nov 2006
Posts: 730
Likes: 2
From: Indiana
Sounds like your doing great, yes you just have the OEM plastic style guides, when you and if you clean the block, be sure to put rags in the piston holes where there lower in the cylinders, and don't get anything on the higher ones between cylinder wall and the upper ring, just a tiny gap, and check the flatness of head and block they way it's shown in your manual with the feeler gauge you got, in the book you have says the maximum it can be, I don't have my manual with me to tell you, I know it's in there.
The manual shows you where to put that sealant too. That manual is very informative to do the top end of the 22R and 22R-E together...Put new gasket on and get it all back together and when you do the whole thing in the spring you have time to get all the parts together you'll need and you'll be able to do it all in a couple days since now you know how :} I still would get a toyota OEM head gasket in the spring. They are only $45 bucks...
The manual shows you where to put that sealant too. That manual is very informative to do the top end of the 22R and 22R-E together...Put new gasket on and get it all back together and when you do the whole thing in the spring you have time to get all the parts together you'll need and you'll be able to do it all in a couple days since now you know how :} I still would get a toyota OEM head gasket in the spring. They are only $45 bucks...


