
Replace L drive axle 94 4runner (w/pix)
 May 3, 2008 | 06:38 PM
#1

Thread Starter
Registered User
Joined: Mar 2008
Posts: 32
Likes: 1
From: Ames, Iowa
Replace L drive axle 94 4runner (w/pix)
Thanks to all those on this site who offered valuable advice on how to do this job. I thought it might help the next guy to document the method with a description and a few photos. This method works for the driver's side. My truck is a 3.0 5-spd. If you try this yourself, make sure the vehicle is properly supported before you get under it.
________________________
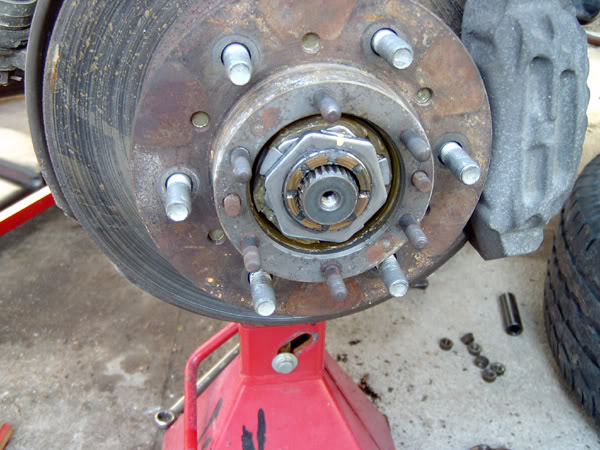
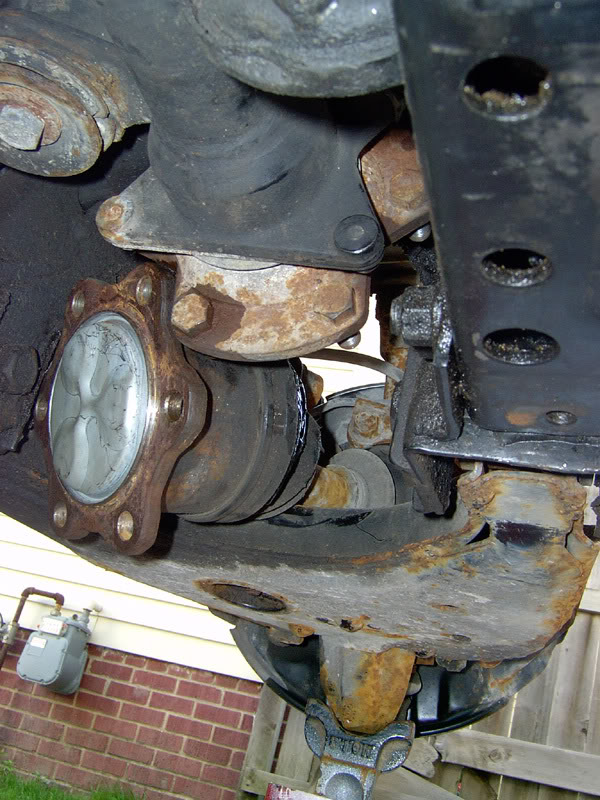
Remove the wheel and the metal center cap, six bolts and lock washers on the flange. Lubricate and run two 8mm x 1.25 bolts into the threaded holes on the flange to force it outward. Squirt liberally with penetrating oil. Tap the ends of the flange studs with a small ball-pein hammer. Position your body in front of the flange to catch the split conical washers as they pop off the studs. Remove the flange, and the bolt and washer in the end of the axle. Then remove the snap ring and heavy splined washer. It will look like this:
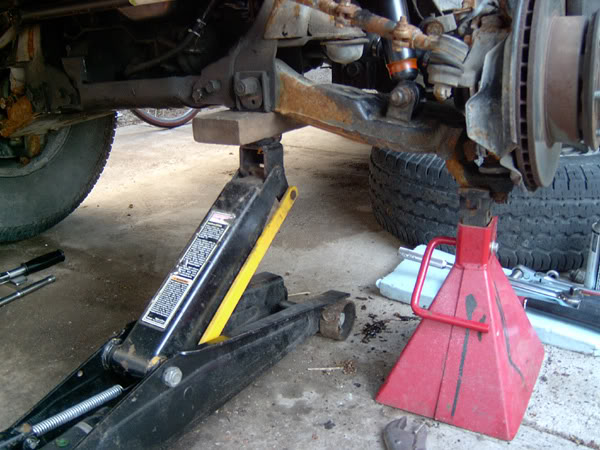
Set a jackstand under the rear of the truck on the side opposite the front axle you are replacing. Get it as close to the frame as you can.
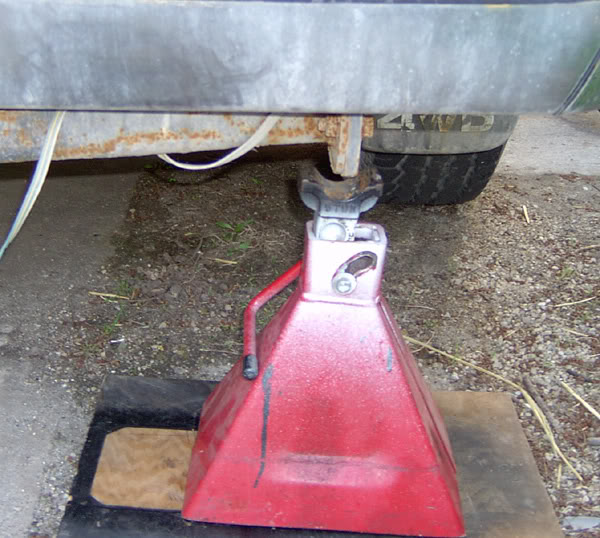
Jack up the front of the truck and set a jackstand under the ball joint right up against the nut.
When you let the jack down, the weight of the truck will straighten out the drive axle giving you critical clearance. As the truck comes down, the ball joint will slide outward moving the nut away from the jackstand. Make sure the stand is still safely supporting the truck.
View from the rear with jackstands in proper position:

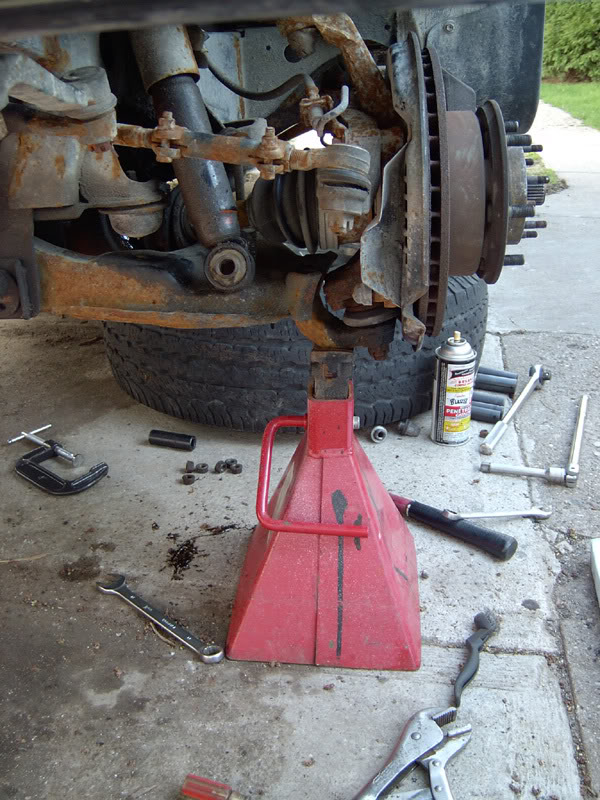
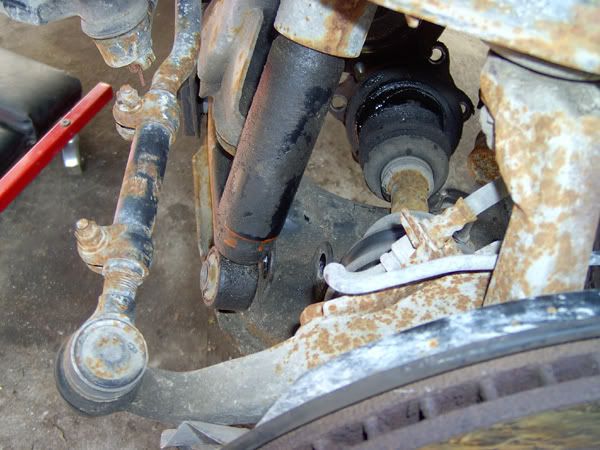
Remove the six 17mm nuts from the studs holding the inner tulip joint and slide it off the studs. If you have positioned things right, it will come off the studs. Now, orient the end of the shaft and the drive flange as shown below:
This will allow you to slide the shaft inward past the flange without removing any of the studs or the balljoint. I did unfasten the bottom of the shock absorber because it looked like the outer joint might not clear if I didn't.
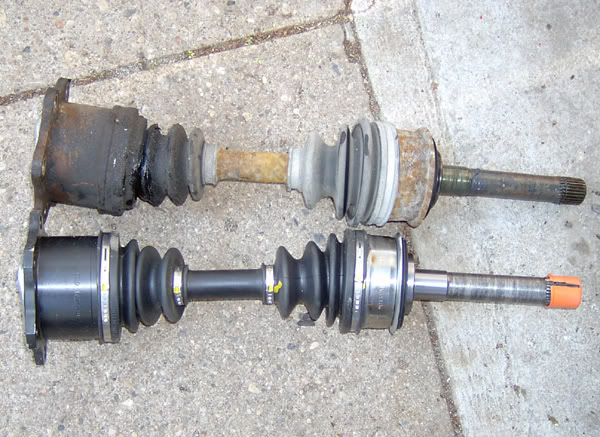
Compare the old and new axles to make sure you have the right one.
Reverse to install. Make sure the gasket on the flange is new or undamaged and don't forget to re-install the snap ring on the new shaft. I had to push the outer joint outward to make room for the splined washer and snap ring.

Torque spec for the 12mm flange nuts is 23 ft-lb., and 61 ft-lb. for the 17mm inner joint nuts.
________________________
Remove the wheel and the metal center cap, six bolts and lock washers on the flange. Lubricate and run two 8mm x 1.25 bolts into the threaded holes on the flange to force it outward. Squirt liberally with penetrating oil. Tap the ends of the flange studs with a small ball-pein hammer. Position your body in front of the flange to catch the split conical washers as they pop off the studs. Remove the flange, and the bolt and washer in the end of the axle. Then remove the snap ring and heavy splined washer. It will look like this:
Set a jackstand under the rear of the truck on the side opposite the front axle you are replacing. Get it as close to the frame as you can.
Jack up the front of the truck and set a jackstand under the ball joint right up against the nut.
When you let the jack down, the weight of the truck will straighten out the drive axle giving you critical clearance. As the truck comes down, the ball joint will slide outward moving the nut away from the jackstand. Make sure the stand is still safely supporting the truck.
View from the rear with jackstands in proper position:
Remove the six 17mm nuts from the studs holding the inner tulip joint and slide it off the studs. If you have positioned things right, it will come off the studs. Now, orient the end of the shaft and the drive flange as shown below:
This will allow you to slide the shaft inward past the flange without removing any of the studs or the balljoint. I did unfasten the bottom of the shock absorber because it looked like the outer joint might not clear if I didn't.
Compare the old and new axles to make sure you have the right one.
Reverse to install. Make sure the gasket on the flange is new or undamaged and don't forget to re-install the snap ring on the new shaft. I had to push the outer joint outward to make room for the splined washer and snap ring.
Torque spec for the 12mm flange nuts is 23 ft-lb., and 61 ft-lb. for the 17mm inner joint nuts.
May 3, 2008 | 07:12 PM
#3
Registered User
Joined: Mar 2008
Posts: 12,723
Likes: 6
From: Temecula Valley, CA
You said 'two lip'... huh hu huh huh huh uh.
Just kidding. I like how you used the rear to help leverage the front.
Oh, and is that the bolt-hole (in the last pic) that someone was asking about so vehemently whether they needed a bolt in it or not?
Just kidding. I like how you used the rear to help leverage the front.
Oh, and is that the bolt-hole (in the last pic) that someone was asking about so vehemently whether they needed a bolt in it or not?
May 3, 2008 | 09:05 PM
#4
Thread Starter
Registered User
Joined: Mar 2008
Posts: 32
Likes: 1
From: Ames, Iowa
Yeah, that's the one. There is a wide washer under an 8mm bolt with a 12mm head. Torque spec for that one is 13 ft-lb, and the FSM says to pack the cover with multi-purpose grease before tapping it back in place. Mine was dry when I removed it. I put the bolt back in.
May 3, 2008 | 09:08 PM
#5
Thread Starter
Registered User
Joined: Mar 2008
Posts: 32
Likes: 1
From: Ames, Iowa
May 4, 2008 | 11:18 AM
#7
Registered User
Joined: Mar 2008
Posts: 379
Likes: 1
From: Ontario, Canada
I saw that thread too. Toyota put it in there in case the snap ring failed. It's a redundant backup. We have a D-handled driver at Toyota with the correct thread that we can put into that hole and pull on the axle while installing the snap ring. We also use it to push and grease between the axle and hub to correct the cold weather whine that some 2nd Gen owners complain about.
Trending Topics
Mar 6, 2009 | 06:49 PM
#8

Registered User
Joined: Apr 2003
Posts: 10
Likes: 0
From: Lakewood, Wash.
Replaced drivers' side CV axle '95 4Runner today....
Followed the pictures and instructions as closely as possible including unbolting the shock absorber (which was necessary to get the outside boot past) and came to the conclusion that even though it's possible this way rather than unbolting half the front end....there is no easy way to get this job done! The pictures were a great help and spot on, but I raised and lowered both ends of the vehicle a number of times trying to get things "positioned right" and it was still an absolute beyatch both getting that inside flange out and the new one back in! Also tried turning the wheel in either direction....I don't know how I finally got it done, but it's like new now! That hint with threading the 8mm bolts into the hub plate and lightly tapping the flange bolts to get the cone washers out worked too easy! Saved me a ton of money not taking it back to the Toyota "stealer" after having recall work done ($64 for EMPI axle + my time). Thanks for the write up and pics, VERY much appreciated! One suggestion: loosen the 17mm flange bolts before unbolting the hub plate so your helper can hold the brake as 61 ft/lbs can be alot when you're trying to break them loose in such tight quarters (or hang a wrench on them and wedge it against the frame like I did....). Took me alot longer than I expected, but I'm probably not what anyone would call a wrench! 
Mar 6, 2009 | 07:01 PM
#9

Registered User
Joined: Aug 2006
Posts: 1,518
Likes: 1
From: Tucson, AZ USA Age:60
Followed the pictures and instructions as closely as possible including unbolting the shock absorber (which was necessary to get the outside boot past) and came to the conclusion that even though it's possible this way rather than unbolting half the front end....there is no easy way to get this job done! The pictures were a great help and spot on, but I raised and lowered both ends of the vehicle a number of times trying to get things "positioned right" and it was still an absolute beyatch both getting that inside flange out and the new one back in! Also tried turning the wheel in either direction....I don't know how I finally got it done, but it's like new now! That hint with threading the 8mm bolts into the hub plate and lightly tapping the flange bolts to get the cone washers out worked too easy! Saved me a ton of money not taking it back to the Toyota "stealer" after having recall work done ($64 for EMPI axle + my time). Thanks for the write up and pics, VERY much appreciated! One suggestion: loosen the 17mm flange bolts before unbolting the hub plate so your helper can hold the brake as 61 ft/lbs can be alot when you're trying to break them loose in such tight quarters (or hang a wrench on them and wedge it against the frame like I did....). Took me alot longer than I expected, but I'm probably not what anyone would call a wrench!
Remove the studs and replace 'em with bolts...
Next time it'll be a piece of cake to do


Fred
Mar 6, 2009 | 07:13 PM
#10

Registered User
Joined: Apr 2008
Posts: 471
Likes: 0
From: Tempe, AZ
I didn't change the studs to bolts, but I wish I had cuz eventually I'll have to change those axles again. I'll put bolts in then I suppose.
Sep 3, 2009 | 10:01 AM
#11

Registered User
Joined: Jan 2009
Posts: 245
Likes: 0
Using this post for a pickup
Bill, thanks one ton for this write up. I followed your steps to perform a left axle change on a 1994 pickup and it worked like a charm. However, based on your photo of the disconnected axle positioned next to the tulip joint, I wonder if the dimensions of our a-arms are the same? Your photo just seems to show more room than I encountered.
Anyway, I ended up having to break loose two of the studs in order to install the new axle (the old one went to pieces, so removal wasn't too bad). I put a few hours into playing with jack positions and fidgeting with the axle, and I'm convinced that there is no way that the axle would have gone in while all six of the 17mm studs were in place. I would recommend that anyone trying this loosen the studs while the concerned axle, wheel and tire are still connected so that you have some kind of leverage with which to break loose the studs (which require about 40 billion lbs. of torque). This all assumes that you have a cheap and insufficient set of tools, like myself.
Thanks again! I feel like if I had to do this again I could get the whole thing done in less than 30 minutes.
Last edited by dromomaniac; Sep 3, 2009 at 10:05 AM.
Oct 13, 2009 | 03:30 PM
#12
Registered User
Joined: Sep 2006
Posts: 309
Likes: 0
From: Portland Oregon
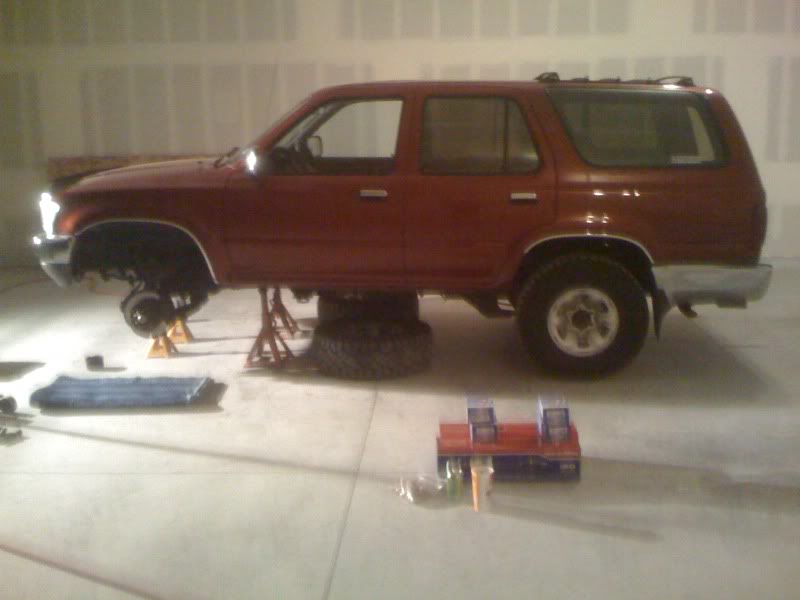
I used this thread and my axle replacement went great. Instead of jacking up the opposite rear end I put the whole front end on jack stands and left the back alone. This worked perfect for me and both axles came out with ease. Thanks Bill, this helped me complete my job, using the 8x1.25 bolts worked great too, my new cv shafts came with bolts to do this. Here is a pick of how i jacked my rig up before the job.
This is the old and new axles and ball joint i replaced. As you can see the axles were completely shot.

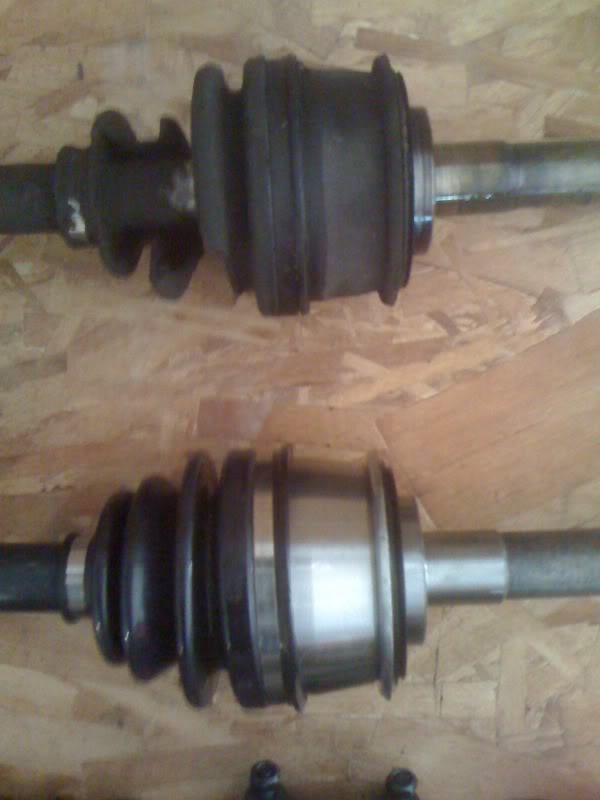
This is the old and new axles and ball joint i replaced. As you can see the axles were completely shot.
Nov 3, 2009 | 02:15 PM
#13
Registered User
Joined: Jul 2009
Posts: 35
Likes: 0
From: Bellingham -> Spokane, WA
I'm getting ready to replace both front axles on my '91 4runner and am confused about the difference between what I'm reading here and what the procedure is in the FSM. The FSM makes it seem like a simple 5 step job, but that clearly isn't the case! Is the biggest problem clearance in getting the axles in and out? What aspects that make this job tough are overlooked by the FSM?
Is the biggest problem clearance in getting the axles in and out? What aspects that make this job tough are overlooked by the FSM?
Nov 4, 2009 | 10:44 AM
#14
Registered User
Joined: Sep 2006
Posts: 309
Likes: 0
From: Portland Oregon
Mine is a 91 too. For me the toughest part was getting it all apart the first time. I wouldnt have been able to do the job without an impact wrench and some extensions. The hardest part was getting the CV shaft out, but it just took a little moving around and it came out in about 5 min. I read up on this job for about a month before i actually got all my parts and it definitely made the job easier. The first side was a learning process that took a while, but the second side was a piece of cake, i could do this job easily now. I didnt really take too many pictures because bill's write up is great, but if you have any questions I can try to help. Since you arent doing ball joints at the same time this job should be pretty simple (the ball joint took the longest to learn and put back in).
Nov 4, 2009 | 09:21 PM
#15

Banned
Joined: Sep 2009
Posts: 655
Likes: 2
From: sacramento ca
Just changed out the driverside on my 93. Boy was that a task. Took about 2 hours or so. That damn fsm make it sound like a quick job. Wrong! Feels good after it's all done. Time for the passenger side next!
Nov 6, 2009 | 11:14 AM
#16
Registered User
Joined: Jul 2009
Posts: 35
Likes: 0
From: Bellingham -> Spokane, WA
I'm halfway through replacing the drivers side cv axle in my 91 4-cyl. Iwas able to get the axle in and out without too much trouble. But now I'm having trouble re-installing the snap ring! It's sooo close to going in the grove but not quite. I'd heat the shaft up but there's grease everywhere I need to figure out if I can push or pull it without doing any harm. How hard does it need to be pulled/pushed?
Nov 6, 2009 | 11:52 AM
#17
Registered User
Joined: Sep 2006
Posts: 309
Likes: 0
From: Portland Oregon
Heating the axle is just going to cause it to expand making it harder to slide the ring on. When I did mine i didnt have to push or pull the axle at all, it just slid into place. Is the groove for the snap ring not sticking out far enough or are you having trouble opening the ring? If the axle just isnt sticking out enough you should be able to push/pull it without causing any harm, mine had a little free play when I did it, but it shouldn't be difficult to move.
Nov 6, 2009 | 03:05 PM
#18
Registered User
Joined: Jul 2009
Posts: 35
Likes: 0
From: Bellingham -> Spokane, WA
I got it all back together but I was having lots of trouble getting the snap ring on because the axle wasn't sticking far enough through the hub. After pushing and pulling for a while I finally put the flange back on, backed it off with the bolts used to remove it then used the screww in the end of the axle to basically pull the axle through the bearings. Just barely was able to snap the snap ring into the groove. This technique worked pretty well, but I could have saved almost an hour of screwing around.
Overall the job isn't that difficult, I used the excellent info above to help me. I ended up setting the ball-joint onto a jackstand and eureka, the CV axle just barely squeezed out. I did have to use a cheater on the axle bolts thought.
Overall the job isn't that difficult, I used the excellent info above to help me. I ended up setting the ball-joint onto a jackstand and eureka, the CV axle just barely squeezed out. I did have to use a cheater on the axle bolts thought.
Nov 9, 2009 | 09:45 PM
#19
Registered User
Joined: Jul 2009
Posts: 14
Likes: 0
From: Oceanside CA
I've got a 95 Runner that I did the CV boots on about a month ago. Like the man befor me said, the first one was a lerning process, it took me about 7hours to do  . But the second side only took me 1.5 hours to do. But now I wanna do all four of my Ball Joints. I've looked for a good right up on doing them but cant find anything. Can anyone help?
. But the second side only took me 1.5 hours to do. But now I wanna do all four of my Ball Joints. I've looked for a good right up on doing them but cant find anything. Can anyone help?
Nov 9, 2009 | 10:03 PM
#20
Registered User
Joined: Sep 2008
Posts: 3,887
Likes: 16
From: Spokane, WA
When i did this last year in my 87, it was seriously a bear.
It was also 100 degrees out and i was in an un-airconditioned shop too..
next time i'm just going to pop out all 6 studs and replace with bolts.
It was also 100 degrees out and i was in an un-airconditioned shop too..
next time i'm just going to pop out all 6 studs and replace with bolts.


