
Removing rear heater?
 May 11, 2011 | 05:45 PM
#21

Registered User
Joined: Mar 2011
Posts: 246
Likes: 3
From: Dallas, TX
Thats another thing Ive never done before haha. Im having trouble finding the drain valve. Any idea where it is?
Also, I just had new coolant put in on Monday. Is there a way to drain it, and then put the same coolant back in once I am done? All the guides I have seen for draining coolant involve flushing it out with water. I figure that will dilute the coolant too much.
Also, I just had new coolant put in on Monday. Is there a way to drain it, and then put the same coolant back in once I am done? All the guides I have seen for draining coolant involve flushing it out with water. I figure that will dilute the coolant too much.
May 11, 2011 | 06:33 PM
#22
Registered User
Joined: Apr 2010
Posts: 815
Likes: 0
From: Kingston, Ontario CANADA
Ok so a little lesson on that heater! It is a heater core. How it works: When your engine warms up, the coolant also warms up. The coolant then goes through the tube and into that "contraption" as you called it, (that is the heater core). The water circulates through that and warms it up also. When the fan is turned on it blows air across the heater core, in turn warming up the air. Giving you nice warm feet in the winter! Ok so this is how you are going to want to do this. First put a towel down under the hoses that you are going to disconnect in the engine bay. Make sure the lever on your heater control on the dash is all the way to the cold side. Unhook the hoses in the engine bay and bypass them. Some coolant is going to come out, hence the towel. After you have bypassed the two hoses you are going to crawl under the vehicle and trace those two steel lines back to just behind the transfer case. They might be a little hard to find because they are protected by a metal heat shield. You will find them just behind the transfer case and going up into rubber hoses and then into the cab. Get a bucket and some towels. carefully unhook the rubber lines and let the coolant flow into a bucket. After all the coolant has drained (its just what was inside the heater core and the lines, not from your motor) you can then proceed to pull out the entire heater from inside the cab. Be sure to top off the coolant when you are done (shouldnt be too much). Let us know how it works out. Any other questions feel free to ask. If you need any pictures just let me know and I can get some for you. Good luck!
mlrunner95 - keep taking your pic's, this will be a good mod/project post. I'm really glad that you posted that question.
May 11, 2011 | 07:42 PM
#23
Thread Starter
Registered User
Joined: May 2011
Posts: 23
Likes: 0
From: Nor Cal, California
Ok so a little lesson on that heater! It is a heater core. How it works: When your engine warms up, the coolant also warms up. The coolant then goes through the tube and into that "contraption" as you called it, (that is the heater core). The water circulates through that and warms it up also. When the fan is turned on it blows air across the heater core, in turn warming up the air. Giving you nice warm feet in the winter! Ok so this is how you are going to want to do this. First put a towel down under the hoses that you are going to disconnect in the engine bay. Make sure the lever on your heater control on the dash is all the way to the cold side. Unhook the hoses in the engine bay and bypass them. Some coolant is going to come out, hence the towel. After you have bypassed the two hoses you are going to crawl under the vehicle and trace those two steel lines back to just behind the transfer case. They might be a little hard to find because they are protected by a metal heat shield. You will find them just behind the transfer case and going up into rubber hoses and then into the cab. Get a bucket and some towels. carefully unhook the rubber lines and let the coolant flow into a bucket. After all the coolant has drained (its just what was inside the heater core and the lines, not from your motor) you can then proceed to pull out the entire heater from inside the cab. Be sure to top off the coolant when you are done (shouldnt be too much). Let us know how it works out. Any other questions feel free to ask. If you need any pictures just let me know and I can get some for you. Good luck!
Now that is exactly what we are looking for. That was great man, thanks very much for your detail instructions. I printed them out and is sitting on my work bench waiting for me to attacking this project next week. Outstanding!
mlrunner95 - keep taking your pic's, this will be a good mod/project post. I'm really glad that you posted that question.
mlrunner95 - keep taking your pic's, this will be a good mod/project post. I'm really glad that you posted that question.
 May 12, 2011 | 03:01 PM
#24
Registered User
Joined: Aug 2010
Posts: 231
Likes: 0
From: Dayton,NV
Im glad that I could help! Like I said, If you have any more questions or need any pictures of anything that you are stuck on just let me know and I will do my best to help out. Oh and by the way Welcome to Yotatech!! There is a ton of info on here about just about everything you can think of and lots of people to help.
May 14, 2011 | 05:46 PM
#25
Thread Starter
Registered User
Joined: May 2011
Posts: 23
Likes: 0
From: Nor Cal, California
Well, thanks to everyones help, I was able to remove the heater today.
Before (I took the seats out to make it easier to work.):

After:

And that ^ is how it sits currently. I plan on sealing the hole the heater tubes went through and installing an ammo can as the new center console. Weather reports say rain tomorrow so it will have to wait till at least Monday. I will return with pics of the finished product once its done.
Thanks again for guiding me through it all
Before (I took the seats out to make it easier to work.):
After:
And that ^ is how it sits currently. I plan on sealing the hole the heater tubes went through and installing an ammo can as the new center console. Weather reports say rain tomorrow so it will have to wait till at least Monday. I will return with pics of the finished product once its done.
Thanks again for guiding me through it all
May 14, 2011 | 06:02 PM
#26
Registered User
Joined: Mar 2011
Posts: 246
Likes: 3
From: Dallas, TX
you got me thinking about that little hole where the heater hoses were.... you might want to look at the junk yard for some old japanese econoboxes that have no A/C.... typically they will have a oval rubber plug where the grommet would be for the A/C lines... if you find the right one and make it fit, it will save you the trouble of properly sealing that hole and preventing water ingress... I still recommend a metal plate on top to keep the grommet in place of course 
May 15, 2011 | 09:05 PM
#28
Thread Starter
Registered User
Joined: May 2011
Posts: 23
Likes: 0
From: Nor Cal, California
you got me thinking about that little hole where the heater hoses were.... you might want to look at the junk yard for some old japanese econoboxes that have no A/C.... typically they will have a oval rubber plug where the grommet would be for the A/C lines... if you find the right one and make it fit, it will save you the trouble of properly sealing that hole and preventing water ingress... I still recommend a metal plate on top to keep the grommet in place of course
May 18, 2011 | 03:25 PM
#29
Thread Starter
Registered User
Joined: May 2011
Posts: 23
Likes: 0
From: Nor Cal, California
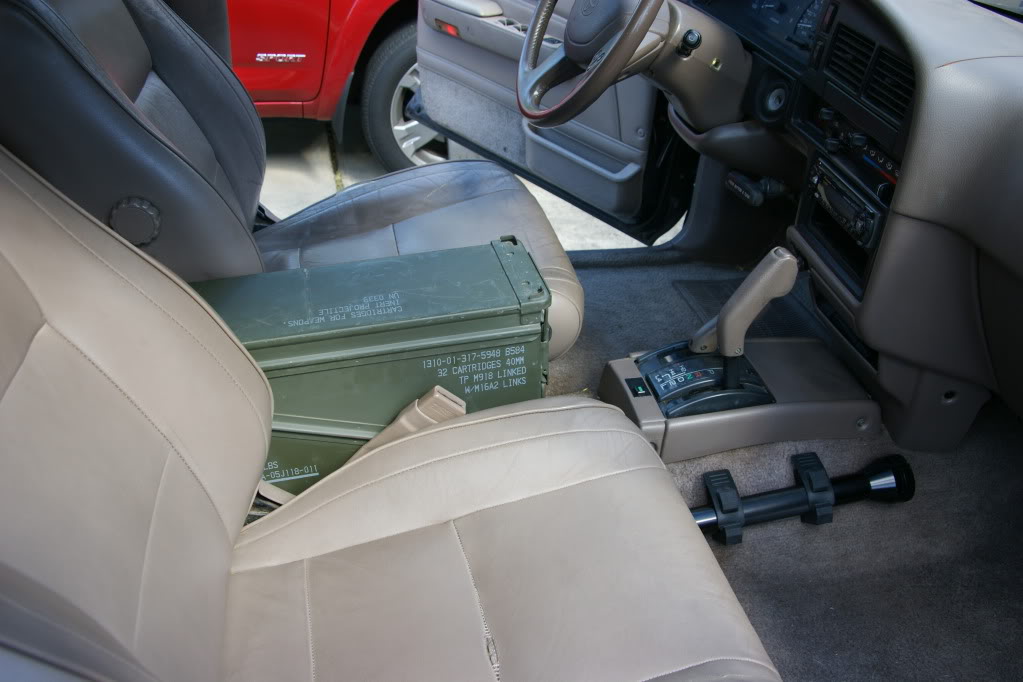
Finally completed it today! I searched through google for pictures of other peoples ammo can center consoles and found that somebody had used a 40mm ammo can. I just so happened to have had a 40mm ammo can sitting empty in the garage so I pretty much copied his design.
Here is the center console sitting on the 40mm ammo can with a standard .50 cal ammo can in front of it for size reference.

I used the same attachment brackets that the heater was on to mount the ammo can.

Here it is between the seats (makes a great armrest!).
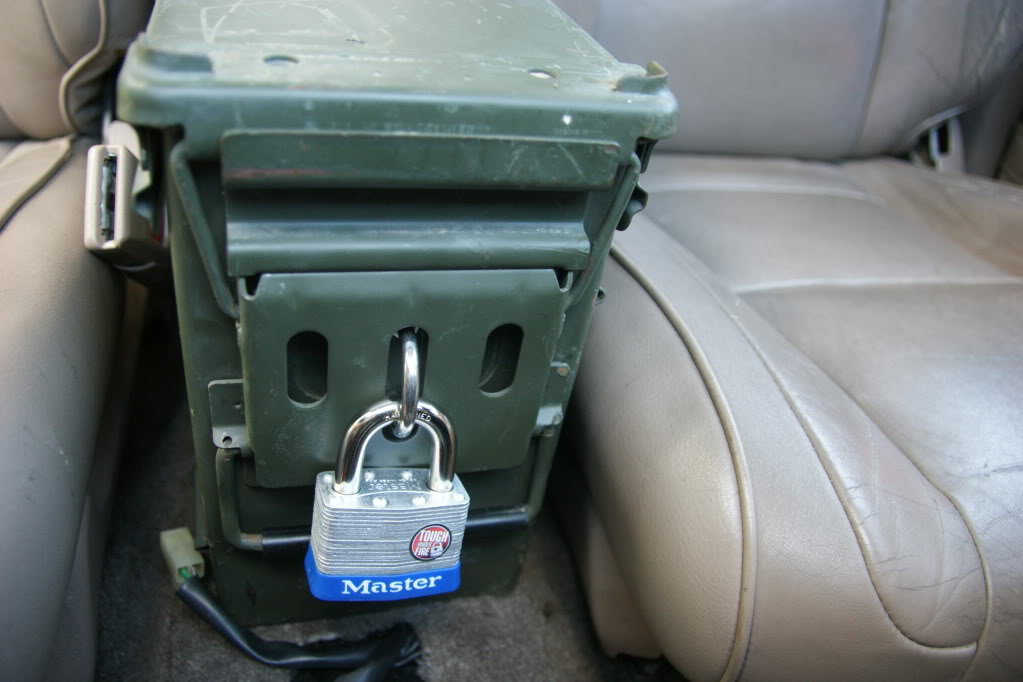
A traditional .50 cal ammo can has a hinge on the back and a latch on the front. These 40mm cans have a latch on the front and the back. So (stealing the idea from the original poster) I removed one latch and attached a door hinge so that the lid will lift open like a center console should. Its not pretty but it works and I will probably paint it later on to make it match.

Lastly, I installed a U-bolt to the front (also not my idea) so that it can be locked. An extra benefit if I take the doors off this summer.
Thanks again to everyone who helped me pull this off. YotaTech is by far the most helpful group of people on any forum I have been on.
Here is the center console sitting on the 40mm ammo can with a standard .50 cal ammo can in front of it for size reference.
I used the same attachment brackets that the heater was on to mount the ammo can.
Here it is between the seats (makes a great armrest!).
A traditional .50 cal ammo can has a hinge on the back and a latch on the front. These 40mm cans have a latch on the front and the back. So (stealing the idea from the original poster) I removed one latch and attached a door hinge so that the lid will lift open like a center console should. Its not pretty but it works and I will probably paint it later on to make it match.
Lastly, I installed a U-bolt to the front (also not my idea) so that it can be locked. An extra benefit if I take the doors off this summer.
Thanks again to everyone who helped me pull this off. YotaTech is by far the most helpful group of people on any forum I have been on.
May 18, 2011 | 05:03 PM
#31
Registered User
Joined: Apr 2010
Posts: 815
Likes: 0
From: Kingston, Ontario CANADA
No Dras, I haven't even started yet. My rock sliders came in last week, I had them welded up, took them to Line-X to get sprayed and just got them back today. For the past 3 days I've been stripping down my frame and coating them with Duplicolour bedliner. I just finished coating the last side tonight and should have the sliders on hopefully tomorrow night...pic's are coming.
Hopefully after this long weekend coming up I'll get started on that project. I'm still looking for a console to replace the one I want to remove. More to follow on that one.
Hopefully after this long weekend coming up I'll get started on that project. I'm still looking for a console to replace the one I want to remove. More to follow on that one.
May 18, 2011 | 06:54 PM
#33
Registered User
Joined: Apr 2010
Posts: 815
Likes: 0
From: Kingston, Ontario CANADA
 Jul 3, 2011 | 12:08 PM
#38
Registered User
Joined: Sep 2009
Posts: 100
Likes: 0
From: San Luis Obispo
o sorry brother. i just did this mod and made a whicked center console out of MDF. when my gf gives me her old camera ( i got her a new one ) ill make a write up and show you those bypassed hoses. very simple stuff
) ill make a write up and show you those bypassed hoses. very simple stuff
Jul 3, 2011 | 04:22 PM
#40
Registered User
Joined: Jul 2009
Posts: 319
Likes: 0
From: Denver, Colorado
Now you'll just have to put the key under the truck where it isn't easily accessible and if you ever get pulled over and they want to search the crate they will need a warrant! Hahah
Last edited by 93YotaGuy; Jul 3, 2011 at 04:24 PM.


