
Power Antenna Dead
 Feb 17, 2013 | 05:33 PM
#1
Thread Starter
Registered User
Joined: Dec 2011
Posts: 1,388
Likes: 8
From: CA, Until TSHTF!
Power Antenna Dead
My power antenna finally bit it.
I don't want to put another power antenna in.
So I wondering if I cant bolt up a standard antenna (no power)
without having to modify it?.
Can't find any threads directly related.
Any help is always appreciated.
I don't want to put another power antenna in.
So I wondering if I cant bolt up a standard antenna (no power)
without having to modify it?.
Can't find any threads directly related.
Any help is always appreciated.
 Feb 18, 2013 | 09:49 AM
#3
Thread Starter
Registered User
Joined: Dec 2011
Posts: 1,388
Likes: 8
From: CA, Until TSHTF!
Thanks for the response.
Just did a little more researching and measuring and
ordered what I needed.
I can re-work mounting tab myself if needed.
I'm good to go.

 Feb 18, 2013 | 11:16 AM
#4
Registered User
Joined: Jun 2011
Posts: 180
Likes: 0
From: Seattle, WA
I used the one here which was in a reply to a thread I posted a bit ago 
http://www.crutchfield.com/p_12044TY...u-Antenna.html
Post in question:
https://www.yotatech.com/forums/f116...cement-257618/
The antenna fit fine, but turns out my radio is crap so need to replace it hehe.
http://www.crutchfield.com/p_12044TY...u-Antenna.html
Post in question:
https://www.yotatech.com/forums/f116...cement-257618/
The antenna fit fine, but turns out my radio is crap so need to replace it hehe.
Last edited by Webbuff; Feb 18, 2013 at 11:18 AM.
Feb 19, 2013 | 07:23 AM
#5
Thread Starter
Registered User
Joined: Dec 2011
Posts: 1,388
Likes: 8
From: CA, Until TSHTF!
I used the one here which was in a reply to a thread I posted a bit ago
http://www.crutchfield.com/p_12044TY...u-Antenna.html
Post in question:
https://www.yotatech.com/forums/f116...cement-257618/
The antenna fit fine, but turns out my radio is crap so need to replace it hehe.
http://www.crutchfield.com/p_12044TY...u-Antenna.html
Post in question:
https://www.yotatech.com/forums/f116...cement-257618/
The antenna fit fine, but turns out my radio is crap so need to replace it hehe.
I'm pretty sure it will work.
Thanks for the links.
Feb 20, 2013 | 10:43 AM
#6

Registered User
Joined: Aug 2008
Posts: 52
Likes: 0
From: Central CA
My automatic extending/collapsing antenna broke off so I got another one. Broke it off, too, and was upset at myself for not being more careful. I replaced that one with a marine antenna wire that I laid under my dash. It works good. My local stereo shop did it while I waited. It looks clean with no antenna sticking up.
Trending Topics
Feb 20, 2013 | 04:32 PM
#10
http://www.crutchfield.com/p_12044TY...u-Antenna.html
This is what 92 Toy suggested to me. . I however was dumb and decided to do a Tacoma Whip antenna. . .
This is what 92 Toy suggested to me. . I however was dumb and decided to do a Tacoma Whip antenna. . .
Feb 20, 2013 | 04:43 PM
#11

Registered User
Joined: Sep 2012
Posts: 49
Likes: 0
From: MA
Yes it will fit with no mods because i did the same to mine. I didn't bother sealing the hole,but unless your planning on driving in rivers, you should be fine. You could probably seal it with some kind of silicone.
 Feb 23, 2013 | 03:10 PM
#13
Thread Starter
Registered User
Joined: Dec 2011
Posts: 1,388
Likes: 8
From: CA, Until TSHTF!
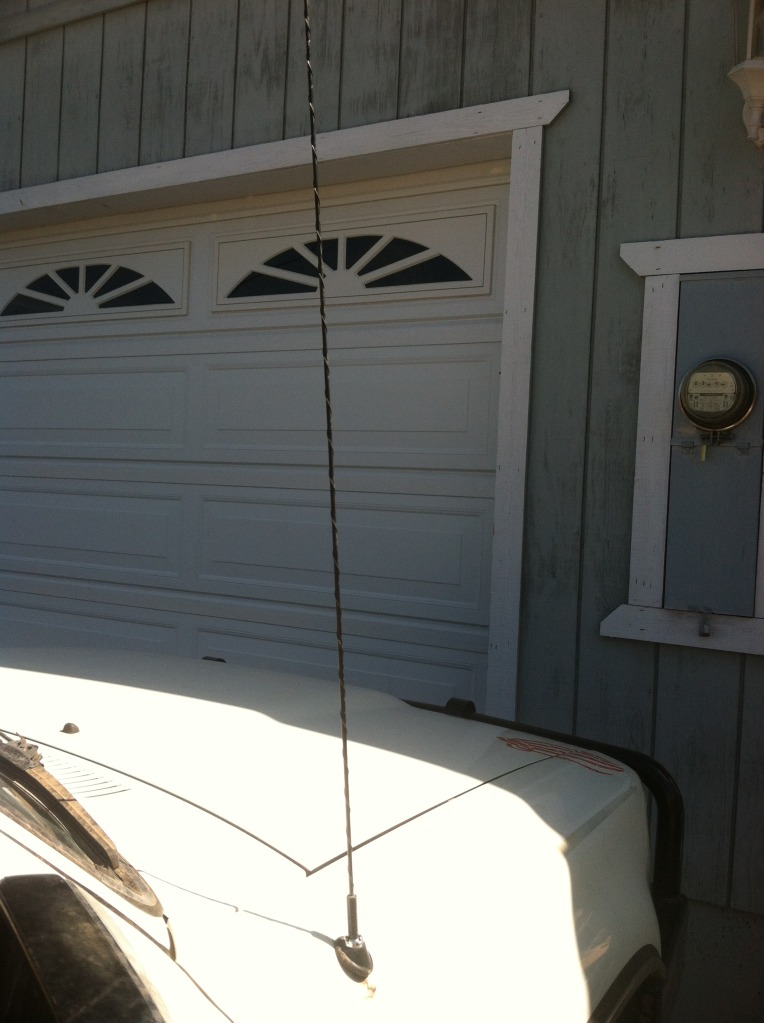
Replaced antenna from power to standard.
Pretty straight forward and easy to do.

Removed 5 bolts from splash guard starting from the bottom and just slide it out of way.
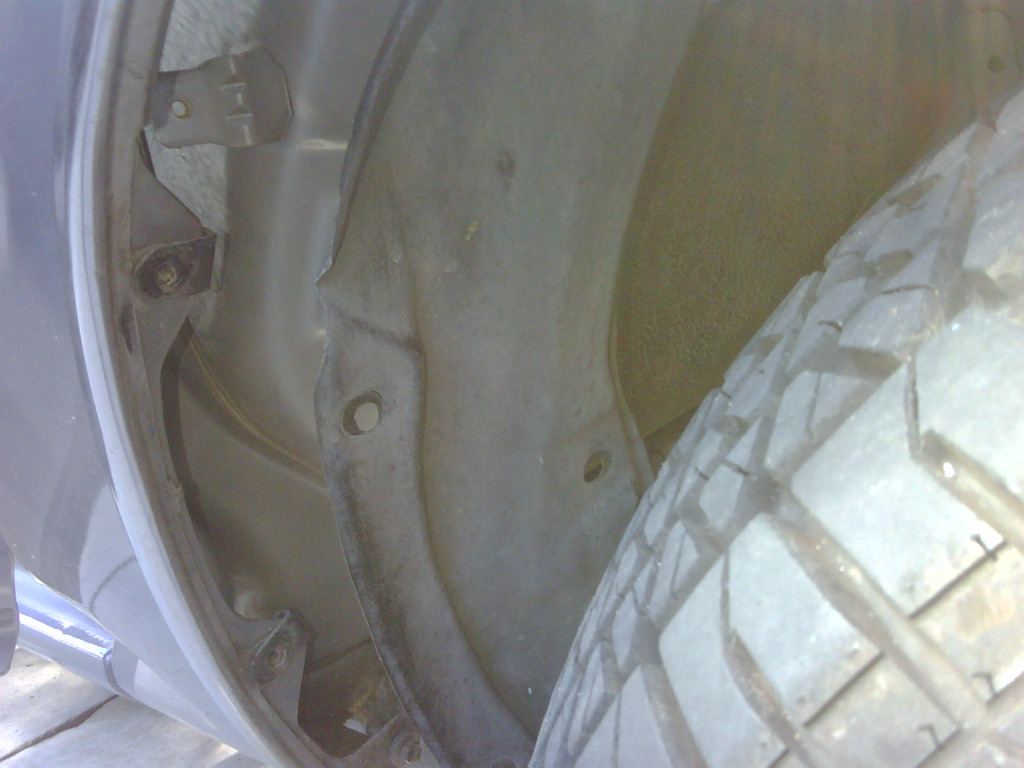
remove antenna assembly mounting bolt.

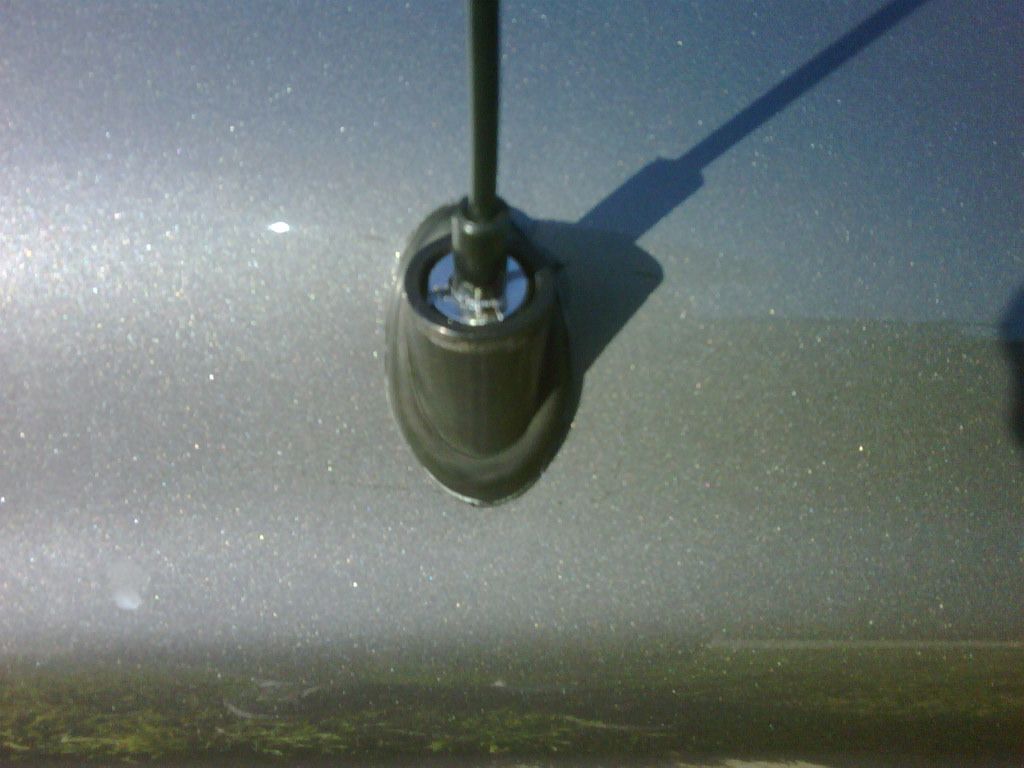
Install replacement antenna to mounting plate it comes with mounting clip bracket. (bottom of pic)
Run antenna plug through original pilot hole and plug in to stereo unit.
It was a little difficult to plug in to unit as I only removed glove box assembly.
I didn't want to to disassemble the whole lower dash area.
Very cramped area, after a lot of yelling and dislocating body parts I was able to plug it in
Hopefully this can help someone if needed.
The finished product---vv--- great reception again.
Pretty straight forward and easy to do.
Removed 5 bolts from splash guard starting from the bottom and just slide it out of way.
remove antenna assembly mounting bolt.
Install replacement antenna to mounting plate it comes with mounting clip bracket. (bottom of pic)
Run antenna plug through original pilot hole and plug in to stereo unit.
It was a little difficult to plug in to unit as I only removed glove box assembly.
I didn't want to to disassemble the whole lower dash area.
Very cramped area, after a lot of yelling
and dislocating body parts I was able to plug it inHopefully this can help someone if needed.
The finished product---vv--- great reception again.
Feb 23, 2013 | 07:26 PM
#14
I have my stock/toyota no stereo fender plug still, uh somewhere I dunno where I put that now that I thought of it.
Anyway.. You can fill the old hole with one of those if you can find the part number. OR get creative with some epoxy.
Material:
1 can, bottle or pen of touchup paint.
1 nozzle of epoxy
2 pieces 3-4" long & full width AL foil, folded over 1-2" wide
1 roll of duct tape.
1 roll of masking tape.
1-2 pieces of sand paper
Undo the inner fender as above.
Using masking tape mark off an area 1/2-1/4 inch outside the edge of the hole, you want two layers of tape here to protect the paint from the next step.
Sand down to metal around the hole inside the area you masked off.
Apply two(or more) layers more of masking tape all around the masked area, this forms a rim for the epoxy to lap onto the outside of the fender.
Place 1pc foil on the inside covering the hole. Tape this in place with the duct tape making sure you have all the edges covered.
Attach the second piece of foil to the outside by taping it vertically and only at the bottom, eg a flap attached at the bottom.
Mix and apply epoxy to the face of the hole allowing it to flow onto the inner foil and inside the hole, it should form a bit of an overlap on the inside and outside "H" shaped to hold it in place.
"Paint" some more epoxy onto the outside, and fold the outer foil upwards as you go. The outter foil will help it stay in place on the fender and keep it from running. Tape the edges of the foil so it doesn't leak while curing.
After the epoxy cures to it's gel stage, this is aproximately the "pot life", you can peel the outer foil off and all but the last layer of masking tape. It's ok to skip this step.
Once fully cured, peel off any masking tape and break off any epoxy ontop of the tape.
Reapply a single layer of masking tape, 2-3(or more!) inchs all the way around your new epoxy.
Carefully sand down the epoxy and feather the edges down to the tape level.
VERY carefully sand down the edge of the epoxy to the paint level. using high grit (200+)
Apply a shot of primer, wait. Apply you color matched paint, wait. Apply a shot of clear coat if you want, wait. Gently sand out any paint runs or blemishs with high grit.
Celebrate!
yeah I know no one asked, well they kind of did You can also use a body putty but you'd want to seal the inside of that and it's prone to shrinkage.
Anyway.. You can fill the old hole with one of those if you can find the part number. OR get creative with some epoxy.
Material:
1 can, bottle or pen of touchup paint.
1 nozzle of epoxy
2 pieces 3-4" long & full width AL foil, folded over 1-2" wide
1 roll of duct tape.
1 roll of masking tape.
1-2 pieces of sand paper
Undo the inner fender as above.
Using masking tape mark off an area 1/2-1/4 inch outside the edge of the hole, you want two layers of tape here to protect the paint from the next step.
Sand down to metal around the hole inside the area you masked off.
Apply two(or more) layers more of masking tape all around the masked area, this forms a rim for the epoxy to lap onto the outside of the fender.
Place 1pc foil on the inside covering the hole. Tape this in place with the duct tape making sure you have all the edges covered.
Attach the second piece of foil to the outside by taping it vertically and only at the bottom, eg a flap attached at the bottom.
Mix and apply epoxy to the face of the hole allowing it to flow onto the inner foil and inside the hole, it should form a bit of an overlap on the inside and outside "H" shaped to hold it in place.
"Paint" some more epoxy onto the outside, and fold the outer foil upwards as you go. The outter foil will help it stay in place on the fender and keep it from running. Tape the edges of the foil so it doesn't leak while curing.
After the epoxy cures to it's gel stage, this is aproximately the "pot life", you can peel the outer foil off and all but the last layer of masking tape. It's ok to skip this step.
Once fully cured, peel off any masking tape and break off any epoxy ontop of the tape.
Reapply a single layer of masking tape, 2-3(or more!) inchs all the way around your new epoxy.
Carefully sand down the epoxy and feather the edges down to the tape level.
VERY carefully sand down the edge of the epoxy to the paint level. using high grit (200+)
Apply a shot of primer, wait. Apply you color matched paint, wait. Apply a shot of clear coat if you want, wait. Gently sand out any paint runs or blemishs with high grit.
Celebrate!
yeah I know no one asked, well they kind of did
You can also use a body putty but you'd want to seal the inside of that and it's prone to shrinkage.
 Feb 28, 2013 | 11:18 AM
#16
Thread Starter
Registered User
Joined: Dec 2011
Posts: 1,388
Likes: 8
From: CA, Until TSHTF!
I have my stock/toyota no stereo fender plug still, uh somewhere I dunno where I put that now that I thought of it.
Anyway.. You can fill the old hole with one of those if you can find the part number. OR get creative with some epoxy.
Material:
1 can, bottle or pen of touchup paint.
1 nozzle of epoxy
2 pieces 3-4" long & full width AL foil, folded over 1-2" wide
1 roll of duct tape.
1 roll of masking tape.
1-2 pieces of sand paper
Undo the inner fender as above.
Using masking tape mark off an area 1/2-1/4 inch outside the edge of the hole, you want two layers of tape here to protect the paint from the next step.
Sand down to metal around the hole inside the area you masked off.
Apply two(or more) layers more of masking tape all around the masked area, this forms a rim for the epoxy to lap onto the outside of the fender.
Place 1pc foil on the inside covering the hole. Tape this in place with the duct tape making sure you have all the edges covered.
Attach the second piece of foil to the outside by taping it vertically and only at the bottom, eg a flap attached at the bottom.
Mix and apply epoxy to the face of the hole allowing it to flow onto the inner foil and inside the hole, it should form a bit of an overlap on the inside and outside "H" shaped to hold it in place.
"Paint" some more epoxy onto the outside, and fold the outer foil upwards as you go. The outter foil will help it stay in place on the fender and keep it from running. Tape the edges of the foil so it doesn't leak while curing.
After the epoxy cures to it's gel stage, this is aproximately the "pot life", you can peel the outer foil off and all but the last layer of masking tape. It's ok to skip this step.
Once fully cured, peel off any masking tape and break off any epoxy ontop of the tape.
Reapply a single layer of masking tape, 2-3(or more!) inchs all the way around your new epoxy.
Carefully sand down the epoxy and feather the edges down to the tape level.
VERY carefully sand down the edge of the epoxy to the paint level. using high grit (200+)
Apply a shot of primer, wait. Apply you color matched paint, wait. Apply a shot of clear coat if you want, wait. Gently sand out any paint runs or blemishs with high grit.
Celebrate!
yeah I know no one asked, well they kind of did You can also use a body putty but you'd want to seal the inside of that and it's prone to shrinkage.
Anyway.. You can fill the old hole with one of those if you can find the part number. OR get creative with some epoxy.
Material:
1 can, bottle or pen of touchup paint.
1 nozzle of epoxy
2 pieces 3-4" long & full width AL foil, folded over 1-2" wide
1 roll of duct tape.
1 roll of masking tape.
1-2 pieces of sand paper
Undo the inner fender as above.
Using masking tape mark off an area 1/2-1/4 inch outside the edge of the hole, you want two layers of tape here to protect the paint from the next step.
Sand down to metal around the hole inside the area you masked off.
Apply two(or more) layers more of masking tape all around the masked area, this forms a rim for the epoxy to lap onto the outside of the fender.
Place 1pc foil on the inside covering the hole. Tape this in place with the duct tape making sure you have all the edges covered.
Attach the second piece of foil to the outside by taping it vertically and only at the bottom, eg a flap attached at the bottom.
Mix and apply epoxy to the face of the hole allowing it to flow onto the inner foil and inside the hole, it should form a bit of an overlap on the inside and outside "H" shaped to hold it in place.
"Paint" some more epoxy onto the outside, and fold the outer foil upwards as you go. The outter foil will help it stay in place on the fender and keep it from running. Tape the edges of the foil so it doesn't leak while curing.
After the epoxy cures to it's gel stage, this is aproximately the "pot life", you can peel the outer foil off and all but the last layer of masking tape. It's ok to skip this step.
Once fully cured, peel off any masking tape and break off any epoxy ontop of the tape.
Reapply a single layer of masking tape, 2-3(or more!) inchs all the way around your new epoxy.
Carefully sand down the epoxy and feather the edges down to the tape level.
VERY carefully sand down the edge of the epoxy to the paint level. using high grit (200+)
Apply a shot of primer, wait. Apply you color matched paint, wait. Apply a shot of clear coat if you want, wait. Gently sand out any paint runs or blemishs with high grit.
Celebrate!
yeah I know no one asked, well they kind of did
You can also use a body putty but you'd want to seal the inside of that and it's prone to shrinkage. What's all this about?
All I did was replace a simple antenna.
Feb 28, 2013 | 11:39 AM
#17
 You could of course use a bondo w/ fiberglass and follow the directions on the can, a regular filler will shrink and fall out.
Feb 28, 2013 | 01:59 PM
You could of course use a bondo w/ fiberglass and follow the directions on the can, a regular filler will shrink and fall out.
Feb 28, 2013 | 01:59 PM
#18
Thread Starter
Registered User
Joined: Dec 2011
Posts: 1,388
Likes: 8
From: CA, Until TSHTF!
Not a fan of power antenna's anyway.
Forgive me, but what are the metal sheathes you referring to.
Do you possibly have a pic of them?
Last edited by ksti; Feb 28, 2013 at 02:02 PM.
Feb 28, 2013 | 04:02 PM
#20
Thread Starter
Registered User
Joined: Dec 2011
Posts: 1,388
Likes: 8
From: CA, Until TSHTF!


