IFS BJ spacers, Upper & Lower Balljoint removal / install
 Aug 17, 2011 | 08:07 PM
#1
Thread Starter
Registered User
iTrader: (3)
Joined: Sep 2008
Posts: 272
Likes: 0
From: Flagstaffrica, Land of Trustafarians
IFS BJ spacers, Upper & Lower Balljoint removal / install
Definitely a lurker here, with a lil to add here & there.
Today I replaced both upper & lower balljoints & added spacers, the first in a series of projects for my toyota.
First things first:
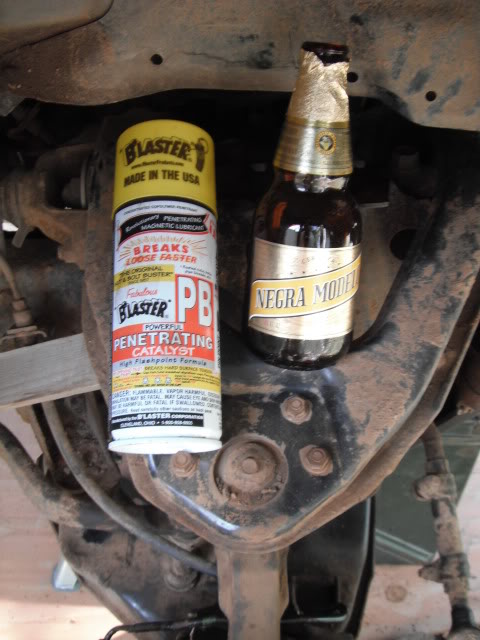

Soaked everything 5 or 6 times over the course of a month prior to this project with PB Blaster, definitely made life easy.
A good stock of Modelos ( or Bud Light) is also required.
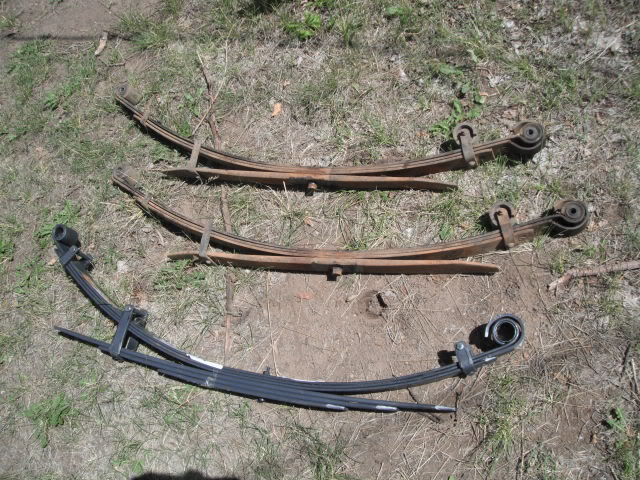
My old balljoints were pretty much beat, the truck could not stay in alignment & had some new creaks & moans in the front end, besides the usual toyota 'creak'. The shocks were also toast, with completely disintegrated bushings.
If you are even thinking about attempting this project, pony up the 14.95 at Napa for a pittman arm puller.
There was a smaller puller as well that was a combo tie-rod & pittman arm puller, get the bigger one. The old ball joints are wedged in the steering knuckle with an incredible amount of force!!
Other tools needed::
EYE PROTECTION!
Angle grinder (only if you are installing ball-joint spacers)
open & boxed wrenches & sockets, (I think 12 & 14mm deep sockets, 14mm (or 9/16), 17, 19 & 22mm were the primary wrenches & regular sockets used,
3/8 & 1/2" 3" extensions
torque wrench,
Pittman arm puller,
3 pound hammer,
shop towels,
PB Blaster,
Beer,
bail wire (to wire the steering knuckle out of the way when replacing the lower ball joint.)
Chock rear wheels
Remove tires
Place a piece of one-by or two-by between the upper bumpstop & A-arm. This gives you more room later in the removal/install of ball joints (and spacers)
Jack & secure the front end off the ground
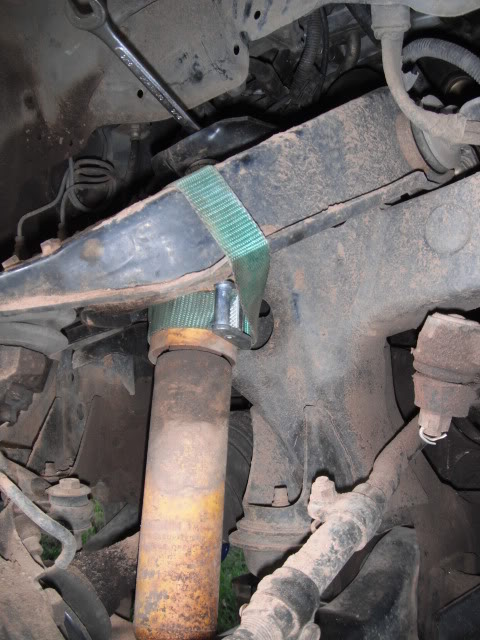
Remove front shock. The top nut will spin with the upper half of the shock body. I used a 2-foot cam strap wrapped around the steel dust cover & a-arm. This prevented the shock from rotating & allowed me to loosen the top nut.
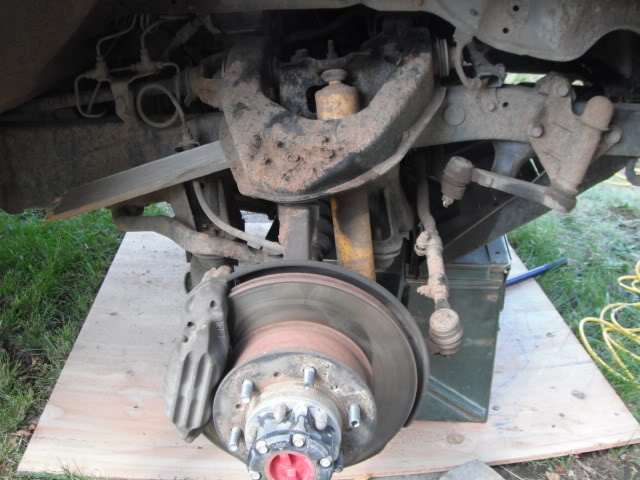
Unbolt your swaybar end-link, brake caliper, & steering arm off the steering knuckle. This will give you room to use the puller.
Good time to replace any rotten tie-rod ends, brake pads, rotors...

Suspend caliper with bailing wire to chassis to prevent tearing a brake line.
Unbolt the 4 upper & 4 lower ball joint bols that attach to the steering knuckle & bail-wire (or use your handy 2' strap) the steering knuckle out of the way.
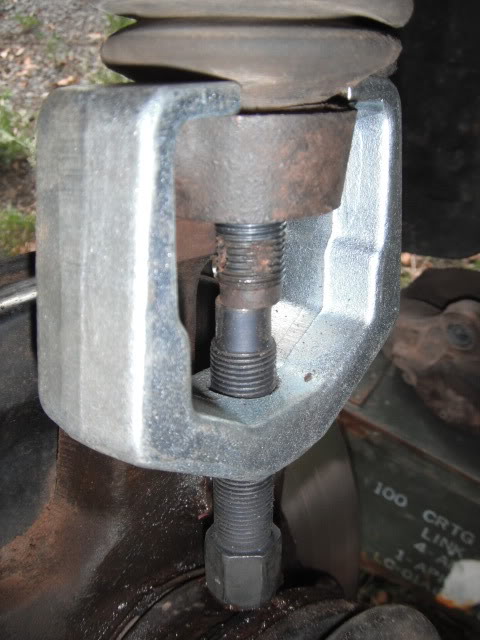
Pull out those beat up old ball joints with the pittman arm puller. Tighten the wrench on the puller, then alternately tap the old ball joint with your mini-sledge & tighten the puller again, until with a great BAAANG!!! the ball joints will pop out. The lowers seemed the toughest ( and loudest) to pull, but it took less than 2-3 minutes pulling on each balljoint. I have heard horror stories of mechanics spending hours with a pickle fork, air chisel, blow torch, ad naseum... This went very smooth compared to those stories, due in part to having an extra tool.
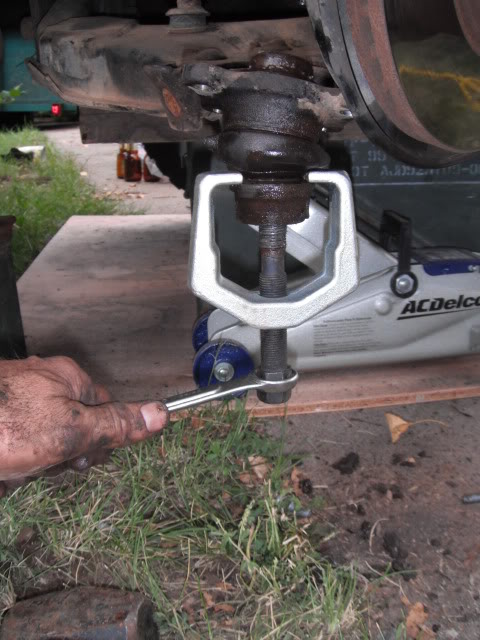
These pop off with such force that eye protection is a must!!!
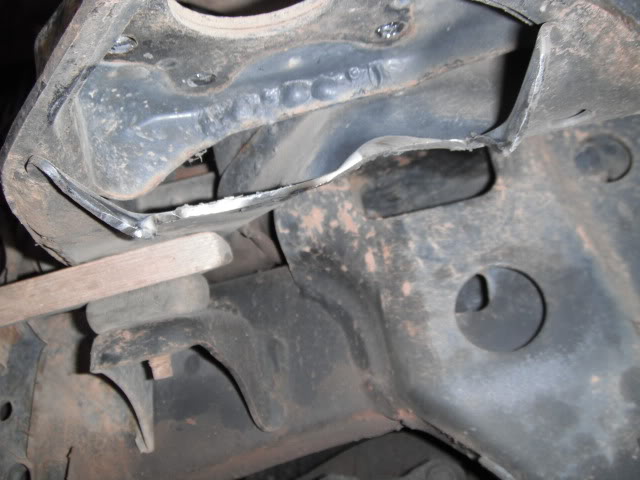
Since I was installing BJ spacers, I clearanced the inside of the a-arms with an angle grinder. Skip this step if you are just installing ball joints. Note this photo (below) is from a low angle. 10-15 minutes per side with the grinder did the job, stopping frequently to see if enough clearance was gained to fit the spacer.
To knock out the studs in the new ball joints in order to make room for the spacer bolts, I used the lip of the a-arm & 3-lb sledge.
Skip this step if you are NOT adding BJ spacers!
Install upper & lower ball joints onto the a-arms. If installing spacers, add them now. Use blue loctite & torque the upper 4-bolts to 25 ft-lbs, snugging the ny-lock nuts atop the first four nuts. Merely snug these up, if you go to 25 ft-lbs you may strip the nylon nuts.
NOTE: The torque value for replacement balljoints may be different, call your local dealer to find this specification if you are not adding ball joint spacers!!!
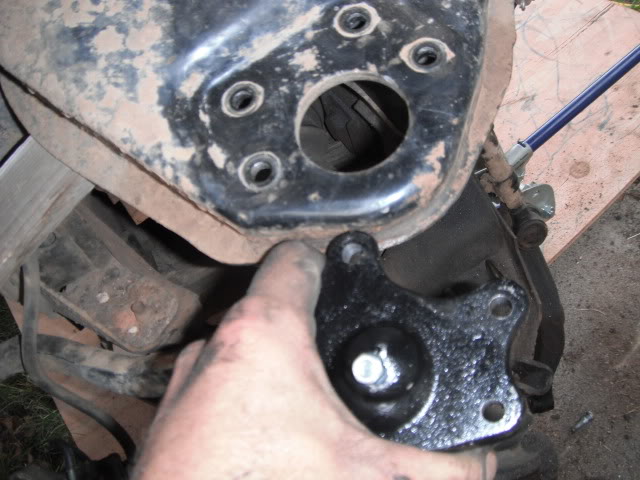
Note in this picture (below) I have the spacer installed & haven't installed the lower balljoint. The bolts are oniy loosely snugged up to give me some 'wiggle-room' to install the steering knuckle.
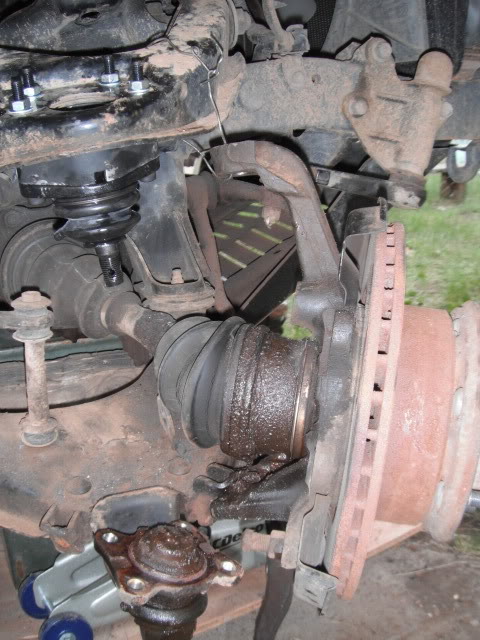
Once you have it all together, properly tighten all nuts & bolts to proper torque. The CV axle will probably slide out towards you, when re-installing you will have to wiigle the CV & force it back towards the front differential. It is easy to wiggle the hub & push the hub in at the same time in order to get the front drive axle to seat properly.
The castle nut on the lower balljoint is supposed to be torqued to 135-ft-lbs, but I had to torque it to almost 150-ft-lbs in order to get a cotter pin to align inside the castle nut.
The dealer told me to torque the lower 4 bolts that attatch to the steering knuckle to 60 ft-lbs as well. Loctited these as well.
Re-install calipers & steering assembly. I did not have a torque spec on these parts,(Edited to add: per Haynes manual, 105ft-lbs, added blue loctite).
The bolts that attatch the steering arm & brake-line brackets were on extremely tight, and covered with red loctite, so expect Hell getting them off. I tightened these to 105 per haynes ft-lb & covered the bolts with blue loctite.
Install new shock, in my case an Old Man Emu nitrocharger. Use handy 2-foot strap here as well to prevent the shock body from rotating.
Drink a beer, and repeat for the other side.

Put the tires back on, lower vehicle, drive it around a few miles, then re-check all torque specs.
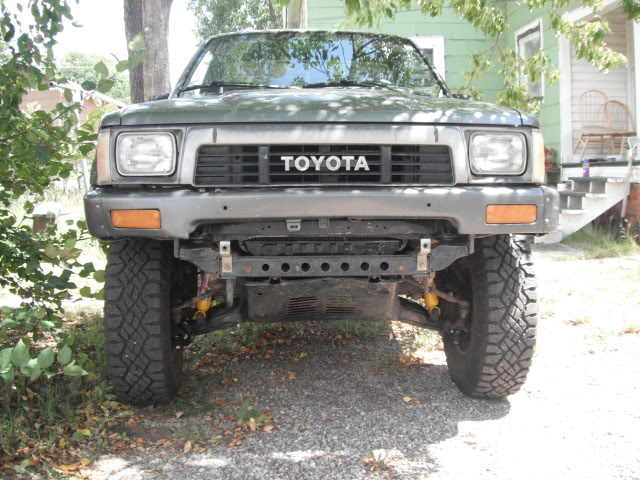
I spent 7 hours on this project, and that includes a little beer drinking, a Napa run & lunch. I got rained out this evening & don't have any completed photos, but those will be up tomorrow.
The balljoints I purchased were factory toyota parts from the dealer, I spent almost 300 dollars after tax for all four.
Balljoint spacers came off e-bay for 20 bucks a few years ago. Bolts were included, but used, so I replaced these all with grade 10.9 hardware from a local store, CopperState Nut & Bolt, for 8 dollars.
Negro Modelo was on sale for 11.99 a 12-pack.
Nitrocharger shocks were bought from 4-wheelers for 90 a piece, shipped.
I spent about 100 bucks at Napa for loctite, a few wrenches & sockets I needed, shop towels, PB Blaster & a new battery for my dirt bike.
All of this was done with hand tools, no air-tools.

Today I replaced both upper & lower balljoints & added spacers, the first in a series of projects for my toyota.
First things first:
Soaked everything 5 or 6 times over the course of a month prior to this project with PB Blaster, definitely made life easy.
A good stock of Modelos ( or Bud Light) is also required.
My old balljoints were pretty much beat, the truck could not stay in alignment & had some new creaks & moans in the front end, besides the usual toyota 'creak'. The shocks were also toast, with completely disintegrated bushings.
If you are even thinking about attempting this project, pony up the 14.95 at Napa for a pittman arm puller.
There was a smaller puller as well that was a combo tie-rod & pittman arm puller, get the bigger one. The old ball joints are wedged in the steering knuckle with an incredible amount of force!!
Other tools needed::
EYE PROTECTION!
Angle grinder (only if you are installing ball-joint spacers)
open & boxed wrenches & sockets, (I think 12 & 14mm deep sockets, 14mm (or 9/16), 17, 19 & 22mm were the primary wrenches & regular sockets used,
3/8 & 1/2" 3" extensions
torque wrench,
Pittman arm puller,
3 pound hammer,
shop towels,
PB Blaster,
Beer,
bail wire (to wire the steering knuckle out of the way when replacing the lower ball joint.)
Chock rear wheels
Remove tires
Place a piece of one-by or two-by between the upper bumpstop & A-arm. This gives you more room later in the removal/install of ball joints (and spacers)
Jack & secure the front end off the ground
Remove front shock. The top nut will spin with the upper half of the shock body. I used a 2-foot cam strap wrapped around the steel dust cover & a-arm. This prevented the shock from rotating & allowed me to loosen the top nut.
Unbolt your swaybar end-link, brake caliper, & steering arm off the steering knuckle. This will give you room to use the puller.
Good time to replace any rotten tie-rod ends, brake pads, rotors...
Suspend caliper with bailing wire to chassis to prevent tearing a brake line.
Unbolt the 4 upper & 4 lower ball joint bols that attach to the steering knuckle & bail-wire (or use your handy 2' strap) the steering knuckle out of the way.
Pull out those beat up old ball joints with the pittman arm puller. Tighten the wrench on the puller, then alternately tap the old ball joint with your mini-sledge & tighten the puller again, until with a great BAAANG!!! the ball joints will pop out. The lowers seemed the toughest ( and loudest) to pull, but it took less than 2-3 minutes pulling on each balljoint. I have heard horror stories of mechanics spending hours with a pickle fork, air chisel, blow torch, ad naseum... This went very smooth compared to those stories, due in part to having an extra tool.
These pop off with such force that eye protection is a must!!!
Since I was installing BJ spacers, I clearanced the inside of the a-arms with an angle grinder. Skip this step if you are just installing ball joints. Note this photo (below) is from a low angle. 10-15 minutes per side with the grinder did the job, stopping frequently to see if enough clearance was gained to fit the spacer.
To knock out the studs in the new ball joints in order to make room for the spacer bolts, I used the lip of the a-arm & 3-lb sledge.
Skip this step if you are NOT adding BJ spacers!
Install upper & lower ball joints onto the a-arms. If installing spacers, add them now. Use blue loctite & torque the upper 4-bolts to 25 ft-lbs, snugging the ny-lock nuts atop the first four nuts. Merely snug these up, if you go to 25 ft-lbs you may strip the nylon nuts.
NOTE: The torque value for replacement balljoints may be different, call your local dealer to find this specification if you are not adding ball joint spacers!!!
Note in this picture (below) I have the spacer installed & haven't installed the lower balljoint. The bolts are oniy loosely snugged up to give me some 'wiggle-room' to install the steering knuckle.
Once you have it all together, properly tighten all nuts & bolts to proper torque. The CV axle will probably slide out towards you, when re-installing you will have to wiigle the CV & force it back towards the front differential. It is easy to wiggle the hub & push the hub in at the same time in order to get the front drive axle to seat properly.
The castle nut on the lower balljoint is supposed to be torqued to 135-ft-lbs, but I had to torque it to almost 150-ft-lbs in order to get a cotter pin to align inside the castle nut.
The dealer told me to torque the lower 4 bolts that attatch to the steering knuckle to 60 ft-lbs as well. Loctited these as well.
Re-install calipers & steering assembly. I did not have a torque spec on these parts,(Edited to add: per Haynes manual, 105ft-lbs, added blue loctite).
The bolts that attatch the steering arm & brake-line brackets were on extremely tight, and covered with red loctite, so expect Hell getting them off. I tightened these to 105 per haynes ft-lb & covered the bolts with blue loctite.
Install new shock, in my case an Old Man Emu nitrocharger. Use handy 2-foot strap here as well to prevent the shock body from rotating.
Drink a beer, and repeat for the other side.
Put the tires back on, lower vehicle, drive it around a few miles, then re-check all torque specs.
I spent 7 hours on this project, and that includes a little beer drinking, a Napa run & lunch. I got rained out this evening & don't have any completed photos, but those will be up tomorrow.
The balljoints I purchased were factory toyota parts from the dealer, I spent almost 300 dollars after tax for all four.
Balljoint spacers came off e-bay for 20 bucks a few years ago. Bolts were included, but used, so I replaced these all with grade 10.9 hardware from a local store, CopperState Nut & Bolt, for 8 dollars.
Negro Modelo was on sale for 11.99 a 12-pack.
Nitrocharger shocks were bought from 4-wheelers for 90 a piece, shipped.
I spent about 100 bucks at Napa for loctite, a few wrenches & sockets I needed, shop towels, PB Blaster & a new battery for my dirt bike.
All of this was done with hand tools, no air-tools.
Last edited by AZ89LONGBED; Oct 12, 2011 at 06:28 PM.
 Aug 18, 2011 | 05:02 AM
#6
Registered User
Joined: Apr 2008
Posts: 238
Likes: 0
From: Vermont
Dude - you're the man! Great write-up. I have moog tierod ends, upper and lower BJ's, idler arms and A arm bushings all coming from Rock Auto in the next week, and Wabbit's IFS BJ spacer lift kit with shox on the way as well. This write up will definitely save me time.
Thanks.
Thanks.

Trending Topics

 Aug 18, 2011 | 01:25 PM
#10
Thread Starter
Registered User
iTrader: (3)
Joined: Sep 2008
Posts: 272
Likes: 0
From: Flagstaffrica, Land of Trustafarians
AK-- I used 2 20-mm cans in addition to my jackstands under the front crossmember, just in case... The .50 cal is about perfect height for setting the caliper on, until you get the bailing wire out to tie it to the frame
Aug 20, 2011 | 08:39 AM
#12
This is great! I got to do this exact same job, collecting parts right now. I plan on using oem balljoints too ( i think mine are original with 308,xxx miles). Regarding the shocks: are they extended travel to compensate for the spacers?
Aug 25, 2011 | 09:38 PM
#14
Registered User
Joined: May 2008
Posts: 56
Likes: 0
From: [East] Bay Area, CA
Thanks for doing this write up. I replaced 3 of 4 ball joints last year and and am just now doing the last upper. I couldn't remember, for the life of me, the trick to getting to that upper without removing other junk (I don't have a small bottle jack handy). That 1x4 or 2x4 between the bump stop and the control arm is so key. Cheers!
Last edited by BlackBox; Aug 25, 2011 at 09:40 PM.
Aug 25, 2011 | 11:34 PM
#16
Registered User
Joined: Jan 2011
Posts: 353
Likes: 0
From: va
Man like everyone else said great write up just done mine last weekend and i wish i would of known that strap trick for the shocks it prob would have saved me 30 mins per side we had to take big dead blow and beat em till they broke.
 Great thread!!!