
Gaskets and Seals Needed for Knock Sensor Change
 Jun 19, 2011 | 12:54 PM
#1

Thread Starter
Registered User


Joined: Jun 2011
Posts: 109
Likes: 2
Gaskets and Seals Needed for Knock Sensor Change
I have to change out the knock sensor pigtail on my 3vze. I've got someone (knowledgeable) to help but I need to gather the parts. Can anyone tell me what seals and gaskets I will need?thx.
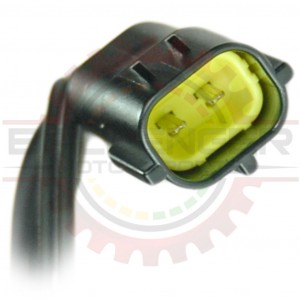
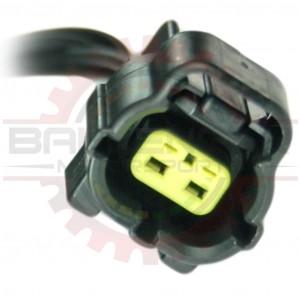
Also, I need a new connector that attaches to the end of the wiring harness (the one that connects to the knock sensor pigtail). Mine is ragged and the dealer says they don't sell them. Anyone got a suggestion?
Also, I need a new connector that attaches to the end of the wiring harness (the one that connects to the knock sensor pigtail). Mine is ragged and the dealer says they don't sell them. Anyone got a suggestion?
Last edited by elaketiger; Jun 19, 2011 at 01:09 PM.
Jun 19, 2011 | 02:10 PM
#2
Registered User
Joined: Sep 2008
Posts: 222
Likes: 2
From: SW Washington
I think you just need an intake plenum gasket, because it needs to be removed to get to the knock sensor. While you're under there, you could consider valve cover gaskets if they're old as well as a new pcv valve and new grommet if necessary. It's also easy access to injectors if they need cleaning and new gaskets. Sorry, but I don't have much info about the knock sensor pigtail. I would recommend NAPA for the plenum gasket, which is around $4.
Last edited by DJ99; Jun 19, 2011 at 02:13 PM.
Jun 19, 2011 | 03:03 PM
#3
Registered User
Joined: Jan 2007
Posts: 6,106
Likes: 27
For a new connector you could try one of these guy's:
www.connectorsfast.com
www.bmotorsports.com
Have fun!
EDIT: I went ahead and looked around on those sites for you, and me out of curiousity.
connectorsfast has this one that might work.
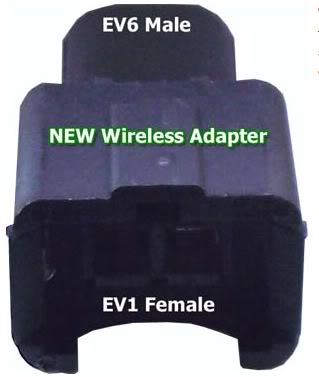
bmotorsports has these two(part #s CONN-85729 & CONN-85730), or a few others, that you could make work(if you bought both).
www.connectorsfast.com
www.bmotorsports.com
Have fun!
EDIT: I went ahead and looked around on those sites for you, and me out of curiousity.
connectorsfast has this one that might work.
bmotorsports has these two(part #s CONN-85729 & CONN-85730), or a few others, that you could make work(if you bought both).
Last edited by MudHippy; Jun 20, 2011 at 09:15 AM.
Jun 20, 2011 | 12:45 AM
#4
Contributing Member
Joined: Apr 2006
Posts: 4,787
Likes: 36
From: TENN Native Languishing in Virginia
I'd take this opportunity to replace ALL the injector seals. On second thought, send them off to www.witchhunter.com & get them cleaned. They'll come back with new seals/o-rings much cheaper than you can buy a full set of them.
Also think about crush washers for the fuel rails if you remove them.
Also think about crush washers for the fuel rails if you remove them.
Jun 20, 2011 | 03:56 AM
#5
Thread Starter
Registered User
Joined: Jun 2011
Posts: 109
Likes: 2
Does the plenum have to be off to pull the injectors? I hate to leave it in tear down mode while the injectors are being cleaned. The truck is located out of town and it is likely to be 2-3 weeks between trips to work on it.
Trending Topics
Jul 5, 2011 | 07:31 AM
#8
Registered User
Joined: Jan 2008
Posts: 1,085
Likes: 7
From: Connecticut
Also a good time to adjust the valves, which should be done if the last time was 80k miles or more. Exhaust valves tend to stretch and tighten up on this motor, and eventually don't close all the way, and burn. The 92-95 motors seem more prone to the problem. Adjusting the valves is a PITA, however. This post has info on the tool needed:
http://www.toyotanation.com/forum/sh...19#post3137919
Other thoughts: https://www.yotatech.com/forums/f116.../#post51741765
x2 on the pcv valve & grommet.
I would try a few more dealers before accepting that the connector is unavailable from Toyota. Consider this post from a guy who was told by his local dealer that he would have to buy an entire wiring harness for his 22re truck to get a new knock sensor connector, but he found a part # on the connector itself and another dealer, who was willing to look it up, cross-referenced it to a connector repair kit:
http://www.toyotanation.com/forum/sh...49#post2940349 IDK if such a kit is available for the 3VZE (connector is different than the 22re one), but given that knock sensor woes are more common on that motor, there must be at least a chance that a kit is available. You should be able to see the connector somewhere under the throttle body and above the valve cover and perhaps can unplug it (with ignition OFF) and read a number off of it. BTW the connector changed, I think in 92.
Here are some pics of the location that I've bookmarked, all from other yt members I believe:
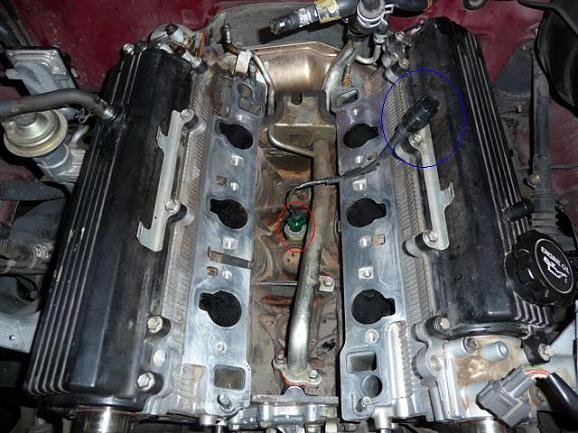
Here the gray-sleeved pigtail lays over the valve cover:

Here the black connector pokes out under the fuel rail and TPS:
http://www.toyotanation.com/forum/sh...19#post3137919
Other thoughts: https://www.yotatech.com/forums/f116.../#post51741765
x2 on the pcv valve & grommet.
I would try a few more dealers before accepting that the connector is unavailable from Toyota. Consider this post from a guy who was told by his local dealer that he would have to buy an entire wiring harness for his 22re truck to get a new knock sensor connector, but he found a part # on the connector itself and another dealer, who was willing to look it up, cross-referenced it to a connector repair kit:
http://www.toyotanation.com/forum/sh...49#post2940349 IDK if such a kit is available for the 3VZE (connector is different than the 22re one), but given that knock sensor woes are more common on that motor, there must be at least a chance that a kit is available. You should be able to see the connector somewhere under the throttle body and above the valve cover and perhaps can unplug it (with ignition OFF) and read a number off of it. BTW the connector changed, I think in 92.
Here are some pics of the location that I've bookmarked, all from other yt members I believe:
Here the gray-sleeved pigtail lays over the valve cover:
Here the black connector pokes out under the fuel rail and TPS:
Last edited by sb5walker; Jul 5, 2011 at 07:40 AM.
Jul 5, 2011 | 07:37 AM
#9
Registered User
Joined: Sep 2005
Posts: 2,074
Likes: 1
From: Binghamton, NY
I have to change out the knock sensor pigtail on my 3vze. I've got someone (knowledgeable) to help but I need to gather the parts. Can anyone tell me what seals and gaskets I will need?thx.
Also, I need a new connector that attaches to the end of the wiring harness (the one that connects to the knock sensor pigtail). Mine is ragged and the dealer says they don't sell them. Anyone got a suggestion?
Also, I need a new connector that attaches to the end of the wiring harness (the one that connects to the knock sensor pigtail). Mine is ragged and the dealer says they don't sell them. Anyone got a suggestion?
James
Jul 5, 2011 | 02:48 PM
#10
Registered User
Joined: Nov 2008
Posts: 2,306
Likes: 8
From: Cheyenne, Wyoming

No, just the upper intake needs to be taken off.
The timing belt does not even need to be touched.
Jul 6, 2011 | 04:30 AM
#11
Registered User
Joined: Feb 2011
Posts: 38
Likes: 0
The only thing I had to remove related to the timing belt when I replaced my knock sensor was the idler pulley up top...just opened the cover a little bit to get at those 4 screws holding the bracket on. Never touched the belt
Jul 6, 2011 | 04:44 AM
#12
Thread Starter
Registered User
Joined: Jun 2011
Posts: 109
Likes: 2
Do you need to maintain tension on the belt while the idler pulley is off to keep it from relaxing and getting the main crank out of line?
Jul 6, 2011 | 05:07 AM
#13

Registered User
Joined: Jun 2011
Posts: 41
Likes: 0
From: Connecticut
I JUST did this very repair a couple of weeks ago. I purchased:
1) Knock Sensor
2) Knock Sensor pigtail harness
3) 2 intake gaskets (YES the lower intake HAS to come off)
4) Plenum Gasket
5) 12 crush seals for the fuel rails
6) 2 valve cover gaskets (not required but they were leaking so I did them while it was easy)
7) PCV valve and grommet
8) New Idler Pulley (mine was spinning a little too freely. This NEEDS to be loosened and you will loose tension on the timing belt but it doesn't need to come OFF completely)
9) EGR gasket (the one to the intake plenum)
10) Water bypass gasket (this is on the rear of the intake manifold)
Off the top of my head i think that's it...
Jul 6, 2011 | 06:28 AM
#14
Thread Starter
Registered User
Joined: Jun 2011
Posts: 109
Likes: 2
I JUST did this very repair a couple of weeks ago. I purchased:
1) Knock Sensor
2) Knock Sensor pigtail harness
3) 2 intake gaskets (YES the lower intake HAS to come off)
4) Plenum Gasket
5) 12 crush seals for the fuel rails
6) 2 valve cover gaskets (not required but they were leaking so I did them while it was easy)
7) PCV valve and grommet
8) New Idler Pulley (mine was spinning a little too freely. This NEEDS to be loosened and you will loose tension on the timing belt but it doesn't need to come OFF completely)
9) EGR gasket (the one to the intake plenum)
10) Water bypass gasket (this is on the rear of the intake manifold)
Off the top of my head i think that's it...
1) Knock Sensor
2) Knock Sensor pigtail harness
3) 2 intake gaskets (YES the lower intake HAS to come off)
4) Plenum Gasket
5) 12 crush seals for the fuel rails
6) 2 valve cover gaskets (not required but they were leaking so I did them while it was easy)
7) PCV valve and grommet
8) New Idler Pulley (mine was spinning a little too freely. This NEEDS to be loosened and you will loose tension on the timing belt but it doesn't need to come OFF completely)
9) EGR gasket (the one to the intake plenum)
10) Water bypass gasket (this is on the rear of the intake manifold)
Off the top of my head i think that's it...
1. A tube of RTV Black
2. 1 Water Outlet Gasket
3. 1 EGR Valve Gasket
4. 1 Intake Air Surge Tank Gasket
5. 2 Intake Manifold Gaskets.
So I should only still need the crush seals (I thought there were only 8, are there 12?), and the pigtail (my Knock Sensor was new when the engine was rebuilt in March)?
Jul 6, 2011 | 06:36 AM
#15
Registered User
Joined: Feb 2011
Posts: 38
Likes: 0
Is the plenum gasket also called the Intake Air Surge Tank Gasket. I bought a gasket kit that contains:
1. A tube of RTV Black
2. 1 Water Outlet Gasket
3. 1 EGR Valve Gasket
4. 1 Intake Air Surge Tank Gasket
5. 2 Intake Manifold Gaskets.
So I should only still need the crush seals (I thought there were only 8, are there 12?), and the pigtail (my Knock Sensor was new when the engine was rebuilt in March)?
Jul 6, 2011 | 07:16 AM
#16
Thread Starter
Registered User
Joined: Jun 2011
Posts: 109
Likes: 2
Here is my big fear: Replacing the knock sensor wire and reassembling and still code 52.
Question for anyone: I can access the knock sensor pigtail connection where it plugs into the main wiring harness. Could this be used as a test: Purchase the new pigtail and find a used knock sensor and vise-grip it to the engine hook, plug it in to the new pigtail and that into the wiring harness and test. Does the knock sensor get a ground through the engine block?
I'm just wanting to make sure the pigtail is the problem and not the main wiring harness or the computer.
Jul 6, 2011 | 10:59 AM
#17
Registered User
Joined: Jun 2011
Posts: 41
Likes: 0
From: Connecticut
Is the plenum gasket also called the Intake Air Surge Tank Gasket. I bought a gasket kit that contains:
1. A tube of RTV Black
2. 1 Water Outlet Gasket
3. 1 EGR Valve Gasket
4. 1 Intake Air Surge Tank Gasket
5. 2 Intake Manifold Gaskets.
So I should only still need the crush seals (I thought there were only 8, are there 12?), and the pigtail (my Knock Sensor was new when the engine was rebuilt in March)?
1. A tube of RTV Black
2. 1 Water Outlet Gasket
3. 1 EGR Valve Gasket
4. 1 Intake Air Surge Tank Gasket
5. 2 Intake Manifold Gaskets.
So I should only still need the crush seals (I thought there were only 8, are there 12?), and the pigtail (my Knock Sensor was new when the engine was rebuilt in March)?
As far as the crush washers, there are 8 to connect the cross-over pipes that connect the left/right fuel rails in front and in back. 2 per connection and there's 4 connections....BUT there are also two larger ones that seal the where the main fuel line attaches to the fuel rail. Lastly, there are a couple under things like the Engine Coolant temp probe which i took off to inspect. I guess if you're just doing the minimum you'll need a total of 10. 8 for the crossover pipes and 2 for the main line.
Jul 6, 2011 | 01:23 PM
#18
Registered User
Joined: Sep 2005
Posts: 2,074
Likes: 1
From: Binghamton, NY
James
Jul 6, 2011 | 03:43 PM
#19
Registered User
Joined: Jul 2006
Posts: 479
Likes: 5
From: Anchorage
While I also strongly recommend replacing the timing belt and water pump when you're doing this job, you can skip it if you really want to.
You will need to remove the upper radiator hose housing where it connects to the upper idler pulley to remove the pulley, and the drive belts and fan so you can remove the upper timing belt cover. Now you can use strong clamp-type paper clips to secure the timing belt to the pulleys. Use a couple on each. The teeth will prevent the belt from slipping as long as it isn't allowed to raid up away from the pulley. The clips will do that. Now when you remove the upper idler pulley, the timing belt will remain engaged to the cam pulleys and cam timing will not change.
The other suggestions above on things to do when you're in there are great and strongly recommended.
There's another thread recently on this same job that also had a lot of good info. It should be in the first couple of pages.
Here's the other thread:
https://www.yotatech.com/forums/f116...cedure-237357/
Last edited by bugs1961; Jul 6, 2011 at 03:50 PM. Reason: added link
Jul 6, 2011 | 04:47 PM
#20
Registered User
Joined: Jun 2011
Posts: 41
Likes: 0
From: Connecticut
While I also strongly recommend replacing the timing belt and water pump when you're doing this job, you can skip it if you really want to.
You will need to remove the upper radiator hose housing where it connects to the upper idler pulley to remove the pulley, and the drive belts and fan so you can remove the upper timing belt cover. Now you can use strong clamp-type paper clips to secure the timing belt to the pulleys. Use a couple on each. The teeth will prevent the belt from slipping as long as it isn't allowed to raid up away from the pulley. The clips will do that. Now when you remove the upper idler pulley, the timing belt will remain engaged to the cam pulleys and cam timing will not change.
The other suggestions above on things to do when you're in there are great and strongly recommended.
There's another thread recently on this same job that also had a lot of good info. It should be in the first couple of pages.
Here's the other thread:
https://www.yotatech.com/forums/f116...cedure-237357/
You will need to remove the upper radiator hose housing where it connects to the upper idler pulley to remove the pulley, and the drive belts and fan so you can remove the upper timing belt cover. Now you can use strong clamp-type paper clips to secure the timing belt to the pulleys. Use a couple on each. The teeth will prevent the belt from slipping as long as it isn't allowed to raid up away from the pulley. The clips will do that. Now when you remove the upper idler pulley, the timing belt will remain engaged to the cam pulleys and cam timing will not change.
The other suggestions above on things to do when you're in there are great and strongly recommended.
There's another thread recently on this same job that also had a lot of good info. It should be in the first couple of pages.
Here's the other thread:
https://www.yotatech.com/forums/f116...cedure-237357/


