
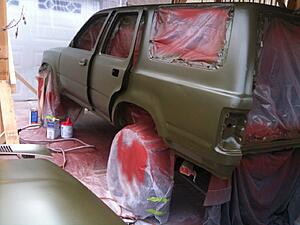
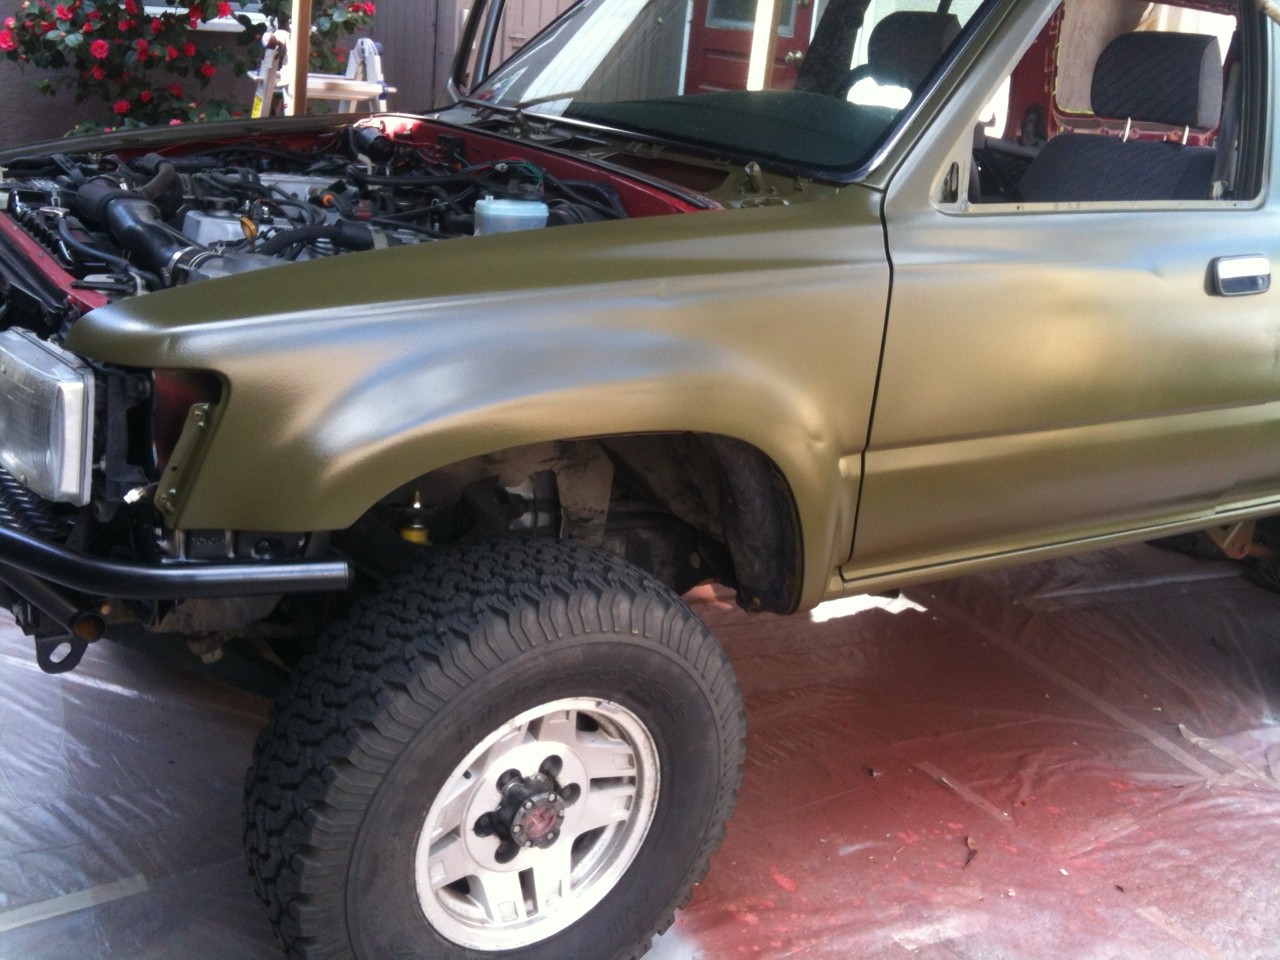
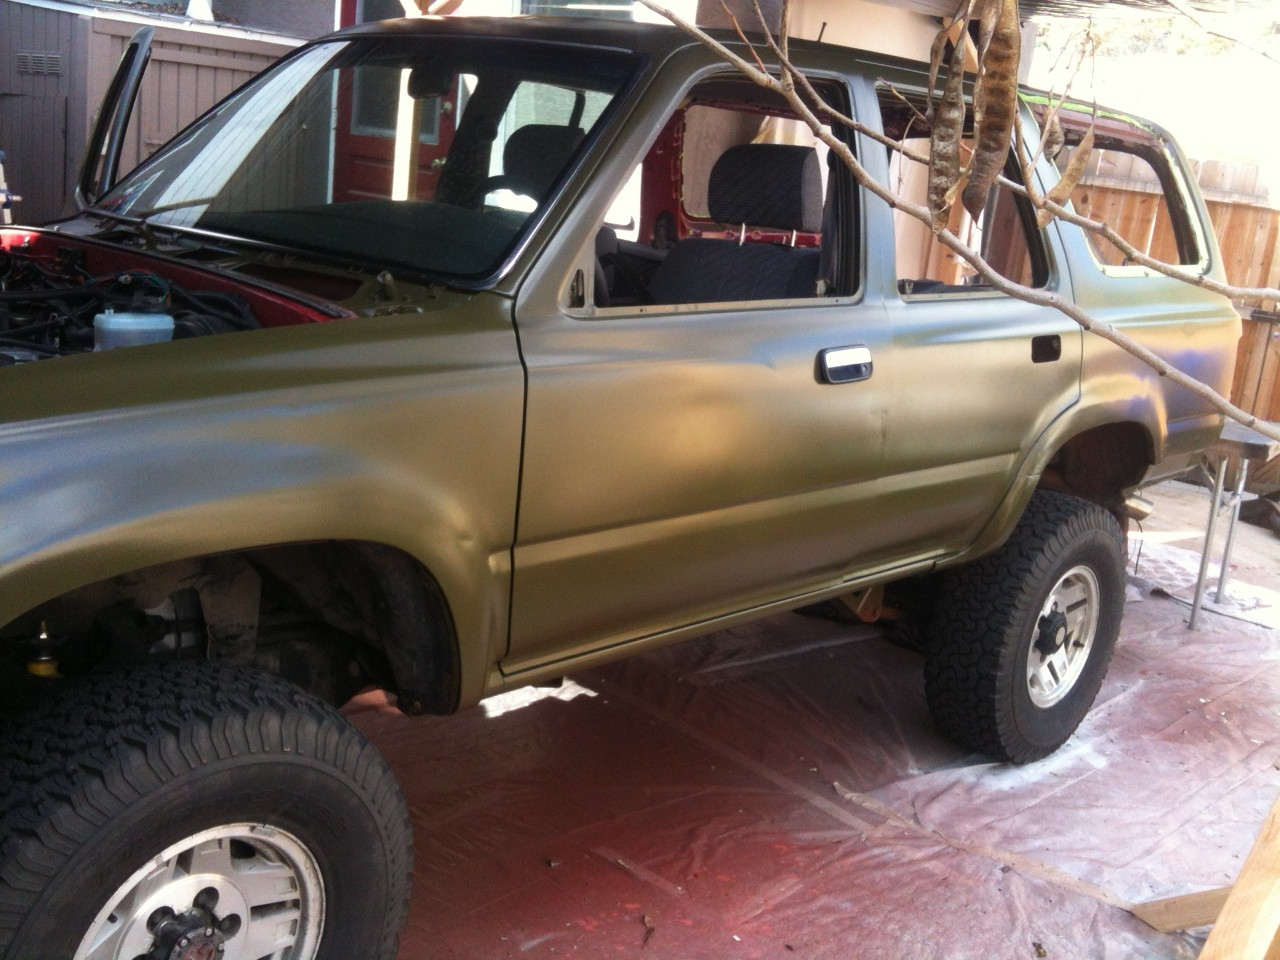
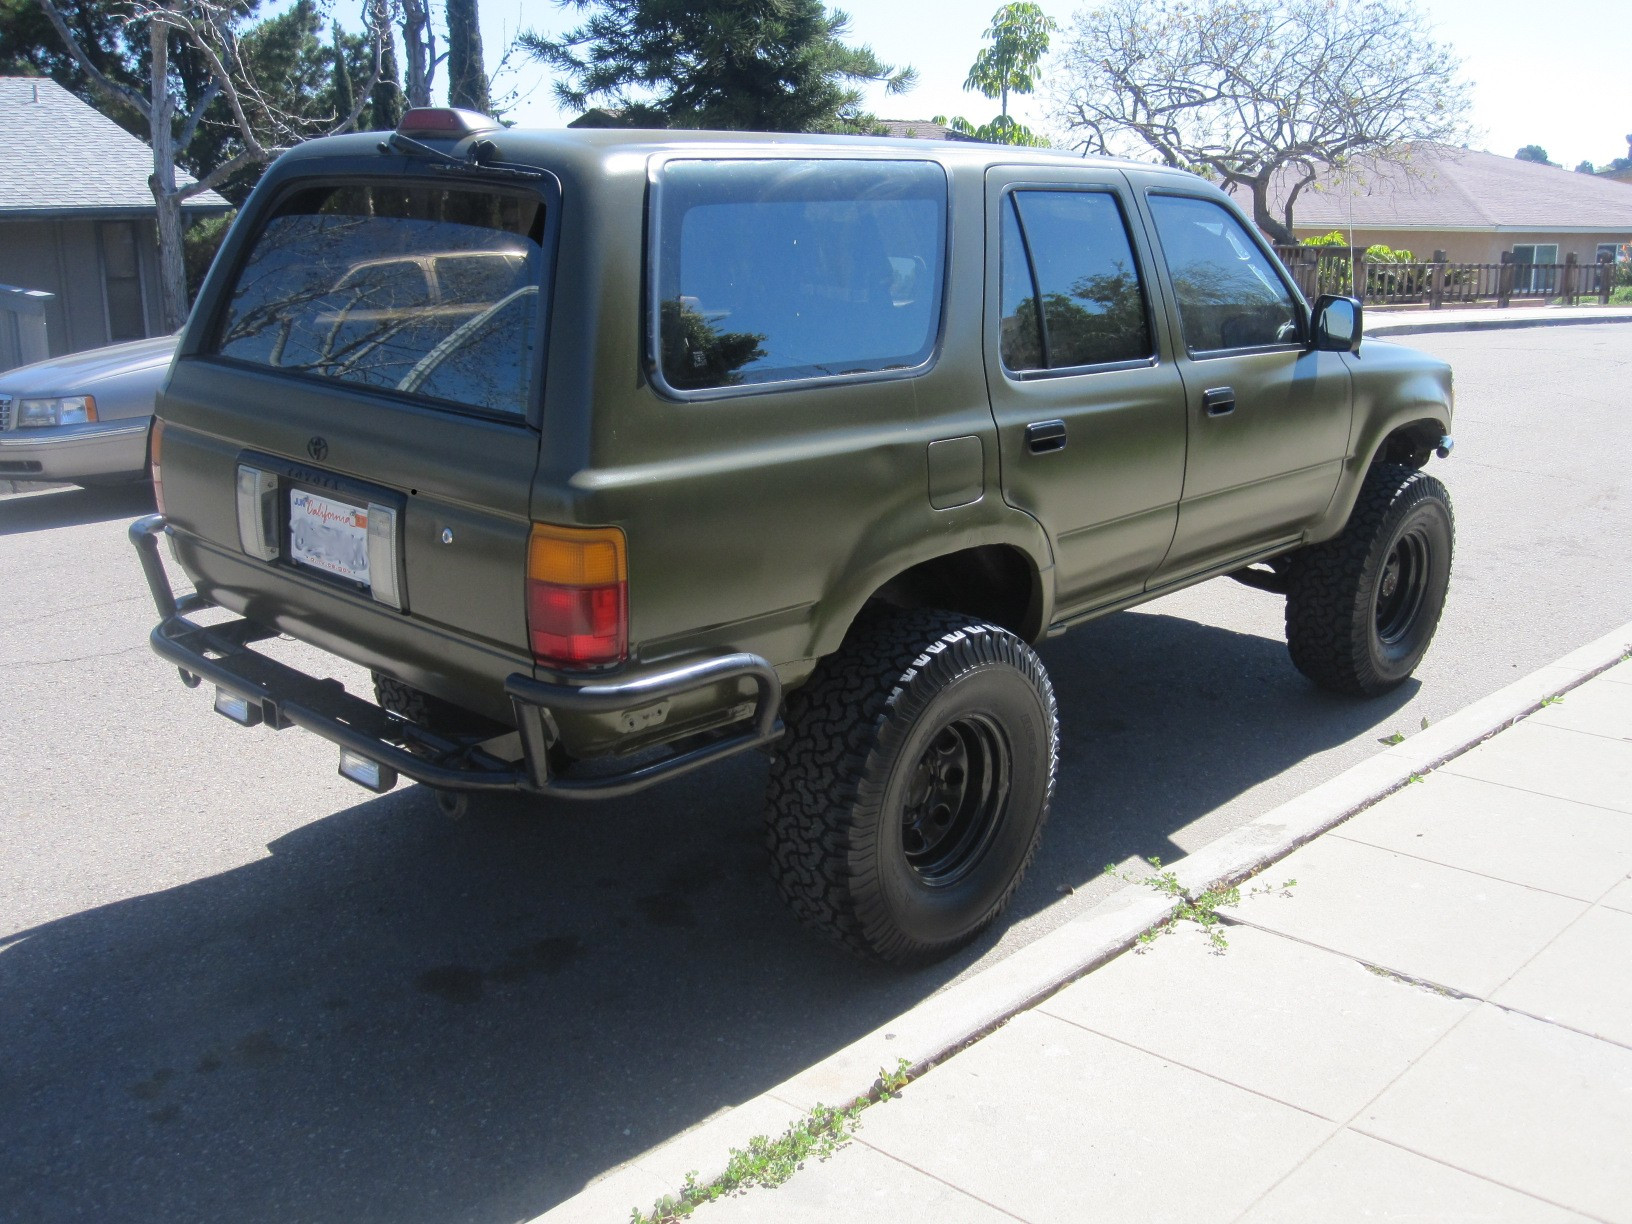
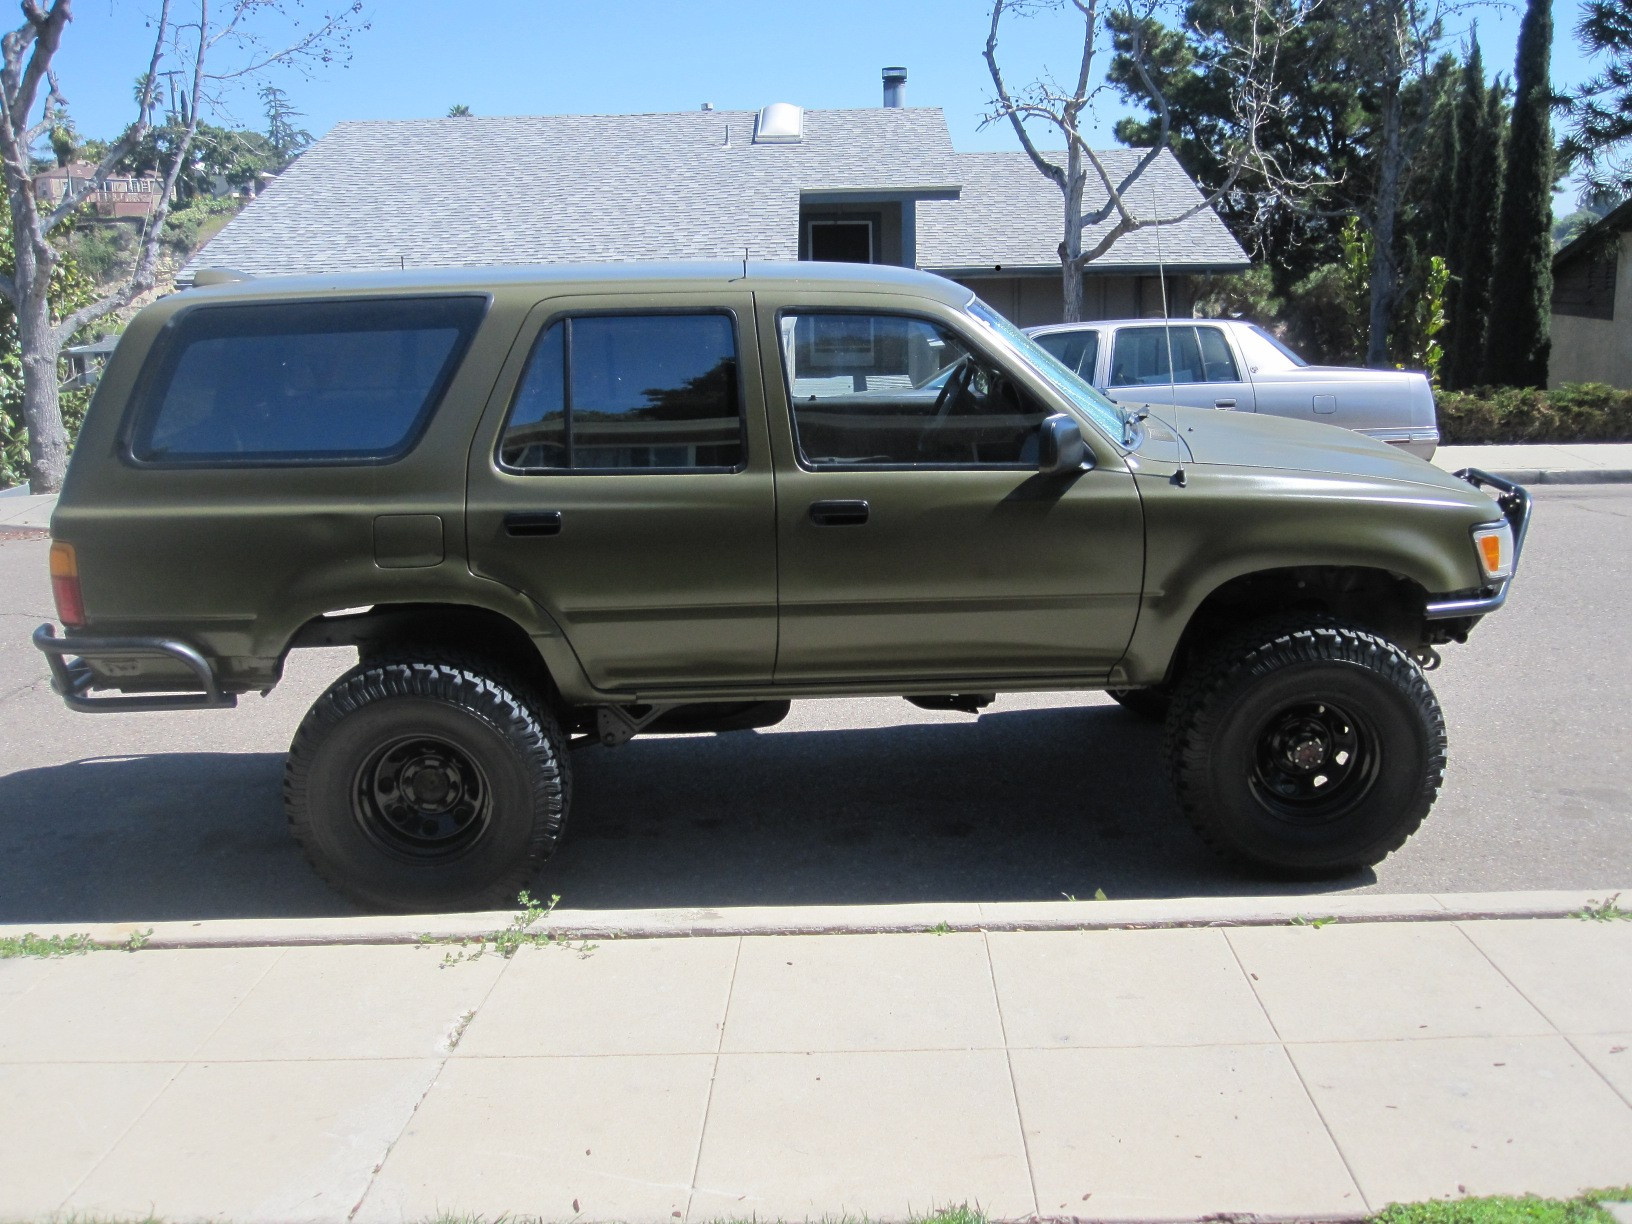
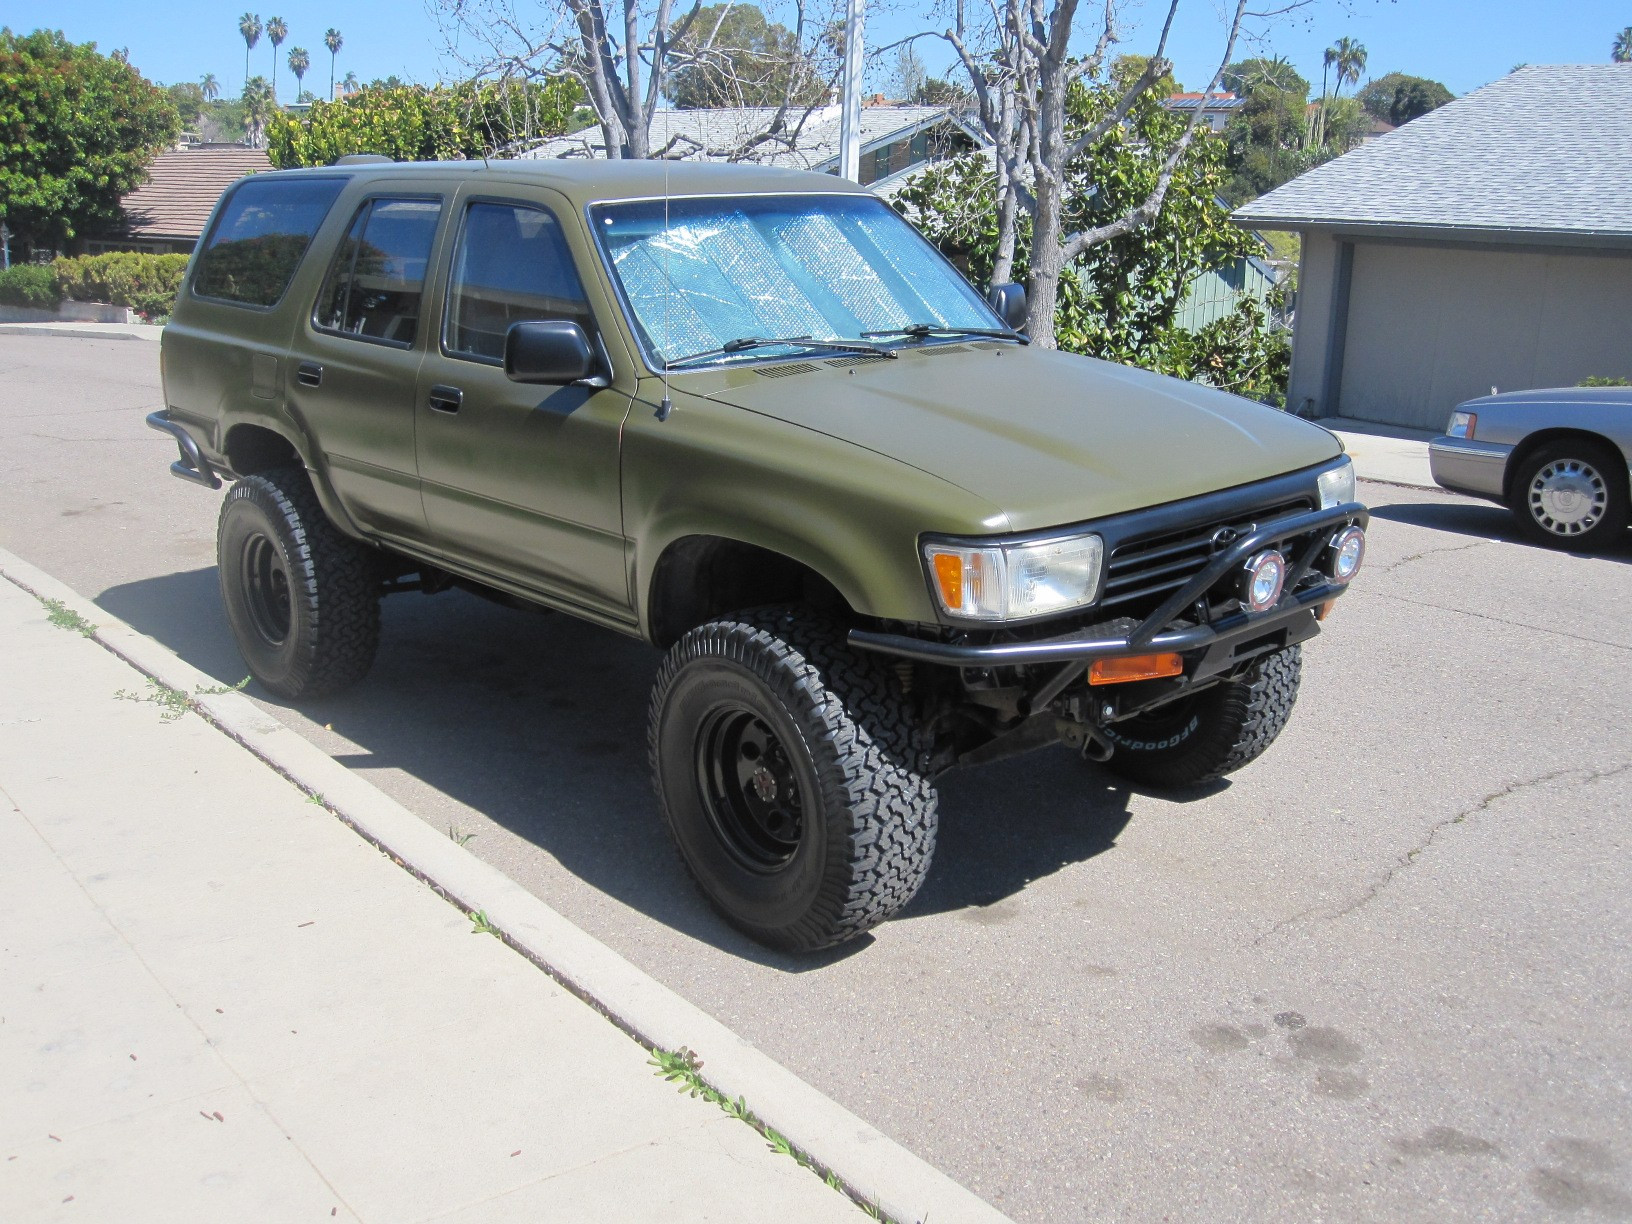
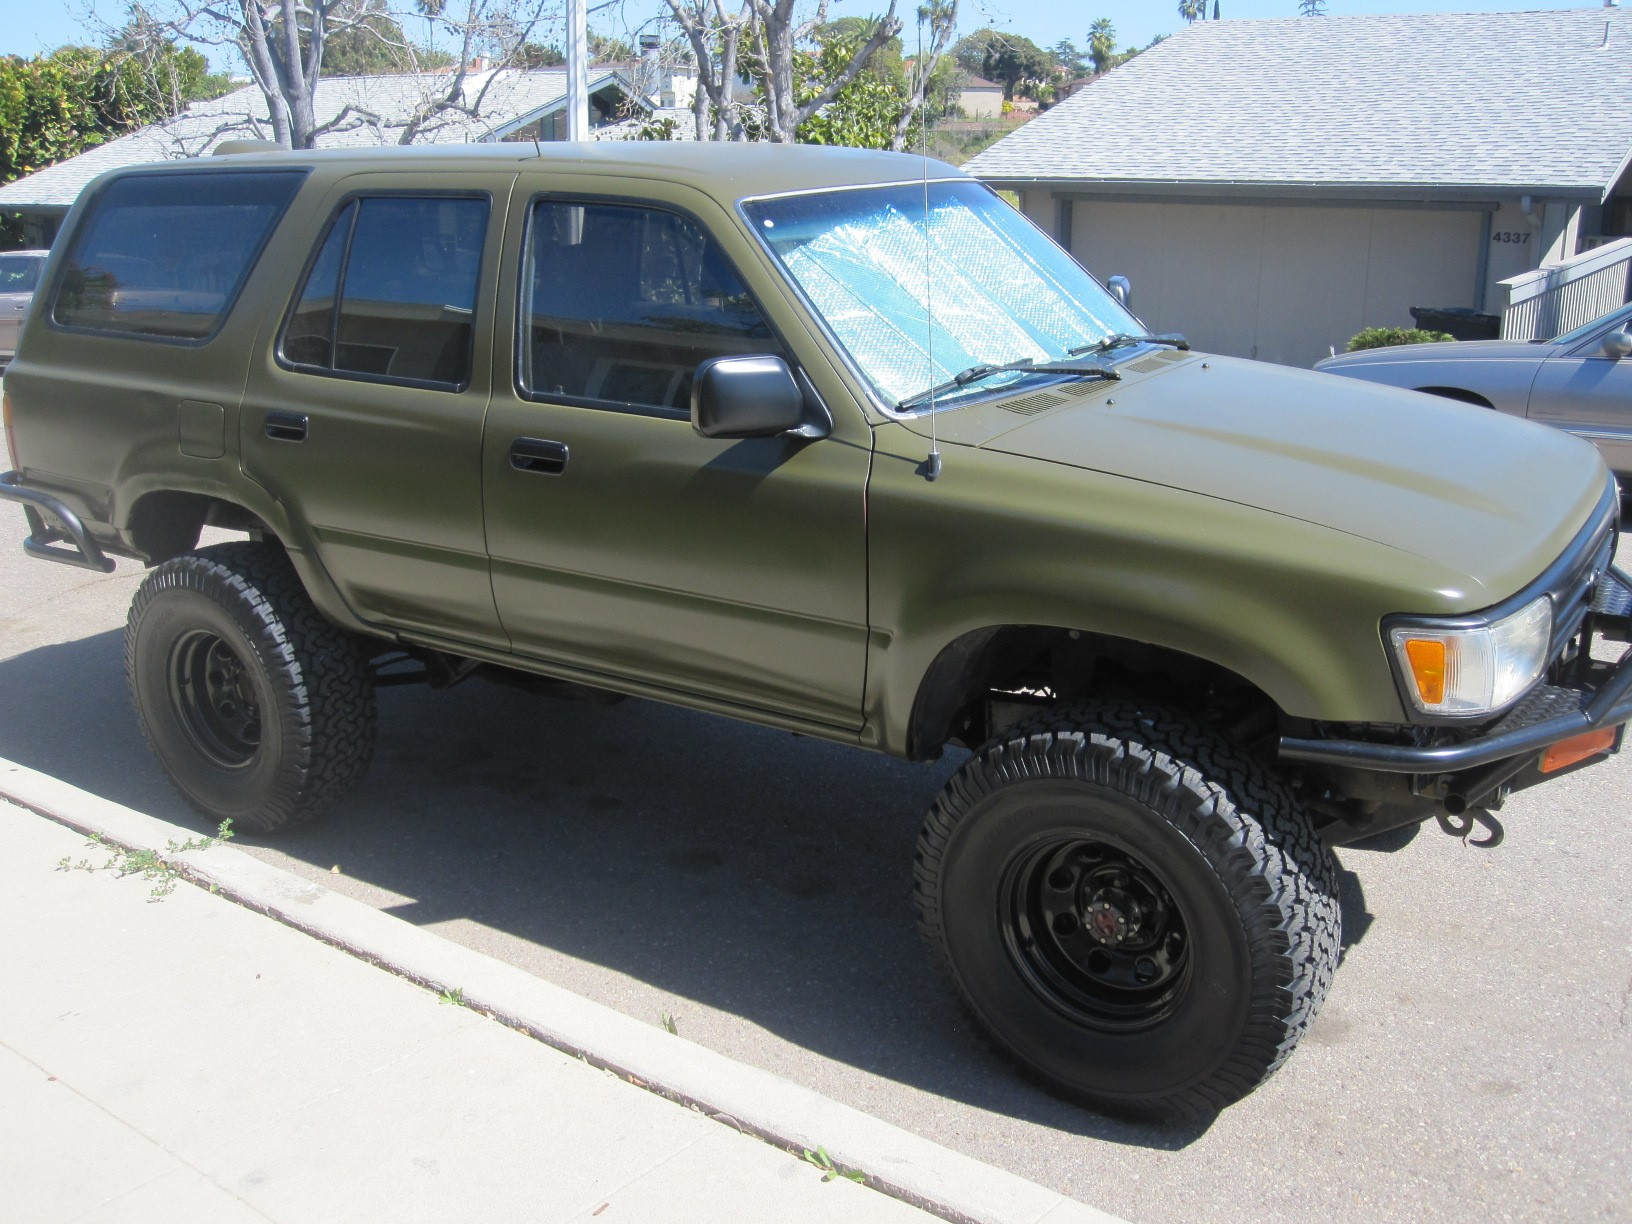
Finally painted the rig! OD green. Write-up with pics!
 Mar 5, 2013 | 07:50 PM
#1

Thread Starter
Registered User
Joined: Apr 2012
Posts: 52
Likes: 0
From: San Diego
Finally painted the rig! OD green. Write-up with pics!

here is the gallery of all of the pictures: http://imgur.com/a/lvALQ#0
i'm just wrapping up my driveway paintjob and thought i would right a quick article on what i did to help others since i have been helped so much through this site. feel free to post questions and i will answer them when i can. things are drying so i'll add some fresh pics and comments once i get it all put back together.
here are the steps i took:
- built a driveway paint booth out of lumber, plastic, and thrift store sheets
- took off all emblems and outer trim peices
- washed the truck with dawn dish detergent
- dried it with a leaf blower
- rolled it into the booth
- removed all the windows from the doors
- removed the tailgate
- removed the rear quarter glass. you need to take out the side interior trim panels completely to get to the 11 10mm nuts holding the window in. take a box cutter and slowly cut the glue while pushing out carefully. have a helper on the other side. wear gloves! that glue is nasty and will get on everything. i used 3M adhesive removed to get it off anywhere it dropped
- taped and masked the entire truck
- wiped entire truck down with wax and grease remover
- found some rust in the wheel wells so cut it out then grinded to clean metal
- welded in some new sheet metal. my first side i used a crappy harbor freight 90 amp buzz box which was horrible. i borrowed a friend's 220 mig for the other side
- used kitty hair then evercoat topfiller to shape the new metal back to contour
- feathered body filler out with 150 grit
- used a harbor freight palm sander with 3M 320 grit discs to sand down clear coat
- cleaned off car with wax and grease remover
- using a harbor freight hvlp gun i shot red oxide epoxy primer mixed with epoxy hardener 2:1
- after drying i wetsanded the drips out where i didn't dial the gun right. for wetsanding i used a spray bottle of water and some blocks along with soft pads
- clean the wetsand up with some axis pre-clean
- tack cloth over the truck to clean up dust and debris
- shot a coat of epoxy sealer at a ratio of 2:1:1 (primer:reducer:hardener)
- let cure overnight
- tack cloth the truck again
- shoot my first coat of OD green using gillespie ajp ww2 paint with some acrylic enamel reducer and high solids hardener (both napa crossfire brand). the ratio was 8:4:1 (paint:reducer:hardener)
- let cure for 3 hours
- tack cloth truck
- shoot another coat of green
- let cure for 3 hours
- tack cloth again
- shoot final coat
overall the paint looks good. there is some orange peel where i got lazy and some drips i didn't fix completely (again due to laziness). other than that the green looks really good and should hold up well.
some notes:
- get a good respirator!
- you don't have to use hardener in the gillespie, but the tests i did without it it seems to take a week or so to become hard enough to not scratch easily. the hardener makes the paint a little more shiny and darker but i think it will hold up better over time to the sun since this paint has no UV protection
- having a real HVLP gun with a compressor setup would def yield better results than the HVLP turbine i used, but i think it did a good job for a driveway job. i have a compressor but it is only a 35 gallon and i didn't want to mess around with having to wait for it to refill, cycle times, air cleaners, and water traps. this is a truck not a garage queen so i am more than happy with the results
- use automotive masking tape and sanding sheets only!

Last edited by modot66; Mar 14, 2013 at 12:50 PM.
 Mar 8, 2013 | 06:51 AM
#4
Thread Starter
Registered User
Joined: Apr 2012
Posts: 52
Likes: 0
From: San Diego
More pics
Been raining so haven't had much time to get everything back together but here are some more pics. still want to black out the rest of the chrome trim pieces and get new tires and wheels (if anyone in san diego is looking to buy a nice set of 31x10.50 BFG A/T's with 15" stock rims let me know, they are about a year old and i have receipts).
i'll post more pics this weekend


i'll post more pics this weekend

Last edited by modot66; Mar 8, 2013 at 06:59 AM.

Trending Topics

 Mar 13, 2013 | 07:43 PM
#10
Registered User
Joined: Apr 2010
Posts: 815
Likes: 0
From: Kingston, Ontario CANADA
Mar 14, 2013 | 06:37 AM
#12
Thread Starter
Registered User
Joined: Apr 2012
Posts: 52
Likes: 0
From: San Diego
Mar 14, 2013 | 06:47 AM
#13
Thread Starter
Registered User
Joined: Apr 2012
Posts: 52
Likes: 0
From: San Diego
had a few emails about this so figured i would post:
i used one gallon of red oxide epoxy primer and hardener from tcpglobal's "kustom shop". shot a coat of 2:1 primer:hardener. then shot a sealer coat of the same thing only with a medium reducer so the sealer ratio is 2:1:1 primer:reducer:hardener
for paint i used gillespie AJP WW2 semi-gloss OD green ordered from army jeep parts. one gallon was enough. you need to reduce this paint with either xylene or an acrylic enamel reducer. since i live in CA xylene wasn't available so i used napa crossfire reducer CR242.
i also used a hardener which will turn the paint slightly darker and give it more of a sheen but will be tougher and last longer in the sun. up to you if you want to add the hardener. my test panel without hardener took about 4 weeks to get hard enough that i couldn't scratch it with a fingernail.
the hardener i used was napa crossfire ch257. i mixed the paint, reducer, and hardener at a ration of 8:4:1. keep in mind i used an HVLP turbine which puts out hotter air than a traditional compressor setup with cooling lines and dessicants. so depending on what you are shooting with do some tests on those ratios. many people reduce the paint/reducer at 3:1 but i needed a little more reducer due to the hotter air of the turbine.
 Mar 15, 2013 | 02:08 PM
#16
Thread Starter
Registered User
Joined: Apr 2012
Posts: 52
Likes: 0
From: San Diego
Mar 15, 2013 | 08:46 PM
#17

Thanks for sharing! And the mix and equipment details 
I've been considering DIY mine. With the HF sprayer(#44677), and a paint kit from tcpglobal. I think you''ve sold me and they're both gonna be oweing you a commision
I've been considering DIY mine. With the HF sprayer(#44677), and a paint kit from tcpglobal. I think you''ve sold me and they're both gonna be oweing you a commision
 Oct 29, 2013 | 03:54 PM
#20
Registered User
Joined: May 2010
Posts: 2,587
Likes: 7
From: Ofallon Missouri
The dent by the gas door is killing me!!!!
I say you better fix it!! Thats an easy one to pop out!!
All that hard work and it looks great..but Im ocd'ing on the dent.
Let the tribe speak...
BTW bumpers and wheel are pimp. All goes together nice.
I say you better fix it!! Thats an easy one to pop out!!
All that hard work and it looks great..but Im ocd'ing on the dent.
Let the tribe speak...
BTW bumpers and wheel are pimp. All goes together nice.


