Famous "high idle/surge" culprits!
 06-09-2008, 08:32 PM
#401
Registered User
Thread Starter
Join Date: Feb 2008
Location: Salem, OR
Posts: 2,805
Likes: 0
Received 0 Likes
on
0 Posts
Check out my new sig
Also, I need a bigger garage

Then I had all of this stuff to put in my garage...lol

Also, I need a bigger garage
Then I had all of this stuff to put in my garage...lol
Last edited by 91Toyota; 06-09-2008 at 08:35 PM.
 06-09-2008, 09:58 PM
#402
Registered User
Holy crap....you lost track of what bearings went where? Good luck. You could match'em pu iwith the the scoring marks. If not, you'lll need to put a...what you call that thing...help me out, kirk...that toolt hingy...on the crank and take your bearing clearances from there. That way, it wont matter. New bearings will go on any journal. The pistons....keep track of them, Gomer. You'll be real fubar'd then.
Okay...gues whoe's wife brougth home a bottle of Carolan's. I'll give you there guesses and then it's teh FAIL sign for you.
Okay...gues whoe's wife brougth home a bottle of Carolan's. I'll give you there guesses and then it's teh FAIL sign for you.
06-10-2008, 12:52 AM
#403
Registered User
Thread Starter
Join Date: Feb 2008
Location: Salem, OR
Posts: 2,805
Likes: 0
Received 0 Likes
on
0 Posts
Holy crap....you lost track of what bearings went where? Good luck. You could match'em pu iwith the the scoring marks. If not, you'lll need to put a...what you call that thing...help me out, kirk...that toolt hingy...on the crank and take your bearing clearances from there. That way, it wont matter. New bearings will go on any journal. The pistons....keep track of them, Gomer. You'll be real fubar'd then.
Okay...gues whoe's wife brougth home a bottle of Carolan's. I'll give you there guesses and then it's teh FAIL sign for you.
Okay...gues whoe's wife brougth home a bottle of Carolan's. I'll give you there guesses and then it's teh FAIL sign for you.

I'll make sure to keep track on the others...if I decide to take them apart. Honestly, how do you know which bearing goes to which one and how to put it on EXACTLY how you found it?
I have no clue what a bottle of Carolans is...lol. If I had to guess I would say your wife did
 06-10-2008, 07:49 AM
#405
Registered User
Yep...that's the stuff. I'm really not much of a drinker, but when I feel the urge it's usually that or a good microbrew.
Anyway, there are little notches on the bearing inserts that you line up with the insert saddles and caps. Plus, you have the oil inlets to line up. Those are not on either the main caps or rod caps, but on the saddle side of each and also in the inserts. On the caps, though, you should see stains from the inlet in the bearing being there.
The caps will have numbers and arrows indicating the order and direction the go in.....forward toward the front end of the crankshaft. Well, come to think of it, the rod caps won't, but the mains do. On the rod caps there is a notch on one side while not on the other. The notch goes towards the front. You can see the difference in this pic. The 3rd piston in line from the left is turned around while the others you can still see the notch on side of the cap.
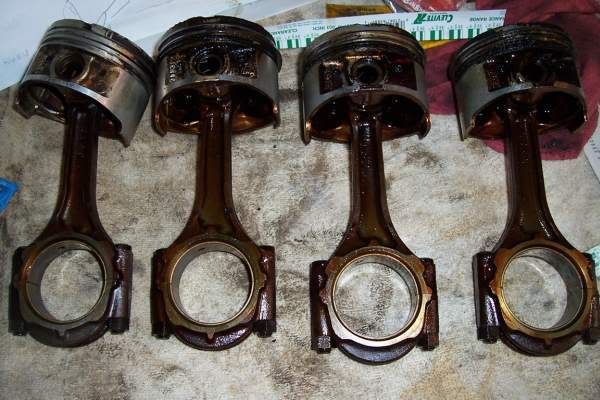
Here's the mains. Note that the center cap is easy to identify as the thrustwashers are installed on either side of it. Plus, the bolt for the oil strainer.

From the wear on the bearings, it's probably safe to say whatever you find on any other journals/bearings will be the same for any other. They'll probably all fall within the same tolerances....or very, very close. I'll bet you just need some standard bearings. But, do plastigage them all. Keep the inserts in their respective saddle or cap and you won't have to worry about keeping the order.....if you don't drop anything again....lol. (I've done it, too. So, no big deal. )
)
I'm really not much of a drinker, but when I feel the urge it's usually that or a good microbrew. Anyway, there are little notches on the bearing inserts that you line up with the insert saddles and caps. Plus, you have the oil inlets to line up. Those are not on either the main caps or rod caps, but on the saddle side of each and also in the inserts. On the caps, though, you should see stains from the inlet in the bearing being there.
The caps will have numbers and arrows indicating the order and direction the go in.....forward toward the front end of the crankshaft. Well, come to think of it, the rod caps won't, but the mains do. On the rod caps there is a notch on one side while not on the other. The notch goes towards the front. You can see the difference in this pic. The 3rd piston in line from the left is turned around while the others you can still see the notch on side of the cap.
Here's the mains. Note that the center cap is easy to identify as the thrustwashers are installed on either side of it. Plus, the bolt for the oil strainer.
From the wear on the bearings, it's probably safe to say whatever you find on any other journals/bearings will be the same for any other. They'll probably all fall within the same tolerances....or very, very close. I'll bet you just need some standard bearings. But, do plastigage them all. Keep the inserts in their respective saddle or cap and you won't have to worry about keeping the order.....if you don't drop anything again....lol. (I've done it, too. So, no big deal.
)
06-10-2008, 12:31 PM
#406
Registered User
Thread Starter
Join Date: Feb 2008
Location: Salem, OR
Posts: 2,805
Likes: 0
Received 0 Likes
on
0 Posts
Yep...that's the stuff. I'm really not much of a drinker, but when I feel the urge it's usually that or a good microbrew.
Anyway, there are little notches on the bearing inserts that you line up with the insert saddles and caps. Plus, you have the oil inlets to line up. Those are not on either the main caps or rod caps, but on the saddle side of each and also in the inserts. On the caps, though, you should see stains from the inlet in the bearing being there.
The caps will have numbers and arrows indicating the order and direction the go in.....forward toward the front end of the crankshaft. Well, come to think of it, the rod caps won't, but the mains do. On the rod caps there is a notch on one side while not on the other. The notch goes towards the front. You can see the difference in this pic. The 3rd piston in line from the left is turned around while the others you can still see the notch on side of the cap.
Here's the mains. Note that the center cap is easy to identify as the thrustwashers are installed on either side of it. Plus, the bolt for the oil strainer.
From the wear on the bearings, it's probably safe to say whatever you find on any other journals/bearings will be the same for any other. They'll probably all fall within the same tolerances....or very, very close. I'll bet you just need some standard bearings. But, do plastigage them all. Keep the inserts in their respective saddle or cap and you won't have to worry about keeping the order.....if you don't drop anything again....lol. (I've done it, too. So, no big deal.)
I'm really not much of a drinker, but when I feel the urge it's usually that or a good microbrew. Anyway, there are little notches on the bearing inserts that you line up with the insert saddles and caps. Plus, you have the oil inlets to line up. Those are not on either the main caps or rod caps, but on the saddle side of each and also in the inserts. On the caps, though, you should see stains from the inlet in the bearing being there.
The caps will have numbers and arrows indicating the order and direction the go in.....forward toward the front end of the crankshaft. Well, come to think of it, the rod caps won't, but the mains do. On the rod caps there is a notch on one side while not on the other. The notch goes towards the front. You can see the difference in this pic. The 3rd piston in line from the left is turned around while the others you can still see the notch on side of the cap.
Here's the mains. Note that the center cap is easy to identify as the thrustwashers are installed on either side of it. Plus, the bolt for the oil strainer.
From the wear on the bearings, it's probably safe to say whatever you find on any other journals/bearings will be the same for any other. They'll probably all fall within the same tolerances....or very, very close. I'll bet you just need some standard bearings. But, do plastigage them all. Keep the inserts in their respective saddle or cap and you won't have to worry about keeping the order.....if you don't drop anything again....lol. (I've done it, too. So, no big deal.
)
LOL...I didn't even see those notches...I guess I should pay closer attention. It will be easier putting it back together now!
Yeah, the wear isn't too bad...and hopefully I will be able to get away using just standard bearings
I will make sure I plastigage them all and to make sure everything stays where it should.
I have a question; when I put it back together, am I supposed to use some sort of thread locker on the threads? And the head bolts, do I just screw them in again? Or do I have to clean them out?
06-10-2008, 06:45 PM
#407
Registered User
LOL...I didn't even see those notches...I guess I should pay closer attention. It will be easier putting it back together now!
Yeah, the wear isn't too bad...and hopefully I will be able to get away using just standard bearings
I will make sure I plastigage them all and to make sure everything stays where it should.
I have a question; when I put it back together, am I supposed to use some sort of thread locker on the threads? And the head bolts, do I just screw them in again? Or do I have to clean them out?

No...the wear isn't too bad at all. Were it not for the scoring (those grooves are where you'd be losing some oil pressure), they might even be passable....theoretically, but not pratically. So, yeah....plastigage them all and write down on a good page in your manual (you do have one, don't you?) what the tolerances are. Same for your ring end gaps and anything other gauging you do.
As for thread locker, none is used on the main or rod bearing caps. There may be other bolts where it's needed for the bottom end, but I don't recall. You'll need to refer to the manual for that.
Headbolts....are you planning on reusing yours? If they are in good shape, you can. Mt. Goat posted engnbldr's recommendation on head bolt installation that I followed. You might do that, as well.
>>>*Other than simple overheat, the #1 cause of head gasket failure is clamping force variations.
Usually when I mention this, the answer is "I torqued it properly!"
*Yes, very likely, but torque, which is a twisting force, means almost nothing when we are talking about clamping force.
Dirt or machinery debris in the bolt holes will throw the clamping force off as much as 50% and more, even though the torque wrench reads perfectly normal.
The same happens when installing new bolts. The very best bolts made will show a rough mating surface at the threads when inspected under a microscope.
When installing new or used fastners, first be sure the bolt will spin in and out ALL THE WAY freely with simple finger pressure. Be sure they are lightly oiled, not too much which can hydraulic lock at the bottom of any blind holes and spoil your day.
Use this simple breakin procedure for any new bolts: Tighten all of them to 50%, back off 1/4 turn, then to 75%, back off 1/4 turn. Then take them to 100%, back off 1/4 turn and repeat. Do a retorque after full warmup.
*This procedure simply assures that the imperfections of the threads seat to the bolt hole threads.
Yes, time consuming, but much faster and less costly than another set of gaskets, the actual clamping force will increase vastly, even though the torque load is exactly the same.
The alternative is you may be additional twisting at the top of the bolt after the threads have come to a stop from excess friction.
If any single one does that, head gasket failure prematurely is gauranteed, plus it weakens the bolt....*EB
Quote:
>>>*Morning!
*Quite a discussion. We always replace the head bolts on the 3VZE, mostly because of early on we had two cases of breaking them. This spoils a day quickly...
*Ever notice it is nearly always either the last one or the next to last one?...*LOL**
I personally won't make the studs, I do not own the equipment to roll the threads during the forming process. Sure, I could set up and cut the threads, this is much weaker than a formed and rolled out piece. *More work, too and I'm lazy.......All it takes is one little stress riser and the stud can break.
Usually breakage with bolts is due to the threads creating resistance, they stop turning. The same can happen with a stud if the nut end threads are not completely free and lubed. Once they stop slipping as they are torqued, you are now twisting the shaft of the piece. I have had a couple of cases of folks breaking brand new bolts, this is the cause of that.
If the shaft of the fastner is actually twisted rather than tightened into the block, it is not creating clamping force at all, even though the torque wrench may read accurate load.
Yep, it can break. So before we even think of going to maximum torque, we clean the threads in the block with a chaser, (NOT a tap)..Then we oil the threads and spin the bolt all the way in and out with our fingers. This assures they are clean and lubed.
Then we pull them to 50%, all of them. ... back off 1/4 turn and repeat, note each time it will turn a tad more before 50% is reached. This is because the threads are bedding in. We do this 5 times, then we go to 75%, then to 100%, all done. We do this with ALL new fastners...it assures a more even clamping force, inconsistant clamping force is the number 2 cause of early head gasket failure..(heat is number one)
It takes some time, sure, but it takes less time than pulling the head back off...Hope this helps.....*EB
 Care to elaborate, dear chum?
06-10-2008, 07:38 PM
Care to elaborate, dear chum?
06-10-2008, 07:38 PM
#410
Registered User
Thread Starter
Join Date: Feb 2008
Location: Salem, OR
Posts: 2,805
Likes: 0
Received 0 Likes
on
0 Posts
I really don't mean to critize you at all....really, but it would be a very good idea to pay attention doing this job. It's rather critical if it's not done well. I would hate to see you have a problem once it's back together and running.
No...the wear isn't too bad at all. Were it not for the scoring (those grooves are where you'd be losing some oil pressure), they might even be passable....theoretically, but not pratically. So, yeah....plastigage them all and write down on a good page in your manual (you do have one, don't you?) what the tolerances are. Same for your ring end gaps and anything other gauging you do.
As for thread locker, none is used on the main or rod bearing caps. There may be other bolts where it's needed for the bottom end, but I don't recall. You'll need to refer to the manual for that.
Headbolts....are you planning on reusing yours? If they are in good shape, you can. Mt. Goat posted engnbldr's recommendation on head bolt installation that I followed. You might do that, as well.
Yeah, I have a manual...I wouldn't dare tightening or loosening the head with out a manual to tell me the patterns...lol.
I was planning on reusing the head bolts...lol. But I don't have a chaser nor do I know what one looks like. Isn't it supposed to have a cut on the thread to gather the dirt and grime?
Thanks!
06-10-2008, 07:38 PM
#411
Registered User
Join Date: Mar 2008
Location: Temecula Valley, CA
Posts: 12,723
Likes: 0
Received 5 Likes
on
5 Posts
yeah...
you can't just simply say don't use thread-locking compounds on any of the fasteners: bearing caps, head bolts, main journals...
...use a torque wrench, and clean the threads and holes out so there is nothing in there to keep the bolts from bottoming out?
drama queen...
and if his engine doesn't work right, are we splitting the cost of fixing it?
oops... matthew...
everything's going fine, right?
Last edited by abecedarian; 06-10-2008 at 07:40 PM.
 06-10-2008, 08:03 PM
#415
Registered User
yeah...
you can't just simply say don't use thread-locking compounds on any of the fasteners: bearing caps, head bolts, main journals...
...use a torque wrench, and clean the threads and holes out so there is nothing in there to keep the bolts from bottoming out?
drama queen...
and if his engine doesn't work right, are we splitting the cost of fixing it?
oops... matthew...
everything's going fine, right?
you can't just simply say don't use thread-locking compounds on any of the fasteners: bearing caps, head bolts, main journals...
...use a torque wrench, and clean the threads and holes out so there is nothing in there to keep the bolts from bottoming out?
drama queen...
and if his engine doesn't work right, are we splitting the cost of fixing it?
oops... matthew...
everything's going fine, right?
It's been long, hot day cleaning out a barn, Kirk. If you'd like for me to follow, try some less cryptic terminology please.
 06-10-2008, 08:45 PM
#418
Registered User
Oh, that's it. Now leave me hanging without following the joke. Gah...story of my life.
Maybe after my wits have refresh from a good sleep I'll get it.
Maybe after my wits have refresh from a good sleep I'll get it.
06-11-2008, 12:05 PM
#419
Registered User
Thread Starter
Join Date: Feb 2008
Location: Salem, OR
Posts: 2,805
Likes: 0
Received 0 Likes
on
0 Posts
06-11-2008, 01:40 PM
#420
Registered User
Thread Starter
Join Date: Feb 2008
Location: Salem, OR
Posts: 2,805
Likes: 0
Received 0 Likes
on
0 Posts
Alright, now I need some help. I'm having a hard time understanding this plastigage stuff.
I found the thing in manual for putting plastigage on the crankshaft.
It tells me to put a piece on, a little off center, but across the full width.
So, basically I torque it the nuts down, then remove the nuts and look at the plastigage. Take the tool (piece of paper) and find out how much play I have (or whatever you call it)...but how do I know what is good and what is bad.
Should I just do it and then you guys tell me whats good or bad?...lol


