
DIY Soft top install for under $100 (I spent $84)
 Jul 3, 2013 | 10:57 AM
#1

Thread Starter
Registered User
Joined: Oct 2009
Posts: 38
Likes: 0
From: Durango, CO
DIY Soft top install for under $100 (I spent $84)
So have been wanting a soft top for a while, and decided to do the same thing a bunch of other guys have done, sort of, using a j**p sized soft top for a cheap bikini top for my runner.
4crawler and some other write-ups I saw, used various ways to secure the top, including buying a Jeep windshield channel and somehow attaching that. I actually bought that (~$20) but when it got here, I saw that it would be a f-show to mate it up, so decided to go a simpler, easier, and cheaper route - use aluminum flat bar for a curved piece to attach the top to, and install snaps to attach the top to the flat bar.
Came out good enough for now, I saw a few things I would have done differently, but I am content for the moment. I am very happy with the overall result, except for the places I screwed up in the details (curve of the flat bar I got wrong, I was learning about snap installation, and that could have been better, and I would like to add a support bar made from some electrical conduit to stiffen it up and make it look a little better).
Parts and price list:
Bestop Part # 52508-01, Black crush Traditional Bikini Top for 76-91 CJ7/8 - $50 on Amazon a month ago; I have Prime, so dont know if add'l shipping would apply if you don't.
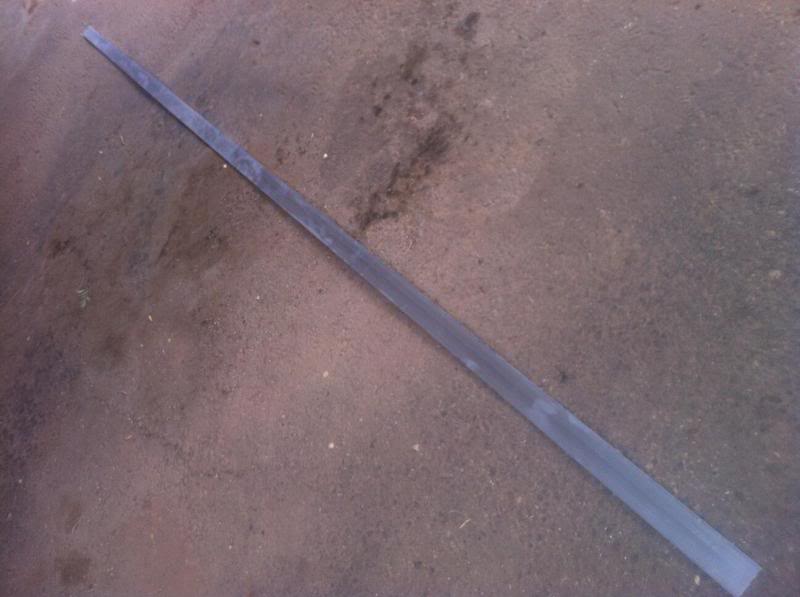
Aluminum Flat bar, 2" x 8ft; 1/8" thick, $25 @ Home Depot. I almost went with 1/4", but thought it might be a bit too thick and hard to bend (I am using metal carport poles as my bending jig lol). I think it would have worked fine, but the 1/8 seems to be fine also; havent seen any lack of strength.
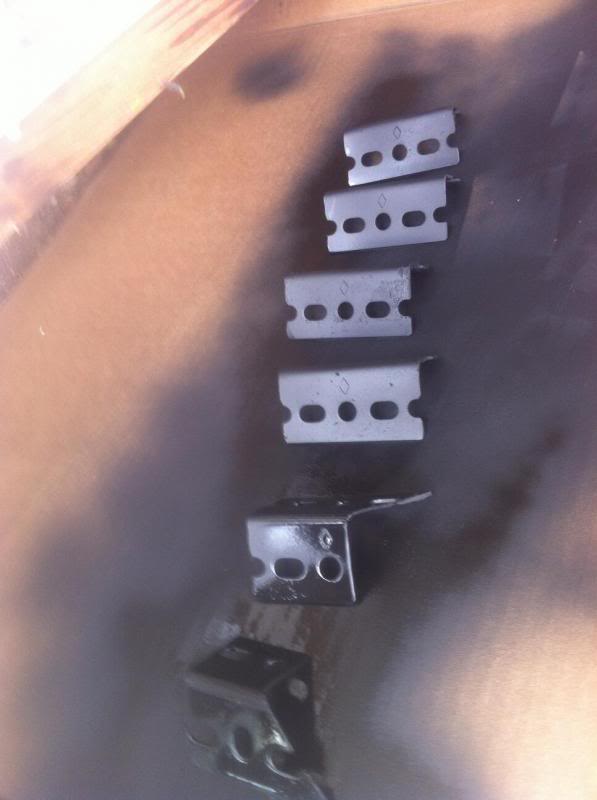
Corner bracket material - I had it laying around, I think I used 1-1/2x1-1/2 size; it would have been about $5 I think @ HDepot.
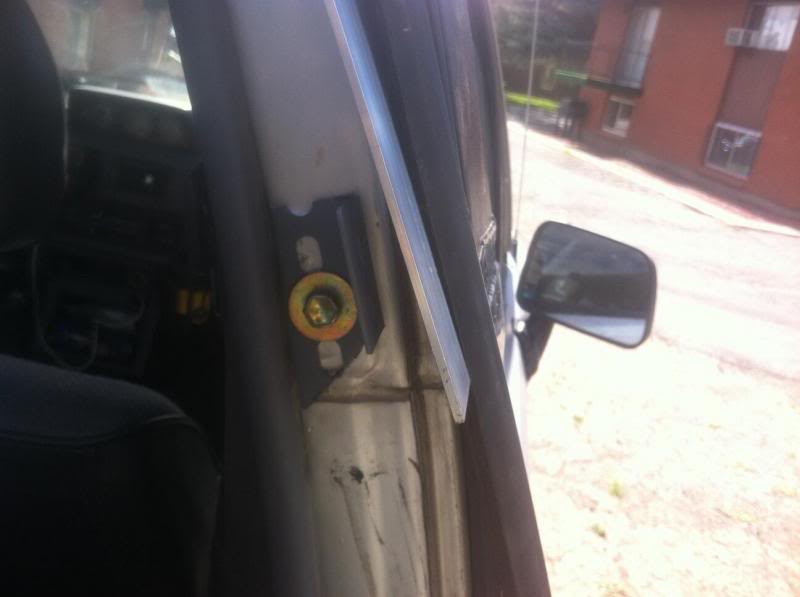
Bolts to attach to runner - used bolts from the hard top
Nuts and bolts to attach frame to brackets - #8x1/2", Stainless, w/bolts - $6 @ HDepot, I needed 6 total, the bolts came in a 6pk and the nuts in two 4pks (just like hot dogs and buns...why do they do this?)
Snaps - my buddy had a snap kit he let me use, and he had snaps too. Snaps would have been cheap to buy, about $3 or so, but the tools to install would cost about $10-30 I think.
Nuts and bolts to attach snap bases to flat bar: $3 @ HDepot; I used 1 pack of 8qty #6x1"; they didnt have stainless.
Total out of pocket cost for me: $84
total out of pocket if you had to buy the things I didnt have, and the snaps and the snap tool:
~$100-120 I would guess.
Its a very simple process.
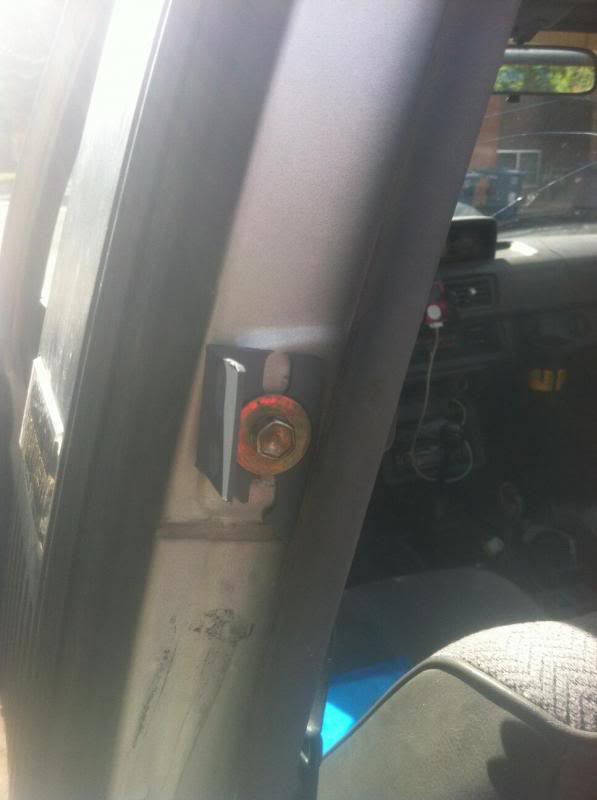
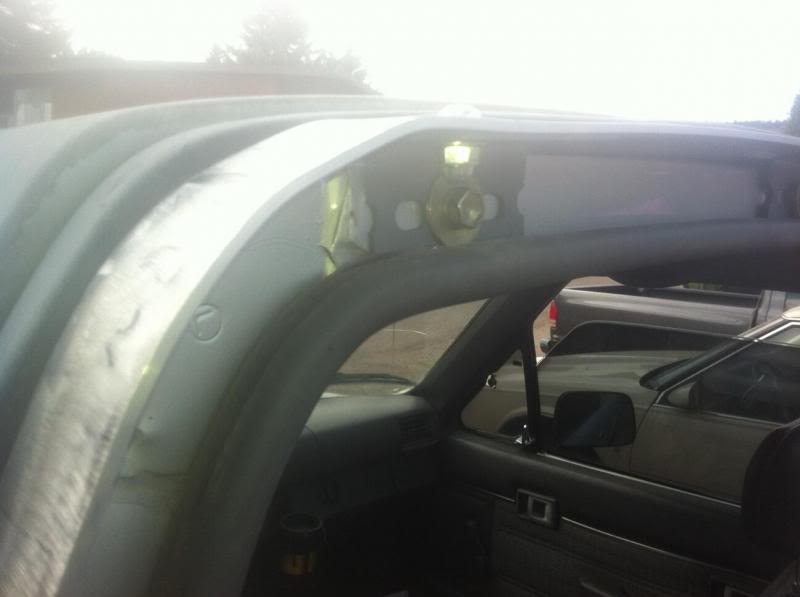
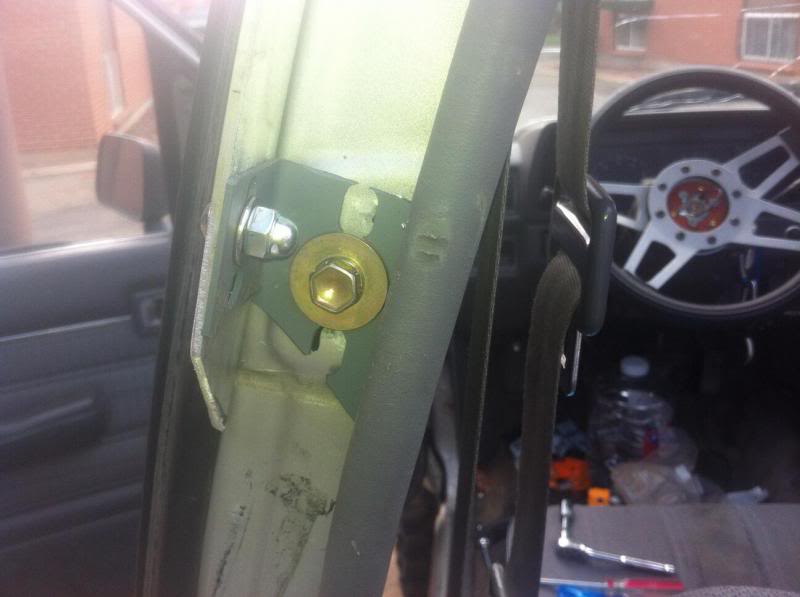
Cut mounting brackets from 1.5x1.5" stock, grind edges smooth; paint. This size seems to line up nicely from the hardtop mounting holes, to raise up the flat bar nice and even and flush with the roof.
Wait for paint to dry, about time to drink a beer, and bolt them in to the hard top bolt holes:

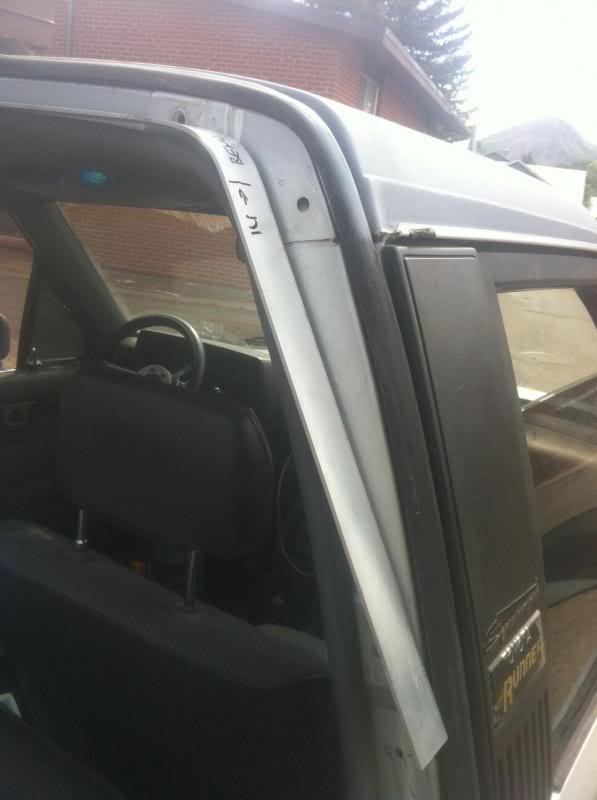
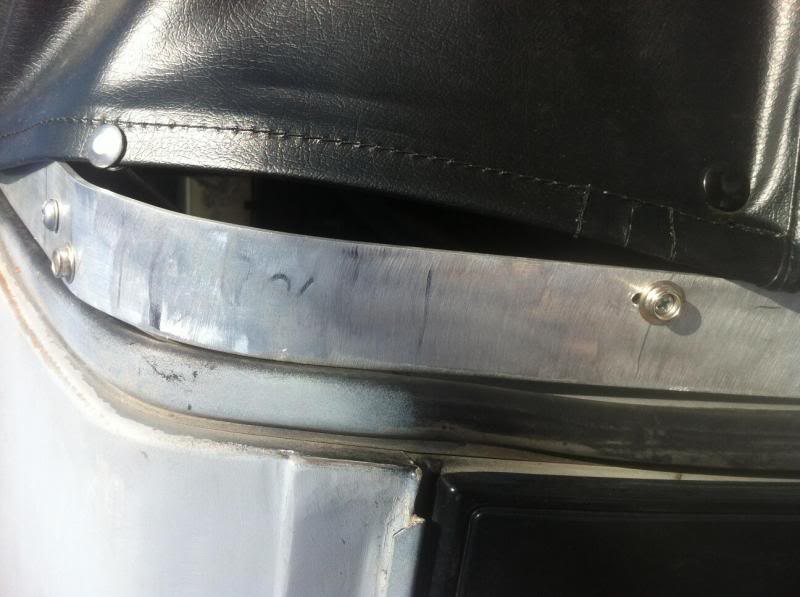
If you are impatient like me, and try to work while paint is drying, and bend aluminum flat bar to match curve of roof, look at my photos and see that I bent the bar along the wrong contour. I bent along the rubber trim line, instead of along the roof line where it would go *on top of the brackets*. So I had to straighten out one bend and move it, resulting in the poor bend on the left corner:
Original bend is smooth, but in wrong location:

Now see the above photo, where I measured/bent along the rubber trim; and now look below, where once I had the brackets on, I had to re-bend and it looks like crap:
Once bar is bent approx to shape, mark ends to cut.
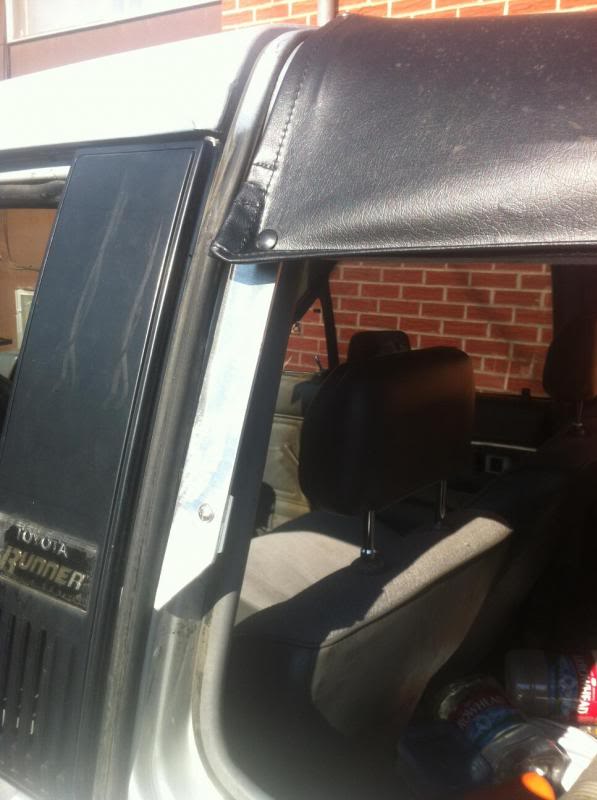
I extended the sides down so they would bolt in to the lower side holes of the hard top mounting; this would allow me to wrap the soft top a few inches down the side, and hopefully keep it tight and looking right. I cut the ends at an angle to look better, grinded smooth, and took the grinder to the whole flat bar really quickly to scuff it up evenly and take some of the shine off the aluminum (my truck is not shiny, why should one flat bar be?)
Drill holes in the flat bar to match holes in the mounting brackets.
Bolt into place. I ran out of washers, I will put them in the proper place later. The top is only gonna be on for a few weeks until we move, then when I take the hard top off again, I will put more washers in. I also used "acorn" type capture nuts, which I thought looked much nicer than a nut with bolt threads sticking out, and less likely for any back seat passengers to catch/scratch hands, etc on.
Stainless will never rust, or seize to the aluminum, for y'all in any rusty places. The stainless hardware *was* at least twice as expensive as galvanized, but for such small pieces and small amounts, it was only about $3 extra.
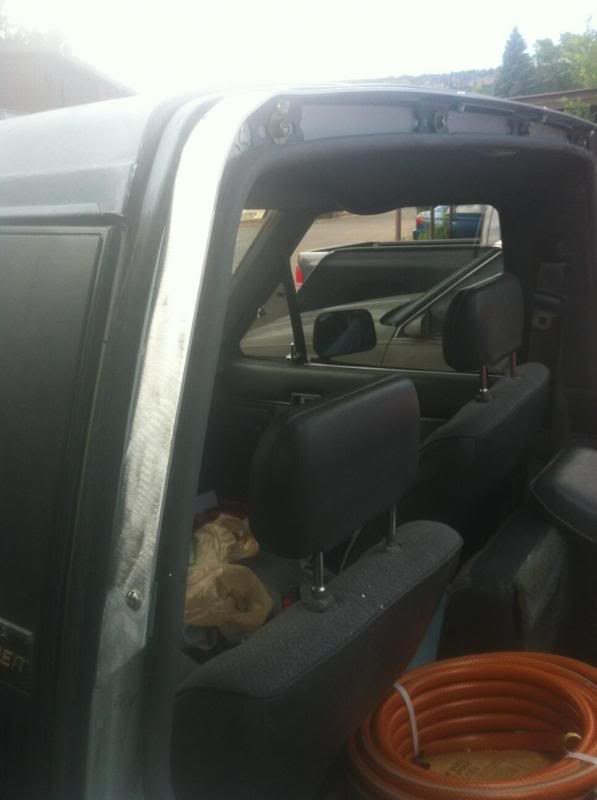
Ok, now the frame is sized and shaped and installed, now lay the soft top over to get an idea of how it fits and looks.
(Forgot to take a photo here)
Now its time to choose where snaps will go, how many, etc. I originally used the two factory corner snaps and three across the top, but that did not keep it nearly tight enough, so later I went back and added four more snaps.
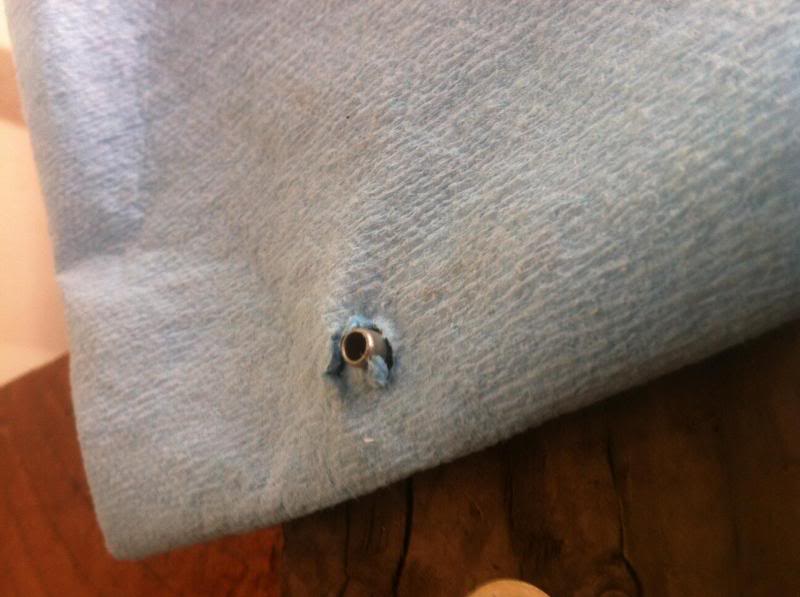
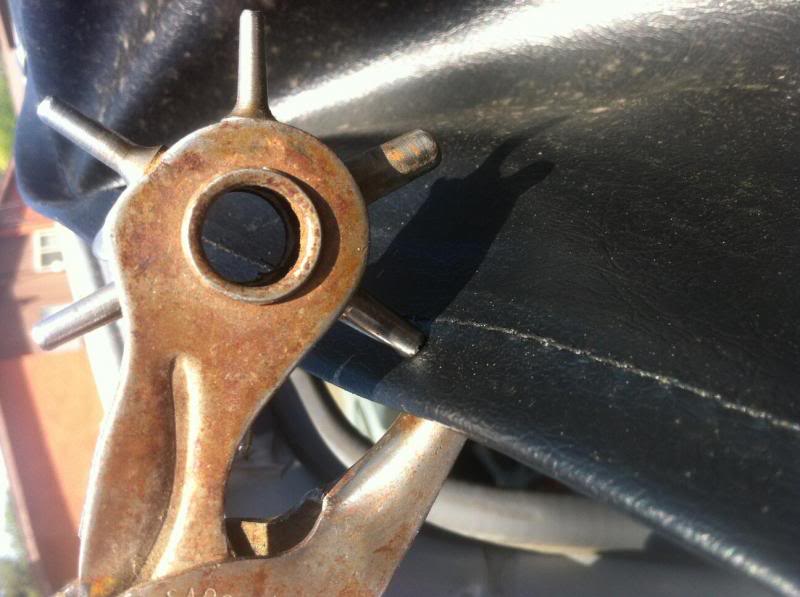
Snap installation was pretty straightforward and simple; but technique required a couple of practice tries before I got the snaps installed tightly and nicely.
The tool kit has these tools in it:
snap "hole punch" tool with various sized punches for different snaps, find the one that fits your snap posts.
Snap "punch" and hammer, for flattening the post into the "cup" of the snap.
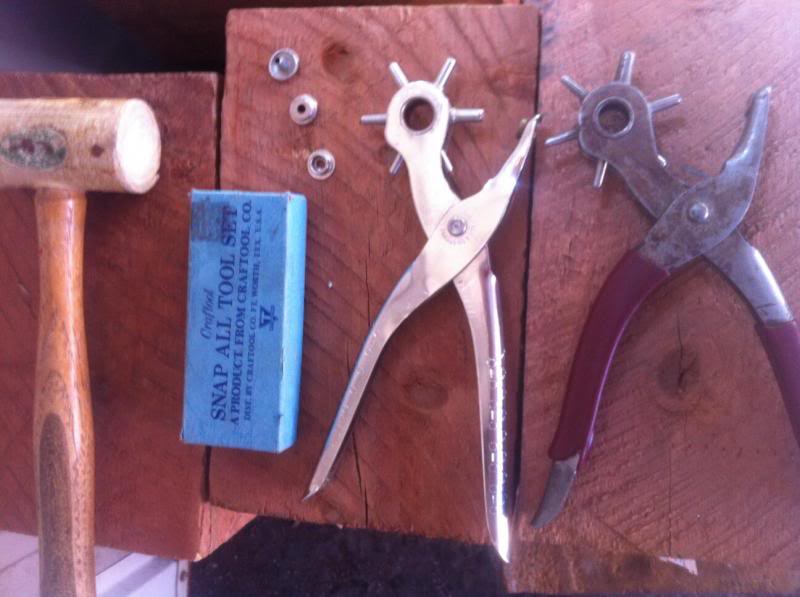
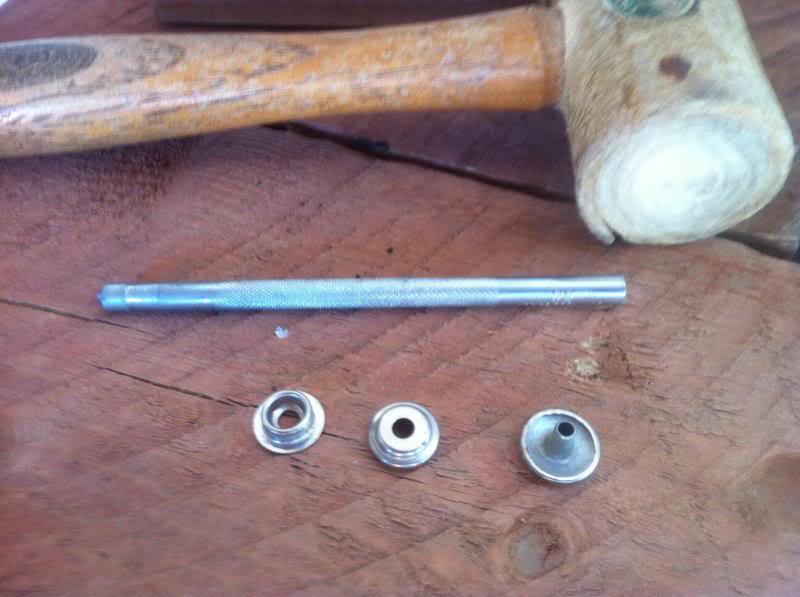
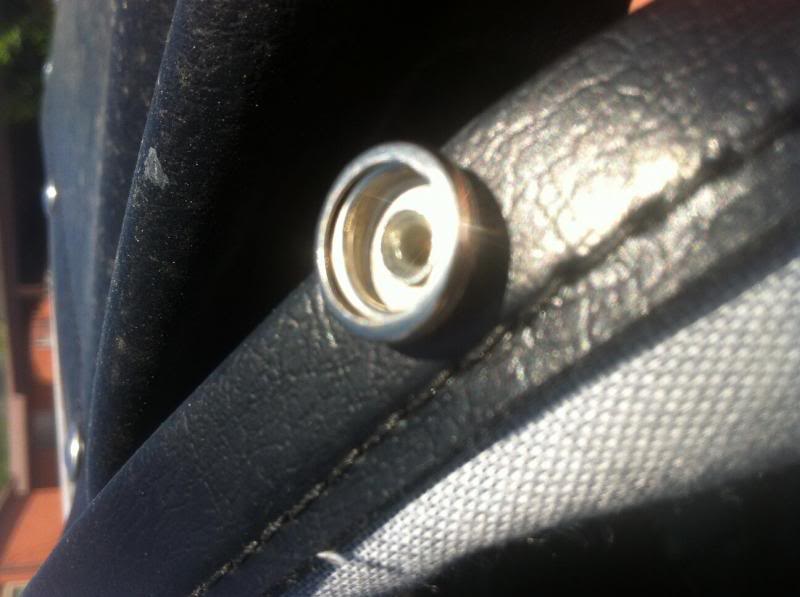
Snaps come in three pieces:
top, middle cup, and base. The "top" goes on the outside of your fabric with the post poking through the fabric, the middle cup goes on the inside/bottom of fabric, and they get sandwiched together, just like a rivet.
I did a couple of practice ones on a blue shop paper towel folded over, to figure out the process:
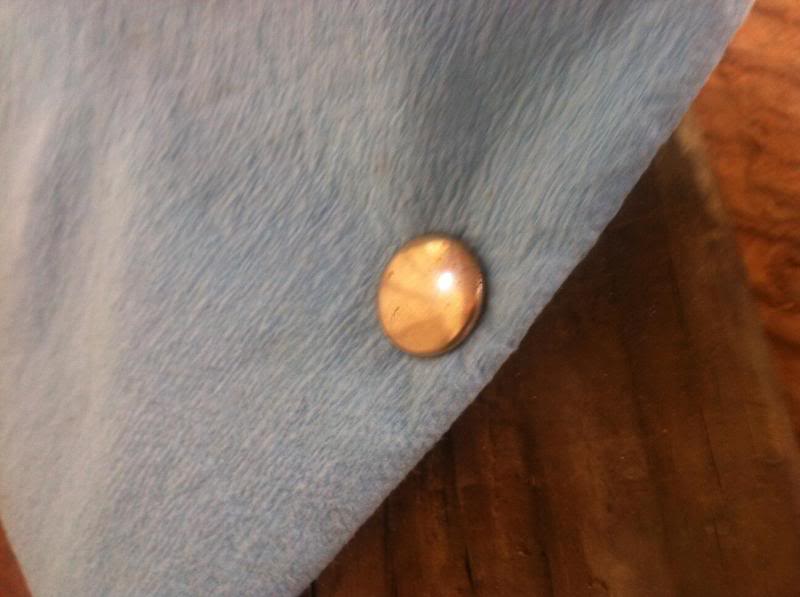
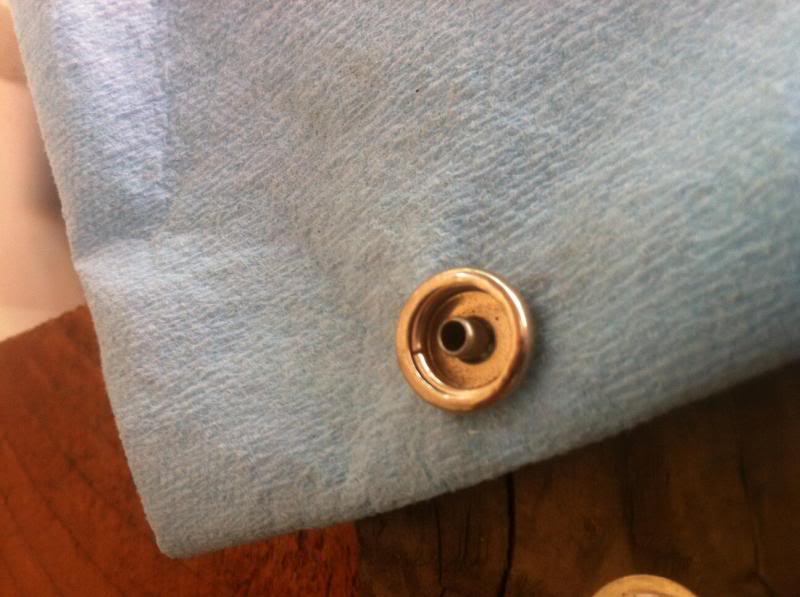
The first one I boogered up, I did not have the punch straight vertically and so the post was mangled.
This one came out right:
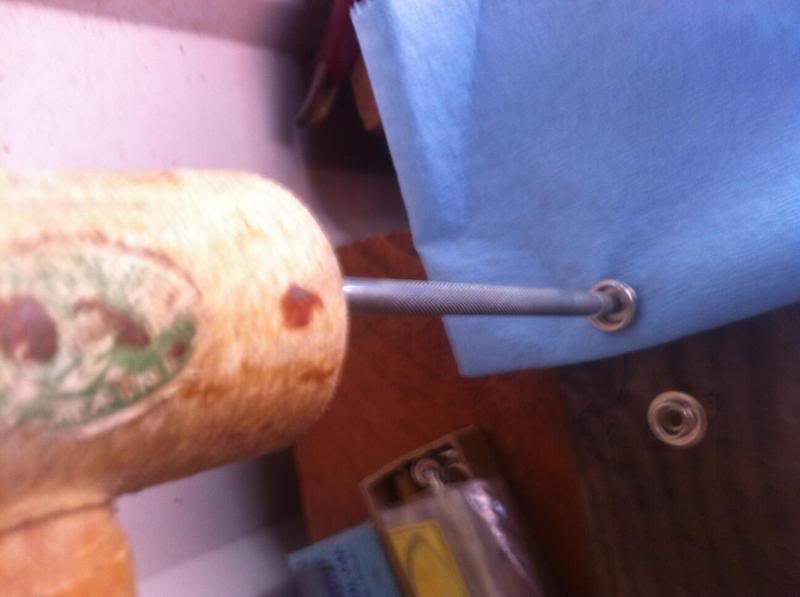
Once I had it figured out, I moved to the actual soft top:
This soft top comes with a "hemmed" edge, and inside the hem is a piece of stiff-ish plastic that seems great to hold the snaps, without tearing the fabric.
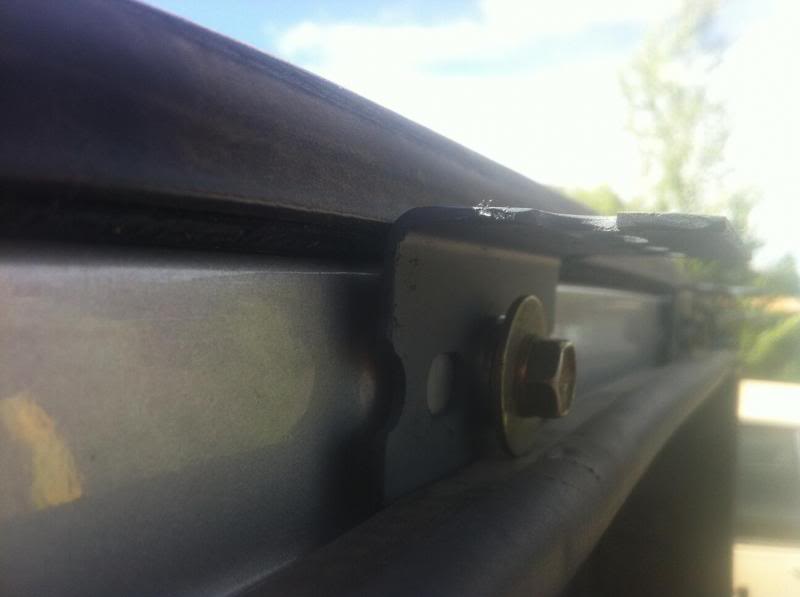
The "Base" gets attached to whatever you are snapping to, in my case, the flat bar, using bolts/nuts. I could have used the sheet metal screws, but I hate screws and prefer nuts/bolts. Cleaner looking and easier to change out if necessary. #6 Pan Head Machine Screws fit nicely into the snap bases, and the pan head style did not stick out above the base at all, which would cause your snap to not work. I just wish they had had stainless in stock.
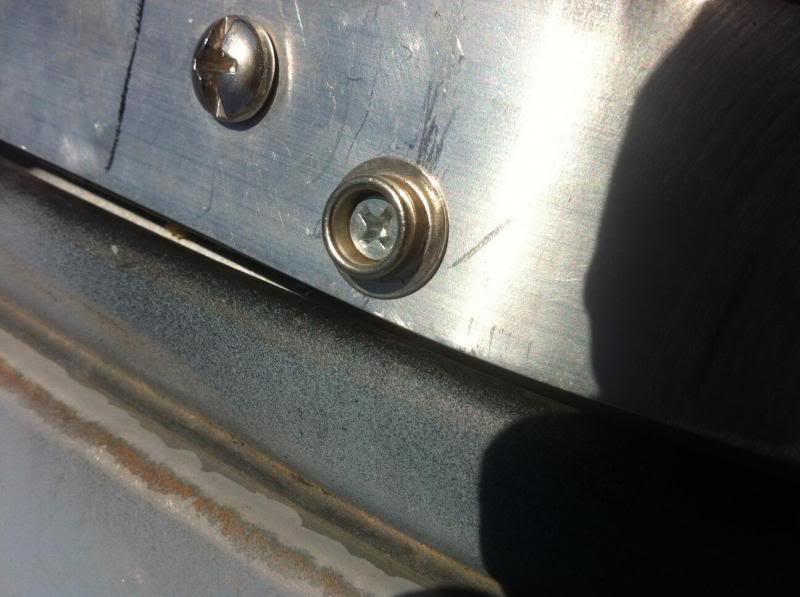
Now the frame is installed, the top has snaps installed, and it is time to install all the snap bases on the flat bar (see photo above). I would have preferred stainless bolts/nuts here as well, but Home-Crap-Pot did not have stainless that small. One more thing to swap out when I have time.
This was my first time doing snaps like this, and I didnt get the spacing of the bases quite right, resulting in a little wavi-ness: (see between the bottom-most two snaps in picture)
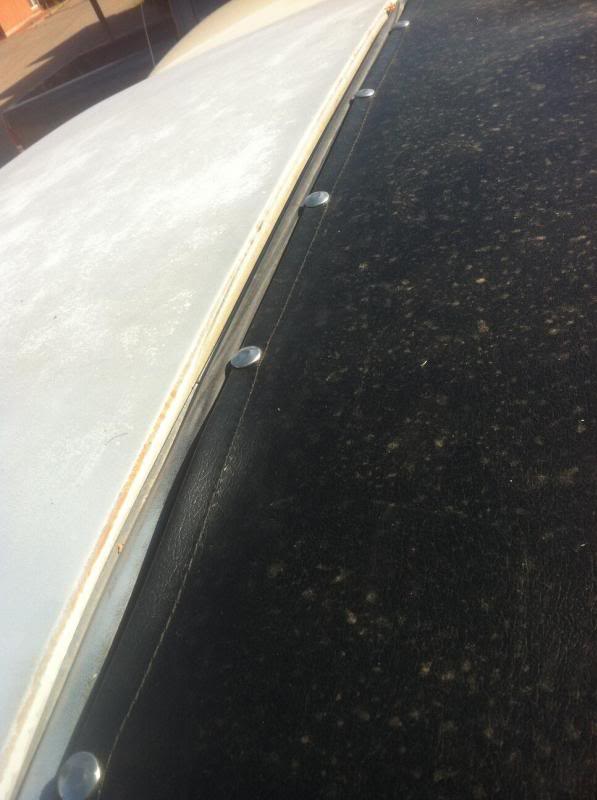
I tried my best to start from the middle snap, and work out, alternating sides, to keep good tension. It was a tricky part, and not all of them came out quite right to get the tension I wanted.
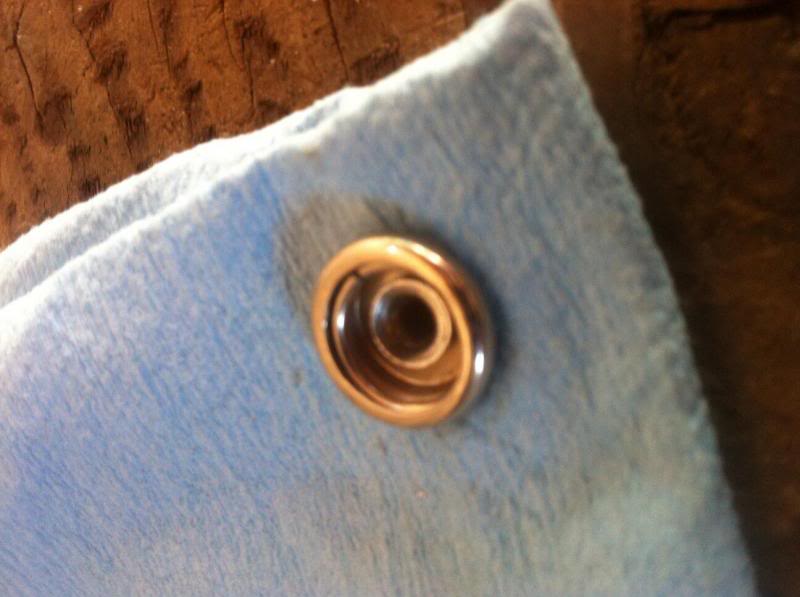
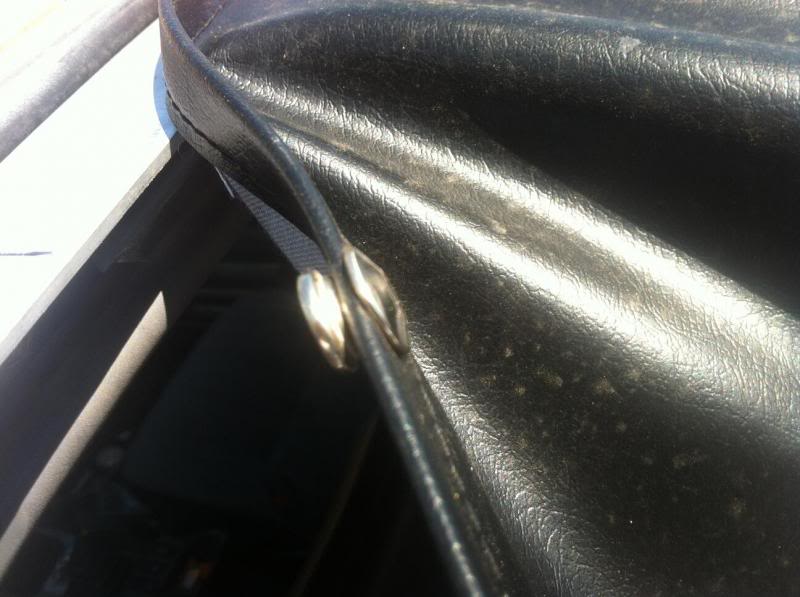
And the last two snaps, the black corner ones, were factory installed, so I installed bases to match, and snapped all the snaps on.
Then ran the tie-down straps (sewed on to the top at factory) down to the cargo tie downs behind the roll bar on the floor, and tightened snug.
Finished product:
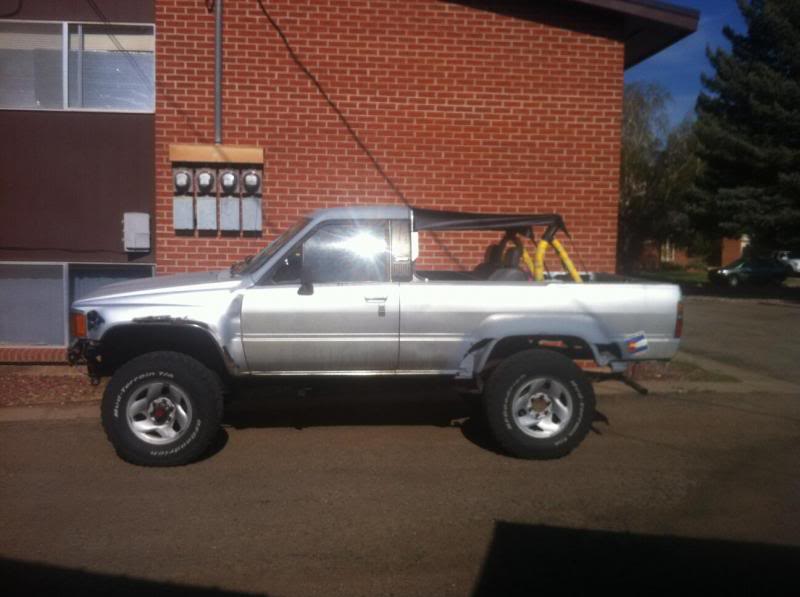
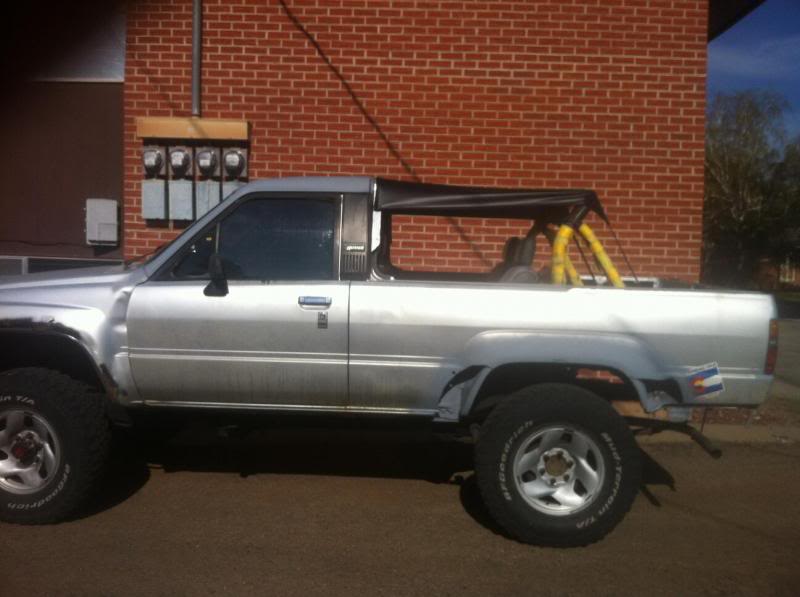
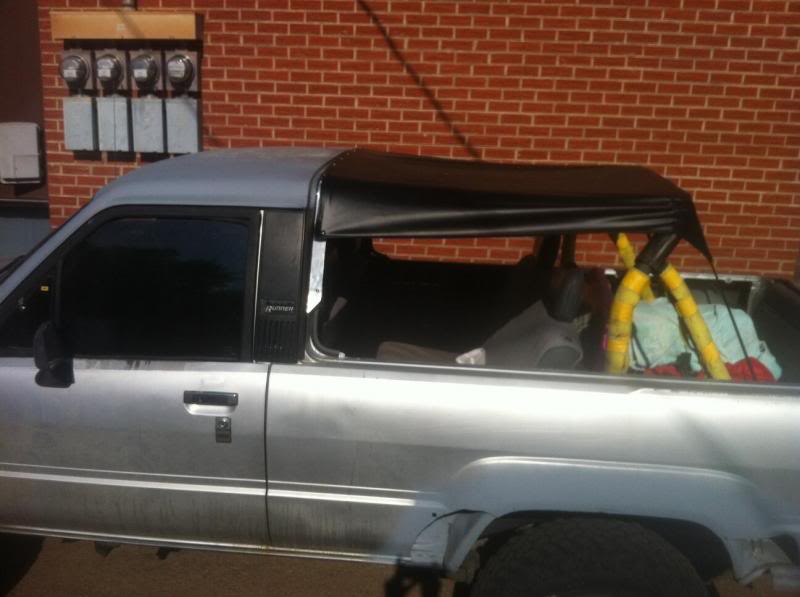
It looks fine from the inside:
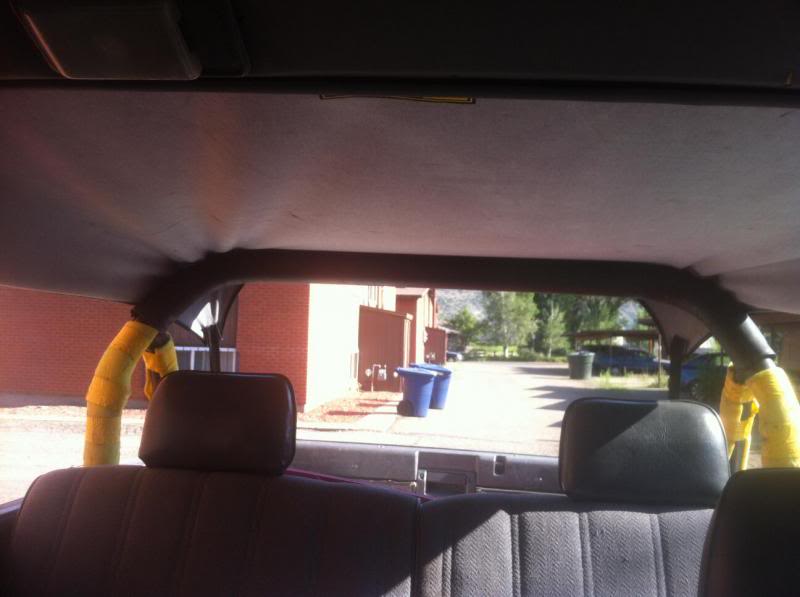
but from the outside there are a few creases and wrinkles I would like to get out.
Maybe a mid-way support would help that. I dont have time now but will do that later this summer.
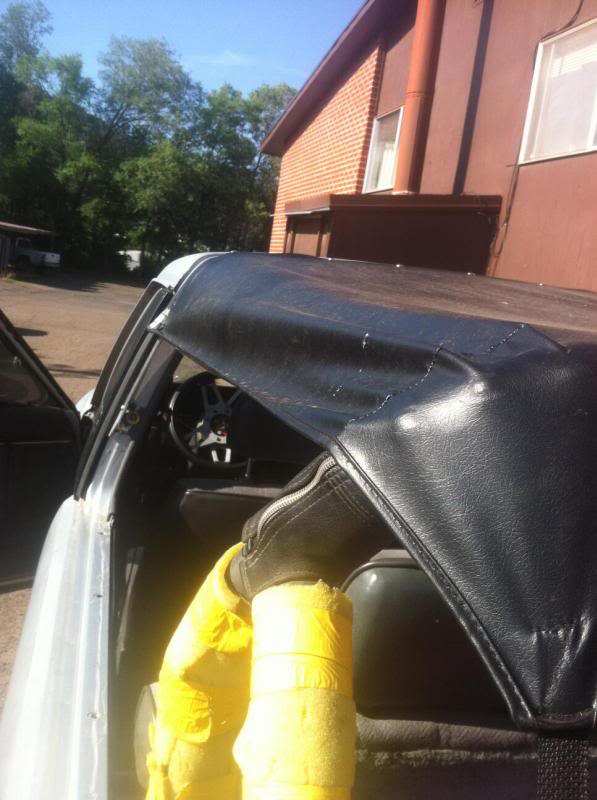
Also, the factory corner snaps do not line up quite right with the ones I installed, so the corner pulls up a bit. I am going to move the bases and install new snaps, closer to the front about 1/2" or so, to tighten up the corners and hopefully make them more flat:
Final results and opinions:
I originally had only four snaps installed. This was not nearly enough, the top was too loose and flapped substantially in any wind or while driving above 35mph.
Adding more snaps seems to have partly solved this.
A mid-support would be a great addition.
I might consider adding snaps and bases to snap the back to the factory "rollbar", as the tie-down straps seem to pull kinks into the soft top, due to not pulling tension in a straight line.. Not really a rollbar anyways, so drilling some small holes would not be an issue. Combined with a mid-support, this would work nicely to smooth it out, I think.
All stainless hardware would be better.
I would also use 1.5" aluminum angle to make the mounting brackets - the angle I used, looks like crap. But it was free. But aluminum would be SO much sexier, and match the flat bar. And when I learn to weld, I will just weld some mounting tabs on to the flat bar. That would be the sexiest way methinks. I also want to swap out the hardtop bolts with something the right size, they were a bit too long; designed for the extra thickness of the fiberglass; so I had to washer-out the ones along the roof line. Those bolt holes bottom out. The ones in the side pillar dont, though.
Overall, it keeps the wind and sun out nicely - an INCREDIBLE difference in the drivers seat from having no top back there, surprisingly. And it works wonderfully in the rain. The back seat gets a few drops, but me up front, I stay cool and dry all the time.
This is most definitely one of the mods that has made me the most happy!
4crawler and some other write-ups I saw, used various ways to secure the top, including buying a Jeep windshield channel and somehow attaching that. I actually bought that (~$20) but when it got here, I saw that it would be a f-show to mate it up, so decided to go a simpler, easier, and cheaper route - use aluminum flat bar for a curved piece to attach the top to, and install snaps to attach the top to the flat bar.
Came out good enough for now, I saw a few things I would have done differently, but I am content for the moment. I am very happy with the overall result, except for the places I screwed up in the details (curve of the flat bar I got wrong, I was learning about snap installation, and that could have been better, and I would like to add a support bar made from some electrical conduit to stiffen it up and make it look a little better).
Parts and price list:
Bestop Part # 52508-01, Black crush Traditional Bikini Top for 76-91 CJ7/8 - $50 on Amazon a month ago; I have Prime, so dont know if add'l shipping would apply if you don't.
Aluminum Flat bar, 2" x 8ft; 1/8" thick, $25 @ Home Depot. I almost went with 1/4", but thought it might be a bit too thick and hard to bend (I am using metal carport poles as my bending jig lol). I think it would have worked fine, but the 1/8 seems to be fine also; havent seen any lack of strength.
Corner bracket material - I had it laying around, I think I used 1-1/2x1-1/2 size; it would have been about $5 I think @ HDepot.
Bolts to attach to runner - used bolts from the hard top
Nuts and bolts to attach frame to brackets - #8x1/2", Stainless, w/bolts - $6 @ HDepot, I needed 6 total, the bolts came in a 6pk and the nuts in two 4pks (just like hot dogs and buns...why do they do this?)
Snaps - my buddy had a snap kit he let me use, and he had snaps too. Snaps would have been cheap to buy, about $3 or so, but the tools to install would cost about $10-30 I think.
Nuts and bolts to attach snap bases to flat bar: $3 @ HDepot; I used 1 pack of 8qty #6x1"; they didnt have stainless.
Total out of pocket cost for me: $84
total out of pocket if you had to buy the things I didnt have, and the snaps and the snap tool:
~$100-120 I would guess.
Its a very simple process.
Cut mounting brackets from 1.5x1.5" stock, grind edges smooth; paint. This size seems to line up nicely from the hardtop mounting holes, to raise up the flat bar nice and even and flush with the roof.
Wait for paint to dry, about time to drink a beer, and bolt them in to the hard top bolt holes:
If you are impatient like me, and try to work while paint is drying, and bend aluminum flat bar to match curve of roof, look at my photos and see that I bent the bar along the wrong contour. I bent along the rubber trim line, instead of along the roof line where it would go *on top of the brackets*. So I had to straighten out one bend and move it, resulting in the poor bend on the left corner:
Original bend is smooth, but in wrong location:
Now see the above photo, where I measured/bent along the rubber trim; and now look below, where once I had the brackets on, I had to re-bend and it looks like crap:
Once bar is bent approx to shape, mark ends to cut.
I extended the sides down so they would bolt in to the lower side holes of the hard top mounting; this would allow me to wrap the soft top a few inches down the side, and hopefully keep it tight and looking right. I cut the ends at an angle to look better, grinded smooth, and took the grinder to the whole flat bar really quickly to scuff it up evenly and take some of the shine off the aluminum (my truck is not shiny, why should one flat bar be?)
Drill holes in the flat bar to match holes in the mounting brackets.
Bolt into place. I ran out of washers, I will put them in the proper place later. The top is only gonna be on for a few weeks until we move, then when I take the hard top off again, I will put more washers in. I also used "acorn" type capture nuts, which I thought looked much nicer than a nut with bolt threads sticking out, and less likely for any back seat passengers to catch/scratch hands, etc on.
Stainless will never rust, or seize to the aluminum, for y'all in any rusty places. The stainless hardware *was* at least twice as expensive as galvanized, but for such small pieces and small amounts, it was only about $3 extra.
Ok, now the frame is sized and shaped and installed, now lay the soft top over to get an idea of how it fits and looks.
(Forgot to take a photo here)
Now its time to choose where snaps will go, how many, etc. I originally used the two factory corner snaps and three across the top, but that did not keep it nearly tight enough, so later I went back and added four more snaps.
Snap installation was pretty straightforward and simple; but technique required a couple of practice tries before I got the snaps installed tightly and nicely.
The tool kit has these tools in it:
snap "hole punch" tool with various sized punches for different snaps, find the one that fits your snap posts.
Snap "punch" and hammer, for flattening the post into the "cup" of the snap.
Snaps come in three pieces:
top, middle cup, and base. The "top" goes on the outside of your fabric with the post poking through the fabric, the middle cup goes on the inside/bottom of fabric, and they get sandwiched together, just like a rivet.
I did a couple of practice ones on a blue shop paper towel folded over, to figure out the process:
The first one I boogered up, I did not have the punch straight vertically and so the post was mangled.
This one came out right:
Once I had it figured out, I moved to the actual soft top:
This soft top comes with a "hemmed" edge, and inside the hem is a piece of stiff-ish plastic that seems great to hold the snaps, without tearing the fabric.
The "Base" gets attached to whatever you are snapping to, in my case, the flat bar, using bolts/nuts. I could have used the sheet metal screws, but I hate screws and prefer nuts/bolts. Cleaner looking and easier to change out if necessary. #6 Pan Head Machine Screws fit nicely into the snap bases, and the pan head style did not stick out above the base at all, which would cause your snap to not work. I just wish they had had stainless in stock.
Now the frame is installed, the top has snaps installed, and it is time to install all the snap bases on the flat bar (see photo above). I would have preferred stainless bolts/nuts here as well, but Home-Crap-Pot did not have stainless that small. One more thing to swap out when I have time.
This was my first time doing snaps like this, and I didnt get the spacing of the bases quite right, resulting in a little wavi-ness: (see between the bottom-most two snaps in picture)
I tried my best to start from the middle snap, and work out, alternating sides, to keep good tension. It was a tricky part, and not all of them came out quite right to get the tension I wanted.
And the last two snaps, the black corner ones, were factory installed, so I installed bases to match, and snapped all the snaps on.
Then ran the tie-down straps (sewed on to the top at factory) down to the cargo tie downs behind the roll bar on the floor, and tightened snug.
Finished product:
It looks fine from the inside:
but from the outside there are a few creases and wrinkles I would like to get out.
Maybe a mid-way support would help that. I dont have time now but will do that later this summer.
Also, the factory corner snaps do not line up quite right with the ones I installed, so the corner pulls up a bit. I am going to move the bases and install new snaps, closer to the front about 1/2" or so, to tighten up the corners and hopefully make them more flat:
Final results and opinions:
I originally had only four snaps installed. This was not nearly enough, the top was too loose and flapped substantially in any wind or while driving above 35mph.
Adding more snaps seems to have partly solved this.
A mid-support would be a great addition.
I might consider adding snaps and bases to snap the back to the factory "rollbar", as the tie-down straps seem to pull kinks into the soft top, due to not pulling tension in a straight line.. Not really a rollbar anyways, so drilling some small holes would not be an issue. Combined with a mid-support, this would work nicely to smooth it out, I think.
All stainless hardware would be better.
I would also use 1.5" aluminum angle to make the mounting brackets - the angle I used, looks like crap. But it was free. But aluminum would be SO much sexier, and match the flat bar. And when I learn to weld, I will just weld some mounting tabs on to the flat bar. That would be the sexiest way methinks. I also want to swap out the hardtop bolts with something the right size, they were a bit too long; designed for the extra thickness of the fiberglass; so I had to washer-out the ones along the roof line. Those bolt holes bottom out. The ones in the side pillar dont, though.
Overall, it keeps the wind and sun out nicely - an INCREDIBLE difference in the drivers seat from having no top back there, surprisingly. And it works wonderfully in the rain. The back seat gets a few drops, but me up front, I stay cool and dry all the time.
This is most definitely one of the mods that has made me the most happy!
Jul 3, 2013 | 11:28 AM
#2
Pretty good job for the price, I need to work out a bikini top for mine too.
Did you draw some inspiration from this thread? https://www.yotatech.com/forums/f88/...ni-top-119857/
Did you draw some inspiration from this thread? https://www.yotatech.com/forums/f88/...ni-top-119857/
 Jul 3, 2013 | 03:02 PM
#4

Registered User
Joined: Apr 2004
Posts: 699
Likes: 1
From: Albuquerque, NM
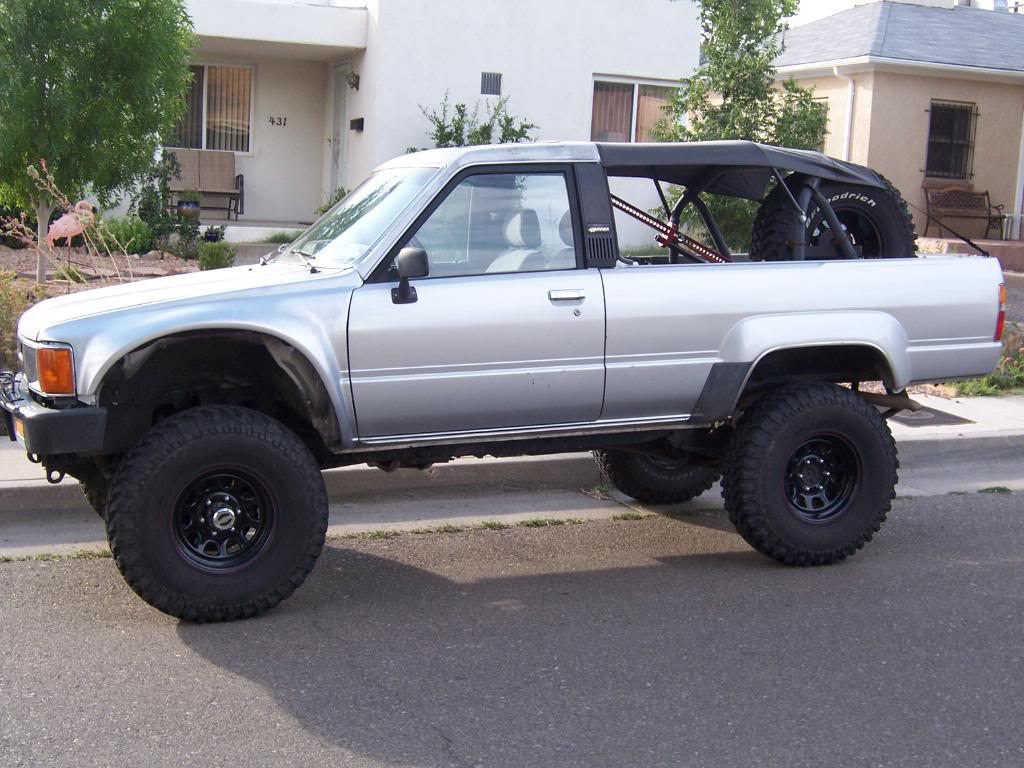
That looks pretty good. a bow attached to the roll bar would make it tighter. I like the 4runner, I used to have one a lot like it.
I got your email about the tires but my email reply bounced. send me a pm if you are still interested.
Robb

I got your email about the tires but my email reply bounced. send me a pm if you are still interested.
Robb


Thread
Thread Starter
Forum
Replies
Last Post
FS[GreatLakes]: Toyota collection part out
88sasturbotoy
Axles - Suspensions - Tires - Wheels
3
Jan 30, 2026 01:57 PM
jasonty
Pre 84 Trucks (Build-Up Section)
41
Dec 23, 2018 01:00 PM
crashburnoveride
86-95 Trucks & 4Runners
1
Jul 10, 2015 06:39 AM
FS[SouthEast]: 1st Gen 4Runner Slider Window, Driver Side
coryc85
Misc Stuff (Vehicle Related)
0
Jul 6, 2015 04:07 AM


