
Cracked Cylinder
 Aug 9, 2008 | 06:55 PM
#81
Thread Starter
Registered User
Joined: May 2008
Posts: 141
Likes: 0
Dang,
You really do have some good pictures there. And DANG those are some long extensions. When I busted out the 4's extension today I thought I was top dog. They may have what I need to do what you show there but I'm not sure. They seem to have every tool you could imagine but dang. I wonder if there is a way to just put that exhaust cross over on once I have the bellhousing bolts in? I will find out tomorrow.
Good to hear about the numbers on the wiring harness. I was slightly worried about that.
We did make pretty good progress. I have a buddy HOPEFULLLY comming by at 0900 to help me out a bit (he has never really worked on a car) and then in the afternoon I have a buddy comming by that is about the skill level I am but a real dive in and get-er-dun kinda guy.
So goal for tomorrow is get all of the stuff transferred over to the new engine, get the engine in, with all bellhousing botls, Starter, and AC along with bolts.
Then Monday and Tuesday Night finish up the wiring, fill with fluids, make sure vacume hoses are right and start up!!!! I hope to get it there by that point as the shop is closed Wed, Thurs, and it will kill me if I have to wait till Friday.
Question #1: Not sure if it came off an auto or 5 speed (I would assume 5 speed)...but just in case (I will call the guy I got it from tomorrow)...what is this trick you speak of?
#2: I put a (slightly charged original battery in there today and got NOTHING registering in the cab....like it had zero juice. I figured even at 9 volts I would get something...but then again it is a 12V system so it doesn't surprise me to much. I went to wally world *(Wal-Mart) and picke up a new battery. I checked all the fuses but didn't find anything ary.....hopefully everything will be good tomorrow.
NEXT UPDATE: Around 1900 tomorrow night.
Thank you again to all....I realy appreciat the help.
Aug 9, 2008 | 08:35 PM
#82
Registered User
Joined: Sep 2007
Posts: 1,235
Likes: 4
Dang,
You really do have some good pictures there. And DANG those are some long extensions. When I busted out the 4's extension today I thought I was top dog. You can probably string together enough 4", 6", 12" extensions to make it work. That many joints would probably make the wobble extensions unnecessary too.They may have what I need to do what you show there but I'm not sure. They seem to have every tool you could imagine but dang. I wonder if there is a way to just put that exhaust cross over on once I have the bellhousing bolts in? I will find out tomorrow.I'm almost positive that putting the crossover in after installing the bellhousing bolts is impossible.
Good to hear about the numbers on the wiring harness. I was slightly worried about that.
We did make pretty good progress. I have a buddy HOPEFULLLY comming by at 0900 to help me out a bit (he has never really worked on a car) and then in the afternoon I have a buddy comming by that is about the skill level I am but a real dive in and get-er-dun kinda guy.
So goal for tomorrow is get all of the stuff transferred over to the new engine, get the engine in, with all bellhousing botls, Starter, and AC along with bolts.
Then Monday and Tuesday Night finish up the wiring, fill with fluids, make sure vacume hoses are right and start up!!!! I hope to get it there by that point as the shop is closed Wed, Thurs, and it will kill me if I have to wait till Friday.Just do what you've been doing and you will be fine.
Question #1: Not sure if it came off an auto or 5 speed (I would assume 5 speed)...but just in case (I will call the guy I got it from tomorrow)...what is this trick you speak of? With the clutch removed, look at the end of the crankshaft. If there is a bearing installed in the end of the crank it will be obvious. Look at your old engine to see what it looks like. If it had an auto tranny hooked up to it before, there will just be a round hole about 1 1/4" diameter in the end of the crank. The pilot bearing supports the very tip of the input shaft of the trans, so you definately need it. If the new engine does not have one, you can try to buy a new one or salvage the one out of the old engine. It is very hard to use a bearing puller on them without destroying the bearing, so I use the grease trick. With a grease gun, I insert the tip into the center of the pilot bearingand fill the cavity behind the bearing with grease. Make sure it is full. Then you take a bolt that is slightly smaller than the ID of the bearing and wrap a little electrical tape around it so it is a snug fit inside the inner race of the bearing. You insert it against the grease and pop it with a hammer a time or two. The bearing will move a little bit and then you have to add grease and pop it a couple more times. Repeat until it comes all the way out. I'm sorry I don't have any pictures to demonstrate this, but hopefully you can figure it out.
#2: I put a (slightly charged original battery in there today and got NOTHING registering in the cab....like it had zero juice. I figured even at 9 volts I would get something...but then again it is a 12V system so it doesn't surprise me to much. I went to wally world *(Wal-Mart) and picke up a new battery. I checked all the fuses but didn't find anything ary.....hopefully everything will be good tomorrow. 9 volts is not near enough to run 12 volt circuits, but you probably know this already
NEXT UPDATE: Around 1900 tomorrow night.
Thank you again to all....I realy appreciat the help.
Hope this helps.
Aug 11, 2008 | 08:15 AM
#84
Thread Starter
Registered User
Joined: May 2008
Posts: 141
Likes: 0
Something was up with my internet. It would let me visit some sites but a majority would not show up. I forgot to try again later in the evening.
All I have to say is the engineers of this Engine should be ashamed of themselves. I opened the hood to my buddies 07 prerunner and there was a couple of nicely routed hoses and wires. It about made me cry...this thing is a nightmare. Ok I'm done with that part of the ranting.
So I am pissed about the guy who rebuilt the thing (Toyota rebuild my ass).
#1: They used Black RVT silicone to put the electronic plugs on top of the injectors. So guess what they would not come off. So after trying to clean them out and breaking all of the connections inside of it I relized I had to take off the upper intake plenum and EGT anyway so I just swapped out the good injectors from my other engine. What a fiasco. Maily because to of the nuts holding on the fuel rails stripped. Luckily I was at this skills lab as they had some of those special sockets you beat on with a hammer and eat into them. So that got those two off and luckily I had extra nuts from the other engine.
#2: The engine I bought came out of a 2WD...I never thought to ask...but I noticed the oil pans were different so I had to swap them out. Bought a gasket at autozone and of course the holes did not match up so I just used a bunch of Black RVT Silocone and sealed it up. But before I could swap it over I had to swap over the oil pick up as well (the one on the engine I pulled was horrible. So we cleaned up the oil pan really well along with the oil pick-up in the parts washer. Then I had to modify the oil pickup by cutting off the support legs becuase they did not match up with the old mounting location. So that took up some time.
Then we eventually got the thing in the car and it took us a bit to get it leveled out right and things preped and out of the way. We finally got it in there and about 5 of the bellhousing bolts in. We are going to get the starter back in today with the rest of the bellhousing bolts as well as the AC compressor. Then if time permits get the Power steering pump hooked back up and finally the engine mounts bolted in. Ohh I had to switch over these as well becuase one was missing and the other one was bad on the new engine.
I removed the old wireing harness and one of the fuel rails as they are still on my car. I got rid of most of the hoses but kep them in a box just in case I need them. Most everything is still on the truck (thank god toyota did the dissasembly a long time ago) But it is going to take awhile to figure out where all of the hoses go and the connectors.
I figure if I can get everything I said above done today (2-9 is when the shope is open) I can do the electrical tomorrow night. We will see though. With the pain of those bellhousing bolts and the tight space for the AC and starter it will probably take me most of the time to complete those 4 small tasks. And I won't get anything done if I can get some of my buddies over to help out. Sorry again no pics...just working as fast as I can to get it all done. At least I should be able to roll it out tonight. Doubt I will be able to get off work at 2 tomorrow like I will be today in order to go out and work on it.
The shop is closed Wednesday and Thursday so it looks like I will not be finishing it until Friday (but I do have a holiday Friday so I will have that whole afternoon to work on it)
Sorry for the long jumbled post...more to follow tomorrow morning.
Ohh and a hint for those putting the bellhousing back on. When you put the "stiffening brackets" on leave them lose otherwise you will not be able to line up the bolts. You can reach both of them easily thru the wheel wells to lossen and then tighten again once you have the bellhousing bolts in. Of course the engine will have to be on the hoist still and slightly elevated.
Aug 11, 2008 | 04:07 PM
#85
Registered User
Joined: Sep 2007
Posts: 1,235
Likes: 4
It sounds like everything is going well for you. A few @#$#%^& moments are to be expected for sure. Sounds like you made it past them ok.
Since the new engine was from a 2wd, did you have to swap the oil cooler? It seems like they are different than the one on the 4wd.
Since the new engine was from a 2wd, did you have to swap the oil cooler? It seems like they are different than the one on the 4wd.
Aug 12, 2008 | 08:44 AM
#86
Thread Starter
Registered User
Joined: May 2008
Posts: 141
Likes: 0
Well,
I have yet to notice/find the oil cooler. I still have a lot of hoses hanging around though. But I don't remember taking one off anywhere. All I remember seeing is the AC and the radiator of which I took off. There was no oil cooler hoses attached to it (like you see for transmissions in the bottom of the radiators sometimes) or an extra small oil cooler.
I had an extremely successful night last night . All of my buddies suck balls so I was there all by myeself but the weather was nice and cool and I spent 6 hours working on it.
I was able to get the bellhousing bolts in relatively quickly. They were really easy with some long extensions and a wobbly. I don't think I got the uppers torqued correctly but they are good enough not to come out.
I got the starter in. Since I was by myself that took a bit as I had to raise and lower the hoist bymyself going back and forth until I got the right height I could get in there thru the wheel well. Finally finaggle one bolt in and then I was able to get underneith and get the other in. Hopefully it engages correctly but I doubt there will be a problem. Then I had to route the cables and all went well there.
Next I tried getting the AC compressor in. Oops. I had put it in the battery tray for safe keeping while dropping the engine in the tight spot. Well it would not fit with the power sterring pump. So off came the pump and I lossened the tensioners. I was able to get it in pretty easily, then I got the power steering pump and all pullies on. I was starting to make good progress.
I then stuffed some rags in the intake plenum and began plugging things in. It involved a lot of swapping back and forth parts from one engine to another and making small fixes modifications (busted/missing washers, broken gaskets, etc.) but all went well. I got the larger harness screwed in and in place. I swapped a few new hoses on and the only change I see was there was an extra sensor on the very back of the engine (center) that was a blue cylindrical snesor) and I did not have one of those on my wireing harness and on the engine that I took out that hole was never tapped. But just behind that I had to drop in another sensor so I think that was just a small year change and shoudn't be a problem.
Got the fuel lines in (Except one...I can't figure out where it goes...I'm guessign somewhere on the upper intake once I put it on. If not I'm out of ideas.
I've got some Questions as always.
#1: I put the ground for the battery on the AC compressor becuase that is where it seemed to want to be (but I also saw a spot for it on the bracket for the AC compressor that mounts to the engien block)....Which is it? I would hate a ground to be my problem when trying to get the thing running.
#2: The new engine came with a downey cold air intake. I was going to use it but it appears there is an electrical plug for the stock intake (is this the case?). If so I wonder if leaving that large connector off with the other intake is going to cause any grief?
#3: Last question. I have 2 12" hoses that are surronded by a foam protector. I beleive they are the air vavlve for the power steering pump. They fit there perfect on the pump but I can not find the other end where they go. I'm going to go back and take a closer look at your pictures because I think I might be able to figure it out. I bet they go somewhere on the upper intake plenum just like everything else (there are at least a dozen hozes up there)
I'm going to print out the photos and open the manual and if all goes well I will get a majorityof the wires and hoses put on as well the upper intake tonight (I only have about 2 hours to work tonight though). I'm hoping to get it 90% buttoned up tonight so all I have to do on Friday is put in the radiator, fill with fluids, put on the rad fan, double check everything, put in the battery, and drain the fuel tank, fill the fuel tank, cycle the key 4-5 times for 15 seconds and crank.
I have yet to notice/find the oil cooler. I still have a lot of hoses hanging around though. But I don't remember taking one off anywhere. All I remember seeing is the AC and the radiator of which I took off. There was no oil cooler hoses attached to it (like you see for transmissions in the bottom of the radiators sometimes) or an extra small oil cooler.
I had an extremely successful night last night
. All of my buddies suck balls so I was there all by myeself but the weather was nice and cool and I spent 6 hours working on it.I was able to get the bellhousing bolts in relatively quickly. They were really easy with some long extensions and a wobbly. I don't think I got the uppers torqued correctly but they are good enough not to come out.
I got the starter in. Since I was by myself that took a bit as I had to raise and lower the hoist bymyself going back and forth until I got the right height I could get in there thru the wheel well. Finally finaggle one bolt in and then I was able to get underneith and get the other in. Hopefully it engages correctly but I doubt there will be a problem. Then I had to route the cables and all went well there.
Next I tried getting the AC compressor in. Oops. I had put it in the battery tray for safe keeping while dropping the engine in the tight spot. Well it would not fit with the power sterring pump. So off came the pump and I lossened the tensioners. I was able to get it in pretty easily, then I got the power steering pump and all pullies on. I was starting to make good progress.
I then stuffed some rags in the intake plenum and began plugging things in. It involved a lot of swapping back and forth parts from one engine to another and making small fixes modifications (busted/missing washers, broken gaskets, etc.) but all went well. I got the larger harness screwed in and in place. I swapped a few new hoses on and the only change I see was there was an extra sensor on the very back of the engine (center) that was a blue cylindrical snesor) and I did not have one of those on my wireing harness and on the engine that I took out that hole was never tapped. But just behind that I had to drop in another sensor so I think that was just a small year change and shoudn't be a problem.
Got the fuel lines in (Except one...I can't figure out where it goes...I'm guessign somewhere on the upper intake once I put it on. If not I'm out of ideas.
I've got some Questions as always.
#1: I put the ground for the battery on the AC compressor becuase that is where it seemed to want to be (but I also saw a spot for it on the bracket for the AC compressor that mounts to the engien block)....Which is it? I would hate a ground to be my problem when trying to get the thing running.
#2: The new engine came with a downey cold air intake. I was going to use it but it appears there is an electrical plug for the stock intake (is this the case?). If so I wonder if leaving that large connector off with the other intake is going to cause any grief?
#3: Last question. I have 2 12" hoses that are surronded by a foam protector. I beleive they are the air vavlve for the power steering pump. They fit there perfect on the pump but I can not find the other end where they go. I'm going to go back and take a closer look at your pictures because I think I might be able to figure it out. I bet they go somewhere on the upper intake plenum just like everything else (there are at least a dozen hozes up there)
I'm going to print out the photos and open the manual and if all goes well I will get a majorityof the wires and hoses put on as well the upper intake tonight (I only have about 2 hours to work tonight though). I'm hoping to get it 90% buttoned up tonight so all I have to do on Friday is put in the radiator, fill with fluids, put on the rad fan, double check everything, put in the battery, and drain the fuel tank, fill the fuel tank, cycle the key 4-5 times for 15 seconds and crank.
Last edited by addicted56; Aug 12, 2008 at 08:49 AM.
Aug 12, 2008 | 09:06 AM
#87
Contributing Member
Joined: Nov 2002
Posts: 10,666
Likes: 5
From: Oklahoma State
A 3.0 oil cooler can be seen in this pic and a couple of your pics on page 2:

Its the round thing below the drivers side exhaust manifold, to the rear of the oil filter. It has 2 coolant hoses that run to it, one from the t-stat area and one from the block.
Its the round thing below the drivers side exhaust manifold, to the rear of the oil filter. It has 2 coolant hoses that run to it, one from the t-stat area and one from the block.
Aug 12, 2008 | 09:09 AM
#88
Registered User
Joined: Sep 2007
Posts: 1,235
Likes: 4
Well,
I have yet to notice/find the oil cooler. I still have a lot of hoses hanging around though. But I don't remember taking one off anywhere. All I remember seeing is the AC and the radiator of which I took off. There was no oil cooler hoses attached to it (like you see for transmissions in the bottom of the radiators sometimes) or an extra small oil cooler.The oil cooler is round and is attached to the engine block. On the 4x4 model it is located to the reaer of the block on the other side of the motor mount from the oil filter. The 4x2 model has it mounted on the oil filter adapter itself. I'll try to take a picture and post it later.
I had an extremely successful night last night. All of my buddies suck balls so I was there all by myeself but the weather was nice and cool and I spent 6 hours working on it.I know the feeling.
I was able to get the bellhousing bolts in relatively quickly. They were really easy with some long extensions and a wobbly. I don't think I got the uppers torqued correctly but they are good enough not to come out.Good job, those can be a real PITA.
I got the starter in. Since I was by myself that took a bit as I had to raise and lower the hoist bymyself going back and forth until I got the right height I could get in there thru the wheel well. Finally finaggle one bolt in and then I was able to get underneith and get the other in. Hopefully it engages correctly but I doubt there will be a problem. Then I had to route the cables and all went well there.
Next I tried getting the AC compressor in. Oops. I had put it in the battery tray for safe keeping while dropping the engine in the tight spot. Well it would not fit with the power sterring pump. So off came the pump and I lossened the tensioners. I was able to get it in pretty easily, then I got the power steering pump and all pullies on. I was starting to make good progress.
I then stuffed some rags in the intake plenum and began plugging things in. It involved a lot of swapping back and forth parts from one engine to another and making small fixes modifications (busted/missing washers, broken gaskets, etc.) but all went well. I got the larger harness screwed in and in place. I swapped a few new hoses on and the only change I see was there was an extra sensor on the very back of the engine (center) that was a blue cylindrical snesor) and I did not have one of those on my wireing harness and on the engine that I took out that hole was never tapped. My first swap had the exact same extra cooling sender. i am thinking it was for the auto tranny, something to do with the overdrive circuit. I just left it in place.But just behind that I had to drop in another sensor so I think that was just a small year change and shoudn't be a problem.
Got the fuel lines in (Except one...I can't figure out where it goes...I'm guessign somewhere on the upper intake once I put it on. If not I'm out of ideas.There is a fuel return on the hard lines attached to the upper plenum
I've got some Questions as always.
#1: I put the ground for the battery on the AC compressor becuase that is where it seemed to want to be (but I also saw a spot for it on the bracket for the AC compressor that mounts to the engien block)....Which is it? I would hate a ground to be my problem when trying to get the thing running.On the ones I have been working on, the ground goes to the side of the engine block near the a/c compressor. I think that mounted to the compressor itself is probably fine, because it is directly bolted to a bracket and then the block. It shouldn't cause you any problems.
#2: The new engine came with a downey cold air intake. I was going to use it but it appears there is an electrical plug for the stock intake (is this the case?). If so I wonder if leaving that large connector off with the other intake is going to cause any grief?Some of the other guys here probably know more about this than me, but I think you are refering to the MAF sensor. It is located on the stock air box and AFAIK is definately needed in order for the ECU to manage the engine properly. If I am wrong, hopefully someone will chime in and correct me. Hopefully MT Goat is still watching this thread.
#3: Last question. I have 2 12" hoses that are surronded by a foam protector. I beleive they are the air vavlve for the power steering pump. They fit there perfect on the pump but I can not find the other end where they go. I'm going to go back and take a closer look at your pictures because I think I might be able to figure it out. I bet they go somewhere on the upper intake plenum just like everything else (there are at least a dozen hozes up there)Yes, those lines will hook to the hard lines that are connected to the upper plenum. My pics should help in that respect. Let me know if you still have questions.
I'm going to print out the photos and open the manual and if all goes well I will get a majorityof the wires and hoses put on as well the upper intake tonight (I only have about 2 hours to work tonight though). I'm hoping to get it 90% buttoned up tonight so all I have to do on Friday is put in the radiator, fill with fluids, put on the rad fan, double check everything, put in the battery, and drain the fuel tank, fill the fuel tank, cycle the key 4-5 times for 15 seconds and crank.
I have yet to notice/find the oil cooler. I still have a lot of hoses hanging around though. But I don't remember taking one off anywhere. All I remember seeing is the AC and the radiator of which I took off. There was no oil cooler hoses attached to it (like you see for transmissions in the bottom of the radiators sometimes) or an extra small oil cooler.The oil cooler is round and is attached to the engine block. On the 4x4 model it is located to the reaer of the block on the other side of the motor mount from the oil filter. The 4x2 model has it mounted on the oil filter adapter itself. I'll try to take a picture and post it later.
I had an extremely successful night last night
. All of my buddies suck balls so I was there all by myeself but the weather was nice and cool and I spent 6 hours working on it.I know the feeling.I was able to get the bellhousing bolts in relatively quickly. They were really easy with some long extensions and a wobbly. I don't think I got the uppers torqued correctly but they are good enough not to come out.Good job, those can be a real PITA.
I got the starter in. Since I was by myself that took a bit as I had to raise and lower the hoist bymyself going back and forth until I got the right height I could get in there thru the wheel well. Finally finaggle one bolt in and then I was able to get underneith and get the other in. Hopefully it engages correctly but I doubt there will be a problem. Then I had to route the cables and all went well there.
Next I tried getting the AC compressor in. Oops. I had put it in the battery tray for safe keeping while dropping the engine in the tight spot. Well it would not fit with the power sterring pump. So off came the pump and I lossened the tensioners. I was able to get it in pretty easily, then I got the power steering pump and all pullies on. I was starting to make good progress.
I then stuffed some rags in the intake plenum and began plugging things in. It involved a lot of swapping back and forth parts from one engine to another and making small fixes modifications (busted/missing washers, broken gaskets, etc.) but all went well. I got the larger harness screwed in and in place. I swapped a few new hoses on and the only change I see was there was an extra sensor on the very back of the engine (center) that was a blue cylindrical snesor) and I did not have one of those on my wireing harness and on the engine that I took out that hole was never tapped. My first swap had the exact same extra cooling sender. i am thinking it was for the auto tranny, something to do with the overdrive circuit. I just left it in place.But just behind that I had to drop in another sensor so I think that was just a small year change and shoudn't be a problem.
Got the fuel lines in (Except one...I can't figure out where it goes...I'm guessign somewhere on the upper intake once I put it on. If not I'm out of ideas.There is a fuel return on the hard lines attached to the upper plenum
I've got some Questions as always.
#1: I put the ground for the battery on the AC compressor becuase that is where it seemed to want to be (but I also saw a spot for it on the bracket for the AC compressor that mounts to the engien block)....Which is it? I would hate a ground to be my problem when trying to get the thing running.On the ones I have been working on, the ground goes to the side of the engine block near the a/c compressor. I think that mounted to the compressor itself is probably fine, because it is directly bolted to a bracket and then the block. It shouldn't cause you any problems.
#2: The new engine came with a downey cold air intake. I was going to use it but it appears there is an electrical plug for the stock intake (is this the case?). If so I wonder if leaving that large connector off with the other intake is going to cause any grief?Some of the other guys here probably know more about this than me, but I think you are refering to the MAF sensor. It is located on the stock air box and AFAIK is definately needed in order for the ECU to manage the engine properly. If I am wrong, hopefully someone will chime in and correct me. Hopefully MT Goat is still watching this thread.
#3: Last question. I have 2 12" hoses that are surronded by a foam protector. I beleive they are the air vavlve for the power steering pump. They fit there perfect on the pump but I can not find the other end where they go. I'm going to go back and take a closer look at your pictures because I think I might be able to figure it out. I bet they go somewhere on the upper intake plenum just like everything else (there are at least a dozen hozes up there)Yes, those lines will hook to the hard lines that are connected to the upper plenum. My pics should help in that respect. Let me know if you still have questions.
I'm going to print out the photos and open the manual and if all goes well I will get a majorityof the wires and hoses put on as well the upper intake tonight (I only have about 2 hours to work tonight though). I'm hoping to get it 90% buttoned up tonight so all I have to do on Friday is put in the radiator, fill with fluids, put on the rad fan, double check everything, put in the battery, and drain the fuel tank, fill the fuel tank, cycle the key 4-5 times for 15 seconds and crank.
Awesome progress! You just about have this thing wrapped up.
Over the weekend, I finished putting a set of headgaskets on the engine that I swapped last week. That fixed it right up. Yesterday I started pulling the engine on the second engine swap. I must have learned something on the first one because working alone I had the engine out in 5 hours. I am waiting on a remanned longblock, so I get to relax and watch the Olympics tonight!
Aug 12, 2008 | 09:20 AM
#89
Contributing Member
Joined: Nov 2002
Posts: 10,666
Likes: 5
From: Oklahoma State
Yes, you need the AFM connected up and plumbed in behind the air filter.
Aug 12, 2008 | 09:37 AM
#90
Thread Starter
Registered User
Joined: May 2008
Posts: 141
Likes: 0
MAF...that is the acronym I was looking for. I might just screw around with that other intake down the road. I'm sure I'll be wittleing down error codes for the first couple days and that would be one less I would have to worry about.
I know the exact area for the oil cooler of which you speak (Seems like a HORRIBLE location). I don't remember seeing it but I will take a look tonight. I am not to worried though becuase everything should be there.
Good to hear my Ground shoudl be fine. My buddy took the bolt out for that thing so I had no idea where it went. I hope he shows up tonight becuase he is the one that helped me rip the top portion of that motor off and between the two of us we should be able to get it.
I'm getting excited about getting this thing going. I think once I get get that upper portion on tonight that will leave me with very few questions and left over hoses.
I should have put new plugs in while I was at it but completely forgot. Guess I will do it down the road.
I can see how you get a lot faster at doing this once you have done it once or twice. Still doesn't change the fact that this is a relatively complicated engine replacement.
Glad to hear the HG fixed your problem. That would have been a huge PIA to take back out and put another engine in.
Good luck on your next swap. You are going to be a pro at this in no time.
Aug 12, 2008 | 11:25 AM
#91
Contributing Member
Joined: Nov 2002
Posts: 10,666
Likes: 5
From: Oklahoma State
Actually that's the wrong acronym but its misuse has become rampant lately. I've almost given up trying to set people straight on it but here goes:
MAF = Mass air flow (sensor) used after 96 on the OBDII year trucks. Measures air flow by estimating the mass of air flowing passed a hot wire which is cooled by the air flow. Greatly effected by dirt or oil and needs cleaning sometimes.
AFM = VAFM = VAF = volume air flow meter. Used on pre-96 models. Estimates air flow based on volume. Uses a spring loaded flap door to move a potentiometer. The more air flow the more the door swings open. Almost never needs cleaning unless submerged in muddy water or something like that. Potentiometer is sealed in box. http://personal.utulsa.edu/~nathan-b...33volumeai.pdf
Last edited by mt_goat; Aug 12, 2008 at 12:40 PM.
Aug 12, 2008 | 01:04 PM
#93
Thread Starter
Registered User
Joined: May 2008
Posts: 141
Likes: 0
And now I know I'm glad I got the good one. I hate when things often brake or need cleaning. I'm off to the lab to put in a couple hours or work.
I better finish it by Friday as I just found out from my wife that I got suckerd into helping her company during some big weekend sale to watch horses.
I HATE HORSES!!! Unless they are paying me in a lot of beer afterwards I'm going to be a sour one. This 4-Runner is already past schedule.
I'm glad I got the good one. I hate when things often brake or need cleaning. I'm off to the lab to put in a couple hours or work.I better finish it by Friday as I just found out from my wife that I got suckerd into helping her company during some big weekend sale to watch horses.
I HATE HORSES!!! Unless they are paying me in a lot of beer afterwards I'm going to be a sour one. This 4-Runner is already past schedule.
Aug 13, 2008 | 03:31 AM
#94
Thread Starter
Registered User
Joined: May 2008
Posts: 141
Likes: 0
Well,
It was another pretty good night. I got off work around 5:30 and took some large printed out color copies of the vaccume hoses from this thread. It helped a little bit but I'm still stuck. Right before I stopped trying to figure them out though I finally found the diagram in my manual (they had huge photo's of every year of 4 cylinder and then one DINKY photo of the 6 cylinder for all years crammed in a corner. Couldn't bleive it. Then I found a small copy of the hoses diagram on the hood but it is kinda strange looking. It did help me find one hose though. I had one hose on the engine and one still on the car. All I had to do was rip one out and I was one hose closer. I figure that is the way it has to be done. Just one at a time.
Question #1: I can not find the sending unit and plug for the EGR anywhere from either of the two engines. But at the same timeon my truck the female plug that accepts it has a factory plug in it that is capped off (will not accept wires). It appears factory done like they did not use it. I figure I will just thread a bolt in that hole on the egr and hope for the best
Question #2: If this one can get answered I can Gaurantee find out where the last few hoses go quickly. Where do the two hoses that come from the air pump/diaphram on the bottom of the power steering pump go. As you know they are both the same diameter and I figured they would go close together on the intake but it doesn't appear so. If I can figure out where those go I would be in business.
Ok so back to the productiveness. For only being there a bit over 3 hours I feel pretty good about what I got done. First I checked out that aftermarket Downey cold air intake. It is actually a Really nice unit. It has the factory plug for the Volumetric Air Sensor (I'll go back and edit with the correct Acronym). So I was pretty stoked about that.
I then started figureing out where all of the little vacumes and plug on the drivers side of the engine went. I had to pull some hoses from the old engine and dig in a parts bin for the other but I finally found them all slowly but surely. It was like a puzzle and gave you a quick high when you found one. Then I grabbed the old gasket off of the other engine and put it on and placed the intake on. I got it all bolted on and finished all the plugs, hoses, etc and bolted it down. I then got the throttle cables on. After that I started working on all the vaccume hoses. I got all of the small ones but still have about 4-5 uncovered. I decided to take a break from that and put in the radiator, clutch, fan and shroud. I then went and got the battery because I wanted to see if most things in the car worked as it has been sitting half a decade. I hooked it up and everything works accept the rear window...which I already new that. Turn signals, reverse, hi-low beams, windows, locks interior lights, sunroof you name it. So I was pretty stoked about that. I then went and hooked up a couple more connectors and double checked everything and made some notes of what to do on Friday and then by then it was time to clean up and push it back outside.
All I have left is to
#1: Hook up the rest of those vaccume hoses
#2: Put on Cold air intake
#3: Put fresh engine oil
#4: Put ATF in for Powersteering
#5: Fill with Coolant
#6: Put on Hood
#7: Put in windheild wiper resiviour and fill
#8: Drain and refil fuel tank. (which they are going to make me drag out of the area over to another parking lot away from them to do (but ohh well)
#9: Hook up the battery, prime the system and crank away to see what happens.
If all goes well I will have it done before dark on Friday.
Aug 13, 2008 | 05:18 AM
#95
Registered User
Joined: Sep 2007
Posts: 1,235
Likes: 4
Good progress! You don't have much left now.
I'm not sure that I understand question #1, but in the pic you can see the egr, so maybe it will help you out. I didn't label it, but the egr is right under the text in the photo, just in case one or both of us has their terminology mixed up again.
This pic should answer question #2:
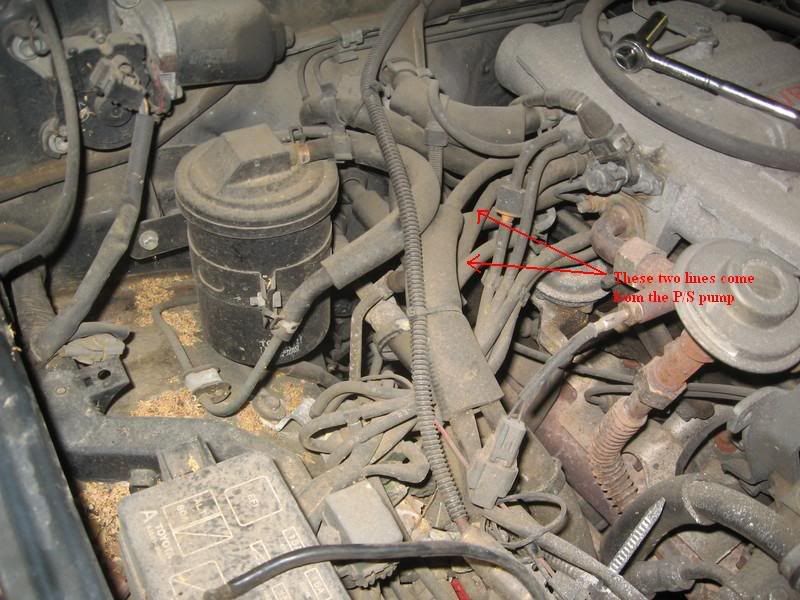
I'm not sure that I understand question #1, but in the pic you can see the egr, so maybe it will help you out. I didn't label it, but the egr is right under the text in the photo, just in case one or both of us has their terminology mixed up again.
This pic should answer question #2:
Last edited by zlathim; Aug 13, 2008 at 05:22 AM.
Aug 13, 2008 | 03:16 PM
#96
Thread Starter
Registered User
Joined: May 2008
Posts: 141
Likes: 0
OK.
Thank you for that picture. I think I understand them now. I understand where that lower one goes and I "THINK" I can make out where that other hose goes. Considereing the other two hoses needed would be larger.
As far as Question #1 I am refering to the EGR sensor. Look on your picture where it says "FROM". Follow that down to the grey plug. On my truck the plug has a factory insert that blocks of the plug so it is not necessary. I will take some picture on Friday but it should be to late by that part because I should be done.
Am I correct that the valve cover breakther hose belongs up on one of those vacume lines as well??? I think it is one of those on the very top. GOSH DARN IT!!! This is why I wish I had my truck here. I would be snapping pictures and actually be able to work on it right now. Ohh well that place was really handy. Between the big work tables and all the tools I couldn't beat it. Even though I had 99% of the tools I used here.
I got the Toyota Insured today so if I can get it registered and the stuff back to me from Oregon by Monday I'm going to be rolling that puppy back to the pad at home.
Thank you again.
Last edited by addicted56; Aug 13, 2008 at 03:22 PM.
 Aug 15, 2008 | 05:50 PM
#98
Thread Starter
Registered User
Joined: May 2008
Posts: 141
Likes: 0


OK WTF. My little sister taught me that acronym.
Anyway Took me about 2 hours to do all the following. Drag that car over to the another parking lot drain the fuel put new fuel in. Then I got it back filled her with coolant, power steering fluid and engine oil. I finished getting all the hoses on and all but one of the electrical plugs. I hooked up the battery put on the air intake and I cranked her over...and cranked her over...and over and over and over.
I did a little checking and I wasn't getting any fuel to the rails WHAT SO EVER. It wasn't even making it to the engine. So here come the famous questions.
#1: Would I be able to hear the fuel pump in the tank running (I think I would)...especially if my ear was right on the tank when the key was on right before I actually engaged the starter.
#2: My manual sucks!!! Where is the relay for the pump???
#3: There was one fuse missing in the engine bay..a 15 amp that was labed CFI but I think it was suppossed to be an EFI that was rubbed off. Not the larger fuse that says EFI but the one right next to it. Anyway when I plugged that fuse in a check engine light came on. It wasn't there before.
#4: Could I have boogered up the fuel pump when I stuck my hose down in th tank to drain it? If so should I just order a pump or mess with the electrical first.
Again I am getting Zero fuel to the rails and I believe the pump not to be running.
The stinky part is if it is not electrical I can not do any more work at the garage which means i have to tow it to my parking lot at work lay some carpet down and drop the tank to replace it and then HOPE it works.
Ohh last question
#5: I wish I had a picture but...there is a small connector on the wiring harness that looks like it reaches down by the engine oil filter (right next to that large bulbed connection...that actually does plug in right next to the oil filter. I can not figure out where it connects to? Any ideas. I will try and grab some pictures sunday if I don't get the thing running.
I have to work all day helping my wife do something for work but Sunday I'm going to be back on it so I need all the suggestions I can get. Plan #1 and Plan #2 if #1 doesn't work type of thing. I hope I don't have to go to Toyota and get a fuel pump...#1 they are not open on the weekends and #2 that is just more money and ass pain.
Thanks guys...I really thought I was going to be there today. Never guessed a fuel pump.
Last edited by addicted56; Aug 15, 2008 at 05:56 PM.
Aug 15, 2008 | 05:58 PM
#99
Registered User
Joined: Mar 2008
Posts: 12,723
Likes: 6
From: Temecula Valley, CA
Whisky Tango Foxtrot... What The Fork.
Sounds like no fuel pressure
drumroll please....
Maybe.
Look for the "Circuit Opening Relay" in your diagrams.
And that didn't change anything?
Not likely it's boogered. Maybe bypass the wiring and power the fuel pump up that way and see what goes.
Burbour or shag?
Knock sensor?
Never can tell unless you bypass all the wiring and power the pump up separately.
Anyway Took me about 2 hours to drag that car over the another parking lot drain the fuel put new fuel in. Then I got it back filled her with coolant, power steering fluid and engine oil. I finished getting all the hoses on and all but one of the electrical plugs. I hooked up the batter put on the air intake and I cranked her over...and cranked her over...and over and over and over.
I did a little checking and I wasn't getting any fuel to the rails WHAT SO EVER. It wasn't even making it to the engine. So here come the famous questions.
#1: Would I be able to hear the fuel pump in the tank running (I think I would)...especially if my hear was right on the tank when the key was on right before I actually engaged the starter
#2: My manual sucks!!! Where is the relay for the pump???
#3: There was one fuse missing in the engine bay..a 15 amp that was labed CFI but I think it was suppossed to be an EFI that was rubbed off. Not the larger fuse that says EFI but the one right next to it. Anyway when I plugged that fuse in an engine light came on. It wasn't there before.
#4: Could I have boogered up the fuel pump when I stuck my hose down in the tank to drain it? If so should I just order a pump or mess with the electrical first.
Again I am getting Zero fuel to the rails.
The stinky part is if it is not electrical I can not do any more work at the garage which means i have to tow it to my parking lot at work lay some carpet down and drop the tank to replace it and then HOPE it works.
The stinky part is if it is not electrical I can not do any more work at the garage which means i have to tow it to my parking lot at work lay some carpet down and drop the tank to replace it and then HOPE it works.
Ohh last question
#5: I wish I had a picture but...ther is a small connector on the wiring harness that looks like it reaches down by the engine oil filter (right next to that large bulbed connection...that actually does plug in right next to the oil filter. I can not figure out where it connects to? Any ideas. I will try and grab some pictures sunday if I don't get the thing running.
#5: I wish I had a picture but...ther is a small connector on the wiring harness that looks like it reaches down by the engine oil filter (right next to that large bulbed connection...that actually does plug in right next to the oil filter. I can not figure out where it connects to? Any ideas. I will try and grab some pictures sunday if I don't get the thing running.
I have to work all day helping my wife do something for work but Sunday I'm going to be back on it so I need all the suggestions I can get. Plan #1 and Plan #2 if #1 doesn't work type of thing. I hope I don't have to go to Toyota and get a fuel pump...#1 they are not open on the weekends and #2 that is just more money and ass pain.
Thanks guys...I really thought I was going to be there today. Never guessed a fuel pump.
Thanks guys...I really thought I was going to be there today. Never guessed a fuel pump.
Aug 15, 2008 | 06:51 PM
#100
Registered User
Joined: Sep 2007
Posts: 1,235
Likes: 4
sorry addicted- I didn't see your previous post.
I think abec has you pointed in the right direction on most of the stuff. For #5, I think you are talking about the electrical connector (unused in your case) that would go to the front axle on the ADD models. When it is unused, it usually has a plug in it so it is obvious that it des not go to anything. It was routed right along side of the oil pressure sending unit lead, just like you described. Just leave it, you don't need to worry about it if your runner does not have ADD.
I think abec has you pointed in the right direction on most of the stuff. For #5, I think you are talking about the electrical connector (unused in your case) that would go to the front axle on the ADD models. When it is unused, it usually has a plug in it so it is obvious that it des not go to anything. It was routed right along side of the oil pressure sending unit lead, just like you described. Just leave it, you don't need to worry about it if your runner does not have ADD.


