When you click on links to various merchants on this site and make a purchase, this can result in this site earning a commission. Affiliate programs and affiliations include, but are not limited to, the eBay Partner Network.
Math says that is acceptable, about 3.5% deviation on the low cylinder. Rebuild spec is ten percent deviation.
There will be some deviation due to heating of the wires while cranking. I don't recall the spec, its in the owners manual, about ten seconds cranking and a minute of rest. Not likely what we see here due to having to move the test apparatus.
Worth noting we don't know how well a HF is calibrated 140 could be just about anything between 100-180, but the deviation is notable.
My test guage is from Napa still probably made.in asia or india and never been calibrated (expense is a factor, were not buiding 5 engines a day, it is a hobby). At some point I need to redo my compression tests with a good battery/power-source since my 120psi is a little low even for a turbo application that is likely overbored.
You've already cracked open the coolant system, should have ran the coolant pressure tests first...
At this point I would go ahead and pull the intake and reseal the lower intake to the head, then swap on a new water pump then reevaluate. Gaskets are cheap, goop is cheap, and you already need the pump due to the leak. Ensure the manifold has a good clean and flat surface, not super critical with a thick gasket or enough goop, and any sealer you use has proper curing time.
A cylinder leak test is probably going to turn up as blow by due to ring wear. Again it looks like if the coolant system is breached it is a one way leak not a huge crack or anything catastrophic.
I just did some googling on 22re intake coolant leak and now I understand why you've been telling me to check and reseal the intake manifold ... I wasn't making the connection that it's a somewhat common problem for the intake manifold gasket to give way and send coolant into any number of cylinders in the head via the coolant passages on the intake side of the engine.
First thing's first I'm going to find a copy of the FSM and then get some notes together and get it pulled apart once I'm organized.
Regarding running the cooling system pressure test I should have done that first for sure but I thought a stuck thermostat was what was causing the waterpump gasket leak and other issues but now that I understand the intake gasket could actually be the cause of all the symptoms this engine is presenting its all starting to make sense. Plus my radiator is also cracked so that plus the (possible) intake gasket leak would explain the roughness of the engine, the coolant in the exhaust, the temp gauge and heater being out of wack because of air in the system, and what you mentioned about air being trapped under the thermostat causing it to stick shut would cause the gasket leak at my waterpump from the pressure buildup. Slap me if I'm not seeing the big picture here. Let's hope this is it. I'm gonna have to wait until payday for parts ... I don't see a point in going further until I have a new radiator, thermostat, waterpump, and FSM in hand anyway. I'll definitely reply back with findings/results so maybe this thread will be useful for some one else down the road.
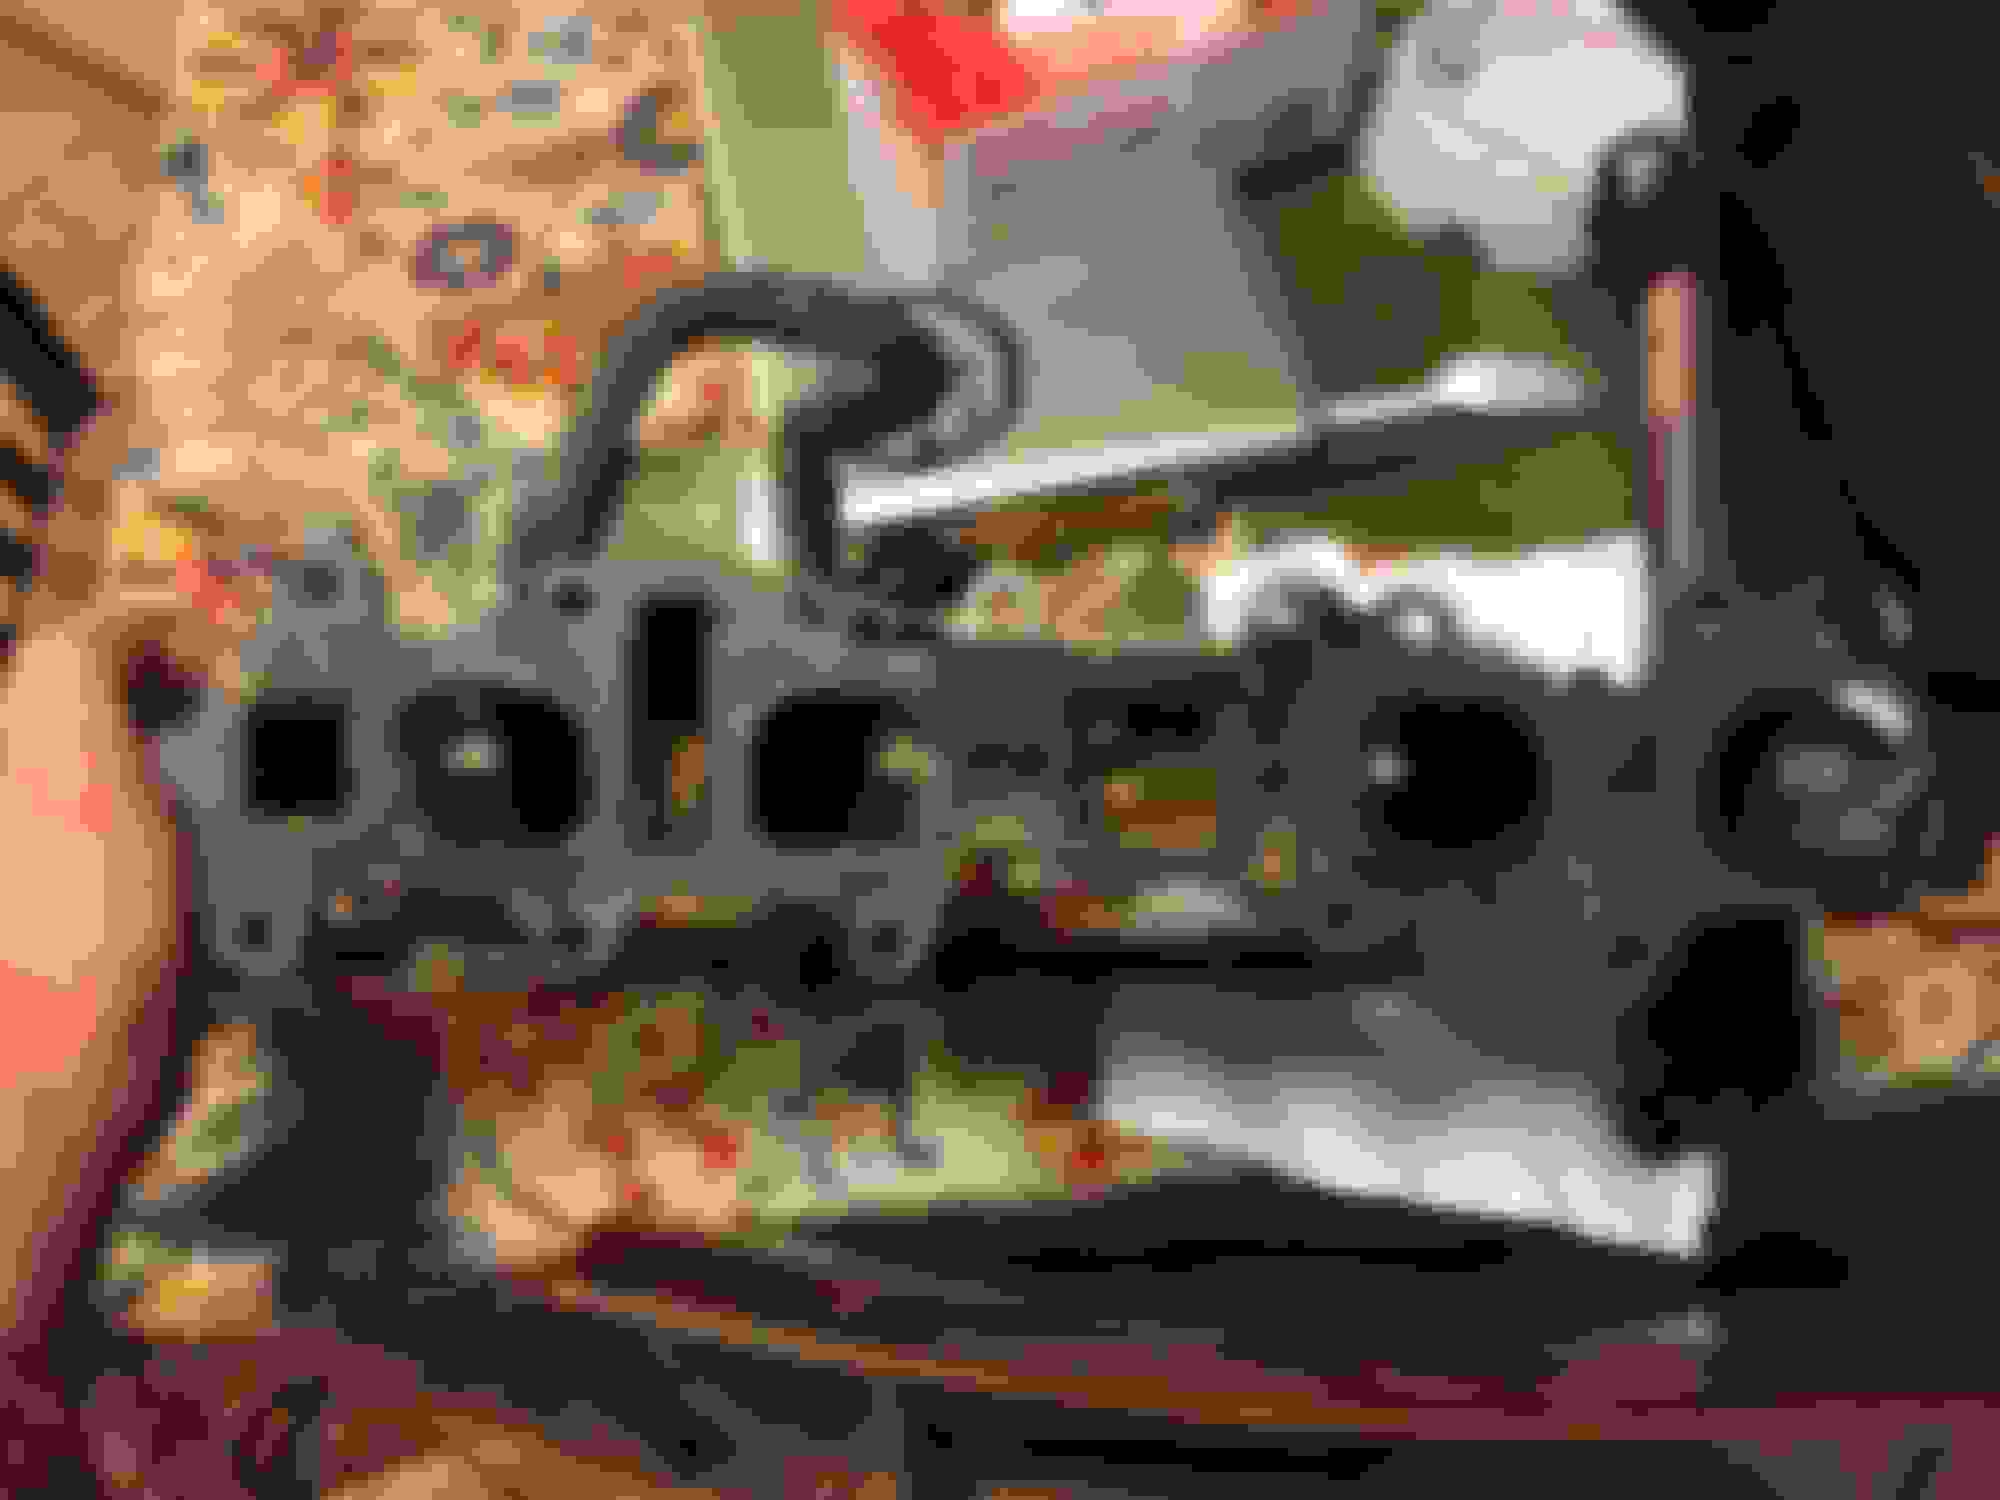
It shows the re lower intake.
On the left is the front if the engine.
from left to right the openings are..
Water jacket, cylinder one, water jacket, cylinder two, water jacket, followed by cylinders three and four. Aft of cylinder four is the egr and its cooling passages (more water jacket). Only that last one (egr) is an actual head issue (crack). The others can be simple fixes.
Part of the design of the plenum (upper intake) and runners (lower intake) is a resonance (shock wave) created by the non adjacent cylinder closing its valve. This shock wave is tuned, by plenum and runner length and volume, to hit the next valve to open. The byproduct of this is a breach in the coolant at the front oriface can shoot water into number three and so on, once it gets in there it's going out one cylinder or another eventually..
Yeah I was able to see the photo and it see how this problem can occur. So basically anything along the manifold causing the leak is mostly gasket related but if it's coming from my EGR coolant port then I'm looking at more serious costly repairs like a new head. Let's hope it's not Cracked at the egr port!
not yet I need to get my cooling system built out before I can troubleshoot the engine issues. Parts are getting ordered and I'll definitely report back once I check the intake manifold and reseal.
Alright so I got parts and I already replaced the radiator and thermostat and flushed the system with distilled water I definitely had flow with the new radiator and thermostat so I think that part of it is fixed. While I had the radiator out I took the liberty of cleaning the front of the engine which was caked with some fine dust and grease sludge, it's honestly hard to tell what was going on in that mess so I cleaned it up so I can better see the leak(s). I've got a new Aisin waterpump but I'm not convinced my water pump was the source of the moisture on the front of the engine... it being so dusty it was hard to tell if there was oil in it or it was just wet but I'm leaning toward oil leak. It looks like maybe front main or oil pump but it could be the timing chain cover in which case that would kind of suck.
Im about to tear into the intake manifold and redo the manifold to head and upper plenum gaskets so I can hopefully get the coolant in the combustion chamber problem resolved.
Regarding the knocking sound. I got a stethoscope and put the probe on the valve cover to try and pinpoint the knock and it seems to be coming from the back valves near cylinder 4 the most but I noticed visually that my plug wires were rattling at the plug boot on cylinder 1 and 4 and when I touch the boots (with my fingers) I physically felt a knocking vibration... since they are on the same stroke on the crank shaft would one cylinder misfiring affect the other? I don't feel this vibration on cylinder 2 or 3 plugs. Wondering if I also have bad plug wires further messing with how this thing runs.
one good thing is I had heat after getting the cooling system worked out. Down side is the temp gauge still never goes above 1/4 warm so I'm thinking this is non related to the other cooling issues and I've read a lot of posts about problems with the temp sensor. I got hard copies of the FSM books and in them it explains how to troubleshoot that sensor so I'll get in to that after I dial in the manifold and newly discovered issues. Unfortunately while crawling around under the truck I found a pretty good seep from the oil pan seal above the drain plug so that's more fun I'll get to dive into after the other stuff. Also discovered the upper ball joint on the passenger side is leaking so ball joints are on the list now too ... .
Heh! the little issues are starting to add up but I'll get it road worthy for sure it's just gonna take a little more time that I thought.
Remove and clean the temp gauge sender while you have the intake off and it will be much simpler.
yeah that definitely makes sense to do it that way since it's stuffed back in there behind everything.
The weather has only been cooperating a few hours at a time so I didn't get a lot done today but I did get all the vacuum lines labeled and pulled and I dumped the oil. The oil had no water in it so that's more hope for this engine also there werent noticable flakes of metal in the oil either .... so far no oil in coolant or coolant in oil so if it is the head gasket it's just a one way leak.
I made good progress today and was able to pull the manifold without too much issue. I decided to just pull the upper then the lower intakes so I could get easy access to the problem Allen bolt near the thermostat housing and I ended up having no problem getting that bolt out using a 6mm 3/8 drive socket.
The problem I did have was when removing the heater/coolant pipe from the manifold (the metal pipe that wraps around the back of the engie) I unfortunately spun one of the heads off one of the bolts leaving a flush section of the bolt still inside the manifold. So now I get to tap it out... the joys of working on 30 year old vehicles! It was coming out fine then hit a small amount of resistance and suddenly it broke off... cost of doing business I guess.
additionally I noticed quite a bit of oil in intake port 1 and a little bit in cylinder 2 intake port but not really much to speak of in cyl 3 or 4 so it seems like I may be having some blow by issues on those cylinders or perhaps valve stem seals are to blame? Could it be a clogged PCV valve too? Would that only foul 2 intake ports but not the others ports? My understanding is that it would foul up the entire intake and not be selective, is that correct? I was just thinking it could be pcv because of how many oil leaks there are and I've read that multiple oil leaks are often a sign of bad pcv system
Also once the intake was off it was pretty obvious that the timing chain cover has a leak on the edge closest to the throttle body and probably on the opposite edge as well. Crappy crappy seals used by whoever rebuilt this thing before me. I want to get this thing back together just to see if this was the intake leaking coolant into the head but part of me just wants to keep going and pull the head since the damn timing cover seal requires pulling the head and replacing the head gasket in the process anyway. Also if I were to just pull the motor and rebuild it, it would make re-sealing the oil pan a heck of a lot easier. Obviously I've got some thinking to do on what my next step is going to be. Any thoughts on this guys?
Here are a few pics ... I didn't notice any obvious areas where I couldn't see coolant discoloration on the gasket but the previous rebuilder did use RTV and the lower manifold gasket in combination and the FSM doesn't say to do that. it was pretty messy around the passages too a lot squeezed in and was actually obstructing flow a bit at the front coolant port.
manifold to head side: Cylinder 1 intake port leaking oil after removal.
Last edited by outdoorjunky; Mar 25, 2018 at 09:53 PM.
I made good progress today and was able to pull the manifold without too much issue. I decided to just pull the upper then the lower intakes so I could get easy access to the problem Allen bolt near the thermostat housing and I ended up having no problem getting that bolt out using a 6mm 3/8 drive socket.
The problem I did have was when removing the heater/coolant pipe from the manifold (the metal pipe that wraps around the back of the engie) I unfortunately spun one of the heads off one of the bolts leaving a flush section of the bolt still inside the manifold. So now I get to tap it out... the joys of working on 30 year old vehicles! It was coming out fine then hit a small amount of resistance and suddenly it broke off... cost of doing business I guess.
additionally I noticed quite a bit of oil in intake port 1 and a little bit in cylinder 2 intake port but not really much to speak of in cyl 3 or 4 so it seems like I may be having some blow by issues on those cylinders or perhaps valve stem seals are to blame? Could it be a clogged PCV valve too? Would that only foul 2 intake ports but not the others ports? My understanding is that it would foul up the entire intake and not be selective, is that correct? I was just thinking it could be pcv because of how many oil leaks there are and I've read that multiple oil leaks are often a sign of bad pcv system
Also once the intake was off it was pretty obvious that the timing chain cover has a leak on the edge closest to the throttle body and probably on the opposite edge as well. Crappy crappy seals used by whoever rebuilt this thing before me. I want to get this thing back together just to see if this was the intake leaking coolant into the head but part of me just wants to keep going and pull the head since the damn timing cover seal requires pulling the head and replacing the head gasket in the process anyway. Also if I were to just pull the motor and rebuild it, it would make re-sealing the oil pan a heck of a lot easier. Obviously I've got some thinking to do on what my next step is going to be. Any thoughts on this guys?
Here are a few pics ... I didn't notice any obvious areas where I couldn't see coolant discoloration on the gasket but the previous rebuilder did use RTV and the lower manifold gasket in combination and the FSM doesn't say to do that. it was pretty messy around the passages too a lot squeezed in and was actually obstructing flow a bit at the front coolant port.
manifold to head side:
....Cylinder 1 intake port leaking oil after removal.
Heater hard line hanger bolt. Pretty sure this is the one that is also used for the egr coolant passage plate on the back side of the head. No way to get at that without pulling the engine or head off.
Oil in runner one and two. Probably a valve seal. This doesn't mean you don't have PCV system issues also. A plugged PCV valve will typically show oil all along the front side line to the air box, so air box, accordion, throttle body will all show heavy oiling.
If you have the equipment, hoist ect, pulling the engine is a very quick task. You will incure a bit of extra expense for exhaust nuts and such. It is alot simpler than dropping the front diff in my opinion.
I don't see heavy oiling in the trottle body, I saw some evidence of oil but it's like a thin residue with cake on dirt over it. Previous owner wheeled it on sandy trails in the imperial desert and there is a lot of really fine silt down there.
Regarding the coolant pipe requiring pulling the engine I am not following you. I broke the bolt on the manifold its self and was able to disconnect that pipe without a problem it's just now I'm going to need to remove that from the manifold and get a new bolt before re-install. If I'm missing what you are saying I apologize.
about a hoist I don't have one but it's been on my list of tools to get so I'd invest in that to do the job.
Ok so after yesterday's discovery of oil in the intake I slept on it and woke up having made the decision to tear the engine down more. I didn't really see any obvious area where the intake manifold gasket was failing but once I popped the head off I noticed the front bolt in the timing chain cover that holds the front of the head down was obviously not torqued to spec it only took me very little effort to loosen that bolt so that might have been the reason for the timing cover leaking... beyond that I believe I've found the issue with coolant loss and coolant in the exhaust. The metal ring on the head gasket for cylinder 4 has not one but two hairline cracks in it ... one near the back of the head and the other between cylinder 3 and 4. I'm guessing this was the cause of the leak although they don't appear to be totally blown through but one is definitely close enough to the edge that some coolant might have been getting past. Can't really see in the pictures because it was hard to see them with the eye but the other cylinders didn't have any cracks. My finger indicates the two areas where a crack is present.
Final verdict is a cracked head between the water passage between cylinder 3 and 4 and cylinder 4 ... crack goes straight across that small 1/4 of aluminum separating The passage from cylinder 4.
Crack from coolant passage to cylinder 4 combustion chamber.
Final verdict is a cracked head between the water passage between cylinder 3 and 4 and cylinder 4 ... crack goes straight across that small 1/4 of aluminum separating The passage from cylinder 4.
Well I'm out of parts cash so the plan is the save money and buy a new assembled head with a 268 cam. The cam shaft on this head has some pitting so I'm replacing it as well. On a positive note the block looks good and the bores are smooth so it looks like I'll just be doing the top end but who knows what I'll find when I get the oil pan off. Fingers crossed that the bearings are good.
Tested all cylinders for rod knock today and turns out my number 2 cylinder has about an 1/16th to and 1/8th inch of play on the down stroke ... I could push that cylinder down some just beyond TDC the others didn't budge at all so I'm pretty sure I discovered the loud knock the engine was making. Not sure where to go from here. I could get a used low miles engine or I could rebuild this one completely. The bores are all clean and smooth so I'm probably going to put the head Back on and pull the engine and rebuild it. In retrospect It's probably what I should have in the first place but I learned a heck of a lot so far from this process so I'm not complaining.
Tested all cylinders for rod knock today and turns out my number 2 cylinder has about an 1/16th to and 1/8th inch of play on the down stroke ... I could push that cylinder down some just beyond TDC the others didn't budge at all so I'm pretty sure I discovered the loud knock the engine was making. Not sure where to go from here. I could get a used low miles engine or I could rebuild this one completely. The bores are all clean and smooth so I'm probably going to put the head Back on and pull the engine and rebuild it. In retrospect It's probably what I should have in the first place but I learned a heck of a lot so far from this process so I'm not complaining.
Let us know what you find. Is it rod to main or wrist pin that is loose, maybe even both..?
You will need a proper bore gauge to inspect the cylinders for taper, most of us don't want to or can not invest in such an expensive tool, IE just because the cylinders look OK doesn't mean they are it is time to call in a professional. Of course some of us see oh I get to buy a new tool..
A stethoscope is a very inexpensive tool and would have gave a good indication of where the tap/knock occurred.
Glad you are making progress, keep it up and keep us updated. What you do in the end, rebuild or used, depends on your budget and intentions.

 Feb 28, 2018 | 07:53 PM


 .
.