
2000 civic buckets in place of 40/60 bench
 Dec 24, 2009 | 07:30 PM
#1
Thread Starter
Registered User
Joined: Apr 2004
Posts: 228
Likes: 0
From: Bloomington, In
2000 civic buckets in place of '87 40/60 bench
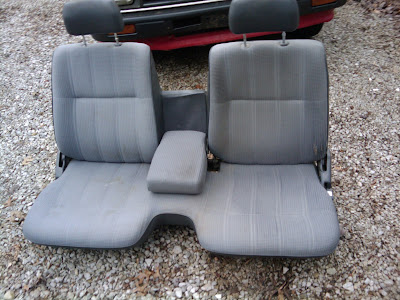
i found some seats from a 2000 civic coupe seats on CL to install into my standard cab 87 2WD toyota.
i settled on these seats because they seemed, from past experience with some 95 civic seats, like a good fit (i.e. somethng that would go in without too much hassle) and it turns out that they were. in fact, they are almost identical to the bench in terms of sitting position (maybe a little bit higher in the seat).
here's the story: of the four bolts required per seat, only one really lines up and another almost does. the other two require drilling. that's the bad news. the good is that they are very easy to put in and require few tools to do so.
this is what came out:
i started by bolting down the bolt closest to the door (which lines up perfect) and then working with the back one (also closest to the door):
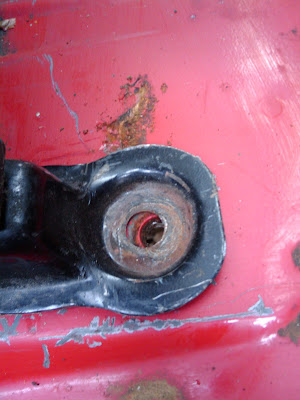
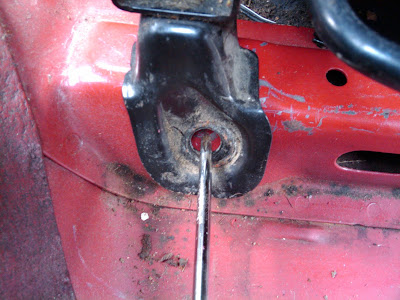
as you can see, it almost fits but not quite. a little grinding and it goes right in there, lining up the seat perfectly.
the next thing to do was to loosen the tunnel side rear leg. it's hard to see here but this leg is held in place to the seat rail by two welds (one on either side) and a rivet. the trick is to grind the welds away leaving the rivet in place as can be seen here:

grind away the welds on either side as seen here:
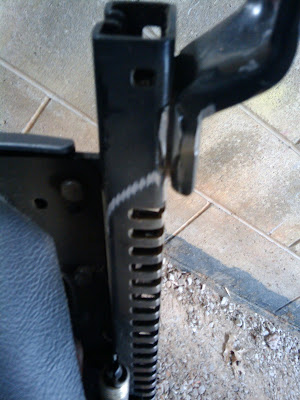
and here:
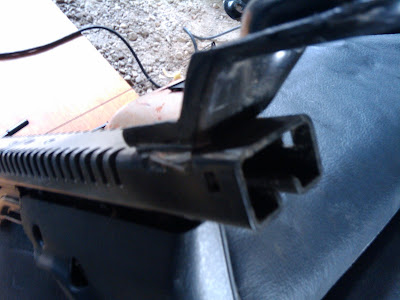
with those out of the way, the rear tunnel side leg pivots, as can be seen here:

with that done the seats can be put back into the cab, leaving the two tunnel side bolts to take care of.
the next step was to drill out the front tunnel side, which does not fit and requires a bolt. after i marked it, i used an oversized washer and nut/bolt from a junkyard donor. i measured, and drilled it all in place. putting the washer/nut in place was a pain but not too bad:
the last step was to pivot the rear tunnel side leg into position and to drill and bold it down using the same procedure (oversized washer bolted down with junkyard donor parts). when i get my hands on a MIG welder i'll weld it into place but for now it will do as is.
one nice thing about this set up is that you can either keep the OEM seat belt set up (because you are drilling your own rear tunnel side hole) or you can use the seat belt 'catch' that came with the civic seats. my seats didn't have the catches so i kept the OEM set up. i might change it if i find donors at the junkyard. this is how they look now:
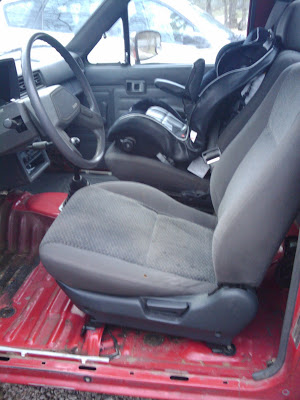
so there is is, very easy, got it done in no time with minimal tools and it didn't cost much. this is what the civic seats look like in place.
hope this helps folx interested in bucket replacements
i settled on these seats because they seemed, from past experience with some 95 civic seats, like a good fit (i.e. somethng that would go in without too much hassle) and it turns out that they were. in fact, they are almost identical to the bench in terms of sitting position (maybe a little bit higher in the seat).
here's the story: of the four bolts required per seat, only one really lines up and another almost does. the other two require drilling. that's the bad news. the good is that they are very easy to put in and require few tools to do so.
this is what came out:
i started by bolting down the bolt closest to the door (which lines up perfect) and then working with the back one (also closest to the door):
as you can see, it almost fits but not quite. a little grinding and it goes right in there, lining up the seat perfectly.
the next thing to do was to loosen the tunnel side rear leg. it's hard to see here but this leg is held in place to the seat rail by two welds (one on either side) and a rivet. the trick is to grind the welds away leaving the rivet in place as can be seen here:
grind away the welds on either side as seen here:
and here:
with those out of the way, the rear tunnel side leg pivots, as can be seen here:
with that done the seats can be put back into the cab, leaving the two tunnel side bolts to take care of.
the next step was to drill out the front tunnel side, which does not fit and requires a bolt. after i marked it, i used an oversized washer and nut/bolt from a junkyard donor. i measured, and drilled it all in place. putting the washer/nut in place was a pain but not too bad:
the last step was to pivot the rear tunnel side leg into position and to drill and bold it down using the same procedure (oversized washer bolted down with junkyard donor parts). when i get my hands on a MIG welder i'll weld it into place but for now it will do as is.
one nice thing about this set up is that you can either keep the OEM seat belt set up (because you are drilling your own rear tunnel side hole) or you can use the seat belt 'catch' that came with the civic seats. my seats didn't have the catches so i kept the OEM set up. i might change it if i find donors at the junkyard. this is how they look now:
so there is is, very easy, got it done in no time with minimal tools and it didn't cost much. this is what the civic seats look like in place.
hope this helps folx interested in bucket replacements
Last edited by alfio; Dec 26, 2009 at 06:15 AM.

 Jan 30, 2011 | 07:23 AM
#4
Thread Starter
Registered User
Joined: Apr 2004
Posts: 228
Likes: 0
From: Bloomington, In
Jan 30, 2011 | 07:48 AM
#5
Thread Starter
Registered User
Joined: Apr 2004
Posts: 228
Likes: 0
From: Bloomington, In

Thread
Thread Starter
Forum
Replies
Last Post
Badfish740
86-95 Trucks & 4Runners
4
Sep 4, 2015 04:21 AM
FS[PacNorWest]: 1993 4 Runner, V6, 4wd, Auto,
AkitaDog
Vehicles - Trailers (Complete)
0
Sep 3, 2015 09:01 PM


