
How to Rebuild Your Carburetor - Write Up
 Oct 23, 2011 | 04:53 PM
#21
Registered User

Joined: May 2008
Posts: 3,277
Likes: 23
From: way way nor cal
Can you soak the whole carb in there prior to disassembly or piece by piece?
Oct 23, 2011 | 05:07 PM
#22
I suggest piece by piece. That way it has a chance to get into the vacuum passages and such. The basket has a pretty fine screen so nothing should fall out. I do all the itty bitty things by hand anyway... But all the jets, bowls, venturis, body, anything metal can be dipped overnight or a couple days.
I just disassemble everything and put it in the basket and let it soak.
I just disassemble everything and put it in the basket and let it soak.
Nov 2, 2011 | 07:46 AM
#23
Registered User
Joined: May 2008
Posts: 3,277
Likes: 23
From: way way nor cal
Mar 8, 2012 | 07:34 PM
#24

Registered User
Joined: Mar 2012
Posts: 1
Likes: 0
From: San Francisco, CA
Great Resource
Glad I found this thread. Helped me with my carb rebuild. I made the mistake of sending it initially to a rebuilder called Carb Junkys in Atlanta, GA. Big mistake. Ended up having to rebuild it again.
http://www.complaintsboard.com/compl...a-c592106.html
http://www.complaintsboard.com/compl...a-c592106.html
Oct 15, 2013 | 04:29 PM
#25
Registered User
Joined: Sep 2012
Posts: 12
Likes: 0
From: layton utah
accelerator pump
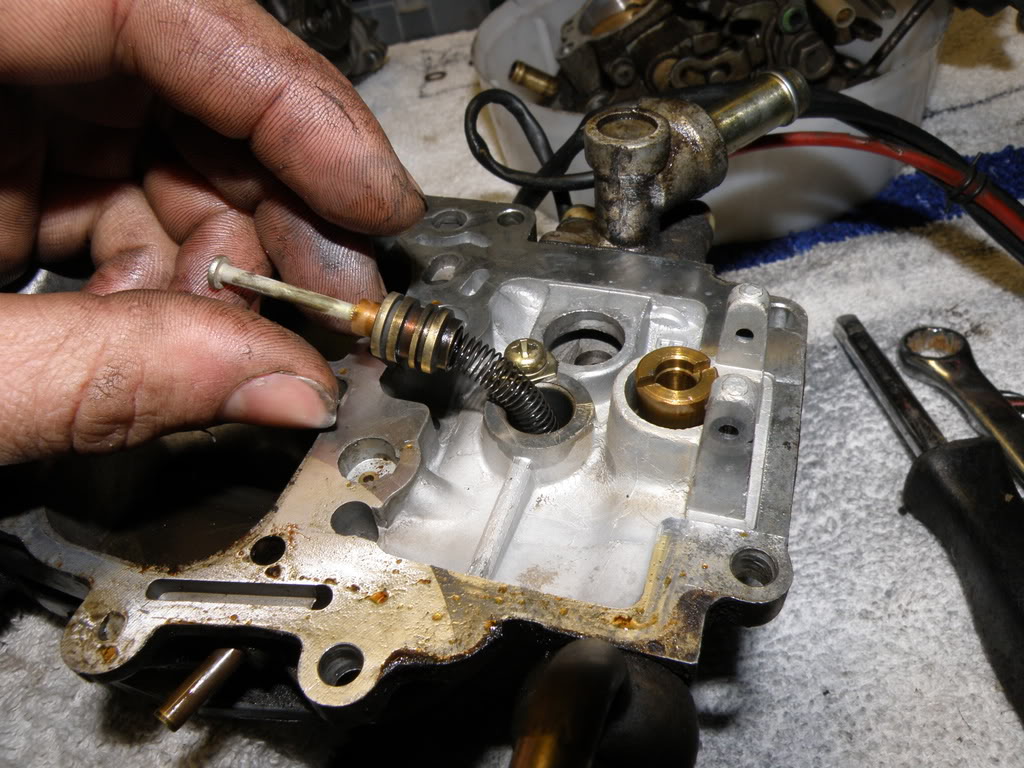
so to start this question sorry if it was stated and i just missed it but in the picture below you are holding a part and it looks similar to the accelerator pump i just bought to replace am i correct in it being the accelerator pump or do you have some insight to shed for me on where thats at? i would download the fsm you posted a link to but im at work and can not access the site currently.
.
|
.
|
Oct 26, 2013 | 08:37 PM
#26

Registered User
Joined: Jul 2012
Posts: 452
Likes: 3
From: Sacramento, CA
The main Accelerator Pump (there's the main pump and then the secondary pump) is on the outside of the carburetor.
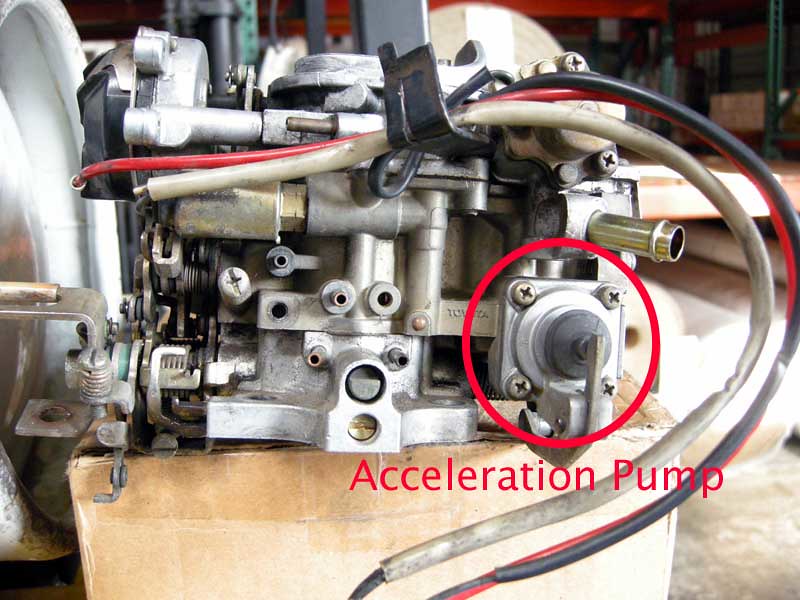
The Auxiliary Accelerator Pump is on the opposite side of the carburetor.
 Apr 1, 2014 | 09:15 AM
#27

Registered User
Joined: Jul 2013
Posts: 18
Likes: 0
Lower Butterflies on 85 carb Sticking
Is there a way to get the lower butterflies off of the carb. I have that lower section soaking for 48 hours and the lower large butterfly is real hard to move. Everything else looks clean and ready to go but this thing is really gummed up.
Any help would be great. Thanks

Any help would be great. Thanks
Dec 23, 2014 | 04:45 PM
#28

Registered User
Joined: Dec 2014
Posts: 5
Likes: 0
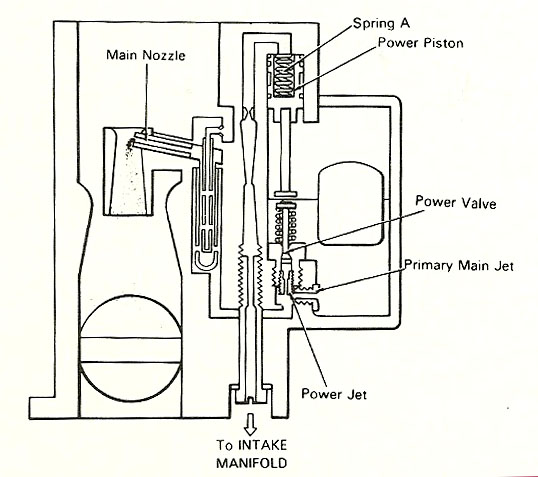
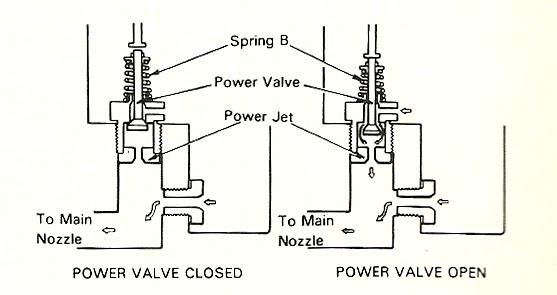
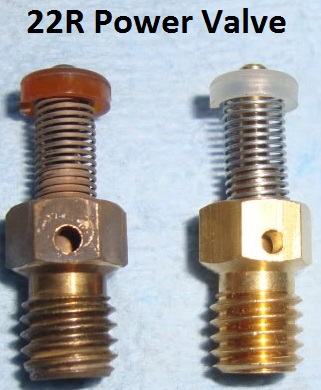
Replace POWER VALVE
With engine off, if your float reservoir is leaking fuel into intake manifold, replace POWER VALVE. PV leaks into the manifold causing a very rich condition at idle and low speed. Replace Power Valve.
Last edited by 30years22R; Dec 23, 2014 at 04:51 PM.
Jan 31, 2015 | 09:55 AM
#30
Registered User
Joined: Jul 2012
Posts: 452
Likes: 3
From: Sacramento, CA
This is a very common occurrence after a the carburetor has been rebuilt.
When I did mine, I replaced the Power Valve, yet is still leaked. I then cut off the metal plunger only portion that actuates the Power Valve, this pushes the valve open. It still leaked.
I never was able to solve the carburetor leak.
When I did mine, I replaced the Power Valve, yet is still leaked. I then cut off the metal plunger only portion that actuates the Power Valve, this pushes the valve open. It still leaked.
I never was able to solve the carburetor leak.

Thread
Thread Starter
Forum
Replies
Last Post
nvwiggins
86-95 Trucks & 4Runners (Build-Up Section)
13
Jun 16, 2016 03:05 PM
13l, 1987, 22r, 85, 87, caburetor, carb, carburetor, how to, instruction, instructions, rebuild, samurai, suzuki, toyota


