Help! Changed timing chain - did I crunch my valves?
 01-20-2013, 04:04 PM
#1
Registered User
Thread Starter
Join Date: May 2010
Location: Durango, Colorado
Posts: 159
Likes: 0
Received 0 Likes
on
0 Posts
Help! Changed timing chain - did I crunch my valves?
As most of my projects go, it started off with changing one small part (the front main seal) and evolved into much more. Now, I'm hoping that I didn't screw up my valves by having the the cam and crank out of synch.
Some history:
My front main seal leaked, and has for a long time. So I decided to change it. While I was in there, I thought I may as well change the timing cover gaskets as that could be leaking as well. It certainly looked like it was leaking. With the timing cover removed, I noticed that one of the plastic guides was broken, both were worn, and the tensioner was way to springy.
The timing chain hadn't been changed in 70,000 miles or so (if ever) so I thought I might as well change that, too. So I ordered a timing chain kit to cover the guides, tensioner, gaskets, seals, etc.
I put everything together patiently, and thought that I had everything lined up and ready to go.
Now, the problem:
I tried to crank it, and it wouldn't turn over. Like the crank was seized up. I charged the battery up and tripled checked the connections, while loosening the alternator belt just a bit, thinking it could be too tight and impairing the turning of the engine.
This time, it fired right up! It did have a very high pitched whine, almost like a loose belt (which would make sense). The engine ran for about a minute, idled down, ran for another fifteen seconds (with the whine lessening) then...... CLUNK!...and it died. A mechanical sounding "clunk" if that makes any sense.
I tried cranking it a couple of times, but it wouldn't start and the battery ran down. So I put the charger back on.
Then I got to thinking.... are my cam and crank out of synch??? Was that clunking noise my valve that just crunched. Did it have anything to do with the whining noise?
According to this write up's pictures, under number 30 http://www.4crawler.com/4x4/CheapTri...ingChain.shtml
maybe my crank WASN'T lined up!!
I had the shiny links in the right place, the dimples on the camshaft sprocket were right before being straight up, very close to 12:00. The tension in the chain felt right. But the crank WAS NOT at 0 degrees. When I put the crankshaft pulley on, the white line was at 5 degrees, and the "key" where the pulley slid on was at 11:00ish, not 12:00, when I slid it on.
Now I'm thinking that I royally screwed something up, and I'm afraid to crank it again.
My question to all of you, Did I cnunch a valve? How could I tell without removing the head? Do I have to take it all apart again and get the crank to 0 while the camshaft sprocket dimples are at high noon?
Of course, I'd prefer to not have to take everything off again, but I don't want to damage the engine any further if it is screwed up.
I'm hoping that I'm just being paranoid and tomorrow, I'll go crank it, and it will fire right up just fine.
Your help is appreciated, as always.
Last edited by Rusto; 01-20-2013 at 04:12 PM.
 01-21-2013, 04:51 AM
#2
Registered User
Thread Starter
Join Date: May 2010
Location: Durango, Colorado
Posts: 159
Likes: 0
Received 0 Likes
on
0 Posts
Okay, I've walked back from the edge a little bit. I'll try to get some pics up of my next move. Maybe that will elicit a comment from all those that viewed  .
.
I don't think it's necessarily out of synch, but to be sure I'm going to hand turn the crank to 0 degrees, then take off the valve cover to see if the cam sprocket dimple is at 12:00. If so, I'll put it back to together and get it started again. If not, I guess I'll pull the sprocket (while everything is still together)and move the cam, w/o moving the crank, until it is at 12:00 then put everything back on. Then I'll hope that no serious damage was done and I'll crank it back up.
Does this seem like a sound strategy?
I'll try and post pictures of my investigation.
.I don't think it's necessarily out of synch, but to be sure I'm going to hand turn the crank to 0 degrees, then take off the valve cover to see if the cam sprocket dimple is at 12:00. If so, I'll put it back to together and get it started again. If not, I guess I'll pull the sprocket (while everything is still together)and move the cam, w/o moving the crank, until it is at 12:00 then put everything back on. Then I'll hope that no serious damage was done and I'll crank it back up.
Does this seem like a sound strategy?
I'll try and post pictures of my investigation.
Last edited by Rusto; 01-21-2013 at 05:00 AM.
01-21-2013, 06:21 AM
#4
Registered User
Thread Starter
Join Date: May 2010
Location: Durango, Colorado
Posts: 159
Likes: 0
Received 0 Likes
on
0 Posts
I haven't done that. I have no reason to think that it wouldn't be, as it running great before I took it apart.
How would I check that? Just look at the valves and make sure they aren't open when the crank says TDC? Or maybe shine a light in the #1 spark plug hole, or measure from the spark hole to make sure it's at the peak of it's rotation?
How would I check that? Just look at the valves and make sure they aren't open when the crank says TDC? Or maybe shine a light in the #1 spark plug hole, or measure from the spark hole to make sure it's at the peak of it's rotation?
01-21-2013, 08:58 AM
#5
Registered User

Join Date: Nov 2012
Posts: 94
Likes: 0
Received 0 Likes
on
0 Posts
if it started up and ran, It should be close enough to not do any damage. unless there was a problem with the new kit you put in
line up the crank, pull dist cap. it should be pointing at the #1 plug wire on the cap.
then pull valve cover . re-position cam if needed.
with valve cover off i would look closely at all the valve and rockers. look for anything out of the ordinary that may point to a bent valve.
then use a ratchet on the crank pulley and rotate the engine 720deg. make sure all the valves open and closer properly.
might as well check/ adjust the valves to
double check crank and cam timming is still correct.
re-install valve cover and try and start
Last edited by toyquad; 01-21-2013 at 09:03 AM.
01-21-2013, 10:04 AM
#6
Registered User
Thread Starter
Join Date: May 2010
Location: Durango, Colorado
Posts: 159
Likes: 0
Received 0 Likes
on
0 Posts
"if it started up and ran, It should be close enough to not do any damage." unless there was a problem with the new kit you put in
"line up the crank, pull dist cap. it should be pointing at the #1 plug wire on the cap.
then pull valve cover . re-position cam if needed."
Music to my ears! That's what I was hoping for. Good call on checking the valve functionality.
I'll get after this tonight and post some pic's and give a progress report after.
01-21-2013, 05:36 PM
#7
Registered User
Thread Starter
Join Date: May 2010
Location: Durango, Colorado
Posts: 159
Likes: 0
Received 0 Likes
on
0 Posts
Well, I have good news and bad news:
The timing was correct.

And I can't get the f'ing pictures to work. I've done it before, but can't do it now. Great. one more thing that's screwed up. (foreshadowing)
The timing was correct.
And I can't get the f'ing pictures to work. I've done it before, but can't do it now. Great. one more thing that's screwed up. (foreshadowing)
Last edited by Rusto; 01-21-2013 at 05:39 PM.
Trending Topics
01-21-2013, 06:19 PM
#8
Registered User
Thread Starter
Join Date: May 2010
Location: Durango, Colorado
Posts: 159
Likes: 0
Received 0 Likes
on
0 Posts
Hey! I was able to get the old version of photobucket to work.
Anyway, the timing was right -

Plus this

let me know I was at 0 degrees and BDC. So I put the camshaft gear back on (without the fuel pump cam wheel) and rotate it once and it comes up at 0again, but like this:

Is that camshaft dimple close enough or does it need to be EXACTLY above the little dowel indicator on the camshaft sprocket? I don't see how it coudl get any closer.
And perhaps you noticed how FUBAR'ed the camshaft gear was!! Here's another picture -

I cannot imagine what happened in there. Perhaps my distributor gear and camshaft gear weren't lined up. That's all I can think of, but how could that happen with the distributor in place where it should be. It went in rather easily. Most of the camshaft gear was in a little mound right below the distributor, but I'm sure the rest made it's way down to the oil pan, which will require a cleanout.
And speaking of the distributor, it was locked up tight and I was unable to get it out without completely destroying it in the process -

Any thoughts as to what happened in there?
Looks like I need a camshaft sprocket and a new distributor for starters.
Anyway, the timing was right -
Plus this
let me know I was at 0 degrees and BDC. So I put the camshaft gear back on (without the fuel pump cam wheel) and rotate it once and it comes up at 0again, but like this:
Is that camshaft dimple close enough or does it need to be EXACTLY above the little dowel indicator on the camshaft sprocket? I don't see how it coudl get any closer.
And perhaps you noticed how FUBAR'ed the camshaft gear was!! Here's another picture -
I cannot imagine what happened in there. Perhaps my distributor gear and camshaft gear weren't lined up. That's all I can think of, but how could that happen with the distributor in place where it should be. It went in rather easily. Most of the camshaft gear was in a little mound right below the distributor, but I'm sure the rest made it's way down to the oil pan, which will require a cleanout.
And speaking of the distributor, it was locked up tight and I was unable to get it out without completely destroying it in the process -
Any thoughts as to what happened in there?
Looks like I need a camshaft sprocket and a new distributor for starters.
Last edited by Rusto; 01-21-2013 at 06:21 PM.
01-23-2013, 09:00 AM
#9
Registered User
Join Date: Nov 2012
Posts: 94
Likes: 0
Received 0 Likes
on
0 Posts
i dont think i have ever had one at exactly 12 o clock.
wouldnt be a bad idea to drop the oil pan and clean it out amd spray lots of brake clean down the timming cover. change the oil now, and again in 300-800miles.
not sure what would cause that to happen other then the dist siezed up.
wouldnt be a bad idea to drop the oil pan and clean it out amd spray lots of brake clean down the timming cover. change the oil now, and again in 300-800miles.
not sure what would cause that to happen other then the dist siezed up.
01-24-2013, 02:56 PM
#10
Registered User
Join Date: Aug 2012
Posts: 37
Likes: 0
Received 0 Likes
on
0 Posts
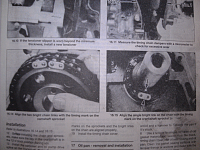
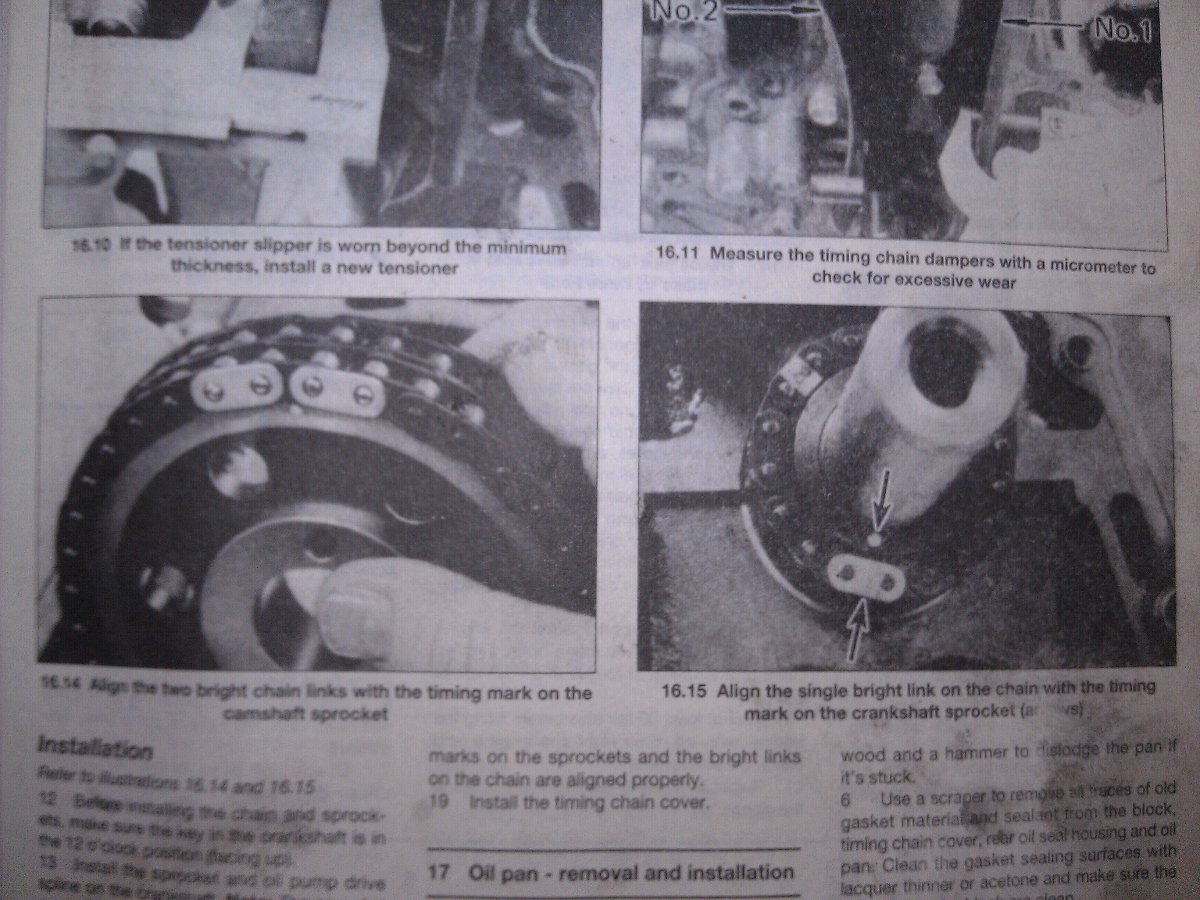
as long as your number 1 piston is on its compression stroke this is what the crank gear (single shiny link) and camshaft gear (double shiny links) with the dimples at 12 o'clock. it looks like in your picture if your crankshaft is on 0 on the compression stroke it looks like your camshaft is 180 out
Sent from my ADR6400L using YotaTech
Sent from my ADR6400L using YotaTech
01-24-2013, 03:01 PM
#11
Registered User
Join Date: Aug 2012
Posts: 37
Likes: 0
Received 0 Likes
on
0 Posts
correction sorry bud but what I meant to say is camshaft gear dimple at 12 o'clock crankshaft gear dimple around 6 ish o'clock lol hope this helps good luck
Sent from my ADR6400L using YotaTech
Sent from my ADR6400L using YotaTech
01-24-2013, 04:26 PM
#12
Registered User
Wow that distributer drive gear is toast. Oh noes.
There is guaranteed to be crap in the pan now.
Id take the front cover off...take it all back apart...drop the pan...clean it all out.
We can help you get her back together.
I have no idea....how the heck that happened. The dizzy must not have been seated all the way. Only conclusion I can come up with.
01-25-2013, 09:51 PM
#15
Registered User
Join Date: Nov 2012
Posts: 94
Likes: 0
Received 0 Likes
on
0 Posts
You most likely dont know what your talking about........
If you read the whole thread, it was setup properly, engine died due to dist breaking. Engine is still in time. How could it bend a valve or two
If you read the whole thread, it was setup properly, engine died due to dist breaking. Engine is still in time. How could it bend a valve or two
01-28-2013, 05:33 AM
#17
Registered User
Thread Starter
Join Date: May 2010
Location: Durango, Colorado
Posts: 159
Likes: 0
Received 0 Likes
on
0 Posts
Thanks for all the feedback and direction.
The crankshaft dimple is at 6 o'clock and the camshaft dimple at 12, so that' right.
There is definitely not-so-little bits of metal floating around. Quite a bit was right in the little bowl underneath the distributor (where the bolt for the timing chain cover resides) and I found a couple inside the fuel pump drive wheel. None made it past there to the rocker assembly and such. Maybe if I had a CSI team I could reassamble the distributor drive gear to see what pieces still remain in the engine. ha.
After looking over the distributor drive gear again, I noticed that the little pin that is supposed to lineup the gear, the fuel pump wheel, and the camshaft sprocket wasn't sticking out the way it should be (towards the engine). Don't know if that would have caused all of this, but it would have definitely kept the fuel pump from working properly and COULD have been a factor of the gear shear. It was probably not in the slot correctly when I torqued it down, thus pressing it out the other side. D'oh!
More and more I think that the distributor wasn't set all the way, causing the failure.
I did rotate the crank by hand a few times and all the valves appear to be moving smoothly, so I'm pretty sure I didn't bend a valve.
I get the distributor in tomorrow, and I already have the drive gear. Once I get everything cleaned out and reassamlbed, I'm going to have to have the distrbutor in and will rotate it a few times with the valve cover off so that I can make sure everything rotating freely.
These are painful lessons that I'm learning, but I am learning them, and that's one of the main reasons I have the truck.
I'll provide another update when I have one. hopefully, this one will be a better one.
02-02-2013, 05:20 PM
#18
Registered User
Thread Starter
Join Date: May 2010
Location: Durango, Colorado
Posts: 159
Likes: 0
Received 0 Likes
on
0 Posts
well, I put it all back together. I didn't take EVERYTHING back apart. With the timing being on, I didn't want to take the whole damn thing apart again.
After making sure the timing chain was lined up and the number 1 cylinder was at TDC, I decided to put everything back together without taking the timing cover off.
I cleaned up the sprocket, and put the distributor drive gear, fuel pump drive "wheel" back in. It went in smoothly and I torqued the bolt camshaft bolt to 58 lbs. I changed the oil and topped off the coolant. I rotated the crank by hand a couple of rotations to confirm that all the valves were functioning correctly. They are.
The new distributor went in easily as well, and seated as it should with the rotor right on the number one cylinder. Before putting the valve cover back on, I turned the crank again with the distributor in place and it all moved freely. Everything else went together fine and I cranked it up.
It cranked up fine (which is great!) but I'm still getting the awful whining noise.
[YOUTUBE]http://www.youtube.com/watch?v=2KlJJS3oNqc[/YOUTUBE]
I kept expecting the oil to make it's rounds in the engine and for the whine to stop, but it didn't after running for a solid minute. The timing chain was pre-lubed. I would think the fuel pump drive wheel would have lubed up when I added the oil, but maybe I need to go back in and make sure that has plenty of oil on it, too. And everything else, while I'm at it.
Any thoughts as to what this is before I give up and take it the mechanic so that he can charge me god knows what to fix it?
Last edited by Rusto; 02-03-2013 at 06:17 AM.
02-03-2013, 01:01 PM
#19
Registered User
Thread Starter
Join Date: May 2010
Location: Durango, Colorado
Posts: 159
Likes: 0
Received 0 Likes
on
0 Posts
I am pretty sure that I figured it out. In fact, I know I did.
The more I listened to the video, and the more I thought about it, I knew there was something metal spinning very fast and touching something else metal.
Then, I retraced every step of the process of removing everything and putting it back on. I remembered that I had damaged the oil pump seal dust cover that sits just behind the crankshaft pulley when I was removing the pulley. It had been bent pretty good, and while I thought I had bent it back to it's original shape, there was a good chance I did not.
Sure enough, when I started looking closely around that area, I noticed some very fine shiny granules. After removing the crankshaft pulley, I discovered that the dust cover was indeed hitting the oil pump very slightly, causing the high pitched whine and the little bit of dust. No damage to speak of to the oil pump, so I'll replace that dust seal and put 'er all back together.
Next video will sound quite a bit better, I'm sure.
Last edited by Rusto; 02-03-2013 at 01:02 PM.
02-05-2013, 04:36 AM
#20
Registered User
Thread Starter
Join Date: May 2010
Location: Durango, Colorado
Posts: 159
Likes: 0
Received 0 Likes
on
0 Posts
Crisis and damage averted. I was able to hammer, bend, sand and tweak the crankshaft pulley dust cover back into it's original shape and then get it all put back together.
It fired right up and is running smoother than ever and is clean, too!
Lessons learned from this way more difficult that it should have been task.
1. Every detail is important. The smallest part, which appears insignificant, isn't necessarily so.
2. Take your time and be patient. If it doesn't go back together easily, without forcing something (like my old distributor) chances are something isn't right.
3. Don't cut corners. I thought getting that dust cover pully "close" to it's original shape was good enough. It wasn't.
4. Don't panic. Be careful, and when something is wrong, review your work step by step and THINK.
It is good to have ol' Blue back up and running. Now that almost all of the mechanical issues are resolved, it's on to more fun stuff, like redoing the interior, checking out a fiberglass bed, POR15'ing the rest of the frame, sand-blasting and powdercoating the wheels, etc...


