
Trekker Trouble
 Dec 4, 2013 | 04:39 AM
#21
[QUOTE=If you are ever crazy bored someday...a few hundred pics of your truck would actually help me alot in my trekker restoration. Hell Id even pay for your time if need be.[/QUOTE]
No charge for advice!...we are all in this together. Heres one picture anyway. I lucked out when I found this one on Craigslist awhile back....everywhere I go people ask me to sell it, even while crusing down the highway yelling to me out their window, and I'm not kidding...
If theres something in particular you want a pic of to help in your restoration just let me know.....Kevin
 Dec 4, 2013 | 01:38 PM
#24
Thread Starter
Registered User
Joined: Oct 2013
Posts: 39
Likes: 0
From: Kealia, HI
Any tricks for getting photos to upload? Having trouble. Anyways picked up fuel pump today, hope to get that in after work. Do I need the spark plug socket to get the plugs out? Replacing those and wires and cap/rotor today too. Thanks for the vids and the help. No joke this is the most extensive auto work I've ever done. Growing up finally at a much older age.
Oh and what about tie rod arms? Midas said I should replace mine too, where to buy, what to get, is it a DIY or should I take it in..
Mahalo
Oh and what about tie rod arms? Midas said I should replace mine too, where to buy, what to get, is it a DIY or should I take it in..
Mahalo
Dec 4, 2013 | 01:44 PM
#25
Tie Rod Ends can be sourced from the dealer. I believe they're very affordable.
The cheater's TRE install is to take a notepad with you, so you can count and record how many turns each TRE takes to unthread from the tie rod. Then when you install the new ones, thread each one on the same number of turns the corresponding old TRE took to remove. Your adjustment should be about ballpark where it was.
The cool thing about all your repairs is that the parts are all very affordable, everything is just a bit time consuming. That's what racks up the prices: shop time.
We'll all be glad to help in any way, good luck!
Last edited by RobotMoose; Dec 4, 2013 at 01:46 PM.
Dec 4, 2013 | 01:50 PM
#26
Registered User
Joined: May 2013
Posts: 400
Likes: 0
From: San Antonio, Tx.
No charge for advice!...we are all in this together. Heres one picture anyway. I lucked out when I found this one on Craigslist awhile back....everywhere I go people ask me to sell it, even while crusing down the highway yelling to me out their window, and I'm not kidding...
If theres something in particular you want a pic of to help in your restoration just let me know.....Kevin

If theres something in particular you want a pic of to help in your restoration just let me know.....Kevin
 Dec 4, 2013 | 03:43 PM
#27
trekkerinhawaii: is it your only car? do you have the place to work on it? If you have not much mecanical knowledge and can afford to learn working on this truck it is a great place to start. The tie rod ends are easy to replace but I suggest getting an alignment done afterwards unless you can put them exactly where they were before. You can also search for ''home made alignment'' that can be done with a couple of 2x4s. Don't hesitate if you have anymore questions.
Dec 4, 2013 | 09:48 PM
#28
Thread Starter
Registered User
Joined: Oct 2013
Posts: 39
Likes: 0
From: Kealia, HI
So tonight I was able to finish changing the fuel filter and the fuel pump. I was not able to finish the spark plugs, etc. One of the screws on the cap used to be a phillips screw, however now its stripped. Suggestions to get this screw out so I can finish replacing spark plugs, cap, and rotor.
I started it up after replacing the pump and filter and same thing happened. It ran for a few seconds, and then died.Tried it numerous times, tried foot on gas pedal, tried pumping gas pedal before starting, it never flooded, just wouldn't stay on.
Could it be the spark plugs? I am taking this next step regardless, but could this be the issue? How do I know how tight to make the plugs when I put them back in?
Yay for another day of having the babysitter take me to work.
Photo help? Anyone? Mine won't upload.
Dec 4, 2013 | 10:27 PM
#29
Plugs should come with guidelines on the box, generally "thread in until tight (do not overtighten) and back X number of turns".
Photos: the easiest way to deal with those is to register with Photobucket, and upload your pictures onto the site, then copy and paste the address for each specific photo and format the address like this:
[img]photoformatexample[/img]
Just replace "photoformatexample" with the URL and you'll be good to go.
Dec 4, 2013 | 11:13 PM
#30
did you check for vacuum leaks? mine did the same thing, hit the gas it would start and run while your pumping the gas, let off and it would die, my pcv valve hose that goes into the intake was cracked on the side you couldn't see. sooooo.
Dec 4, 2013 | 11:40 PM
#31
As far as spark plugs go, do not overtighten them, usually you just have to slightly compress the ring at the base of the thread, and I highly doubt changing them will fix the issue but it is part of a good tune up.
Dec 5, 2013 | 08:58 AM
#32
Thread Starter
Registered User
Joined: Oct 2013
Posts: 39
Likes: 0
From: Kealia, HI
Being the newbie here can you explain how i would check for this in more detail?
Stripped screw suggestions so I can replace the cap?
Dec 5, 2013 | 11:20 AM
#33
One of those cheapie thread-on torches unlit will do the trick.
Dec 5, 2013 | 11:32 AM
#34
Registered User
Joined: May 2008
Posts: 4,591
Likes: 126
From: Montana
First step would be to just take off the air cleaner, if it obstructs your view at all, and visually check to see that no vacuum hoses are hanging loose, unattached to anything. Look around the car and emissions stuff and make sure there are no nozzles without hoses attached to them.
If that checks out, then while the engine is running (ha!), spray around the base of the carb, and all the vacuum hoses. If the idle speeds up when you spray around an area, it's got a leak. If it speeds up when you spray right down the barrel of the carb, that's normal
I don't understand what your second sentence means.
Dec 5, 2013 | 12:19 PM
#36
Thread Starter
Registered User
Joined: Oct 2013
Posts: 39
Likes: 0
From: Kealia, HI
The video is informative thanks. BUT, if my truck will not stay on for more than 2 seconds, it appears to me that I cannot do this test. I am going to replace all the vacuum hoses around the carb tonight, maybe that will fix it.
On my truck the black cap thing (i thought it was called the cap, i may be wrong) where the spark plugs wires go into from the spark plug has 2 screws holding it in place. One of the screws is stripped. How do yall get a stripped screw out?
On my truck the black cap thing (i thought it was called the cap, i may be wrong) where the spark plugs wires go into from the spark plug has 2 screws holding it in place. One of the screws is stripped. How do yall get a stripped screw out?
Dec 5, 2013 | 12:26 PM
#37
Registered User
Joined: May 2008
Posts: 4,591
Likes: 126
From: Montana
Photos would be sooo nice.
I have gone so far as to file two flat spots on opposite sides of the head, and use vice grips on stripped screws.
I know the attitude from personal experience...but you're doing a lot of "throw money at it", rather than trouble shooting. You could save a lot of money by spending the time to actually figure out what's wrong.
A. you'll replace a whole bunch of crap, problem is gone, but you have no idea what the actual problem was. So if it happens again someday...are you going to replace every one of these things again?
B. The problem still won't be fixed and you've spent all this money.
Dec 5, 2013 | 01:00 PM
#38

Registered User
Joined: Apr 2010
Posts: 29
Likes: 0
From: Kapaa, Kauai, Hawaii
83 is right, it might take a little more effort, but you'll thank yourself when you look back at your reciepts, especially in Hawaii. Not sure what island you're on, I sent you a PM, let me know if I can help.
Dec 5, 2013 | 07:26 PM
#39
The video is informative thanks. BUT, if my truck will not stay on for more than 2 seconds, it appears to me that I cannot do this test. I am going to replace all the vacuum hoses around the carb tonight, maybe that will fix it.
On my truck the black cap thing (i thought it was called the cap, i may be wrong) where the spark plugs wires go into from the spark plug has 2 screws holding it in place. One of the screws is stripped. How do yall get a stripped screw out?
On my truck the black cap thing (i thought it was called the cap, i may be wrong) where the spark plugs wires go into from the spark plug has 2 screws holding it in place. One of the screws is stripped. How do yall get a stripped screw out?
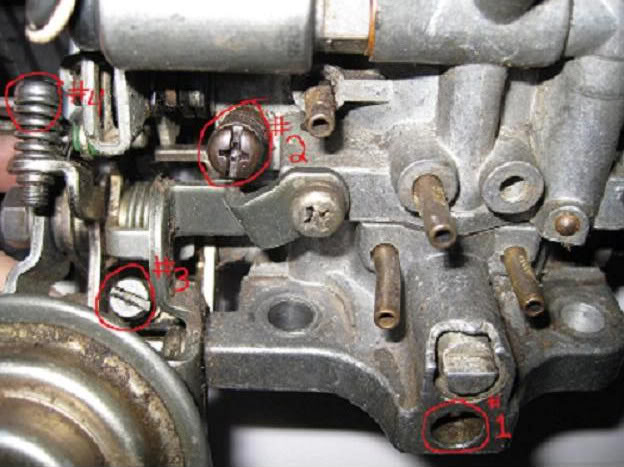
#2 in this picture I've shamelessly pilfered from the internet is the idle speed screw.
I'm glad to see some local help being offered here!
Last edited by RobotMoose; Dec 5, 2013 at 07:27 PM.
Dec 6, 2013 | 04:08 AM
#40
You stated "one of the 2 screws in that black cap thing is stripped"....I assume you mean the distributor cap, if one of the screws is stripped and the cap is only held on by one screw than that could be the problem. The rotor inside spins around it may not be making contact very well with each spark plug contact because the cap is loose....just a thought worth checking.


