
Solid Axle rebuild..w/pictures :)
 Apr 24, 2009 | 08:16 PM
#1
Thread Starter
Registered User

Joined: May 2008
Posts: 3,277
Likes: 23
From: way way nor cal
Solid Axle rebuild..w/pictures :)
A few fellow Yotatecher's asked if I would post up a series of pics after I finished this 84 SA knuckle rebuild with new wheel bearings.
So, I am.
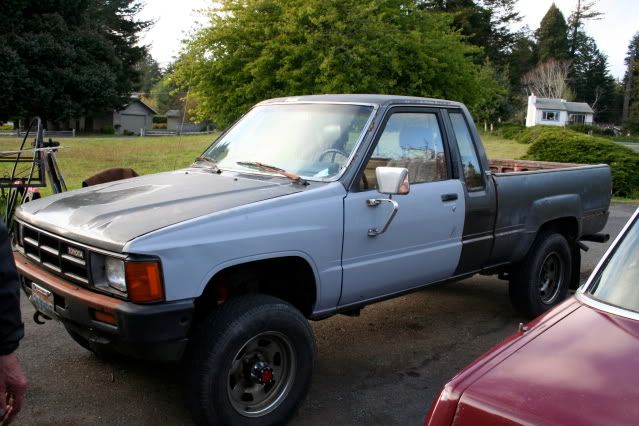
The rig is an 84 ext cab 22r. The owner is the original owner and swears he has never done a thing to the rear or front. He bought it in 1985
After I got the rotor and hub out I noticed the bearings were Chinese and the seals were from Napa. Something strange in this trucks past I presume.
I am sure I missed a few tricks and I am certain I could have done things more efficiently but I did my best and I hope this thread helps someone.
The kit is from Trail Gear it is the knuckle rebuild kit with bearings.
The inner axle seals and cone washers are from Marlin.
The rear brake kit is from Kragen as well as the front reman calipers.
I did not plan on doing a thread on this rebuild and as a result I did not take pictures of the tear down.
The entire job back to front took two days. I had to wait for parts. The overall knuckle rebuild took me around 5 hours. It really is pretty straight forward. The most critical thing is setting the bearing preload, getting the seals and rings in order, and torquing all the nuts to FSM specifications.
As for the lack of pictures here is the tear down. Basically put the truck on jack stands, take off the wheels and tires, brake calipers, hubs, rings, bla bla ... follow the FSM. It is pretty straight forward. Just muster up some confidence and start wrenching things off!
Feel free to berate me to no end...
enjoy!
Here is where I started with the pictures-
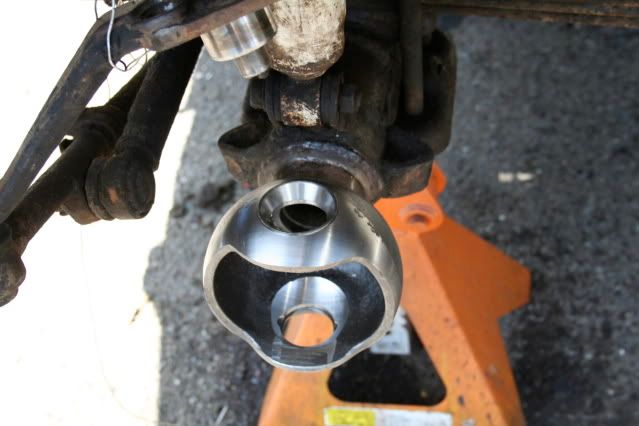
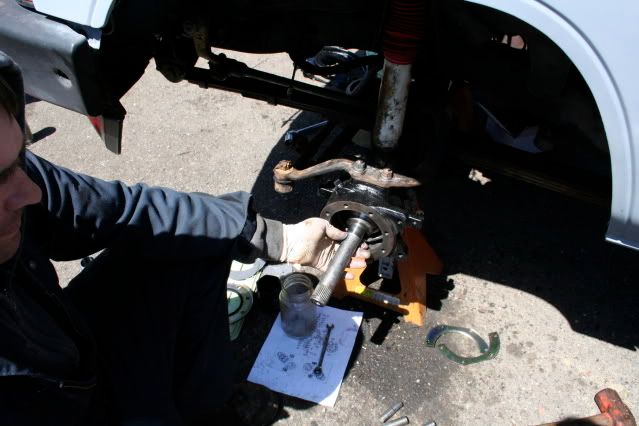
Knuckle ball with everything off and awaiting a new life.
and below are the parts being reassembled after I got all of them off.
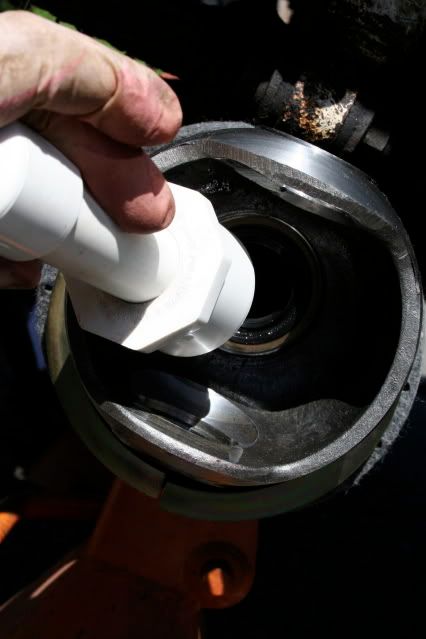
Rotor being greased where my finger is pointing. A good coating is required. Note the old races, bearings and seals out in the right hand side of the picture.

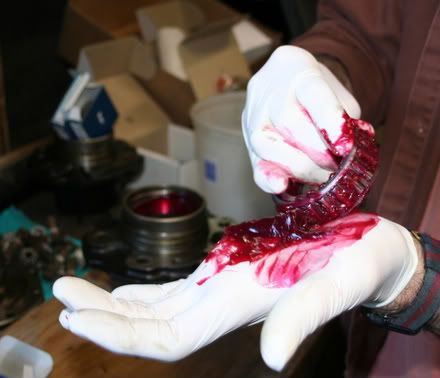
Bearings being saturated with grease...get it in and out and all around.. like SHE said
Rotors out and new races and bearings in as well as a trip to Napa for a turning.
Oil seal in. I used the old race and a BFH to pound the new seal in.
dust covers painted and ready

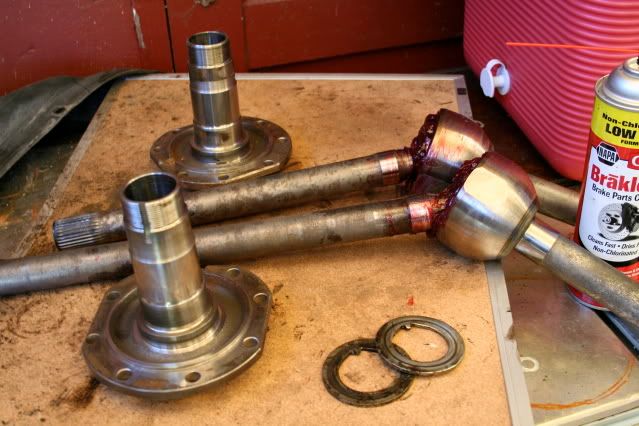
Spindles cleaned, birfs locked and loaded.
knuckles cleaned and painted
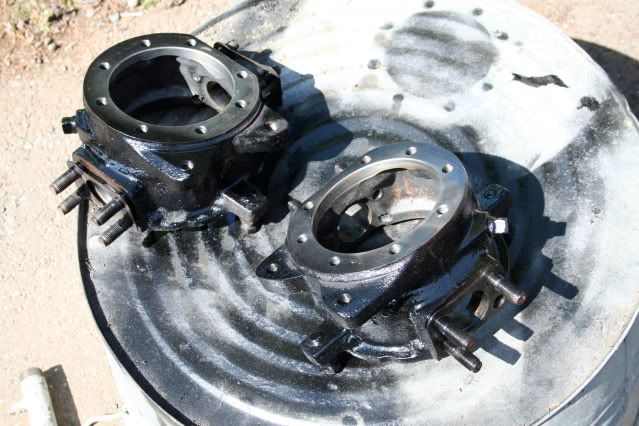
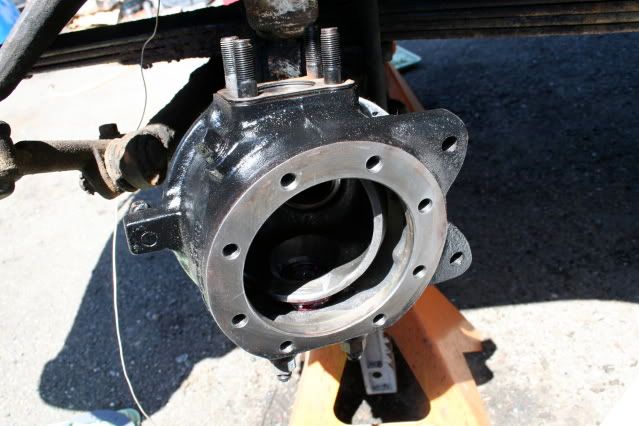
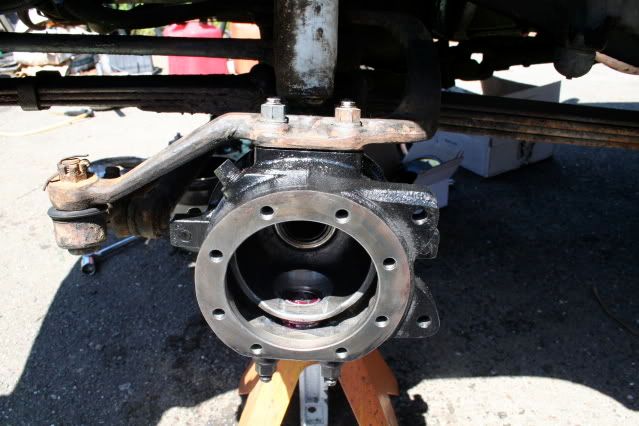
knuckle ball exposed and blowin in the wind.

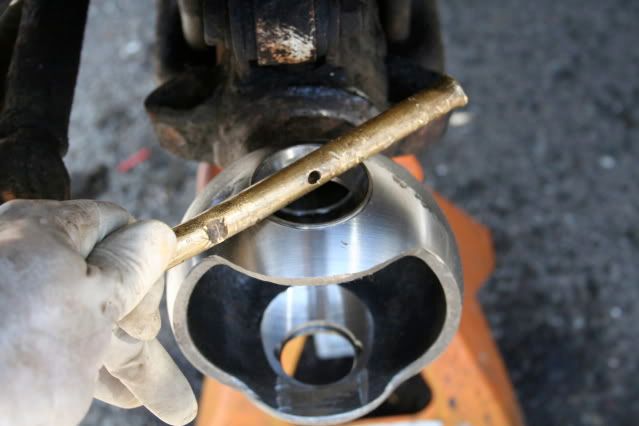
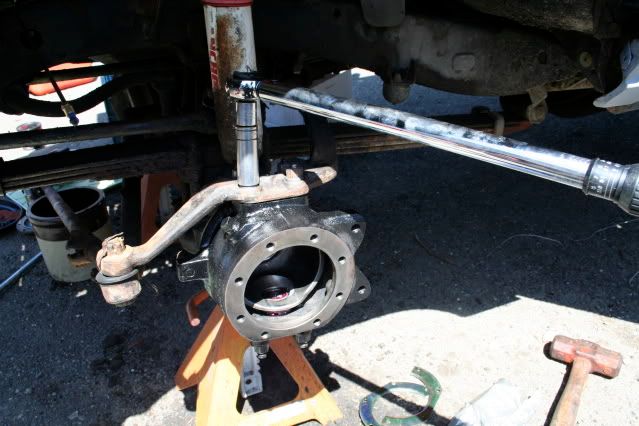
Races pounded in with brass drift
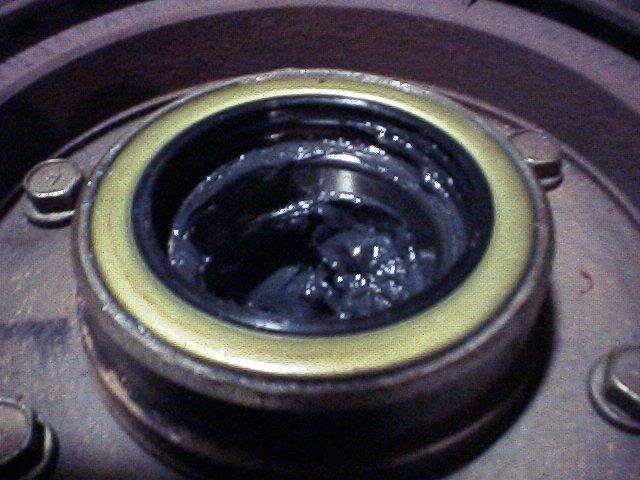
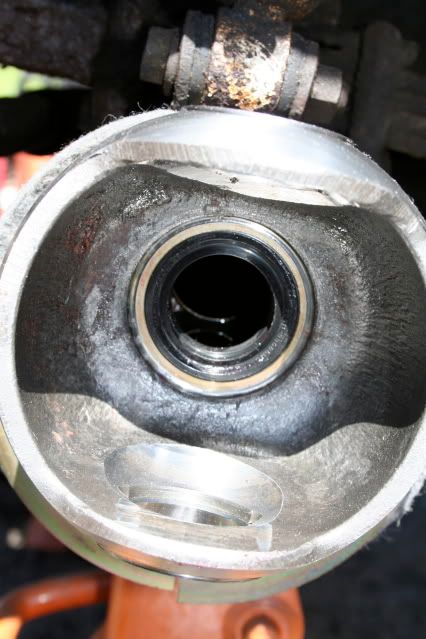
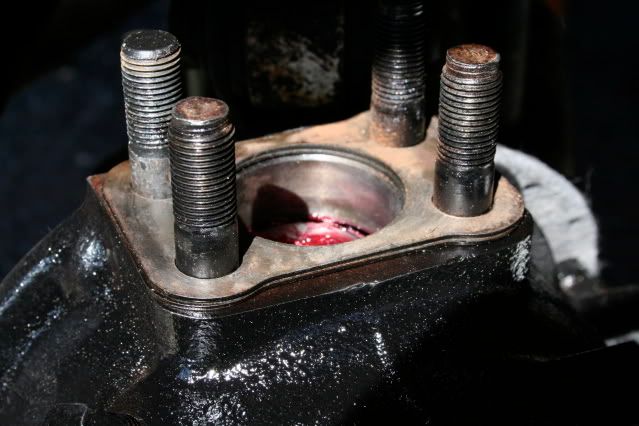
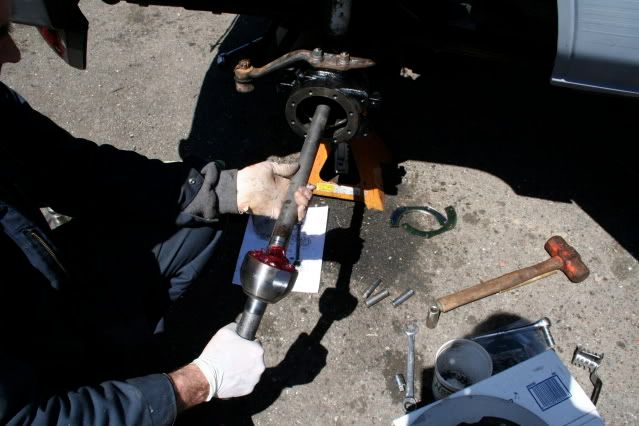
Inner axle with old jenky seal out and new beefy Marlin seal in and just for fun my redneck seal driver to drive it home.
After the new Marlin seals are I felt it was important to put these in at this point. I think it would be pretty hard to do it over the knuckle housing.. SO, I put the rockring, felt, rubber seal and split ring in from back to front IN THAT ORDER

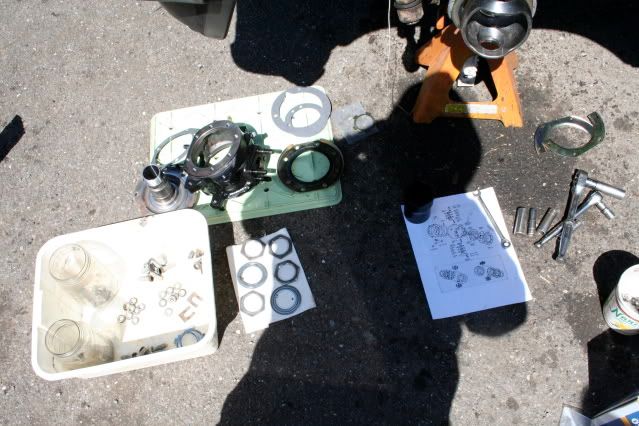
I laid out everything in front of me to make sure things would go smooth
Knuckle housing on with the bearings in BEFORE I put it on.
The bearing is all greased up in the middle of the pic. Note the shims... VERY IMPORTANT. I obsessively wrote down the placement of the shims and I used the old shims to make sure I had the correct preload on the steering.
Knuckle arm on and ready to torque to specs. Make sure to put on the dork bearing on the bottom of the knuckle housing and torque it to specs.
After the knuckle arm is on, cone washers, washers, and nuts all torqued down the greased up birf goes back in.. I had to move the diff flange back and forth to get it to seat in nice and snug.
in and ready to rock...I didn't get a pic but after the birf went in and before the spindle went on I packed the kuckle 3/4 full of grease. I couldn't get a pic of that because my hands were all greasy.
at this point I went behind the knuckle and put all 8 of the 10 mm bolts to tighten up the rockring, felt, rubber seal and split ring seal.

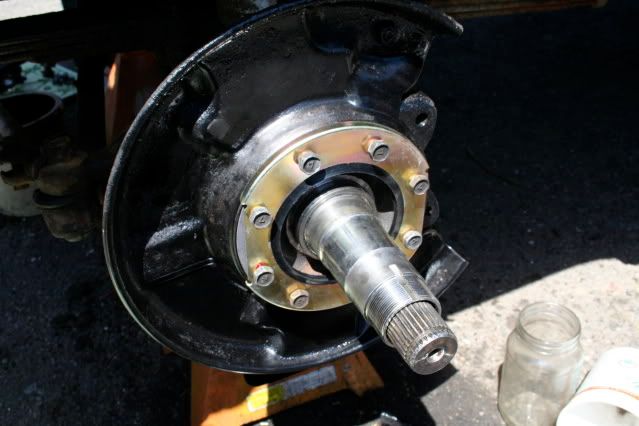
now its time for the knuckle spindle to go in. Put the seal on it first and make sure the little notch on the spindle is pointing up and slip it over the axle. Next the dust shield, seal and gold ring with the 14 mm bolts and washers torqued to spec
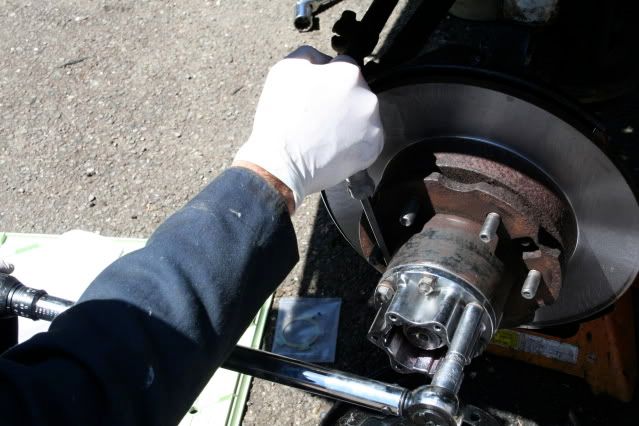
Now put the hub housing and rotor on, push it in and put the thrust washer, adjusting nut, lock washer and lock nut on. Make sure to follow the FSM for the proper preload specs on the bearings by torquing the adjusting nut.
Make sure to bend down the tabs when you have set the proper pre load
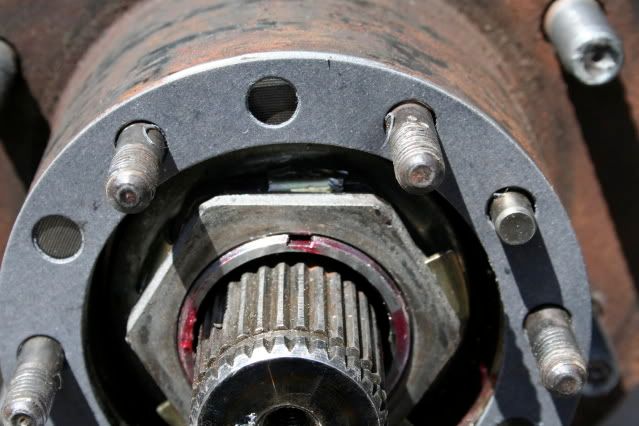
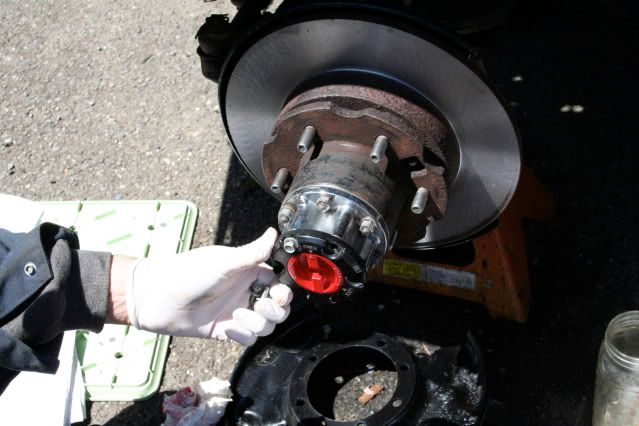
Now its time for the hub body to go on. Gasket on and hub rebuilt with NEW cone washers and ready to go in and torqued to spec. I also put the snap ring back in on the axle with a pair of snap ring pliers. Its hard to see but its in there.
I rebuilt the hubs as well as a fresh paint job and clear coat

Now the free wheeling hub shiny and new!!
New caliper on and the entire side rebuilt and ready to rock

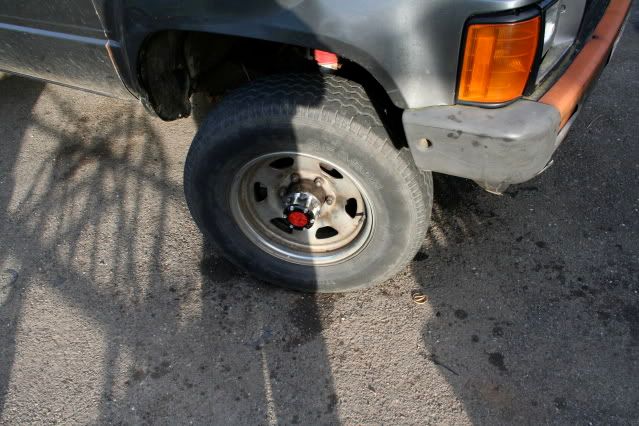
Wheel and tire on looking purdy!
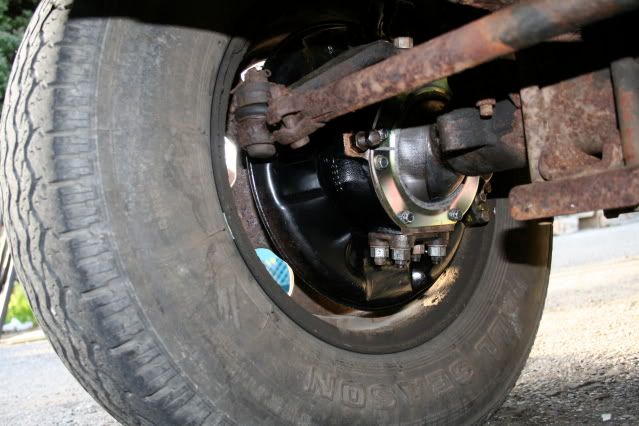
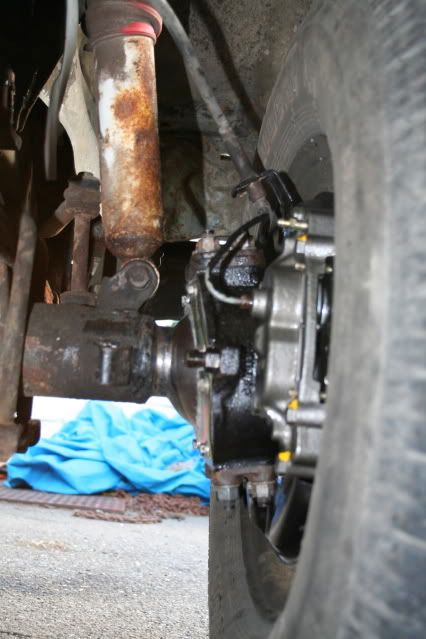
A shot of the underneath after a 30 mile round trip test drive up the coast...
Only a tear drop leaked on to the tire due to the clean beauty of it all

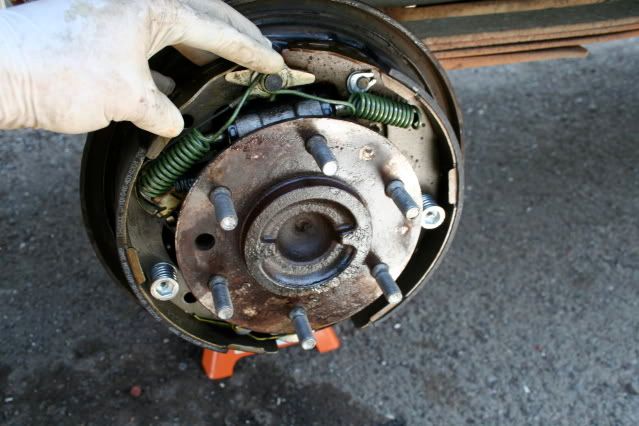
Rear brakes got a new life while I was waiting for big brown.
new caliper
and the truck in all its glory lol
and for trivia sake..
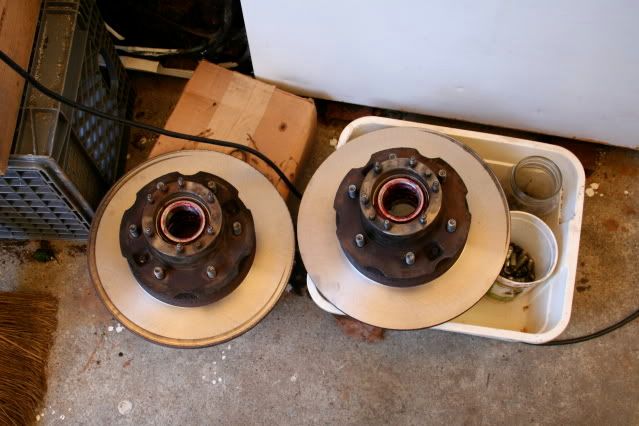
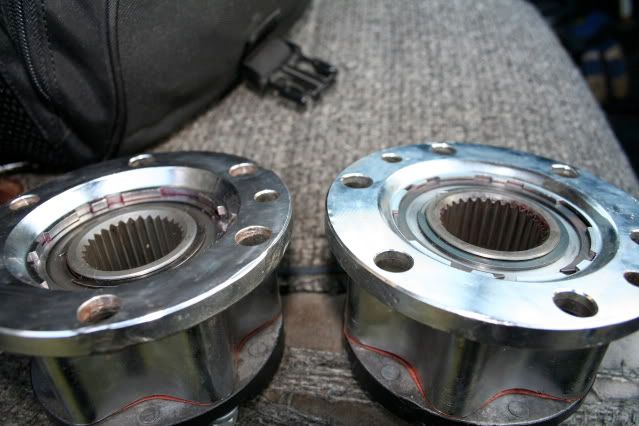
What is the deal here? These are a pair of 83 SA hubs. If you look closely one is slightly bigger on the inside than the other. I tried to put these on this 84 SA but I couldn't get the snap ring on on the outer edge of the axle. Are these the right hubs for an 83 or is there something strange going on here??

Time involved with this was around 7 hrs to do the right and left side.
Trail Gear knuckle kit with bearings, Kragen reman calipers w/right side metal break line, pads, rear Kragen drum kit with wheel cylinders, Marlin seals, Marlin cone washers all around, gear oil, grease, break fluid, break cleaner, lunch, advil, beer............Total cost $354.00
So, I am.
The rig is an 84 ext cab 22r. The owner is the original owner and swears he has never done a thing to the rear or front. He bought it in 1985
After I got the rotor and hub out I noticed the bearings were Chinese and the seals were from Napa.
Something strange in this trucks past I presume.I am sure I missed a few tricks and I am certain I could have done things more efficiently but I did my best and I hope this thread helps someone.
The kit is from Trail Gear it is the knuckle rebuild kit with bearings.
The inner axle seals and cone washers are from Marlin.
The rear brake kit is from Kragen as well as the front reman calipers.
I did not plan on doing a thread on this rebuild and as a result I did not take pictures of the tear down.
The entire job back to front took two days. I had to wait for parts. The overall knuckle rebuild took me around 5 hours. It really is pretty straight forward. The most critical thing is setting the bearing preload, getting the seals and rings in order, and torquing all the nuts to FSM specifications.
As for the lack of pictures here is the tear down. Basically put the truck on jack stands, take off the wheels and tires, brake calipers, hubs, rings, bla bla ... follow the FSM. It is pretty straight forward. Just muster up some confidence and start wrenching things off!
Feel free to berate me to no end...
enjoy!
Here is where I started with the pictures-
Knuckle ball with everything off and awaiting a new life.
and below are the parts being reassembled after I got all of them off.
Rotor being greased where my finger is pointing. A good coating is required. Note the old races, bearings and seals out in the right hand side of the picture.
Bearings being saturated with grease...get it in and out and all around.. like SHE said
Rotors out and new races and bearings in as well as a trip to Napa for a turning.
Oil seal in. I used the old race and a BFH to pound the new seal in.
dust covers painted and ready
Spindles cleaned, birfs locked and loaded.
knuckles cleaned and painted
knuckle ball exposed and blowin in the wind.
Races pounded in with brass drift
Inner axle with old jenky seal out and new beefy Marlin seal in
and just for fun my redneck seal driver to drive it home.After the new Marlin seals are I felt it was important to put these in at this point. I think it would be pretty hard to do it over the knuckle housing.. SO, I put the rockring, felt, rubber seal and split ring in from back to front IN THAT ORDER
I laid out everything in front of me to make sure things would go smooth
Knuckle housing on with the bearings in BEFORE I put it on.
The bearing is all greased up in the middle of the pic. Note the shims... VERY IMPORTANT. I obsessively wrote down the placement of the shims and I used the old shims to make sure I had the correct preload on the steering.
Knuckle arm on and ready to torque to specs. Make sure to put on the dork bearing on the bottom of the knuckle housing and torque it to specs.
After the knuckle arm is on, cone washers, washers, and nuts all torqued down the greased up birf goes back in.. I had to move the diff flange back and forth to get it to seat in nice and snug.
in and ready to rock...I didn't get a pic but after the birf went in and before the spindle went on I packed the kuckle 3/4 full of grease. I couldn't get a pic of that because my hands were all greasy.
at this point I went behind the knuckle and put all 8 of the 10 mm bolts to tighten up the rockring, felt, rubber seal and split ring seal.
now its time for the knuckle spindle to go in. Put the seal on it first and make sure the little notch on the spindle is pointing up and slip it over the axle. Next the dust shield, seal and gold ring with the 14 mm bolts and washers torqued to spec
Now put the hub housing and rotor on, push it in and put the thrust washer, adjusting nut, lock washer and lock nut on. Make sure to follow the FSM for the proper preload specs on the bearings by torquing the adjusting nut.
Make sure to bend down the tabs when you have set the proper pre load
Now its time for the hub body to go on. Gasket on and hub rebuilt with NEW cone washers and ready to go in and torqued to spec. I also put the snap ring back in on the axle with a pair of snap ring pliers. Its hard to see but its in there.
I rebuilt the hubs as well as a fresh paint job and clear coat
Now the free wheeling hub shiny and new!!
New caliper on and the entire side rebuilt and ready to rock
Wheel and tire on looking purdy!
A shot of the underneath after a 30 mile round trip test drive up the coast...
Only a tear drop leaked on to the tire due to the clean beauty of it all
Rear brakes got a new life while I was waiting for big brown.
new caliper
and the truck in all its glory lol
and for trivia sake..
What is the deal here? These are a pair of 83 SA hubs. If you look closely one is slightly bigger on the inside than the other. I tried to put these on this 84 SA but I couldn't get the snap ring on on the outer edge of the axle. Are these the right hubs for an 83 or is there something strange going on here??
Time involved with this was around 7 hrs to do the right and left side.
Trail Gear knuckle kit with bearings, Kragen reman calipers w/right side metal break line, pads, rear Kragen drum kit with wheel cylinders, Marlin seals, Marlin cone washers all around, gear oil, grease, break fluid, break cleaner, lunch, advil, beer............Total cost $354.00
Apr 24, 2009 | 08:32 PM
#3
Thread Starter
Registered User
Joined: May 2008
Posts: 3,277
Likes: 23
From: way way nor cal
If you look at the rest of the truck and you met the owner you would understand why I didn't take it out. BELIEVE me, I did all I could. Take a look at the leafs, stabalizer bar, steering, knuckle arms etc.
Apr 25, 2009 | 05:02 AM
#5
One with the deeper backspacing (distance from flange face to the hub gear face) is an IFS hub body(86-95) with 30 spline hub gear...not an SFA hub(79-85).
Thus it is taller and doesn't allow the room needed to put on the snap ring.
 Apr 25, 2009 | 06:29 AM
#6
Registered User
Joined: Apr 2009
Posts: 101
Likes: 0
From: clinton, louisiana
where do i get the complete rebuild kit for the knuckle arm (seals, bearings, races, gaskets and rings) i have a busted bif and i went the easy way and ordered a new axle........ i mind as well just freshen up the whole knuckle assem if i have to tear that much down to swap axles out. a web address would be great..................
Trending Topics
Apr 25, 2009 | 08:41 AM
#8
Thread Starter
Registered User
Joined: May 2008
Posts: 3,277
Likes: 23
From: way way nor cal
Thats funny Wabbit because those two hubs came off my 83 SA. I distinctly remember the snap ring having no issue on either side when I pulled them off.
Do you have a SA hub laying around? I will trade you one IFS hub for a SA hub..
I distinctly remember the snap ring having no issue on either side when I pulled them off.Do you have a SA hub laying around? I will trade you one IFS hub for a SA hub..
Apr 25, 2009 | 11:12 AM
#9
Registered User
Joined: Oct 2008
Posts: 189
Likes: 0
From: Corvallis, OREGON
Ugh, so Toyo, from the website WabFab just stated, what exactly should I be looking at to do exactly what you did? There's a lot of components (and different combinations of components) to choose from. I'm pretty sure by just following what you did I could def tackle this project, but I don't want to start, then find out I have the wrong parts or are missing some.
And thanks again for posting pics, super helpful, made it all a little bit clearer.
And thanks again for posting pics, super helpful, made it all a little bit clearer.
Apr 25, 2009 | 11:49 AM
#10

Ugh, so Toyo, from the website WabFab just stated, what exactly should I be looking at to do exactly what you did? There's a lot of components (and different combinations of components) to choose from. I'm pretty sure by just following what you did I could def tackle this project, but I don't want to start, then find out I have the wrong parts or are missing some.
And thanks again for posting pics, super helpful, made it all a little bit clearer.
And thanks again for posting pics, super helpful, made it all a little bit clearer.
http://www.marlincrawler.com/axle/fr...xle-seal-hilux
...and use them instead of the ones in the kit. They are much nicer. I used the kit ones in mine and they are fine but were clumsy and frustrating to get in. I then used Marlins in the rear which are different in size but similar in design and they were a breeze. If the extra $20 bucks is un-doable for you, the TG kit from Wab is complete. You don't need anything else, the Marlin seals are just nicer.
Tool-wise, you will also want a way to measure preload so get the fish scale/pull scale too if you don't have something like that around the house already. Also, the 54mm socket is a must have... which reminds me about the bearing nuts. Wabbit has then listed for $8.50 2 items below the knuckle kit. I've been able to re-use mine in all of my encounters so far so you can use your best judgement on that.
EDIT: If you have other Toyota friends around the area, you might be able to borrow the tools.
Apr 25, 2009 | 11:51 AM
#11
Apr 25, 2009 | 12:26 PM
#12
Thread Starter
Registered User
Joined: May 2008
Posts: 3,277
Likes: 23
From: way way nor cal
Get the Knuckle Service kit with wheel bearings that is listed for $145 plus shipping and you will have everything you need. What Toyo did and I would 2nd that decision is to get the Marlin inner seals...
http://www.marlincrawler.com/axle/fr...xle-seal-hilux
...and use them instead of the ones in the kit. They are much nicer. I used the kit ones in mine and they are fine but were clumsy and frustrating to get in. I then used Marlins in the rear which are different in size but similar in design and they were a breeze. If the extra $20 bucks is un-doable for you, the TG kit from Wab is complete. You don't need anything else, the Marlin seals are just nicer.
Tool-wise, you will also want a way to measure preload so get the fish scale/pull scale too if you don't have something like that around the house already. Also, the 54mm socket is a must have... which reminds me about the bearing nuts. Wabbit has then listed for $8.50 2 items below the knuckle kit. I've been able to re-use mine in all of my encounters so far so you can use your best judgement on that.
EDIT: If you have other Toyota friends around the area, you might be able to borrow the tools.
Apr 25, 2009 | 04:49 PM
#14
Registered User
Joined: Oct 2008
Posts: 189
Likes: 0
From: Corvallis, OREGON
In terms of tools the only thing that I saw that I don't have but might need is a torque wrench (which I can get from Harbor Freight) and a pair of snap ring plyers...everything else pretty basic, socket wrenches, crescents, etc. etc.
Anything that was particularly difficult to figure out or tough to manage? I know that I tried to pull the whole assembly off of my '95 pickup and it was a PITA to get the rotors off.
Anything that was particularly difficult to figure out or tough to manage? I know that I tried to pull the whole assembly off of my '95 pickup and it was a PITA to get the rotors off.
Apr 25, 2009 | 05:58 PM
#15
Thread Starter
Registered User
Joined: May 2008
Posts: 3,277
Likes: 23
From: way way nor cal
Once the spindle is off and the dust cover etc. the rotor and hub housing should slide right off. If they don't give them a little persuasion with a hammer.
I would discourage you from buying a torque wrench from Harbor Freight. A good torque wrench is a must and you will use it always. I bought a Craftsman lifetime warranty. It is one of my my useful tools.
You will also need a 54mm socket with 3/8 or 1/2" drive. Wabbit has them as well as Marlin for around $15. You need this socket to set the preload on the bearings by tightening the spindle nut. If you have questions when you get to this point PM me and I can help you.
Your biggest obstacle will be the cone washers. I say this because most people run into problems with these. FOLLOW THE FSM on how to set the cone washers free. Tapered punch and light taps on the head of the stud. If you mangle them you will have to buy new ones $3.69 a piece x 8 on the knuckles and $3.49 a piece x 12 on the hubs
The rebuild is really quite easy. If you have problems PM me.
The torque settings on all the nuts are the most important part IMHO.
As for the moly fortified grease, I did use it on the bearings and packed into the birfs. I used up a half can of lithium on a few of the greasable parts.
Good luck
OH dont forget to count the shims on the knuckles and write down top, bottom L, top, bottom R. This way you don't have to measure new ones and figure it out.
Apr 25, 2009 | 06:54 PM
#16
I would discourage you from buying a torque wrench from Harbor Freight. A good torque wrench is a must and you will use it always. I bought a Craftsman lifetime warranty. It is one of my my useful tools.
You will also need a 54mm socket with 3/8 or 1/2" drive. Wabbit has them as well as Marlin for around $15. You need this socket to set the preload on the bearings by tightening the spindle nut.
You will also need a 54mm socket with 3/8 or 1/2" drive. Wabbit has them as well as Marlin for around $15. You need this socket to set the preload on the bearings by tightening the spindle nut.
The 54mm socket is really a tool that should always be on the trail with you (or someone in the group). It can be tough to resign yourself to get tools with such limited use, but they are worth it. That's why I suggest getting with a group of trusted friends to lend back and forth. Then at least not everyone has to own everything.
Apr 25, 2009 | 07:57 PM
#17
Registered User
Joined: Apr 2009
Posts: 101
Likes: 0
From: clinton, louisiana
Get the Knuckle Service kit with wheel bearings that is listed for $145 plus shipping and you will have everything you need. What Toyo did and I would 2nd that decision is to get the Marlin inner seals...
http://www.marlincrawler.com/axle/fr...xle-seal-hilux
...and use them instead of the ones in the kit. They are much nicer. I used the kit ones in mine and they are fine but were clumsy and frustrating to get in. I then used Marlins in the rear which are different in size but similar in design and they were a breeze. If the extra $20 bucks is un-doable for you, the TG kit from Wab is complete. You don't need anything else, the Marlin seals are just nicer.
Tool-wise, you will also want a way to measure preload so get the fish scale/pull scale too if you don't have something like that around the house already. Also, the 54mm socket is a must have... which reminds me about the bearing nuts. Wabbit has then listed for $8.50 2 items below the knuckle kit. I've been able to re-use mine in all of my encounters so far so you can use your best judgement on that.
EDIT: If you have other Toyota friends around the area, you might be able to borrow the tools.
http://www.marlincrawler.com/axle/fr...xle-seal-hilux
...and use them instead of the ones in the kit. They are much nicer. I used the kit ones in mine and they are fine but were clumsy and frustrating to get in. I then used Marlins in the rear which are different in size but similar in design and they were a breeze. If the extra $20 bucks is un-doable for you, the TG kit from Wab is complete. You don't need anything else, the Marlin seals are just nicer.
Tool-wise, you will also want a way to measure preload so get the fish scale/pull scale too if you don't have something like that around the house already. Also, the 54mm socket is a must have... which reminds me about the bearing nuts. Wabbit has then listed for $8.50 2 items below the knuckle kit. I've been able to re-use mine in all of my encounters so far so you can use your best judgement on that.
EDIT: If you have other Toyota friends around the area, you might be able to borrow the tools.
Apr 25, 2009 | 08:12 PM
#18
Thread Starter
Registered User
Joined: May 2008
Posts: 3,277
Likes: 23
From: way way nor cal
Follow this:
After the hub housing and rotor is on and the spindle is in the up postition (little grove is pointing up at the sky) slide the THRUST WASHER into place along the little grove. After this washer is on put on the adjusting nut (spindle nut) and screw it down to meet up with the thrust washer. Then put the 54mm socket (attached to your torque wrench) and follow this:
Torque spindle nut (adjusting nut) to 43 ft. lbs.
Spin hub right 4-5 rotations (yes, this is correct. Take your two hands and literally spin the hub to the right 4-5 rotations.... then-
Spin hub left 4-5 rotations
Loosen inner spindle nut (same nut)
Spin hub right 4-5 rotations
Spin hub left 4-5 rotations
Torque spindle nut (same nut again) to 43 ft. lbs.
Spin hub right 4-5 rotations
Spin hub left 4-5 rotations
Loosen inner spindle nut (again the same nut)
Spin hub right 4-5 rotations
Spin hub left 4-5 rotations
Torque spindle nut (still the same nut) to ~21 ft. lbs.
After this your preload on the bearings is set correctly. Put on the star washer (lock washer) then put on the outer spindle nut (lock nut which looks exactly like the other spindle (adjusting nut) and tighten this one down to around 11 ftlbs (basically snug but not too much.) Then bend down the 3 of the tabs on the star washer (lock washer) one bent back one bent forward and one bent back.
thats that
Apr 25, 2009 | 08:16 PM
#19
Registered User
Joined: Apr 2009
Posts: 101
Likes: 0
From: clinton, louisiana
Follow this:
After the hub housing and rotor is on and the spindle is in the up postition (little grove is pointing up at the sky) slide the THRUST WASHER into place along the little grove. After this washer is on put on the adjusting nut (spindle nut) and screw it down to meet up with the thrust washer. Then put the 54mm socket (attached to your torque wrench) and follow this:
Torque spindle nut (adjusting nut) to 43 ft. lbs.
Spin hub right 4-5 rotations
Spin hub left 4-5 rotations
Loosen inner spindle nut (same nut)
Spin hub right 4-5 rotations
Spin hub left 4-5 rotations
Torque spindle nut (same nut again) to 43 ft. lbs.
Spin hub right 4-5 rotations
Spin hub left 4-5 rotations
Loosen inner spindle nut (again the same nut)
Spin hub right 4-5 rotations
Spin hub left 4-5 rotations
Torque spindle nut (still the same nut) to ~21 ft. lbs.
After this your preload on the bearings is set correctly. Put on the star washer (lock washer) then put on the outer spindle nut (lock nut which looks exactly like the other spindle (adjusting nut) and tighten this one down to around 11 ftlbs (basically snug but not too much.) Then bend down the 3 of the tabs on the star washer (lock washer) one bent back one bent forward and one bent back.
thats that
Apr 25, 2009 | 08:23 PM
#20
Thread Starter
Registered User
Joined: May 2008
Posts: 3,277
Likes: 23
From: way way nor cal
if you use the same shims and wrote down obsessively in order where they use to live you can leave the fish scale in your tackle box
if not you have to follow the FSM as to the proper preload setting on the steering knuckles relative to the new shim thickness.
I always used the old shims. As a result I have never had to measure (with a caliper) new shiny shims and then yank on the stud with the fishy fish scale to measure the preload.


