A Bodyman's Attempt at Fabbing a Bumper.....
 04-18-2011, 10:04 PM
#21
Registered User
I think you should fill the gaps. Make it look cleaner, and less chance of spilling your beer..... In your driveway or at a campground, of course. 
Can't wait to see it painted!
Can't wait to see it painted!
 04-19-2011, 07:18 AM
#24
Banned

Join Date: Mar 2011
Posts: 60
Likes: 0
Received 0 Likes
on
0 Posts
cool deal
Very nice bumper. I built a similar looking bumper back in 98, which was my third bumper and the start of my fabrication business. My only comment would be, of course you can fabricate. Anyone can, it just takes at minimum, modest tools and determination. Here's the only comment, and I see this alot. You have some nice tubing, looks like 3x5 maybe, which is what I use for my rear bumpers I produce..... Whats the purpose of removing the backsides of the tubing? If it is weight only, you are severly hindering strength, especially torsional rigidity, by saving a minimum of weight. Square and rectalgular tubing is extremely strong and rigid, Channel isn't. I was just curious.
Your bumper looks awesome for the skill level you say you have, and the tools you used? Congrats!!!
Your bumper looks awesome for the skill level you say you have, and the tools you used? Congrats!!!
04-19-2011, 10:55 AM
#26
Registered User

Im kinda digging the bumper also.
If you get a chance next time you take pics of your progress, take a level side shot or profile shot.
The design is great, simple yet still looks good.
If you get a chance next time you take pics of your progress, take a level side shot or profile shot.
The design is great, simple yet still looks good.
04-19-2011, 11:09 AM
#27
Contributing Member
Join Date: Apr 2008
Location: Alabama
Posts: 232
Likes: 0
Received 0 Likes
on
0 Posts
X2...never met a bodyman that couldnt weld at least a little, from what i've seen you can weld pretty good...lookin good...Keep posting pics
04-19-2011, 11:41 AM
#28
Registered User
Join Date: Feb 2011
Location: Broken Arrow, OK
Posts: 342
Likes: 0
Received 0 Likes
on
0 Posts
 04-21-2011, 07:53 PM
#31
Registered User
Thread Starter
Join Date: Mar 2011
Posts: 12
Likes: 0
Received 0 Likes
on
0 Posts
Whats the purpose of removing the backsides of the tubing? If it is weight only, you are severly hindering strength, especially torsional rigidity, by saving a minimum of weight. Square and rectalgular tubing is extremely strong and rigid, Channel isn't. I was just curious.
My thoughts were for some weight reduction; but, good point, I did sacrifice some strength

The ends don't have much torsional flex though.... (with me leaning on them anyhow) Hopefully it will work out....
04-21-2011, 07:59 PM
#32
Registered User
Thread Starter
Join Date: Mar 2011
Posts: 12
Likes: 0
Received 0 Likes
on
0 Posts
When you fill the caps put in some cup holders. a couple of sections of pipe with a hole in the bottom and dimpled for drainage. That would be SICK!! never have to worry about where to set your drink when you get out of your truck. and if you forget it and start rolling might not spill!!.

Unfortunately I needed the shop space so I didn't spend anymore time on it. I'll have to remember that for the next one....
04-21-2011, 08:13 PM
#33
Registered User
Thread Starter
Join Date: Mar 2011
Posts: 12
Likes: 0
Received 0 Likes
on
0 Posts
Well here it is....
I'm terrible about remembering the camera so no interim pics, sorry. I sanded and prepped any rust pitting on the scrap steel. Treated the affeced areas with a acid based convertor, shot the whole thing with etch-primer and a sealer. Then mixed up some left-over single-stage urethane black and added some flatner to bring it down to a somewhat satin-flat and shot it in color.
I will say it looks way out of place on my dd stocker...
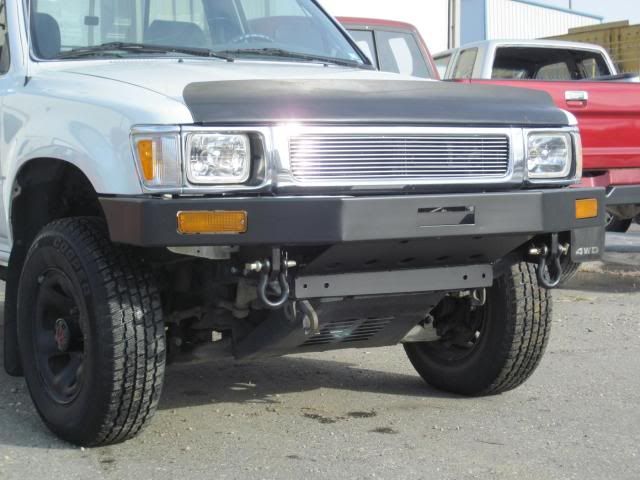
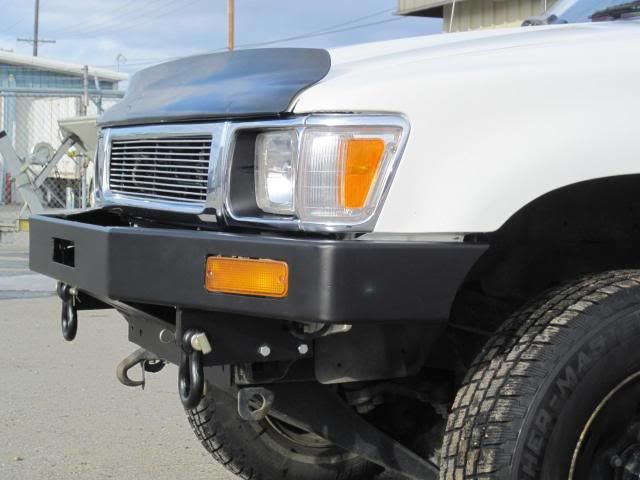
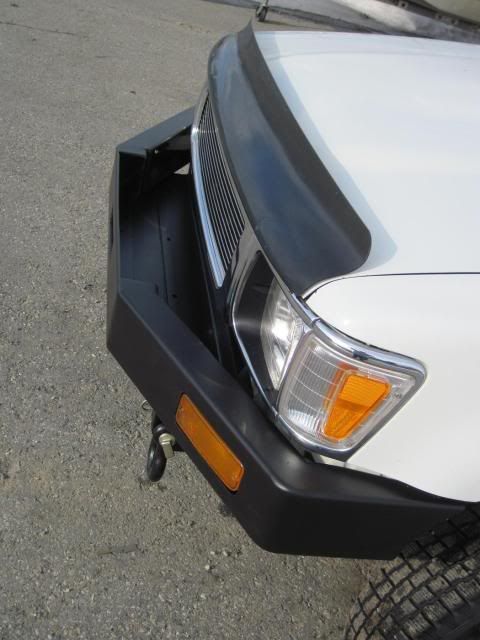
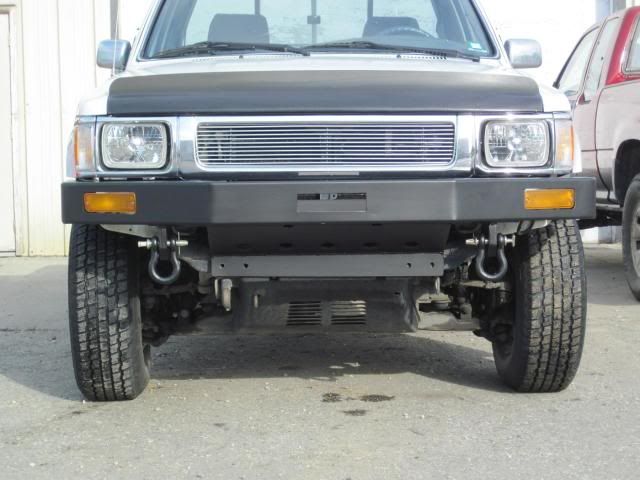
Maybe it's time for some lift and bigger rubber?
Oh, and I need to get the right length bolts at the x-member, and mount my Warn M8000. And, No those oil spots on the asphalt are not from this rig.
I'm terrible about remembering the camera so no interim pics, sorry. I sanded and prepped any rust pitting on the scrap steel. Treated the affeced areas with a acid based convertor, shot the whole thing with etch-primer and a sealer. Then mixed up some left-over single-stage urethane black and added some flatner to bring it down to a somewhat satin-flat and shot it in color.
I will say it looks way out of place on my dd stocker...
Maybe it's time for some lift and bigger rubber?
Oh, and I need to get the right length bolts at the x-member, and mount my Warn M8000. And, No those oil spots on the asphalt are not from this rig.

Thread
Thread Starter
Forum
Replies
Last Post
live4soccer7
84-85 Trucks & 4Runners
3
05-11-2016 06:52 PM
hiluxinargentina
86-95 Trucks & 4Runners
3
09-30-2015 05:51 PM


