tutorials on valve cover gasket?
 11-04-2012, 05:12 PM
#21
Registered User
Thread Starter

Join Date: Mar 2010
Posts: 210
Likes: 0
Received 0 Likes
on
0 Posts
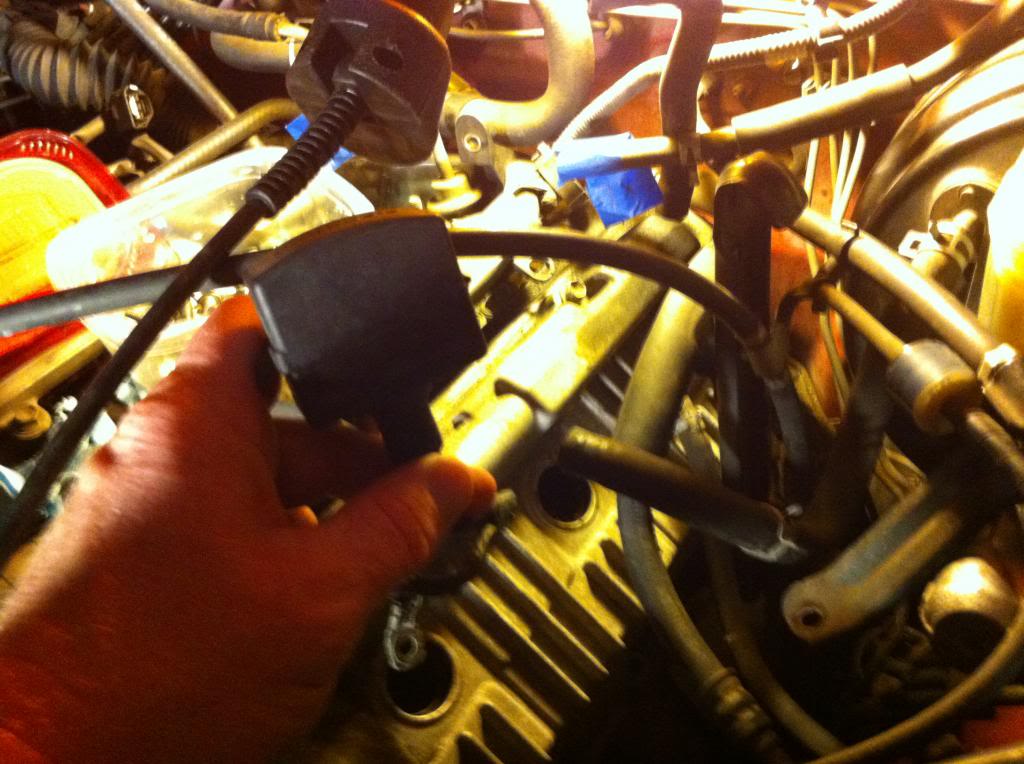
I cant remember, but think I did try a 32. I think I was hoping to find about a 34mm, as it seemed like that would be the perfect size...but I dont have a 34.
Anyways, from the previous post where it was mentioned he could get the factory oem ones started by hand leads me to believe that I just need to get some oem seals.
cause there was no way you could start these by hand.
I have these felpro advanced auto seals on the passenger side cover, and will just have to see if they seal or not.
I dont think they will ever fall into the head, as they are seriously wedged in there.
thx for the suggestion
 11-11-2012, 05:24 AM
#22
Registered User
Thread Starter
Join Date: Mar 2010
Posts: 210
Likes: 0
Received 0 Likes
on
0 Posts
the drivers side cover isnt coming off
the wire loom wont move out of the way
or, do I need to unbolt that metal brace that runs up to the outside of the cover (supports some lines and such)?
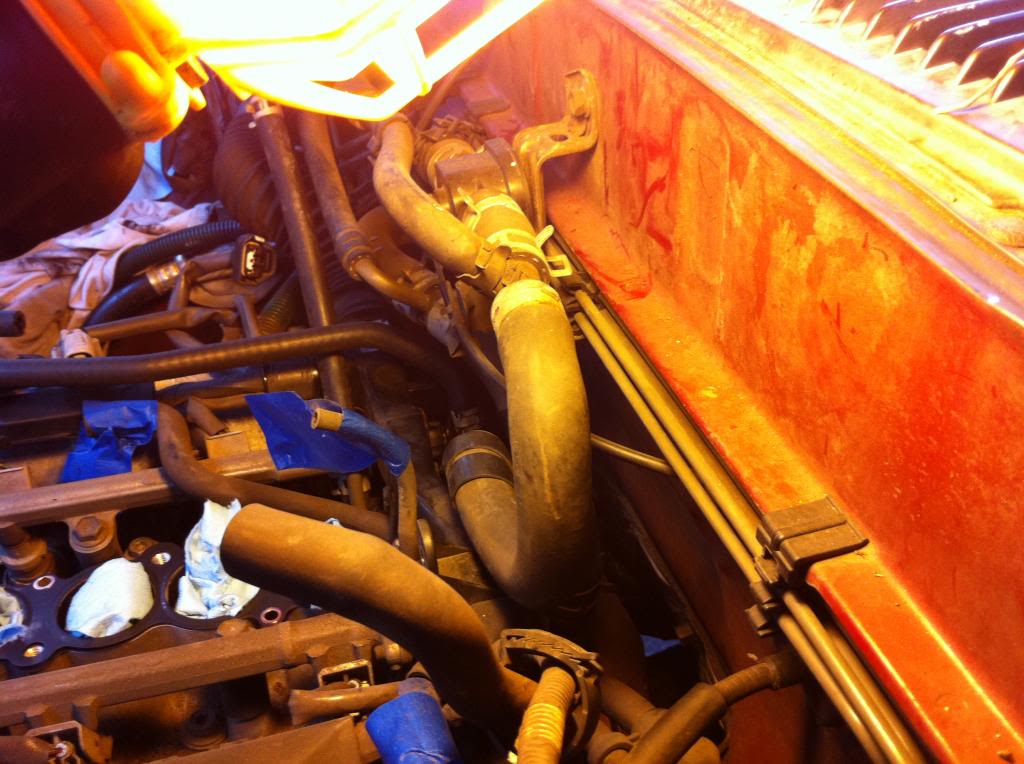
also, I'm replacing the two heater/coolant lines off the rear of the block, as it looks like one is seeping a little, and would be impossible to do without removing the intake
dealer wants 47 dollars each for 'em
I'm figuring this is because you cant buy them anywhere else ?
do I have any other options, or do I have to pay the dealer?
the wire loom wont move out of the way
or, do I need to unbolt that metal brace that runs up to the outside of the cover (supports some lines and such)?
also, I'm replacing the two heater/coolant lines off the rear of the block, as it looks like one is seeping a little, and would be impossible to do without removing the intake
dealer wants 47 dollars each for 'em
I'm figuring this is because you cant buy them anywhere else ?
do I have any other options, or do I have to pay the dealer?
11-11-2012, 07:17 AM
#23
Contributing Member
Join Date: Nov 2010
Location: Columbia River Gorge, Oregon...east side
Posts: 5,125
Likes: 0
Received 2 Likes
on
2 Posts
IIRC, there is a clip on the front of the wire loam near the water outlet that may not be unsnapped. I think when I did just the valve cover gaskets, I did remove (or loosened?) that brace for some clearance. It was tight getting the valve cover off, at any rate. A bungee cord works good for gently helping to hold up the driver side wiring harness.
One of the online Toyota OEM dealer in my sig may have save you some $$ even with shipping. Do you have the hose part numbers by chance?
http://www.utoyot8.com/Picture.aspx?...ccode=&ppName=
http://www.toyotapartseast.com/Page_...3553,3554,3560
One of the online Toyota OEM dealer in my sig may have save you some $$ even with shipping. Do you have the hose part numbers by chance?
http://www.utoyot8.com/Picture.aspx?...ccode=&ppName=
http://www.toyotapartseast.com/Page_...3553,3554,3560
Last edited by rworegon; 11-11-2012 at 07:58 AM.
11-11-2012, 09:39 AM
#24
Registered User
Thread Starter
Join Date: Mar 2010
Posts: 210
Likes: 0
Received 0 Likes
on
0 Posts
IIRC, there is a clip on the front of the wire loam near the water outlet that may not be unsnapped. I think when I did just the valve cover gaskets, I did remove (or loosened?) that brace for some clearance. It was tight getting the valve cover off, at any rate. A bungee cord works good for gently helping to hold up the driver side wiring harness.
One of the online Toyota OEM dealer in my sig may have save you some $$ even with shipping. Do you have the hose part numbers by chance?
http://www.utoyot8.com/Picture.aspx?...ccode=&ppName=
http://www.toyotapartseast.com/Page_...3553,3554,3560
One of the online Toyota OEM dealer in my sig may have save you some $$ even with shipping. Do you have the hose part numbers by chance?
http://www.utoyot8.com/Picture.aspx?...ccode=&ppName=
http://www.toyotapartseast.com/Page_...3553,3554,3560
Ok thx
I will look for a clip for the wiring harness at the front near the thermostat
I'm thinking of just getting some generic coolant or heater hose from advance auto as the bends don't look to drastic
Just a little worried bout quality
I will look at the prices online but usually with shipping it only saves a few bucks
11-11-2012, 09:46 AM
#25
Contributing Member
Join Date: Nov 2010
Location: Columbia River Gorge, Oregon...east side
Posts: 5,125
Likes: 0
Received 2 Likes
on
2 Posts
The clip I'm thinking of is up top in the front where the loam makes a 90 deg turn to the right. There may be another by the thermostat housing/alternator too.
11-11-2012, 04:22 PM
#26
Registered User
Join Date: Feb 2010
Location: Outer Banks, NC
Posts: 570
Likes: 0
Received 0 Likes
on
0 Posts
Matt,
As RWOregon said, I think the problem is with the clip; if I remember it is top left area of the driver's side valve cover if looking from the left side of the 4runner.The driver's side IMHO is much more difficult in removing.
I'd go with the OEM hoses. I have never heard of anyone replacing them, or having them burst, but now is a good time as ever to replace them.
11-11-2012, 06:06 PM
#27
Registered User
Thread Starter
Join Date: Mar 2010
Posts: 210
Likes: 0
Received 0 Likes
on
0 Posts
Matt,
As RWOregon said, I think the problem is with the clip; if I remember it is top left area of the driver's side valve cover if looking from the left side of the 4runner.The driver's side IMHO is much more difficult in removing.
I'd go with the OEM hoses. I have never heard of anyone replacing them, or having them burst, but now is a good time as ever to replace them.
As RWOregon said, I think the problem is with the clip; if I remember it is top left area of the driver's side valve cover if looking from the left side of the 4runner.The driver's side IMHO is much more difficult in removing.
I'd go with the OEM hoses. I have never heard of anyone replacing them, or having them burst, but now is a good time as ever to replace them.
I disconnected the clip for the wiring loom that connects up to one of the bolts on the thermostat, and it gave me a bit more wiggle room.
I'll also look for that other clip you guys mentioned.
I did get the valve cover off, but it would be nice to have more room when installing the cover, as I kind of had to work it back and forth to get it out.
I'll post up pics as I go...
also, I did the drivers side cover spark plug holes with factory oem seals, and they fit much easier into the holes on the cover.
I was able to push them mostly home with my fingers as somebody mentioned and then use the socket to get them all the way in.
no difficulty at all with the oem ones.
I have felpro's on the passenger side, so we will see if they leak.
if they do, at least the passenger side is much easier to get to
11-11-2012, 06:21 PM
#28
Contributing Member
Join Date: Nov 2010
Location: Columbia River Gorge, Oregon...east side
Posts: 5,125
Likes: 0
Received 2 Likes
on
2 Posts
also, I did the drivers side cover spark plug holes with factory oem seals, and they fit much easier into the holes on the cover.
I was able to push them mostly home with my fingers as somebody mentioned and then use the socket to get them all the way in. no difficulty at all with the oem ones.
I was able to push them mostly home with my fingers as somebody mentioned and then use the socket to get them all the way in. no difficulty at all with the oem ones.
Nice progress!
Last edited by rworegon; 11-11-2012 at 06:22 PM.
11-11-2012, 06:25 PM
#29
Registered User
Thread Starter
Join Date: Mar 2010
Posts: 210
Likes: 0
Received 0 Likes
on
0 Posts
11-11-2012, 06:29 PM
#30
Contributing Member
Join Date: Nov 2010
Location: Columbia River Gorge, Oregon...east side
Posts: 5,125
Likes: 0
Received 2 Likes
on
2 Posts
Amazing the differences in a simple part makes in reducing the frustration level sometimes.
You are aware of where the FIPG/RTV goes on the head when re-installing?
At about 7:40, this video shows the corner of the wiring harness where the clip is the we are talking about:
You are aware of where the FIPG/RTV goes on the head when re-installing?
At about 7:40, this video shows the corner of the wiring harness where the clip is the we are talking about:
Last edited by rworegon; 11-15-2012 at 01:36 PM.
11-11-2012, 06:49 PM
#31
Registered User
iTrader: (2)
Join Date: Aug 2004
Location: Iowa
Posts: 150
Likes: 0
Received 0 Likes
on
0 Posts
I just completed the valve cover gasket replacement this weekend. If you need any additional help my memory is still pretty fresh but who knows for how long  . It gets to be a pretty tedious job especially trying to keep all foreign objects off of the top of the head and making sure nothing falls down into it. The darn plastic ears that are used to bolt down the wiring are always fragile as heck so be careful that they don't break and fall down into the valve area. I also checked valve clearance while I was in there and replaced spark plugs. At 156,000 miles all valve clearances where in spec. That made my fricking day. I can only attest that they haven’t been checked for at least 62,000 miles (not sure about previous owner). One of the intake valves on cylinder number one was bordering the tolerance so I swapped in a smaller shim but only because I had a variety on hand. The spark plugs are easier to replace with the plenums off.
. It gets to be a pretty tedious job especially trying to keep all foreign objects off of the top of the head and making sure nothing falls down into it. The darn plastic ears that are used to bolt down the wiring are always fragile as heck so be careful that they don't break and fall down into the valve area. I also checked valve clearance while I was in there and replaced spark plugs. At 156,000 miles all valve clearances where in spec. That made my fricking day. I can only attest that they haven’t been checked for at least 62,000 miles (not sure about previous owner). One of the intake valves on cylinder number one was bordering the tolerance so I swapped in a smaller shim but only because I had a variety on hand. The spark plugs are easier to replace with the plenums off.
Last edited by black_taco; 11-11-2012 at 06:51 PM.
11-12-2012, 02:38 PM
#32
Registered User
Thread Starter
Join Date: Mar 2010
Posts: 210
Likes: 0
Received 0 Likes
on
0 Posts
thx for the video and offers to help.
If I have any more questions, I'll be sure to ask
I'm getting ready to put the drivers side cover back on, then it will just be getting the intake and everything bolted and hooked up correctly.
If I have any more questions, I'll be sure to ask
I'm getting ready to put the drivers side cover back on, then it will just be getting the intake and everything bolted and hooked up correctly.
11-12-2012, 03:35 PM
#33
Contributing Member
Join Date: Nov 2010
Location: Columbia River Gorge, Oregon...east side
Posts: 5,125
Likes: 0
Received 2 Likes
on
2 Posts
You'll have no problem finishing 'er up. I recall posting up in your timing belt thread in late 2011 so hooking everything up correctly is old hat for you. Cheers!
Last edited by rworegon; 11-12-2012 at 03:41 PM.
11-15-2012, 01:26 PM
#34
Registered User
Thread Starter
Join Date: Mar 2010
Posts: 210
Likes: 0
Received 0 Likes
on
0 Posts
ha ha, yeah, I remember the timing belt job

Okay, so it went well.
After I got it all bolted back up it seems to run fine too

The drivers side cover was the more difficult one, but after following the wire harness in all three directions and unclipping it from all locations, I used a bungee cord to hold it up out of the way.
I also unbolted the metal rod holder thingy that runs below the cover and bolts to the head with a 14mm bolt.
Doing these things gave me wiggle room.
I then cleaned the gasket surface on the head with brake cleaner sprayed onto a paper towel.
then used some permatex grey FIPG on the half moons and both sides of the cam humps, front and rear.
It looks great and I'll be watching it for leakage as the miles pile on....

Funny thing is, after I got it all together, I realized that despite all the different stuff you need to remove to do the job, that I could do it real easy the next time.
LOL, it is funny how after you do it the first time, that it seems like an easy job.
thanks everyone for all the help!


Thread
Thread Starter
Forum
Replies
Last Post
the1998sr5
95.5-2004 Tacomas & 96-2002 4Runners
15
07-14-2020 08:35 PM
GreatLakesGuy
The Classifieds GraveYard
8
09-04-2015 09:27 AM


