E-Locker won't engage...
 01-29-2004, 08:43 PM
#41
Registered User
Join Date: Mar 2003
Location: British Columbia
Posts: 397
Likes: 0
Received 0 Likes
on
0 Posts
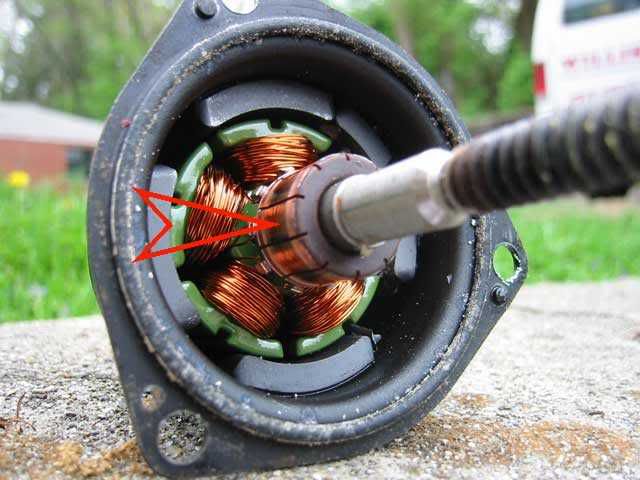
Adam?? Does the gear off the motor drive the fork itself? From your pictures it looks like that small gear might drive the bottom of the fork. I have tear down and rebuild procedures for that locker if anyone wants it.(zip file).
 01-29-2004, 09:06 PM
#43
Registered User
The pinion gear shown in "e3" goes down inside and rides on the gear inside the 3rd shown in "e7". The motor itself doesnt actually move the gears inside in "e7". Shown in "e6", there is a large "coil" spring that the motor winds up, and then it releases and turn the gear shown in "e7".
:pat: too many "e's"
:pat: too many "e's"
01-30-2004, 04:33 AM
#44
Registered User
Join Date: Mar 2003
Location: British Columbia
Posts: 397
Likes: 0
Received 0 Likes
on
0 Posts
yea Jake. Thats how it works. They dont show that inside gear anywhere . Are you sure thats an inside gear? The shaft that the fork slides on is right there. Doesnt look like another gear will fit between the spur and the fork. Anyways.That worm puts a ton of mechanical advantage on the spur. If everything isnt lined up properly the first to go will be the plastic/nylon gear driven by the worm. So Adam you should find out whats happening before the gear goes south. The fork,and that inside gear should move freely. But it probably wont engage until the ring is turning so with the rear wheels raised and turning the driveshaft slowly the gear(if there is one) should move the fork to engage it.And it should be smooth. No hammer needed.Good pictures BTW Adam.
Last edited by zedex; 01-30-2004 at 04:45 AM.
01-30-2004, 03:20 PM
#45
Registered User
Thread Starter
Join Date: Nov 2002
Location: Thornton, CO.
Posts: 904
Likes: 0
Received 0 Likes
on
0 Posts
So, According to some info above and a post over on 4x4 wire - does this look correct...

I should be able to take of this shiny plate and look in there without a bunch of bearings and springs popping out all over, right? Just don't mess with that black top piece.
And Jake, I sent you a PM, but I bet you don't have email notification turned on - so check you private messages.
John
I should be able to take of this shiny plate and look in there without a bunch of bearings and springs popping out all over, right? Just don't mess with that black top piece.
And Jake, I sent you a PM, but I bet you don't have email notification turned on - so check you private messages.
John
 02-15-2004, 12:40 PM
#49
Registered User
Thread Starter
Join Date: Nov 2002
Location: Thornton, CO.
Posts: 904
Likes: 0
Received 0 Likes
on
0 Posts
UPDATE / CONCLUSION
So yesterday I finally got around to taking apart the the E-locker motor (just the bottom part with the large gear, not the motor itself). The main shaft that connects the large gear to the smaller outside gear that goes into the diff was completely siezed up. I don't know if it was dirt or rust or what but I couldn't even turn it by hand. There was also some grime inside the housing and the yellow grease on that large gear was all dried up. (I assume made worse by having no breather hose.) I sprayed the shaft with some PB blaster and within minutes it was turing very freely. I re-greased the large gear and shaft and wiped out all the debris - re-connected the motor to the wires - the gear turned nicely back and forth as the locker switch was turned on and off. It took 2 attempts to get the gear on the motor to line up into the teeth inside the diff but once i got it, I tested it - and it locks in and unlock just like butter! Wahooo!
So, thanks for all the help!!!
John
So yesterday I finally got around to taking apart the the E-locker motor (just the bottom part with the large gear, not the motor itself). The main shaft that connects the large gear to the smaller outside gear that goes into the diff was completely siezed up. I don't know if it was dirt or rust or what but I couldn't even turn it by hand. There was also some grime inside the housing and the yellow grease on that large gear was all dried up. (I assume made worse by having no breather hose.) I sprayed the shaft with some PB blaster and within minutes it was turing very freely. I re-greased the large gear and shaft and wiped out all the debris - re-connected the motor to the wires - the gear turned nicely back and forth as the locker switch was turned on and off.
It took 2 attempts to get the gear on the motor to line up into the teeth inside the diff but once i got it, I tested it - and it locks in and unlock just like butter! Wahooo!So, thanks for all the help!!!
John

 06-07-2005, 04:10 AM
#52
Registered User
Join Date: May 2003
Location: New Brunswick, Canada
Posts: 129
Likes: 0
Received 0 Likes
on
0 Posts
Sorry for resurrecting an old post, but I thougt it was better than starting a new one on the same topic.
The other day after doing my regular check to make sure the locker is working properly it did not lock. I could hear the relays clicking and the power was getting to the actuator. Verified using a test light. My friend has an E-locking third sitting on his bench so we removed the actuator from it and I hooked it up to my wiring harness and it worked fine. I decided to pull my actuator and with some convincing I got it off. Anyhow, by the looks of it, it is shot. Full of sand, rust and dried up grease.
Anyone know where I could find a used replacement?
Cheers,
P
06-07-2005, 06:54 AM
#53
Registered User
Thread Starter
Join Date: Nov 2002
Location: Thornton, CO.
Posts: 904
Likes: 0
Received 0 Likes
on
0 Posts
Mine was all dried up and dirty too - and cleaning it out and re-lubing it up got it working just fine. If I were you , I'd try cleaning your current one out and save yourself some $$$.
John
John
06-07-2005, 03:18 PM
#54
Registered User
Join Date: May 2003
Location: New Brunswick, Canada
Posts: 129
Likes: 0
Received 0 Likes
on
0 Posts
Originally Posted by Mojo_Risin
Mine was all dried up and dirty too - and cleaning it out and re-lubing it up got it working just fine. If I were you , I'd try cleaning your current one out and save yourself some $$$.
John
John

Cheers,
P
06-09-2005, 05:18 AM
#55
Registered User
Join Date: May 2003
Location: New Brunswick, Canada
Posts: 129
Likes: 0
Received 0 Likes
on
0 Posts
Hi folks heads up for a long post!
Here is a quick update. I managed to con, I mean convince my friend to use his E-locker actuator as a spare while I rebuild mine. He has an E-locking third but it is not installed yet. I used 2 "D" cell batteries taped together to create a 3V power source for bench testing as per Dick Foster�s suggestion over on Tacomaterritory.com and my FSM. Then I tested the spare actuator and could run it back and forth smoothly with no problems. I also practiced installing it on the spare third that I had set up on my work bench. This was much easier than under the truck. Anyhow, the best and easiest way is to have the locker in the locked state as indicated by Dick and the FSM. I managed to install it with the locker in the locked position but I�m not sure how that would affect performance of the locker. It seemed to work fine on the bench.
Last night I supported the frame of the truck on jack stands allowing the rear suspension to fully extend. This allowed for easier access to the E-locker actuator. I then removed the connectors from the actuator and locked indication switch. This is where I found another problem. The connector to my locked position indication switch was all corroded and one of the pins on the switch itself was broken. So now I need a new connector and new locked position indication switch. Anyone know where I could find these used?
Anyhow, I installed the spare actuator per procedure and reconnected the locked indication switch. The locker is now functional but I get the dreaded �RR Diff Lock� blink!
So my plan for now is to disassemble my actuator, clean it, lube it, then reassemble it. Hopefully I will be able to make it good as new again. What should I used to keep the gears and other moving parts of the actuator lubricated? Then I will need to find a locked indication switch and connector to go with it then fix that!
Just to clarify you mean clean here:
Should I also clean these?
I have read that putting the motor back together is challenging to say the least. Anyone know of any tricks with re-assembly that I should know of?
The pictures were compliments of Adam F in this tread. Great info here by the way!
Cheers :xbeer3:,
P
Here is a quick update. I managed to con, I mean convince my friend to use his E-locker actuator as a spare while I rebuild mine. He has an E-locking third but it is not installed yet. I used 2 "D" cell batteries taped together to create a 3V power source for bench testing as per Dick Foster�s suggestion over on Tacomaterritory.com and my FSM. Then I tested the spare actuator and could run it back and forth smoothly with no problems. I also practiced installing it on the spare third that I had set up on my work bench. This was much easier than under the truck. Anyhow, the best and easiest way is to have the locker in the locked state as indicated by Dick and the FSM. I managed to install it with the locker in the locked position but I�m not sure how that would affect performance of the locker. It seemed to work fine on the bench.
Last night I supported the frame of the truck on jack stands allowing the rear suspension to fully extend. This allowed for easier access to the E-locker actuator. I then removed the connectors from the actuator and locked indication switch. This is where I found another problem. The connector to my locked position indication switch was all corroded and one of the pins on the switch itself was broken. So now I need a new connector and new locked position indication switch. Anyone know where I could find these used?
Anyhow, I installed the spare actuator per procedure and reconnected the locked indication switch. The locker is now functional but I get the dreaded �RR Diff Lock� blink!
So my plan for now is to disassemble my actuator, clean it, lube it, then reassemble it. Hopefully I will be able to make it good as new again. What should I used to keep the gears and other moving parts of the actuator lubricated? Then I will need to find a locked indication switch and connector to go with it then fix that!
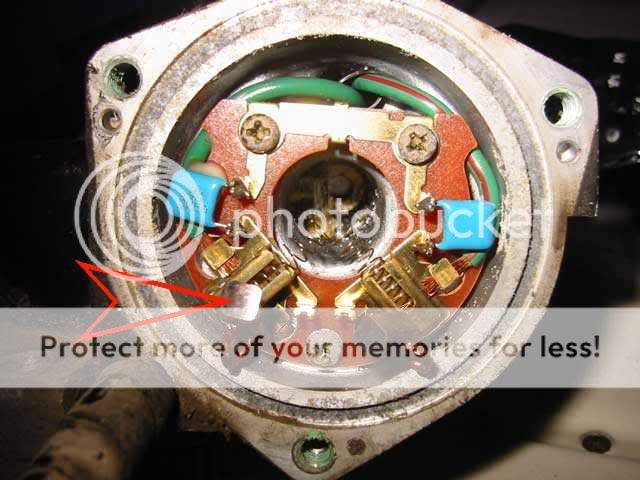
You can clean the armature up with an eraser or a little bit of very fine sandpaper, emery or crocus cloth.
Should I also clean these?
I have read that putting the motor back together is challenging to say the least. Anyone know of any tricks with re-assembly that I should know of?
The pictures were compliments of Adam F in this tread. Great info here by the way!
Cheers :xbeer3:,
P
06-09-2005, 05:29 AM
#56
Contributing Member
Originally Posted by p1michaud
Hi folks heads up for a long post!
Here is a quick update. I managed to con, I mean convince my friend to use his E-locker actuator as a spare while I rebuild mine. He has an E-locking third but it is not installed yet. I used 2 "D" cell batteries taped together to create a 3V power source for bench testing as per Dick Foster�s suggestion over on Tacomaterritory.com and my FSM. Then I tested the spare actuator and could run it back and forth smoothly with no problems. I also practiced installing it on the spare third that I had set up on my work bench. This was much easier than under the truck. Anyhow, the best and easiest way is to have the locker in the locked state as indicated by Dick and the FSM. I managed to install it with the locker in the locked position but I�m not sure how that would affect performance of the locker. It seemed to work fine on the bench.
Last night I supported the frame of the truck on jack stands allowing the rear suspension to fully extend. This allowed for easier access to the E-locker actuator. I then removed the connectors from the actuator and locked indication switch. This is where I found another problem. The connector to my locked position indication switch was all corroded and one of the pins on the switch itself was broken. So now I need a new connector and new locked position indication switch. Anyone know where I could find these used?
I assume the dealer was too much $$$$. You might try online for OEM parts too (better pricing).
Anyhow, I installed the spare actuator per procedure and reconnected the locked indication switch. The locker is now functional but I get the dreaded �RR Diff Lock� blink!
So my plan for now is to disassemble my actuator, clean it, lube it, then reassemble it. Hopefully I will be able to make it good as new again. What should I used to keep the gears and other moving parts of the actuator lubricated? Then I will need to find a locked indication switch and connector to go with it then fix that!
Some regular waterproof grease should be good enough (they sell it at Walmart as a multipurpose synthetic).
Just to clarify you mean clean here:
This is most important to clean (use 400 or higher grit...sand just enough to see bare copper and wipe clean with windex)
Should I also clean these?
you can but they will wear in quickly anyhow (use a non residue cleaner like windex to wipe off surface).
I have read that putting the motor back together is challenging to say the least. Anyone know of any tricks with re-assembly that I should know of?
Use a small nailset to hold the brushes down as you slide the comutator by (be very careful not to damage the brushes)....the rest is simple. Remember to bench test the motor before you put it in to ensure to assembled it correctly and it functions as expected.
The pictures were compliments of Adam F in this tread. Great info here by the way!
Cheers :xbeer3:,
P
Last edited by MTL_4runner; 06-09-2005 at 05:34 AM.
06-09-2005, 05:36 AM
#57
Registered User
Join Date: May 2003
Location: New Brunswick, Canada
Posts: 129
Likes: 0
Received 0 Likes
on
0 Posts
Originally Posted by MTL_4runner
Hope the above in red helps!
Cheers,
P
06-09-2005, 05:41 AM
#58
Contributing Member
Originally Posted by p1michaud
Yep. Thanks a bunch, but what is "a small nailset". I get that you are trying to hold the brushes in place while you reassemble. Any pictures?
Cheers,
P
Cheers,
P
nailset:

Hey, where in NB are you?
06-09-2005, 06:04 AM
#59
Registered User
Join Date: May 2003
Location: New Brunswick, Canada
Posts: 129
Likes: 0
Received 0 Likes
on
0 Posts
Originally Posted by MTL_4runner
You can use any item that is pretty smooth and won't damage the brushes when you hold them (nailset, small philips screwdriver, small pick, toothpick even).
Originally Posted by MTL_4runner
Hey, where in NB are you?
07-15-2005, 05:36 AM
#60
Registered User
Join Date: May 2003
Location: New Brunswick, Canada
Posts: 129
Likes: 0
Received 0 Likes
on
0 Posts
Hi folks,
Been a long time but I wanted to post an update. So I rebuilt the actuator motor using the info provided the yotatech and TTORA boards wich was found using the SEARCH function of all things
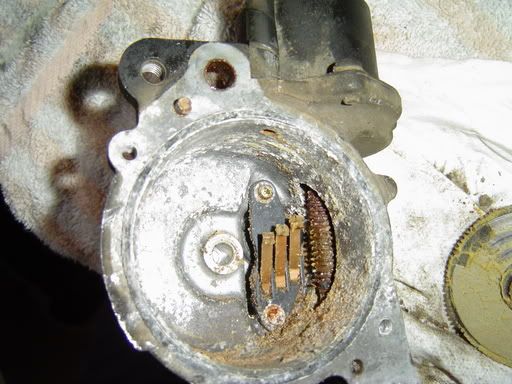
Anyhow, the locker actuator motor was real dirty as you can see...
I've got more pics to upload later.
After following the re-install procedure it worked like a charm. I also had an issue with the "RR Diff Lock" light blinking. After tracing the issue to what I thought was a bad locked position switch and connector I replaced both parts. Now the light won't go out. It's on solid with the diff locked or open. I did some quick checking, even swapped the ECU with a spare for a test, same problem. The locker is fully functional I just don't have the nice indication light that I find very useful. I have to rely on the soud of the actuator locking and the snap when it unlocks. Not the best scenario. Any thoughts on what would be causing the light to stay in solid? I'm suspecting a bad wire that is grounding. Any thougts?
Cheers ,
,
P
Been a long time but I wanted to post an update. So I rebuilt the actuator motor using the info provided the yotatech and TTORA boards wich was found using the SEARCH function of all things
Anyhow, the locker actuator motor was real dirty as you can see...
I've got more pics to upload later.
After following the re-install procedure it worked like a charm. I also had an issue with the "RR Diff Lock" light blinking. After tracing the issue to what I thought was a bad locked position switch and connector I replaced both parts. Now the light won't go out.
It's on solid with the diff locked or open. I did some quick checking, even swapped the ECU with a spare for a test, same problem. The locker is fully functional I just don't have the nice indication light that I find very useful. I have to rely on the soud of the actuator locking and the snap when it unlocks. Not the best scenario. Any thoughts on what would be causing the light to stay in solid? I'm suspecting a bad wire that is grounding. Any thougts?Cheers
,P

Thread
Thread Starter
Forum
Replies
Last Post
zombie_barbarossa
95.5-2004 Tacomas & 96-2002 4Runners
3
10-02-2015 10:54 PM


